# Overview

<figure><img src="https://1526800164-files.gitbook.io/~/files/v0/b/gitbook-x-prod.appspot.com/o/spaces%2F50DeL6mO9sNbAZBSEdaN%2Fuploads%2FyZGpiI5pRHgUT7bLn7r4%2FiShot_2023-12-16_20.42.12.png?alt=media&amp;token=d59a2ea4-e1f2-4d91-ae77-bf7fe6656645" alt=""><figcaption></figcaption></figure>

**Product:** Weaver e-office standard OA platform

**Version:** 11.0

**Product page:** [eoffice.weaverintl.com](https://eoffice.weaverintl.com)  **/** [www.weaverint.com/products/eoffice](https://weaverintl.com/products/eoffice/)

**Website**: [www.weaverintl.com](https://www.weaverintl.com)&#x20;

**Sales email**: <sales@weaverintl.com>

**Support email**: <support@weaverintl.com>

**Partnership**: <partner@weaverintl.com>

**Request for demo**: <https://weaverintl.com/demo-request/>

**Telephone**: +1(209)899-1099


# Chinese Online User Manual

if you are able to read chinese, please click below link to view chinese version user manual

{% embed url="<https://e-office.yuque.com/xxp4kg/ngd5zk>" %}


# e-Office Training Video

Step-by-step to learn how to digitalise your business process via workflow designer, create new workflow application with powerful App Studio

## 1 - Installation

### 1. Product installation

{% embed url="<https://youtu.be/d4Gc67QUscI?si=shwkTEBtkv-yXChd>" %}

## 2 - Organisation setting

### 1. Roles settings

{% embed url="<https://youtu.be/UHyFp92tWwQ?si=qk-mfdCIlasnR1g4>" %}

### 2. Department settings

{% embed url="<https://youtu.be/oBWqbHWnyvM?si=MKWE6GhXbADKyG8L>" %}

### 3. Users settings

{% embed url="<https://youtu.be/Pn1GV8K7IUw?si=Bj8xxV4ZlsFB2t7e>" %}

## 3 - Portal Management

### 1. Portal Design

{% embed url="<https://youtu.be/ouZlzihYUZo?si=hlNDT5wqZiinIJ9->" %}

## 4 - Document Management

### 1. Document Management

{% embed url="<https://youtu.be/DyuLqPVb_4A?si=X0x-hnLFE_nZUxZ3>" %}

## 5 - Workflow

### 1 Leave Application Request

Use leave application as an example to demo how to use the workflow designer to design new workflow

#### 1.1 Leave Application Part 1

{% embed url="<https://youtu.be/YgSXrcfpu2c?si=vgUFK0CxjGebVwbt>" %}

#### 1.2 Leave Application Part 2

{% embed url="<https://youtu.be/53BcN3srTKY?si=6fU747wWCSDQuxU1>" %}

### 2. Reimbursement

Use reimbursement request as example to demo how to use workflow designer to design new reimbursement workflow

{% embed url="<https://youtu.be/RZLZIsApqZg?si=qSwbF86yDh-LdniD>" %}

## 6 - App Studio

Use app studio to create a new contract management application

### 1. Contract Overall report

{% embed url="<https://youtu.be/R0gnh7w3hLk?si=T88Snfv1f5Yg8fxK>" %}

### 2. New contract workflow

{% embed url="<https://youtu.be/W2NJkbUmKDs?si=FmGGK0F141QkLgv2>" %}

### 3. Invoice report

{% embed url="<https://youtu.be/TjQarvE-q5Y?si=tVSOVpUtJecCz4fm>" %}

### 4. New invoice workflow

{% embed url="<https://youtu.be/0SRrD_8nx_k?si=JnMn6TKSDlWXKIy0>" %}

### 5. New Collections

{% embed url="<https://youtu.be/sJl47n3xlqs?si=tK3PEMS2UkVJt00->" %}

### 6. Linked data

{% embed url="<https://youtu.be/LklAT-mMak8?si=wwUSD9nm1TghEA3U>" %}

### 7. Summary

{% embed url="<https://youtu.be/bOQBeWyeD-I?si=CPGEX-gT7jimjyKN>" %}


# Server


# 1 Preparation

## 1.1 Installation Package

### Option 1: Offline Pack

Step 1: Click on [e-office\_v11.0.0.0\_20230508\_offline](https://e-office.obs.cn-east-3.myhuaweicloud.com/11.0/install/offline/e-office_v11_offline.zip) to initiate the download for offline installation package

Step 2: Right-click, click “Extract Here” to get the installer.

<figure><img src="https://1526800164-files.gitbook.io/~/files/v0/b/gitbook-x-prod.appspot.com/o/spaces%2F50DeL6mO9sNbAZBSEdaN%2Fuploads%2FI8fRNcSJhm4SHPU4B6Mg%2Fimage.png?alt=media&amp;token=bb8b6d44-6088-493f-a56c-6170ec54c0ae" alt=""><figcaption></figcaption></figure>

### Option 2:  Online Pack&#x20;

Step 1: Click on <https://e-office.one/download-e-office/>

Step 2: Click on "Download Now" to download the e-office installation pack.&#x20;

<figure><img src="https://1526800164-files.gitbook.io/~/files/v0/b/gitbook-x-prod.appspot.com/o/spaces%2F50DeL6mO9sNbAZBSEdaN%2Fuploads%2FB35COGmK6Ytv0lel62QM%2Fimage.png?alt=media&amp;token=090e8b07-6d9a-41cd-8e81-c49765d4270a" alt=""><figcaption></figcaption></figure>

## 1.2. Firewall

Step 1: Press the Windows Key on your keyboard or click the Start button in the bottom-left corner of your screen or click the search bar next to the Start button on the taskbar.

<figure><img src="https://1526800164-files.gitbook.io/~/files/v0/b/gitbook-x-prod.appspot.com/o/spaces%2F50DeL6mO9sNbAZBSEdaN%2Fuploads%2FaUXlSBKo8Bp8pCoAqzBw%2Fimage.png?alt=media&amp;token=12ed542d-15d1-484c-a178-8c41b53491be" alt=""><figcaption></figcaption></figure>

Step 2: Type “Window Defender Firewall” and click on it to open the program.

&#x20;

<figure><img src="https://1526800164-files.gitbook.io/~/files/v0/b/gitbook-x-prod.appspot.com/o/spaces%2F50DeL6mO9sNbAZBSEdaN%2Fuploads%2FcwcTegIh5v69fttiG7e8%2Fimage.png?alt=media&amp;token=6c0b97e6-7700-4c72-8614-e66f85844abc" alt=""><figcaption></figcaption></figure>

&#x20;Step 3: Click “Turn Windows Defender Firewall on or off”.

<figure><img src="https://1526800164-files.gitbook.io/~/files/v0/b/gitbook-x-prod.appspot.com/o/spaces%2F50DeL6mO9sNbAZBSEdaN%2Fuploads%2FwofYfjl66vjdUO9nP2sm%2Fimage.png?alt=media&amp;token=981e4919-dac9-4cf9-802d-e46c7dd52ec3" alt=""><figcaption></figcaption></figure>

&#x20; Step 4: Turn off both of the firewall and click OK to save the settings made.&#x20;

<figure><img src="https://1526800164-files.gitbook.io/~/files/v0/b/gitbook-x-prod.appspot.com/o/spaces%2F50DeL6mO9sNbAZBSEdaN%2Fuploads%2FSnQM2P7cg7FKoNUMG3Ko%2Fimage.png?alt=media&amp;token=5989836b-b86a-41b8-9c2e-517eb45eeab5" alt=""><figcaption></figcaption></figure>

## 1.3 Confirm Installation Path

### 1.3.1 Check if Drive D: exists?

Step 1: Open File Explorer, under This PC > (D:) exists? or click “This PC”, check whether D: exists under “Device and drives”

<figure><img src="https://1526800164-files.gitbook.io/~/files/v0/b/gitbook-x-prod.appspot.com/o/spaces%2F50DeL6mO9sNbAZBSEdaN%2Fuploads%2FFuqU1cZA8S0kyjKqUn6K%2Fimage.png?alt=media&amp;token=a02364e9-9c02-4c67-9912-682ffd511a29" alt=""><figcaption></figcaption></figure>

### 1.3.2 Confirm if a new disk can be created

Check if it's possible to create a D: drive? Note that when using Instances on Cloud Servers, there may be limitations in creating a new drive depending on the provider e.g.: Tecent.

#### Creating new Drive

Click here[/pages/vgfksL1TQbEX7UnTWu0L#id-3.1-how-to-create-open-a-d-drive](https://eohelp.weaver.com.co/pages/vgfksL1TQbEX7UnTWu0L#id-3.1-how-to-create-open-a-d-drive "mention") to refer to how to create a D: drive.

<br>


# 2 Installation

## 2.1 Installing e-Office Server

Step 1: Double-click on the installer \[e-office\_online] or \[e-office\_v.0.0.0\_version\_offiline] to start the installation process.

<figure><img src="https://1526800164-files.gitbook.io/~/files/v0/b/gitbook-x-prod.appspot.com/o/spaces%2F50DeL6mO9sNbAZBSEdaN%2Fuploads%2FjxwVMfYpoilAW18AGz4o%2Fimage.png?alt=media&amp;token=8f67c045-0535-4082-aa6f-694605363d79" alt=""><figcaption></figcaption></figure>

Step 2: Click Install

<figure><img src="https://1526800164-files.gitbook.io/~/files/v0/b/gitbook-x-prod.appspot.com/o/spaces%2F50DeL6mO9sNbAZBSEdaN%2Fuploads%2FjMJ7HXN1crTgW11qcFvn%2Fimage.png?alt=media&amp;token=53b651b7-5131-4f49-86fe-afe4e752bc3e" alt=""><figcaption></figcaption></figure>

Note: Please refer to the  [4 FAQ](https://eohelp.weaver.com.co/server/4-faq) for any error messages.

&#x20;

Step 3: The online installation package will begin to download the installation package.

| <img src="https://1526800164-files.gitbook.io/~/files/v0/b/gitbook-x-prod.appspot.com/o/spaces%2F50DeL6mO9sNbAZBSEdaN%2Fuploads%2FmRx9IbeDkTeroApdmtRv%2Fimage.png?alt=media&amp;token=e1a53d13-ea11-4100-a6f1-e18140f15135" alt="" data-size="original"> | <img src="https://1526800164-files.gitbook.io/~/files/v0/b/gitbook-x-prod.appspot.com/o/spaces%2F50DeL6mO9sNbAZBSEdaN%2Fuploads%2FcYcMFNA2Kj3G1jhTrw4t%2Fimage.png?alt=media&amp;token=9d5c3ffb-0d18-45bd-b74c-2f3fc09abdf2" alt="" data-size="original"> |
| --------------------------------------------------------------------------------------------------------------------------------------------------------------------------------------------------------------------------------------------------------- | --------------------------------------------------------------------------------------------------------------------------------------------------------------------------------------------------------------------------------------------------------- |

<figure><img src="https://1526800164-files.gitbook.io/~/files/v0/b/gitbook-x-prod.appspot.com/o/spaces%2F50DeL6mO9sNbAZBSEdaN%2Fuploads%2F9j8t5DqtZ3PYadnTuaV3%2Fimage.png?alt=media&amp;token=4b2b2a41-2414-459d-ae1d-727961d43b90" alt=""><figcaption><p>Installation Begins</p></figcaption></figure>

Step 5: This page indicates that the installation has success, click "Experience".

<figure><img src="https://1526800164-files.gitbook.io/~/files/v0/b/gitbook-x-prod.appspot.com/o/spaces%2F50DeL6mO9sNbAZBSEdaN%2Fuploads%2FEZNLHjwIpPoHBbJASHwN%2Fimage.png?alt=media&amp;token=5ab16dfe-1f4a-4677-91a3-1b99c94fb8e8" alt=""><figcaption></figcaption></figure>

## 2.2 Login to e-Office

Redirected Page

<figure><img src="https://1526800164-files.gitbook.io/~/files/v0/b/gitbook-x-prod.appspot.com/o/spaces%2F50DeL6mO9sNbAZBSEdaN%2Fuploads%2F5GJTYEpZWh9GjIfH7GI9%2Fimage.png?alt=media&amp;token=842defb6-1170-4cc0-8ae9-9808ee2bbab8" alt=""><figcaption></figcaption></figure>

You may login using the default credential stated below

**Account Name:** admin

**Account Password:** 123456

When e-office is downloaded, it is automatically on a temporary license. Read [3 License](https://eohelp.weaver.com.co/server/3-license) for more details.

## 2.3 Check if all services is enabled

All services should be enabled in the Server Management Platform

Step 1: Press the Windows Key on your keyboard or click the Start button in the bottom-left corner of your screen or click the search bar next to the Start button on the taskbar.

<figure><img src="https://1526800164-files.gitbook.io/~/files/v0/b/gitbook-x-prod.appspot.com/o/spaces%2F50DeL6mO9sNbAZBSEdaN%2Fuploads%2FaUXlSBKo8Bp8pCoAqzBw%2Fimage.png?alt=media&amp;token=12ed542d-15d1-484c-a178-8c41b53491be" alt=""><figcaption></figcaption></figure>

Step 2: Type “Server Management Platform”, click on it or click \[Open].

<figure><img src="https://1526800164-files.gitbook.io/~/files/v0/b/gitbook-x-prod.appspot.com/o/spaces%2F50DeL6mO9sNbAZBSEdaN%2Fuploads%2FlHTdkOkjgP2VRmVi7zBU%2Fimage.png?alt=media&amp;token=c001f995-ae9b-4078-a956-24bfb21c6321" alt=""><figcaption></figcaption></figure>

Check if all \[Service status] is started.

### 2.3.1 Started

If all the services is started, you may click \[X] on the right-hand side of the program to close the page.&#x20;

Don't worry, the program will continue running in the background.

<figure><img src="https://1526800164-files.gitbook.io/~/files/v0/b/gitbook-x-prod.appspot.com/o/spaces%2F50DeL6mO9sNbAZBSEdaN%2Fuploads%2FUoAWkA70gaU6GGnfXFSb%2Fimage.png?alt=media&amp;token=a2c6b60b-8e9a-43e9-8540-93da4aad56ed" alt=""><figcaption></figcaption></figure>

To open the program, you can access it through the system tray.

Step 1: The system tray is located at the bottom-right corner of the screen on the taskbar, near the clock. The small upward-facing arrow (`^`), is the system tray.  Clicking this arrow will reveal a small popup window containing hidden icons.

<figure><img src="https://1526800164-files.gitbook.io/~/files/v0/b/gitbook-x-prod.appspot.com/o/spaces%2F50DeL6mO9sNbAZBSEdaN%2Fuploads%2FYkBoc1mDqTRJYH9SkDkJ%2Fimage.png?alt=media&amp;token=36036a8a-745e-4a9b-a4a3-cde455980599" alt=""><figcaption></figcaption></figure>

Step 2: Click on the e-office icon to open the Server Management Platform.

<figure><img src="https://1526800164-files.gitbook.io/~/files/v0/b/gitbook-x-prod.appspot.com/o/spaces%2F50DeL6mO9sNbAZBSEdaN%2Fuploads%2FJPBfJkw2T7GWvSzk6dOP%2Fimage.png?alt=media&amp;token=3c59bf22-e5cd-4b26-baae-c57da3ee6345" alt=""><figcaption></figcaption></figure>

### 2.3.2 Deactivated

#### Scenario 1: All service status is deactivated

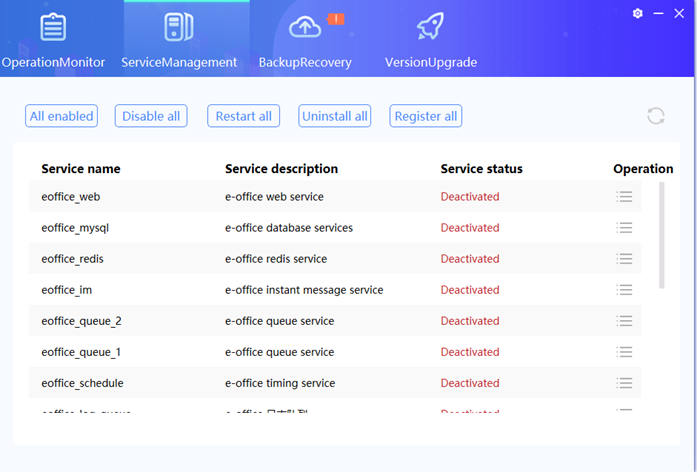
Step 1: Click on \[All enabled]

<figure><img src="https://1526800164-files.gitbook.io/~/files/v0/b/gitbook-x-prod.appspot.com/o/spaces%2F50DeL6mO9sNbAZBSEdaN%2Fuploads%2Fkz1XblEPrVXoke5A4rhW%2Fimage.png?alt=media&amp;token=f761b631-2006-4da9-899b-99cbf89a769e" alt=""><figcaption></figcaption></figure>

Your Service Status should appear as shown in the image below.

<figure><img src="https://1526800164-files.gitbook.io/~/files/v0/b/gitbook-x-prod.appspot.com/o/spaces%2F50DeL6mO9sNbAZBSEdaN%2Fuploads%2FXImymR8ZWuqEt3pRtJiW%2Fimage.png?alt=media&amp;token=3b735686-70e3-4cdd-bef4-85672d3a502b" alt=""><figcaption></figcaption></figure>

#### Scenario 2: Individual Service is deactivated

<figure><img src="https://1526800164-files.gitbook.io/~/files/v0/b/gitbook-x-prod.appspot.com/o/spaces%2F50DeL6mO9sNbAZBSEdaN%2Fuploads%2FbhLzdFmoyaqjlrXWAOcy%2Fimage.png?alt=media&amp;token=98c2899e-d071-4db9-b5e7-ebc8bf828278" alt=""><figcaption></figcaption></figure>

Step 1:  To activate the individual service, click the <img src="https://1526800164-files.gitbook.io/~/files/v0/b/gitbook-x-prod.appspot.com/o/spaces%2F50DeL6mO9sNbAZBSEdaN%2Fuploads%2FqRHxUXHIag6Vl0i4nuHG%2Fimage.png?alt=media&amp;token=f3010bda-0d38-4c66-b9f0-ecd2934e857d" alt="" data-size="line"> button under "Operation" to open more options, then select "Start-up."

<figure><img src="https://1526800164-files.gitbook.io/~/files/v0/b/gitbook-x-prod.appspot.com/o/spaces%2F50DeL6mO9sNbAZBSEdaN%2Fuploads%2Fqq5n7hLhFnElK6cLoAA2%2Fimage.png?alt=media&amp;token=bc27f6c9-5dcd-4aae-9c4f-a7d56c59eb37" alt=""><figcaption></figcaption></figure>

Your Service Status should appear as shown in the image below.

<figure><img src="https://1526800164-files.gitbook.io/~/files/v0/b/gitbook-x-prod.appspot.com/o/spaces%2F50DeL6mO9sNbAZBSEdaN%2Fuploads%2Ftx00KEzvg8p37JtmXAh0%2Fimage.png?alt=media&amp;token=48032921-9fb2-4629-9f00-4540f80eba1e" alt=""><figcaption></figcaption></figure>

## 2.4 Turn back on the firewalls

Step 1: Press the Windows Key on your keyboard or click the Start button in the bottom-left corner of your screen or click the search bar next to the Start button on the taskbar.

<figure><img src="https://1526800164-files.gitbook.io/~/files/v0/b/gitbook-x-prod.appspot.com/o/spaces%2F50DeL6mO9sNbAZBSEdaN%2Fuploads%2FaUXlSBKo8Bp8pCoAqzBw%2Fimage.png?alt=media&amp;token=12ed542d-15d1-484c-a178-8c41b53491be" alt=""><figcaption></figcaption></figure>

Step 2: Type “Window Defender Firewall” and click on it to open the program.

<figure><img src="https://1526800164-files.gitbook.io/~/files/v0/b/gitbook-x-prod.appspot.com/o/spaces%2F50DeL6mO9sNbAZBSEdaN%2Fuploads%2FcwcTegIh5v69fttiG7e8%2Fimage.png?alt=media&amp;token=6c0b97e6-7700-4c72-8614-e66f85844abc" alt=""><figcaption></figcaption></figure>

Step 3: Click “Turn Windows Defender Firewall on or off”.

<figure><img src="https://1526800164-files.gitbook.io/~/files/v0/b/gitbook-x-prod.appspot.com/o/spaces%2F50DeL6mO9sNbAZBSEdaN%2Fuploads%2FwofYfjl66vjdUO9nP2sm%2Fimage.png?alt=media&amp;token=981e4919-dac9-4cf9-802d-e46c7dd52ec3" alt=""><figcaption></figcaption></figure>

Step 4: Turn on both of the firewall and click OK to save the settings made.&#x20;

<figure><img src="https://1526800164-files.gitbook.io/~/files/v0/b/gitbook-x-prod.appspot.com/o/spaces%2F50DeL6mO9sNbAZBSEdaN%2Fuploads%2FqQBQZTSwueylCKUa6Ean%2Fimage.png?alt=media&amp;token=a4036bfc-d56b-4e1f-a3ad-cdd207f2621f" alt=""><figcaption></figcaption></figure>

<br>


# 3 License

## 3.1 Temporary vs Permanent

**Temporary License**&#x20;

* Provides 30-day access to e-office after installation
* Allow the user to evaluate or test before making decision
* This license grants complete access to all of the software’s features.

**Permanent License**&#x20;

* Provides lasting access to e-office after registration
* Ideal for enterprises needing long-term use in their daily operations.&#x20;
* The features availability depends on the specific purchase plan chosen

## 3.2 Install License

To renew a temporary license or apply for a permanent license, you will need to provide the following:

**Machine Code**: Required for both temporary and permanent license requests

There are 2 ways to retrieve the machine code

### 3.2.1 Authorization Centre

Step 1: Add "/eoffice/client/web/registers/add" to the end of your e-office web URL and press Enter on your keyboard to open it.

For example: If your e-office web link is[ ](http://standard.eofficework.com/)<http://standard.eofficework.com/>, then after adding the above suffix, it would be <http://standard.eofficework.com/eoffice/client/web/registers/add>.

<figure><img src="https://1526800164-files.gitbook.io/~/files/v0/b/gitbook-x-prod.appspot.com/o/spaces%2F50DeL6mO9sNbAZBSEdaN%2Fuploads%2FpYAIc1eokfK3cU1Vyv65%2Fimage.png?alt=media&amp;token=051a3ee0-3d43-4633-890d-5189fea217b0" alt=""><figcaption></figcaption></figure>

Step 2: After opening the below page, locate the machine code under 泛微协同办公e-office标准产品 located next to "Version".

<figure><img src="https://1526800164-files.gitbook.io/~/files/v0/b/gitbook-x-prod.appspot.com/o/spaces%2F50DeL6mO9sNbAZBSEdaN%2Fuploads%2FoVN5w9sGym67BPnCZlOf%2Fimage.png?alt=media&amp;token=3d9e85ea-8547-4906-b1bb-48ca622dd490" alt=""><figcaption></figcaption></figure>

Step 3: Please provide the machine code to your Sales Executive or Customer Service Representative.&#x20;

### 3.2.2 Registration Authorization

Step 1: Login to your e-office.&#x20;

<figure><img src="https://1526800164-files.gitbook.io/~/files/v0/b/gitbook-x-prod.appspot.com/o/spaces%2F50DeL6mO9sNbAZBSEdaN%2Fuploads%2FATcENruZa7eHijIh4pvg%2Fimage.png?alt=media&amp;token=28df8a75-701d-446a-a9dd-8642316af5ee" alt="" width="230"><figcaption></figcaption></figure>

Step 2: On the right side of the Navigation Bar, click the ![](https://1526800164-files.gitbook.io/~/files/v0/b/gitbook-x-prod.appspot.com/o/spaces%2F50DeL6mO9sNbAZBSEdaN%2Fuploads%2FWDNu0pa4Cv4SYA6GVvhg%2Fimage.png?alt=media\&token=654a1de0-521f-45bf-b201-2848f29ae132) button to open the authorization details.

<figure><img src="https://1526800164-files.gitbook.io/~/files/v0/b/gitbook-x-prod.appspot.com/o/spaces%2F50DeL6mO9sNbAZBSEdaN%2Fuploads%2F0IlSDY3j7ts2LmrpVDFV%2Fimage.png?alt=media&amp;token=6061d626-a2e7-4fda-a6fb-dd49d113c7cd" alt=""><figcaption></figcaption></figure>

Step 3: Please provide the machine code to your Sales Executive or Customer Service Representative.&#x20;

<figure><img src="https://1526800164-files.gitbook.io/~/files/v0/b/gitbook-x-prod.appspot.com/o/spaces%2F50DeL6mO9sNbAZBSEdaN%2Fuploads%2FAr4Ap1Vwu5WWFTN1sY8p%2Fimage.png?alt=media&amp;token=32af546f-6d8e-4a99-9170-5e19cbc8102a" alt=""><figcaption></figcaption></figure>

**Note:**

Temporary licenses can only be extended for 7 days at a time.


# 4 FAQ

## 4.1 How to create/open a D Drive?

<mark style="color:red;">**CAUTION: Please BACKUP before making any changes to your hard drive partition**</mark>

Step 1: Press ‘Win + X’ and select "Disk Management" to open the Disk Management utility.

&#x20;![](https://1526800164-files.gitbook.io/~/files/v0/b/gitbook-x-prod.appspot.com/o/spaces%2F50DeL6mO9sNbAZBSEdaN%2Fuploads%2FA1DvtWUw8PldPKzu0vx6%2Fimage.png?alt=media\&token=70c98566-ccf5-48c8-b6ed-8ecfbae71e8d)

Step 2: Locate your C drive, right-click, select "Shrink Volume".&#x20;

<figure><img src="https://1526800164-files.gitbook.io/~/files/v0/b/gitbook-x-prod.appspot.com/o/spaces%2F50DeL6mO9sNbAZBSEdaN%2Fuploads%2F6bT8HhZJJByXQ5ANuy8B%2Fimage.png?alt=media&amp;token=f86c0ee3-f29f-49a7-8db6-81f9abe8a0d0" alt=""><figcaption></figcaption></figure>

Step 3: Specify the amount of space **in MB** you want to allocate for your D drive.

<figure><img src="https://1526800164-files.gitbook.io/~/files/v0/b/gitbook-x-prod.appspot.com/o/spaces%2F50DeL6mO9sNbAZBSEdaN%2Fuploads%2F2f3ey2jhcFxFNZmPpYpZ%2Fimage.png?alt=media&amp;token=65e28ab4-092c-4d95-9f89-c44acc7de4cc" alt=""><figcaption><p>The screenshot shows 30GB, 30,000MB was allocate from C -> D drive.</p></figcaption></figure>

Step 4: Right-click on the unallocated space, and click on "New Simple Volume".&#x20;

<figure><img src="https://1526800164-files.gitbook.io/~/files/v0/b/gitbook-x-prod.appspot.com/o/spaces%2F50DeL6mO9sNbAZBSEdaN%2Fuploads%2FXYYbWjk6pPBVLOmkQybR%2Fimage.png?alt=media&amp;token=474f0242-db7f-4757-a0e2-c9fc24c0bf83" alt=""><figcaption></figcaption></figure>

Step 5: Click “Next >”

<figure><img src="https://1526800164-files.gitbook.io/~/files/v0/b/gitbook-x-prod.appspot.com/o/spaces%2F50DeL6mO9sNbAZBSEdaN%2Fuploads%2FAjjV9y1vLin2OhLKrIbt%2Fimage.png?alt=media&amp;token=9f3f8b05-bdae-457c-93e2-a5ae2a11328f" alt=""><figcaption></figcaption></figure>

Step 6: Assign a drive letter (such as D) and format the new partition with a file system (typically NTFS).

&#x20;

<figure><img src="https://1526800164-files.gitbook.io/~/files/v0/b/gitbook-x-prod.appspot.com/o/spaces%2F50DeL6mO9sNbAZBSEdaN%2Fuploads%2FvDHVfLjIx8qgwOMTfEjJ%2Fimage.png?alt=media&amp;token=c08a8f83-cb5e-40a4-84b2-d0aed90ff526" alt=""><figcaption></figcaption></figure>

<figure><img src="https://1526800164-files.gitbook.io/~/files/v0/b/gitbook-x-prod.appspot.com/o/spaces%2F50DeL6mO9sNbAZBSEdaN%2Fuploads%2FSM5aXNOgsrO7M6J4rbJz%2Fimage.png?alt=media&amp;token=db4c06ac-1958-4e7d-a649-124ee8401b8e" alt=""><figcaption></figcaption></figure>

&#x20;Step 7: Complete the wizard, and your new D drive will be created.&#x20;

<figure><img src="https://1526800164-files.gitbook.io/~/files/v0/b/gitbook-x-prod.appspot.com/o/spaces%2F50DeL6mO9sNbAZBSEdaN%2Fuploads%2Fg5Kn3HdRCfvjPi6PIH33%2Fimage.png?alt=media&amp;token=d4da8b20-82a5-43e1-b8b2-092e0bf3b36b" alt=""><figcaption></figcaption></figure>

## 4.2 Error: Invalid Path&#x20;

**Error:** “Invalid path is prompted, please use the correct path to install.”

<figure><img src="https://1526800164-files.gitbook.io/~/files/v0/b/gitbook-x-prod.appspot.com/o/spaces%2F50DeL6mO9sNbAZBSEdaN%2Fuploads%2F3Yn8NLDHJVnVkygVfcav%2Fimage.png?alt=media&amp;token=be91f5f6-df68-4b76-b5b1-4773ceaf7ab5" alt=""><figcaption></figcaption></figure>

### 4.2.1 Reason for prompt

**I**t is because Drive D does not exist.

### 4.2.2 Solution

Check if it's possible to create a D: drive as when using Instances on a Cloud Server, there may be limitations in creating a new drive depending on the provider e.g.: Tecent.

<mark style="color:green;">**If possible, the creation of a D: drive is strongly recommended as C drive will have permission issues.**</mark>&#x20;

#### Option 1: Yes, a new drive can be crested.&#x20;

Please refer to FAQ 3.1 to open alternative drive.

#### Option 2: Not possible to create a new drive

Change the path from D:\e-office\_server\_11.0\ to C:\e-office\_server\_11.0, click on \[Installation] to proceed

&#x20;

## 4.3 Error: Existing e-office

Error: “You have already installed e-office, please uninstall it first and then re-install it.”

<figure><img src="https://1526800164-files.gitbook.io/~/files/v0/b/gitbook-x-prod.appspot.com/o/spaces%2F50DeL6mO9sNbAZBSEdaN%2Fuploads%2FjII73F4GKZLBPVT1JCIO%2Fimage.png?alt=media&amp;token=63d9a62d-60dd-406d-af0d-b7f560b0c032" alt=""><figcaption></figcaption></figure>

### **4.3.1 Reason for prompt:**&#x20;

The error was prompted because an e-Office program was detected in the folder.

<mark style="color:red;">Note: Please exercise the solution with caution to proceed as this will result in the erasure of all data.</mark>

### 4.3.2 Solution:

Step 1: Open **Service Management Platform,** click on “Disable all” to stop all service.

<figure><img src="https://1526800164-files.gitbook.io/~/files/v0/b/gitbook-x-prod.appspot.com/o/spaces%2F50DeL6mO9sNbAZBSEdaN%2Fuploads%2FugMbjYtUcXS4EwZzQavU%2Fimage.png?alt=media&amp;token=3f7dad94-c5c7-48bc-9493-4b71c34f77b6" alt=""><figcaption></figcaption></figure>

Step 2: Go to Task Manager > Service and make sure all e-office services are stopped.

<figure><img src="https://1526800164-files.gitbook.io/~/files/v0/b/gitbook-x-prod.appspot.com/o/spaces%2F50DeL6mO9sNbAZBSEdaN%2Fuploads%2FZ1dd30y6qm9IryKKh2FO%2Fimage.png?alt=media&amp;token=4814a1b3-e0df-4459-aea2-a4c2713d834d" alt=""><figcaption></figcaption></figure>

Step 3: Click show hidden icon on the taskbar and find Server Management Platform, right-click and press “Quit”.

&#x20;![](https://1526800164-files.gitbook.io/~/files/v0/b/gitbook-x-prod.appspot.com/o/spaces%2F50DeL6mO9sNbAZBSEdaN%2Fuploads%2Fpwy524rLG9zFNmrM2Jgo%2Fimage.png?alt=media\&token=e40bd7ac-06a4-4bbc-ae94-ac007ad43a16)

Step 4: Go to Settings > Apps & features > Search for e-office and click on “Uninstall”.

![](https://1526800164-files.gitbook.io/~/files/v0/b/gitbook-x-prod.appspot.com/o/spaces%2F50DeL6mO9sNbAZBSEdaN%2Fuploads%2Fxl5kD6BclELtzqImE4HN%2Fimage.png?alt=media\&token=39c2b739-6b80-454a-bb18-ee9aeef34d04)

## 4.4 Error: Selected directory is not empty

Error: “The selected installation directory is not empty, please select an empty directory!”

<figure><img src="https://1526800164-files.gitbook.io/~/files/v0/b/gitbook-x-prod.appspot.com/o/spaces%2F50DeL6mO9sNbAZBSEdaN%2Fuploads%2FQieBzS2A422lTAAqvqKT%2Fimage.png?alt=media&amp;token=5f542102-7d6e-4851-afd8-878db6dd6dff" alt=""><figcaption></figcaption></figure>

### 4.4.1 Reason for prompt

The path is set as the root directory of a certain drive or in a secondary directory or the file path already exists, such as: D:\\, D:\software, E:\software\oa.

<figure><img src="https://1526800164-files.gitbook.io/~/files/v0/b/gitbook-x-prod.appspot.com/o/spaces%2F50DeL6mO9sNbAZBSEdaN%2Fuploads%2FMD19WEvux2t8Zfjq6T1U%2Fimage.png?alt=media&amp;token=7c4b9422-cad2-44de-859e-477e34ce2125" alt=""><figcaption><p>The folder “e-office_server_11.0”  has already exists under the D: drive</p></figcaption></figure>

Note: A folder creation is unnecessary as the installer will automatically create the folder when installing.

### 4.4.2 Solution

Step 1: Go to the file path and delete the folder

Step 2: Copy and past the file path to re-register the path

Step 3: Continue with the installation


# 5 Service Management Platform

Step 1: Open the service management platform from desktop using shortcut created upon installation.

![](https://1526800164-files.gitbook.io/~/files/v0/b/gitbook-x-prod.appspot.com/o/spaces%2F50DeL6mO9sNbAZBSEdaN%2Fuploads%2F0LFAocHUMpUvMEMAAY7K%2Fimage.png?alt=media\&token=5d162eb3-eec3-4c17-9c91-be7140165547)

If the shortcut is missing from the desktop, go to the installation disk, open e-office\_server\_11.0 > servermanagement, and double-click "ServerManagement.exe" to run it.

<figure><img src="https://1526800164-files.gitbook.io/~/files/v0/b/gitbook-x-prod.appspot.com/o/spaces%2F50DeL6mO9sNbAZBSEdaN%2Fuploads%2FacOGSfxjZJcE73tSy3eP%2FWX20231215-091628%402x.png?alt=media&amp;token=48a7cd01-7660-46d0-9d22-395e5ec1f0db" alt=""><figcaption></figcaption></figure>

## 1 Operation monitor

Monitor OA platform licenses, server RAM, CPU, storage, and online users.

<figure><img src="https://1526800164-files.gitbook.io/~/files/v0/b/gitbook-x-prod.appspot.com/o/spaces%2F50DeL6mO9sNbAZBSEdaN%2Fuploads%2FuyEPyjH536hcS1U04kgy%2Fimage.png?alt=media&amp;token=1cfccfd1-cc8e-40f4-abbe-51174f97f013" alt=""><figcaption></figcaption></figure>

## 2 Service Management

Manage OA service status, including restart, stop, uninstall, and port adjustment.

<figure><img src="https://1526800164-files.gitbook.io/~/files/v0/b/gitbook-x-prod.appspot.com/o/spaces%2F50DeL6mO9sNbAZBSEdaN%2Fuploads%2FiNpQggIAwTT0WVwkheuX%2FWX20231215-091035%402x.png?alt=media&amp;token=364d35c0-eb76-44c7-8839-56bc5685e6bd" alt=""><figcaption></figcaption></figure>

<figure><img src="https://1526800164-files.gitbook.io/~/files/v0/b/gitbook-x-prod.appspot.com/o/spaces%2F50DeL6mO9sNbAZBSEdaN%2Fuploads%2FXZPz8bMfQumM8HH7huGG%2FWX20231215-092354%402x.png?alt=media&amp;token=6a126e97-e99c-412c-aea9-a6924b415ba8" alt=""><figcaption></figcaption></figure>

<figure><img src="https://1526800164-files.gitbook.io/~/files/v0/b/gitbook-x-prod.appspot.com/o/spaces%2F50DeL6mO9sNbAZBSEdaN%2Fuploads%2FLrCkb86DRqVcrVvkPTHY%2FWX20231215-092533%402x.png?alt=media&amp;token=6391352d-a560-4752-bdb3-c1f9d8d010fd" alt=""><figcaption></figcaption></figure>

## 3 Backup Recovery

Set auto backup rules, periodically back up data, and ensure data recovery.

Step 1: Under \[data backup], click on "Set backup"

<figure><img src="https://1526800164-files.gitbook.io/~/files/v0/b/gitbook-x-prod.appspot.com/o/spaces%2F50DeL6mO9sNbAZBSEdaN%2Fuploads%2Fq4P6qpp4r8mjhrd4IeGf%2FWX20231215-092631%402x.png?alt=media&amp;token=1849d9da-98cc-4abd-97c9-b66e09b6246f" alt=""><figcaption></figcaption></figure>

Step 2: Configure the settings

<figure><img src="https://1526800164-files.gitbook.io/~/files/v0/b/gitbook-x-prod.appspot.com/o/spaces%2F50DeL6mO9sNbAZBSEdaN%2Fuploads%2F7X1wuibkqP8MWUDqi33s%2FWX20231215-093021%402x.png?alt=media&amp;token=05a57c20-01a5-4dc1-b4c8-46db0e84ef0e" alt=""><figcaption></figcaption></figure>

### 3.1 Field Explanation

**Backup Mode:** Local/FTP, save the backup file locally or on a remote server.

**Backup Content:** Select the type of file to backup: ***data***: database data; ***files***: Application file, or attachments.

**Auto backup:** Checked the box to enable the feature.

**Automatic cycle:** auto backup frequency: Every day/Every week and the time the backup will occur

**Step 3:** Click "Confirm" to save the settings.&#x20;

<figure><img src="https://1526800164-files.gitbook.io/~/files/v0/b/gitbook-x-prod.appspot.com/o/spaces%2F50DeL6mO9sNbAZBSEdaN%2Fuploads%2FMNBEtNHOaK30JdbVL4Ru%2Fimage.png?alt=media&amp;token=13bef433-fe9f-46ca-bdd1-d8e03a5311c7" alt=""><figcaption></figcaption></figure>

## 4 Version upgrade

Check for newer versions and enable auto-upgrade.

<figure><img src="https://1526800164-files.gitbook.io/~/files/v0/b/gitbook-x-prod.appspot.com/o/spaces%2F50DeL6mO9sNbAZBSEdaN%2Fuploads%2FAkbZSbqwnp9VOQWfcXY8%2FiShot_2023-12-15_09.39.14.png?alt=media&amp;token=a9c4355d-4949-45c5-a9c1-1011084c6412" alt=""><figcaption></figcaption></figure>


# Mobile APP


# 1 Preparation

## 1.1 Register Mobile Users

Step 1: Login to the e-office web application.

<figure><img src="https://1526800164-files.gitbook.io/~/files/v0/b/gitbook-x-prod.appspot.com/o/spaces%2F50DeL6mO9sNbAZBSEdaN%2Fuploads%2FDFgo9raHn7qyN8PoVlcq%2Fimage.png?alt=media&amp;token=6c1ab6a5-e3f4-416a-ba73-80c05b005913" alt="" width="364"><figcaption></figcaption></figure>

Step 2: In \[Setting] > \[Organization] > \[User], click "Add mobile users".

<figure><img src="https://1526800164-files.gitbook.io/~/files/v0/b/gitbook-x-prod.appspot.com/o/spaces%2F50DeL6mO9sNbAZBSEdaN%2Fuploads%2FuK0WnsL90ClZHbu8Ag41%2Fimage.png?alt=media&amp;token=e14fbdfe-42cd-4f17-a193-eb88b4862c6d" alt=""><figcaption></figcaption></figure>

Step 3: Click on the add button ![](https://1526800164-files.gitbook.io/~/files/v0/b/gitbook-x-prod.appspot.com/o/spaces%2F50DeL6mO9sNbAZBSEdaN%2Fuploads%2F0OBeAChBwFBqSFtWVnAp%2Fimage.png?alt=media\&token=7b6274af-236b-46cf-aed5-b3edee263401)to display the staff icon, then click on the ![](https://1526800164-files.gitbook.io/~/files/v0/b/gitbook-x-prod.appspot.com/o/spaces%2F50DeL6mO9sNbAZBSEdaN%2Fuploads%2FbKWawTxdsXUq8aSxy63J%2Fimage.png?alt=media\&token=ef243724-00c2-400c-956a-0af249049536) to add the desired users.

<figure><img src="https://1526800164-files.gitbook.io/~/files/v0/b/gitbook-x-prod.appspot.com/o/spaces%2F50DeL6mO9sNbAZBSEdaN%2Fuploads%2FdYbOnbgQjxLhFWqYDJ6c%2Fimage.png?alt=media&amp;token=4ed315c0-f98d-4700-a318-0bc5ece7e49c" alt=""><figcaption></figcaption></figure>

<figure><img src="https://1526800164-files.gitbook.io/~/files/v0/b/gitbook-x-prod.appspot.com/o/spaces%2F50DeL6mO9sNbAZBSEdaN%2Fuploads%2F4ZM8mjmzLiUox5tTuAAH%2Fimage.png?alt=media&amp;token=d85f2548-fb5f-4f4a-ab77-e5e64c894bfe" alt=""><figcaption></figcaption></figure>

Step 4: Select the desired user or click on **"**&#x53;elect All" to choose all user accounts in the system and enable their mobile access. Then, click "Confirm" to save the changes.&#x20;

<figure><img src="https://1526800164-files.gitbook.io/~/files/v0/b/gitbook-x-prod.appspot.com/o/spaces%2F50DeL6mO9sNbAZBSEdaN%2Fuploads%2FBYGVQN6kZlK34S2I54g5%2Fimage.png?alt=media&amp;token=764bf105-4970-4b09-87d1-4884b3ff389f" alt=""><figcaption></figcaption></figure>

The system will display **"**&#x53;uccessfully set u&#x70;**"** to indicate that the changes have been made.

<figure><img src="https://1526800164-files.gitbook.io/~/files/v0/b/gitbook-x-prod.appspot.com/o/spaces%2F50DeL6mO9sNbAZBSEdaN%2Fuploads%2FxCPwbfs9DbSNcVC4FYTT%2Fimage.png?alt=media&amp;token=4fffe043-ea8f-4288-b56c-9e70fa188ac7" alt=""><figcaption></figcaption></figure>


# 2 Installation

Download all the client from <https://e-office.one/download-e-office/>

<figure><img src="https://1526800164-files.gitbook.io/~/files/v0/b/gitbook-x-prod.appspot.com/o/spaces%2F50DeL6mO9sNbAZBSEdaN%2Fuploads%2F9J72Bts6rZ4wHpRAZfsK%2Fimage.png?alt=media&amp;token=081c9301-9f1a-4672-9e8e-c1739ba4203b" alt=""><figcaption></figcaption></figure>

## 1.1 Android - Google Play Store

Please refer to [#id-1.3-apk](#id-1.3-apk "mention") for now.&#x20;

&#x20;

## 1.2 Apple - IOS Store

<https://apps.apple.com/my/app/eoffice11/id1623764427>

## &#x20;1.3    APK

### 1.3.1  Turn off Play Protect

Step 1: Tap on the Google Play Store icon to open the app.

Step 2: Tap on your profile picture or the three horizontal lines (menu) in the top-right corner of the screen.

<figure><img src="https://1526800164-files.gitbook.io/~/files/v0/b/gitbook-x-prod.appspot.com/o/spaces%2F50DeL6mO9sNbAZBSEdaN%2Fuploads%2FucP4VcEH5j2L0pl7NNHl%2Fimage.png?alt=media&amp;token=89d445e6-947c-482b-af14-18e9d523b2b3" alt="" width="252"><figcaption></figcaption></figure>

Step 3: Select "Play Protect" from the menu options.

<figure><img src="https://1526800164-files.gitbook.io/~/files/v0/b/gitbook-x-prod.appspot.com/o/spaces%2F50DeL6mO9sNbAZBSEdaN%2Fuploads%2FzNwf12P0WhVxzE3LJDuc%2Fimage.png?alt=media&amp;token=8f0cc035-3387-44b9-9d44-14559d4c3c21" alt="" width="252"><figcaption></figcaption></figure>

Step 4: Tap on the gear icon or "Settings" in the top-right corner.

<figure><img src="https://1526800164-files.gitbook.io/~/files/v0/b/gitbook-x-prod.appspot.com/o/spaces%2F50DeL6mO9sNbAZBSEdaN%2Fuploads%2F1EiNQwO9EQ7DD8eILDHL%2Fimage.png?alt=media&amp;token=d0ba061c-a2c0-4b73-85a3-6c3e3a03583f" alt="" width="252"><figcaption></figcaption></figure>

Step 5: Toggle off the switch next to "Scan apps with Play Protect".

<figure><img src="https://1526800164-files.gitbook.io/~/files/v0/b/gitbook-x-prod.appspot.com/o/spaces%2F50DeL6mO9sNbAZBSEdaN%2Fuploads%2FgVXPY7kfZGaXL9K0CqV4%2Fimage.png?alt=media&amp;token=5df0ae14-618e-47af-8f01-ccade9737be1" alt="" width="252"><figcaption></figcaption></figure>

### 1.3.2 Install the APK

Step 1: Open e-office web application, and click on the \[Download center] located at the right of the navigation bar.

<figure><img src="https://1526800164-files.gitbook.io/~/files/v0/b/gitbook-x-prod.appspot.com/o/spaces%2F50DeL6mO9sNbAZBSEdaN%2Fuploads%2FZkHtAh6OD3QtzjY7GVUk%2Fimage.png?alt=media&amp;token=30974b2b-6662-4c63-9447-1eceb1039f35" alt=""><figcaption></figcaption></figure>

Step 2: Scan the QR code with your QR code scanner or camera to download the latest version of the APK.

<figure><img src="https://1526800164-files.gitbook.io/~/files/v0/b/gitbook-x-prod.appspot.com/o/spaces%2F50DeL6mO9sNbAZBSEdaN%2Fuploads%2FpAa3rpLQpgsbmiyjhcD2%2Fimage.png?alt=media&amp;token=b894c278-bbd6-4267-8254-5d640044d493" alt="" width="226"><figcaption></figcaption></figure>

Step 3: Click on the link to open the download page for the program.

<figure><img src="https://1526800164-files.gitbook.io/~/files/v0/b/gitbook-x-prod.appspot.com/o/spaces%2F50DeL6mO9sNbAZBSEdaN%2Fuploads%2FYl45DwAFIZ4aieXHwzRC%2Fimage.png?alt=media&amp;token=be2a4e07-7cf2-42b7-b5b2-78aec2f4f86f" alt="" width="252"><figcaption></figcaption></figure>

Step 4: If you see a warning message that the file cannot be downloaded securely, tap on "Keep" to continuing download the file.

<div align="center"><figure><img src="https://1526800164-files.gitbook.io/~/files/v0/b/gitbook-x-prod.appspot.com/o/spaces%2F50DeL6mO9sNbAZBSEdaN%2Fuploads%2FyctR4oML9OyahduijHuD%2Fimage.png?alt=media&amp;token=50eaad53-f5ee-4aea-b9c6-7dc09e593810" alt="" width="252"><figcaption></figcaption></figure></div>

Step 5: If you see a warning message that the file cannot be downloaded securely, select the option to "Download Anyway".

<figure><img src="https://1526800164-files.gitbook.io/~/files/v0/b/gitbook-x-prod.appspot.com/o/spaces%2F50DeL6mO9sNbAZBSEdaN%2Fuploads%2FuSejKMgMkLp47zRhPehy%2Fimage.png?alt=media&amp;token=d5edd90c-113a-479d-b38d-fc6e4aba235a" alt="" width="252"><figcaption></figcaption></figure>

<figure><img src="https://1526800164-files.gitbook.io/~/files/v0/b/gitbook-x-prod.appspot.com/o/spaces%2F50DeL6mO9sNbAZBSEdaN%2Fuploads%2FwGg5QUo3myvyKIIFL2jT%2Fimage.png?alt=media&amp;token=674605bb-1b7a-44c0-ac8f-3d4027ae2eaf" alt="" width="252"><figcaption><p>The APK is downloading.</p></figcaption></figure>

<figure><img src="https://1526800164-files.gitbook.io/~/files/v0/b/gitbook-x-prod.appspot.com/o/spaces%2F50DeL6mO9sNbAZBSEdaN%2Fuploads%2FsNsd6njeCCfWyB6EwTrq%2Fimage.png?alt=media&amp;token=e7bb3bc8-dbd8-41f7-a6b2-719612c16160" alt="" width="252"><figcaption><p>The APK has finished downloading.</p></figcaption></figure>

Step 6: To install the app, click "Install".

<figure><img src="https://1526800164-files.gitbook.io/~/files/v0/b/gitbook-x-prod.appspot.com/o/spaces%2F50DeL6mO9sNbAZBSEdaN%2Fuploads%2FP4IsuvwM45iUlijZmHv8%2Fimage.png?alt=media&amp;token=b3a059c5-f5da-4a20-8db4-70a6e5f520f6" alt="" width="252"><figcaption></figcaption></figure>

<figure><img src="https://1526800164-files.gitbook.io/~/files/v0/b/gitbook-x-prod.appspot.com/o/spaces%2F50DeL6mO9sNbAZBSEdaN%2Fuploads%2FSXxM7Rw5j46sKPxcDZAN%2Fimage.png?alt=media&amp;token=eae0f560-1056-4478-bcae-5ad7aaff5031" alt="" width="252"><figcaption><p>The app is installing.</p></figcaption></figure>

Step 7: The app is installed. Click **"**&#x4F;pe&#x6E;**"** to launch it.

<figure><img src="https://1526800164-files.gitbook.io/~/files/v0/b/gitbook-x-prod.appspot.com/o/spaces%2F50DeL6mO9sNbAZBSEdaN%2Fuploads%2Fsh5O8mWz8OySBov3N4UL%2Fimage.png?alt=media&amp;token=d11f99b9-30db-415f-9407-8a6e0220ddc3" alt="" width="252"><figcaption></figcaption></figure>

Step 8: The first screen you'll see when the app launches is \[Warm Tips] which provides important information. Click **"**&#x41;gre&#x65;**"** after you finish reading it.

<figure><img src="https://1526800164-files.gitbook.io/~/files/v0/b/gitbook-x-prod.appspot.com/o/spaces%2F50DeL6mO9sNbAZBSEdaN%2Fuploads%2F8H4tVu9WEwQVmwXesBTt%2Fimage.png?alt=media&amp;token=02e7518c-27f5-4dda-a418-5b5861f1ec90" alt="" width="252"><figcaption></figcaption></figure>

<figure><img src="https://1526800164-files.gitbook.io/~/files/v0/b/gitbook-x-prod.appspot.com/o/spaces%2F50DeL6mO9sNbAZBSEdaN%2Fuploads%2FobEDAr3oEsPCLHOIlUk8%2Fimage.png?alt=media&amp;token=09ea7c6d-0459-47ca-a998-c908c2798bc4" alt="" width="252"><figcaption><p>This is the Login Page.</p></figcaption></figure>

### 1.3.3 Turn on the Play Protect

Step 1: Tap on the Google Play Store icon to open the app.

Step 2: Tap on your profile picture or the three horizontal lines (menu) in the top-right corner of the screen.

<figure><img src="https://1526800164-files.gitbook.io/~/files/v0/b/gitbook-x-prod.appspot.com/o/spaces%2F50DeL6mO9sNbAZBSEdaN%2Fuploads%2FucP4VcEH5j2L0pl7NNHl%2Fimage.png?alt=media&amp;token=89d445e6-947c-482b-af14-18e9d523b2b3" alt="" width="252"><figcaption></figcaption></figure>

Step 3: Select "Play Protect" from the menu options.

<figure><img src="https://1526800164-files.gitbook.io/~/files/v0/b/gitbook-x-prod.appspot.com/o/spaces%2F50DeL6mO9sNbAZBSEdaN%2Fuploads%2FzNwf12P0WhVxzE3LJDuc%2Fimage.png?alt=media&amp;token=8f0cc035-3387-44b9-9d44-14559d4c3c21" alt="" width="252"><figcaption></figcaption></figure>

Step 4: Tap on the gear icon or "Settings" in the top-right corner.

<figure><img src="https://1526800164-files.gitbook.io/~/files/v0/b/gitbook-x-prod.appspot.com/o/spaces%2F50DeL6mO9sNbAZBSEdaN%2Fuploads%2F1EiNQwO9EQ7DD8eILDHL%2Fimage.png?alt=media&amp;token=d0ba061c-a2c0-4b73-85a3-6c3e3a03583f" alt="" width="252"><figcaption></figcaption></figure>

Step 5: Toggle on the switch next to "Scan apps with Play Protect".

<figure><img src="https://1526800164-files.gitbook.io/~/files/v0/b/gitbook-x-prod.appspot.com/o/spaces%2F50DeL6mO9sNbAZBSEdaN%2Fuploads%2FOunBtkQwen8ZA8bATT6j%2Fimage.png?alt=media&amp;token=ad6a4eea-f77d-4cca-bb59-0e4b8c7f503b" alt=""><figcaption></figcaption></figure>


# 3 Configuration

## 2.1 Switch Servers

Step 1: Click “Win-key”, key in “CMD”, and run the Command Prompt as administrator.&#x20;

<figure><img src="https://1526800164-files.gitbook.io/~/files/v0/b/gitbook-x-prod.appspot.com/o/spaces%2F50DeL6mO9sNbAZBSEdaN%2Fuploads%2Faeshd4gN38FQLrds6iLJ%2Fimage.png?alt=media&amp;token=067d397a-813f-496a-9c9d-a03e0dcce044" alt=""><figcaption></figcaption></figure>

Step 2: Key in “ipconfig”, and press “ENTER” on your keyboard to prompt the command.&#x20;

<figure><img src="https://1526800164-files.gitbook.io/~/files/v0/b/gitbook-x-prod.appspot.com/o/spaces%2F50DeL6mO9sNbAZBSEdaN%2Fuploads%2FWtRvIPSlELMXyrghexMb%2Fimage.png?alt=media&amp;token=013b4dfb-5968-4c4b-bc7e-ff140094018b" alt=""><figcaption></figcaption></figure>

Step 3: Retrieve the IPv4 Address in the results generated.&#x20;

<figure><img src="https://1526800164-files.gitbook.io/~/files/v0/b/gitbook-x-prod.appspot.com/o/spaces%2F50DeL6mO9sNbAZBSEdaN%2Fuploads%2FAoRj4LPx7vtESfsS3uai%2Fimage.png?alt=media&amp;token=47d71af4-6f4c-4790-8556-fb145bccbc72" alt=""><figcaption></figcaption></figure>

Step 4: Open the Mobile APP and click on \[Switch servers]

<figure><img src="https://1526800164-files.gitbook.io/~/files/v0/b/gitbook-x-prod.appspot.com/o/spaces%2F50DeL6mO9sNbAZBSEdaN%2Fuploads%2FYHH69dEsFNJikAZaEFvA%2Fimage.png?alt=media&amp;token=9ee11066-1fe1-4776-87de-a1f58f96c031" alt="" width="177"><figcaption></figcaption></figure>

Step 5: Enter the link below and replace the ipv4 with the ip address retrieved in step 3. <http://ipv4address:8010>

<figure><img src="https://1526800164-files.gitbook.io/~/files/v0/b/gitbook-x-prod.appspot.com/o/spaces%2F50DeL6mO9sNbAZBSEdaN%2Fuploads%2FGKPGHaQ5SdTij5TdFYGZ%2Fimage.png?alt=media&amp;token=a7a1c797-21b2-4131-8673-93837d9b9aa9" alt="" width="236"><figcaption></figcaption></figure>

## 2.2 Change Mobile APP Language

Step 1: Click on the \[Language] button.

&#x20;

<figure><img src="https://1526800164-files.gitbook.io/~/files/v0/b/gitbook-x-prod.appspot.com/o/spaces%2F50DeL6mO9sNbAZBSEdaN%2Fuploads%2FkAX3J5QXAGGv7VQZ8zPg%2Fimage.png?alt=media&amp;token=8c0f0abb-a63d-4cf2-8c01-8e9cda0e0f89" alt="" width="236"><figcaption></figcaption></figure>

Step 2: Please select the language, and the change will be implemented.

<figure><img src="https://1526800164-files.gitbook.io/~/files/v0/b/gitbook-x-prod.appspot.com/o/spaces%2F50DeL6mO9sNbAZBSEdaN%2Fuploads%2FCS2YZkwMCDSBXtszvnc0%2Fimage.png?alt=media&amp;token=c11b708a-645e-4047-97c4-a366aec2d699" alt=""><figcaption></figcaption></figure>

&#x20;


# Quick Start Guideline

## 1 How to change company logo

### 1.1 Login page logo

Go to\[Setting]->\[Login page]->\[Choose the template]->\<Edit>

<figure><img src="https://1526800164-files.gitbook.io/~/files/v0/b/gitbook-x-prod.appspot.com/o/spaces%2F50DeL6mO9sNbAZBSEdaN%2Fuploads%2F7UA4uilhM5mBXBeIVI9c%2Fimage.png?alt=media&amp;token=d86f9677-fc40-49f7-85a5-ed83e61a5e98" alt=""><figcaption></figcaption></figure>

Then click the logo, and upload your own logo

<figure><img src="https://1526800164-files.gitbook.io/~/files/v0/b/gitbook-x-prod.appspot.com/o/spaces%2F50DeL6mO9sNbAZBSEdaN%2Fuploads%2FG98Q44BSLVKH5EcLZhDv%2Fimage.png?alt=media&amp;token=d4360472-0a3b-44d3-91ee-3a952a83f69c" alt=""><figcaption></figcaption></figure>

### 1.2 Main navigation logo

Go to\[Setting]->\[Navigation bar]->\[Click the logo or text]->\<Upload image/Put text directly>

<figure><img src="https://1526800164-files.gitbook.io/~/files/v0/b/gitbook-x-prod.appspot.com/o/spaces%2F50DeL6mO9sNbAZBSEdaN%2Fuploads%2Fz6XbNSyFumPbl7MgQOw5%2Fimage.png?alt=media&amp;token=61a61e39-21bc-4069-b77b-6f178dae3fc7" alt=""><figcaption></figcaption></figure>

## 2 How to personalise the login page

Go to\[Setting]->\[Login page]->\[Choose the template]->\<Edit>

<figure><img src="https://1526800164-files.gitbook.io/~/files/v0/b/gitbook-x-prod.appspot.com/o/spaces%2F50DeL6mO9sNbAZBSEdaN%2Fuploads%2FZauNhA1SX9UGG3Orlldr%2Fimage.png?alt=media&amp;token=8a811cba-cd23-476a-901a-7e31a0c99e6f" alt=""><figcaption></figcaption></figure>

Choose different login page template from left

<figure><img src="https://1526800164-files.gitbook.io/~/files/v0/b/gitbook-x-prod.appspot.com/o/spaces%2F50DeL6mO9sNbAZBSEdaN%2Fuploads%2Fhj4cYCcWeK3o1xyv0790%2Fimage.png?alt=media&amp;token=a37fc9a7-55fc-4599-b784-c9d70086b0df" alt=""><figcaption></figcaption></figure>

Add more control into the login page, and edit these property on the right.

<figure><img src="https://1526800164-files.gitbook.io/~/files/v0/b/gitbook-x-prod.appspot.com/o/spaces%2F50DeL6mO9sNbAZBSEdaN%2Fuploads%2FVNuHPnh5eGcNhoO0W4s1%2Fimage.png?alt=media&amp;token=4dba3efd-b78b-46b9-bf78-bdf209f9aaf8" alt=""><figcaption></figcaption></figure>

## 3 How to change personal avatar

<figure><img src="https://1526800164-files.gitbook.io/~/files/v0/b/gitbook-x-prod.appspot.com/o/spaces%2F50DeL6mO9sNbAZBSEdaN%2Fuploads%2F88kB3Hi75g8yCEJ0U7wX%2Fimage.png?alt=media&amp;token=b6517e46-1e7e-427b-91ac-43ce63ecd287" alt=""><figcaption></figcaption></figure>

## 4 How to change password

<figure><img src="https://1526800164-files.gitbook.io/~/files/v0/b/gitbook-x-prod.appspot.com/o/spaces%2F50DeL6mO9sNbAZBSEdaN%2Fuploads%2F0YFJfPxt7o12Ex4jbXT8%2Fimage.png?alt=media&amp;token=29e9fbb8-9a49-4961-85a2-4fa06a59ad40" alt=""><figcaption></figcaption></figure>

## 5 How to edit company information

Go to Setting-> Organisation->Company, and then fill in all the basic information

<figure><img src="https://1526800164-files.gitbook.io/~/files/v0/b/gitbook-x-prod.appspot.com/o/spaces%2F50DeL6mO9sNbAZBSEdaN%2Fuploads%2F8YG7TH1w2h9yfKxGan0w%2Fimage.png?alt=media&amp;token=188d34d7-e07b-4457-88ab-4727a0ed036c" alt=""><figcaption></figcaption></figure>

## 6 How to add department

Go to Setting-> Organisation->Department

<figure><img src="https://1526800164-files.gitbook.io/~/files/v0/b/gitbook-x-prod.appspot.com/o/spaces%2F50DeL6mO9sNbAZBSEdaN%2Fuploads%2FXzHktgEhySEzE3MIZWwt%2Fimage.png?alt=media&amp;token=2732b95e-f810-43af-b022-57398322a75b" alt=""><figcaption></figcaption></figure>

### 6.1 Add department one-by-one

<figure><img src="https://1526800164-files.gitbook.io/~/files/v0/b/gitbook-x-prod.appspot.com/o/spaces%2F50DeL6mO9sNbAZBSEdaN%2Fuploads%2F9zwfd9VDC287f3j1vsLO%2Fimage.png?alt=media&amp;token=d236e21c-ae58-45f4-964a-2c7f6f3f4b03" alt=""><figcaption></figcaption></figure>

### 6.2 Add department in a fast way

Click quick editing

<figure><img src="https://1526800164-files.gitbook.io/~/files/v0/b/gitbook-x-prod.appspot.com/o/spaces%2F50DeL6mO9sNbAZBSEdaN%2Fuploads%2F8cGrlsLebnh5v5ywWspR%2Fimage.png?alt=media&amp;token=d7ec648a-6183-4dd3-b7a1-bb487e8250c6" alt=""><figcaption></figcaption></figure>

## 7 How to add user

Go to Setting->Organisation->User

<figure><img src="https://1526800164-files.gitbook.io/~/files/v0/b/gitbook-x-prod.appspot.com/o/spaces%2F50DeL6mO9sNbAZBSEdaN%2Fuploads%2FV3KI9Ly3dyXBPAmS5pjV%2Fimage.png?alt=media&amp;token=43b514e3-ff9e-41ce-ab44-7c0e987a876e" alt=""><figcaption></figcaption></figure>

Different way to add uses

<figure><img src="https://1526800164-files.gitbook.io/~/files/v0/b/gitbook-x-prod.appspot.com/o/spaces%2F50DeL6mO9sNbAZBSEdaN%2Fuploads%2FzzeNY1BziXkolpM7tEPU%2Fimage.png?alt=media&amp;token=57a51c44-9904-4c6a-a494-978de43228f5" alt=""><figcaption></figcaption></figure>

### 7.1 Single enter

<figure><img src="https://1526800164-files.gitbook.io/~/files/v0/b/gitbook-x-prod.appspot.com/o/spaces%2F50DeL6mO9sNbAZBSEdaN%2Fuploads%2FPbpZ798ef5xedFPbe0JF%2FiShot_2023-12-15_10.58.06.gif?alt=media&amp;token=9d5e1e0e-a0de-4556-8d5b-f1d81407df34" alt=""><figcaption></figcaption></figure>

### 7.2 Multi enter

<figure><img src="https://1526800164-files.gitbook.io/~/files/v0/b/gitbook-x-prod.appspot.com/o/spaces%2F50DeL6mO9sNbAZBSEdaN%2Fuploads%2Fi5SVvYsnArnGOFgaAw5P%2FiShot_2023-12-15_10.56.28.gif?alt=media&amp;token=ce38b494-024c-4811-a727-c8dec1bac197" alt=""><figcaption></figcaption></figure>


# Design a new workflow

## 1 High level understand about workflow

<figure><img src="https://lh5.googleusercontent.com/vD_przCvlopx-P0B43RlqDBRF_BA3xkuhAWBPxdCocVJzkxY4iniPdFmie4hCVim4X8A0sFhtnKIeJukRjqTBL-OmfJPtmXils_f_hplrM8MvboHPdZNnHvPvoOgTwtZupZwvTEx5sQaJNYR4w62oOU" alt=""><figcaption><p>High leve understanding</p></figcaption></figure>

<figure><img src="https://lh4.googleusercontent.com/RlG7mm35vdNQACRMkLURqfYf9p3iHN7HbKag76oIVzYDFxMLYEHGVfpQ5SWK7jvzr_Tf4luNf7J1vOVtEt5r1LHzzcPO7mzvOkbb9TrRUL2bofbB_cM6legso_V79YkqSiZNomU-xruI1oZ-kNjFW_k" alt=""><figcaption><p>Simple leave application form and approval</p></figcaption></figure>

A workflow is a business process/approval flow which include a data form and a approval flow

**Form** is used to collect essential data from user, but some basic information could get from system directly

**Workflow** is help to flow the form to each approver, reviewer, manager to check, verify and confirm. There are 2 different workflow, fixed and free flow

* Fixed - follow company policy, only all the relevant approver approved, then workflow will end and archived
* Free - for some requests, there is no clear company policy, so requester could fill in all relevant approver, if some approver need other’s input, they could forward the workflow to others as well

## 2 To design new workflow, you need login to e-office 11.0, and find the workflow from the menu

<figure><img src="https://lh4.googleusercontent.com/nsk19nJf12WfrCJVXZI5A0YkNQWg84unRPi7RCbyIxdnoeObbRxLe3shHxdYA-GCa-EpuEMGIfzWdyxJuR-NMEwUp8hmaR6UuPTlslVXC32NCUdAoranz9K1vM4mYyw6fxEksVE67GeoS4gsywo3EcQ" alt=""><figcaption></figcaption></figure>

## 3 Below screen will display, workflow menu

<figure><img src="https://lh6.googleusercontent.com/QmgSoxvmtn4KfKWmro4VwTiuDtMchL_ZmFFLd0J-30EG_jfWHqPGkq7vkyW2qhFpvnK2Osp8_cBRPcqWZK3JixLi9YT1fgayB4dZzJsxYdquLYAZy4fzlTBntfn-Zo5LbI1yMYY9J77fkAYQ5zFDcGs" alt=""><figcaption></figcaption></figure>

* New request - initial new approval flow
* Pending - check all workflow require user’s review/approval/verification
* Processed - all workflow approved/reject by user
* My request - check all workflow initialled by user
* Delegation - Delegate your approval/review permission to others in a period
* Monitor - Monitor workflow status, process and terminate the workflow
* Form design - design new data collect form
* Workflow design - design approval flow for different use scenarios
* Category - define workflow category by department/use scenarios


# 1 New Form - Leave Application

## 0 Design New Form

### 0.1 Design new form via Simple designer-drag and drop

<figure><img src="https://1526800164-files.gitbook.io/~/files/v0/b/gitbook-x-prod.appspot.com/o/spaces%2F50DeL6mO9sNbAZBSEdaN%2Fuploads%2F4AxKM9FCBxQ8VsCPigaA%2FDrag%20and%20drop%20designer.gif?alt=media&amp;token=de2435c7-abee-4dbd-91b9-bc9e4dbbc8bd" alt=""><figcaption></figcaption></figure>

### 0.2 Design New form via Simple designer-Quick edit

<figure><img src="https://1526800164-files.gitbook.io/~/files/v0/b/gitbook-x-prod.appspot.com/o/spaces%2F50DeL6mO9sNbAZBSEdaN%2Fuploads%2FCN1dar0HJDWu7ufRjCsD%2FSimple%20form%20designer.gif?alt=media&amp;token=e5dfa2b0-3ae5-4851-b87e-6bbdd4c3eeb9" alt=""><figcaption><p>How to create a leave application via simple form designer(Quick edit) - Type the field name, system generate the form for you</p></figcaption></figure>

## 1 Design a leave application form

<figure><img src="https://lh6.googleusercontent.com/_CoNH7JKPK0kMMBNCI-7_HhcyswKU5NVAEClkRtGeR6LTrJPzFcNPAVMn9JGHpGKPWlGPIBgOqx2iyMpFC8uYL6Zr4kXxf5bxhdYFgzxkYydu2NG3PoYR8a_zHSJ_7j4KSnA54zemxG3QiXtQ0FJGqI" alt=""><figcaption></figcaption></figure>

<figure><img src="https://lh6.googleusercontent.com/QDeOm7nebu-AmCl9U6KKwsRzitTWtkLw2_DdUXChXRjLiWufXhRMih2NMng-dQcv6Lszj0zATWazKkK9FIv79hI0qSZIn9IJN6SH7Ff16cEc7r8ffv-Q91QPDWtQoLxty7TXzk25EQ07xkmlJODqU5s" alt=""><figcaption></figcaption></figure>

## 2 Applicant can be auto retrieve from system

<figure><img src="https://lh3.googleusercontent.com/-Ia9TqlW1e7J-t2dMZGz2aZ9vCAt_x964WwxS96Y7Ze_zFkuB6T7PM5-cMvvL16gGK6ciZ_5I8_cqqAuWHrb07lnHPuVI1eCmOeZ5VkuWyszoSphXDNKXmBTjXTVk98IxRZH2rkKTD8AaeMbDbVQKj8" alt=""><figcaption></figcaption></figure>

<figure><img src="https://lh6.googleusercontent.com/jPgJCWA1TjPQ3j8YyvVxK3B9n_6Fpxo-0QXHl4P-_2Gwp4QrR6qasGhP2PAUzqSMwrum6TnLi1Pai9eko22wwgAxs6VPIcSNkwa4azCradfU9RspgHTDDp0rVUJajI8JaYimlglRAuDt82MfiMuK4qM" alt=""><figcaption></figcaption></figure>

Set default option as current user, then when user initial a new request, the user name will auto fill in

## 3 Leave Type could connect with system module Leave

<figure><img src="https://lh5.googleusercontent.com/auvgc1zlfwcFzdoUHz7io85dv53BPQnDxlubRv8J-RoJNVdTp-U_OjSr8JO4ERwwoZk_7g5mFypcm2tjVerQaLseGo6Y-4L8UV5g_baxOZnHf6RvKODGPHy70NKvJgPfO7rVhF20FppzTNMKplP_7ew" alt=""><figcaption></figcaption></figure>

<figure><img src="https://lh4.googleusercontent.com/BUCHJ0ChAIMy0icm6jmQqzfgLLgLrY6tjpRqNvpJaDpX2EHfThy-HIOIH4dJxSYotA4OP98pLCgpPTCNyplSKUeHt47BPvmIYnnBkW6PAv8jnOEc3pd-i04qM06FLHQxceiLAB7WWmQt3OzECfPsp3o" alt=""><figcaption></figcaption></figure>

Connect the leave type field with Leave Management->Holiday type

## 4 Start date and end date\[Text]->\[Date]

<figure><img src="https://lh4.googleusercontent.com/EKM0R8npHw-csMJh6D8cDEf3t8izKg7wAFuyvXDP5bGfHWPmcXnx9Mk4TnSzEMGz1p4Q38YxyrbHlgn4p0ZL5qbcVdpzX2THrheipnxij6lv_tXYc3JatSpjFHKR5CcTbDYXu9MZhR0CgZVZ10piu5U" alt=""><figcaption></figcaption></figure>

## 5 Leave period = end data - start date (Exclude public holiday and weekend)

<figure><img src="https://lh5.googleusercontent.com/Bn-Q3gNZNUEYMoJI20WnRgXYIG1I3s6vXDgEjwsukQ5LNloxHh_hD7sx7dNrhbfgx1jWWyx-1QHLa6yioxvGMfvLP-LxSHV2xAW_iPotz0my9K-Ern2InXFb9IR3ng7OjDM5CGF_9OoyQFWQwNAZaZE" alt=""><figcaption></figcaption></figure>

<br>

<figure><img src="https://lh3.googleusercontent.com/zaUA53ojs8bpxtKGS4mbuYgWQ8dKQ66wQRzOuV_FZhBfpxR1SxBdViQiaeGpD_jVwsLl8BS3cNQM4uEuq0a3pXpwPHcQnuhtvku1vlWjBXkLvr0gm1dXxeXM4hPAMpw4wu-EAB1GHrjxbdv9tiJvBws" alt=""><figcaption></figcaption></figure>

Set up calculation rules, all the form fields could be select by use #

## 6 History records (to show history record, could help approver/review to make decision)

<figure><img src="https://lh3.googleusercontent.com/Vsr9SIi5q6bGRWo_LZiHlbck9DNzQ4kIoBteKiFjHQg-dQKnYQpMpRyWEwtldbOI9L6tirY9jdHCQ4jQeeymuJF8WjC2Qi0VZZohUYB1z0GxUL4uGa2_G8ovIn5hu6_biXrbSN2zqmljwdqSLjIoEag" alt=""><figcaption></figcaption></figure>

<figure><img src="https://lh4.googleusercontent.com/ZtKOlwSX8XvKY9_34IkKnhoRawPjeKryCPqnoS5uqzbXI9uUVVj6_nxIQEColkDEpySP94Oe7282LdjiQOQs6cNQzuevZ9-sVn0FT8UaxyXCGMrYVYEq8_TBkyuKgUQCl2PQeS1hQAqCgBfJABJYISs" alt=""><figcaption></figcaption></figure>

\ <br>


# 2 New workflow-Leave Application

## &#x20;1 Fill in basic information of the workflow

<figure><img src="https://lh5.googleusercontent.com/POYTdRRxTZOnDzjqHbk6Vs-xh0MxRO1AtfULucCHdeIBfVztAS3TujEQJDKGXZITHvjkjtmly3CEpEArL_CYbM4kHGWe6AWnTfAp-AgWv2ZgCWfiHyN5HrhENq3Bm-3a-BcPAKMsaSDwUgT6i2d96kI" alt=""><figcaption></figcaption></figure>

<figure><img src="https://lh5.googleusercontent.com/CjUZKSOamrXChsiASpZz7IBiHESX-R2mz9ISHqEVp6vT-54yTDEWps8Wae2xJ_UhDGIl29BSNaITwPS81GRAMSSUPJ-IwUUXCTqA7USsk6mKINbH44XasZ6hRWsZkEUHpspPmZzOuS9vQC-uG2kC-nU" alt=""><figcaption></figcaption></figure>

## 2 Design the approval flow, configure nodes and exit

<figure><img src="https://lh5.googleusercontent.com/SCBu_DzPdSraQ4AByMIntz-mA9mXniWQPqKXsIqZjzdIhNSy7JocX9CSZcLtd5ziV6MSTRx8z3IbQOhiFea514ChBgAx3EgvWL3OyzV0qId2afzWvJykWaLmcEFYMuTMDIeM_3G5iJzH4d6mLiApz0Q" alt=""><figcaption></figcaption></figure>

## 3 different flow design mode

<figure><img src="https://lh4.googleusercontent.com/2ypFuZP1UEvgKYJiHwpu-8NRJVA_X7OGDsnXgUNw9K-sO2pN2yfa-nIWEfrLuXjR3vV3LcpMUQpEcCBuz2XUTgULRWrBMJhGHkyy8z14gm31OEcVQ0AzO2wdFTrckcdzxgWy5m9VNDuya6bwEY76yRA" alt=""><figcaption></figcaption></figure>

<figure><img src="https://lh4.googleusercontent.com/9CsgNxDeAHz4l1Kcw_StI7s-6o8a2ypbDifLl5ABnh9RiXcrV_gH-rjnFvnTyRw5Ksysrhsj1jnJ_wzZhAL8CV7fHWfWf4w1XDE43rGoJIEjXhO9UG_xIlMhifBd3QWKDhIC50J6N6XkcqZmoTpIjBk" alt=""><figcaption></figcaption></figure>

For requester, make all staff able to initial the request

<figure><img src="https://lh5.googleusercontent.com/dVVkp9ucU53b91jI4QSg4AluTyBHQO14Zpj01XUiVonlglSw10UilAGPyS4ytdPWosLB9nHu7zKCnKemPmqcPCBxeSkK8sUp6NOtmCDYvybUogk71sxwrZoNvXMJWJVNrET2Bb5iGNLYql022oHe8a0" alt=""><figcaption></figcaption></figure>

Do validation check for leave period with leave balance, if not fulfil the requirement, then show error message

<figure><img src="https://lh3.googleusercontent.com/oUy6OhkEHJP5-ihMugCvnlzOY96QzxGFdUsphQsCSk8uSyJSQGXVMB-mJR1TPh80TySB8ldz_u8EjwPzuOiEs3Rl3dEwSxgA3zz6CCa1ga9G5axOQEGlKAHsLsXBqWajJUV-_jRcxVDElSPskpn51xM" alt=""><figcaption></figcaption></figure>

So when user try to submit a leave request, if the leave period > leave balance, system will prompt the error message and stop use to submit the request.

## 3 Set up different exit condition

<figure><img src="https://lh5.googleusercontent.com/_WR8rBtknzsPVvxD17_NAONzJJXXPVmR9MUL_fPykA5ecrQtKOXJ2XJTfXYm2YjtutS5NQyZzy_hPl1CMBk3ul3J8HMe4FQ-hMMWDgBrCpBJRocdmDio6qiu-TBCR0m3TI4QMHDN7FESjDc0QGs9ojg" alt=""><figcaption></figcaption></figure>

## 4 Define field operation&#x20;

Normal field: Edit, non-edit, required

Attachment field: Edit, non-edit. Required, Download, View, Delete, Edit

<figure><img src="https://lh6.googleusercontent.com/x-Sk-MNDIF6X8Y7ffZFgF_wtIigh5158KzQfwrfSzU001aWB8A-5DytTD6Q1ByeZMvRf8gORMftSUWJPZCfi3lGkEgjyET0_JDO7_SJMDD2N4sBwKm1s5F38bgkTVfl0ptGfoenaVrAegCtps3bxYbU" alt=""><figcaption></figcaption></figure>

For required filed, there is a condition control, which mean in some scenario, it must be required, for other scenario, it’s not required. Condition define is similar with other editor

<figure><img src="https://lh4.googleusercontent.com/akmrcs-mEIC1T_znZ3tQizQ9Vv6McGPTXxF_ecJfPHEPFDJxLppy2Bm6pULpGKp2rNYNs7c1p7JHTYop0UXjSoOoyYmP1OnGVNKIS1rEPaRl_UZ6g13GwIugWTiXdibq-0uheUDMk666TDNgTiOepKU" alt=""><figcaption></figcaption></figure>

## 5 Set timeout reminder

Step 1: define timeout duration

Step 2: Choose give a reminder to PIC or just directly auto flow to next node

<figure><img src="https://lh5.googleusercontent.com/fjIGv4Fl_VJ6U0Xt8jAqKcx5OFE1a3uKQlyednqxZx2NfKIfY-aDu9xZRFhm8SmxOv8YMsRc5lEsnoCFl8c6qOgXJENGiSp_RJKeUcpPtQv8ejof8rRSdhQxJ-mYAmN-WOksJXfOH_duyfTEXP8r-9Y" alt=""><figcaption></figcaption></figure>

## 6 Reject

<figure><img src="https://lh5.googleusercontent.com/tJkcOAYofJK0tfu1Z7QBS8xVokJIeVmwi5Pi4wKpx2ABskU5j9pATGh-HbAivQ6a0Y77Ox92-fQOcTiEXBPbKIUUUI_vFe25tDCciCd1iUGF2SEidvzhk7cyFu2glmQSXxz92m73Jdejhv7vFzDui_k" alt=""><figcaption></figcaption></figure>

## 7 Outsend data

When workflow arrive specific node, trigger an action to update/delete/add new records in other system or in e-office 11.0 other table

Example:&#x20;

1. Update leave information in Leave Management
2. Add new product information in product management

<figure><img src="https://lh4.googleusercontent.com/xp9WzigthEmExycC9Kby3EuxAzAKlmZekuxLE9EPKT_CpyGnK9tKZmHy1MnntdkE7YXaRP_65vZfY39V-qq9UQTxvYmw6Rrn7h6H12SiPEkCGww3PhI6-NS_mCafcdiBL-Zqff_TzkeUbZYmVbE37m0" alt=""><figcaption></figcaption></figure>

<figure><img src="https://lh3.googleusercontent.com/r04KKaFvQE5Z5jEDhUTPxHCrO6GQoiclx7-rYuvDi4ey-KLN1o8GkjnynNB9fX_gDgpeBsq1NEOmevQ4obMqQu3q679aHn0GTVxuBdH4gkLyjlQfb55mnWM84Cu4PcomskCs6Ru2UIasuiYpy6-v_VE" alt=""><figcaption></figcaption></figure>

Here we choose the send data to internal Leave module

By select one field from left side and one module field, then click the right arrow, a mapping relationship will be created.

<figure><img src="https://lh5.googleusercontent.com/eQcofvjWjxLIz7rznSR59OD4hcKAQBbgqJjtWELVhjRPe78x9l6zGA7O652_eWi_lMTPDx3Qs-DY9QVisQrpkbPgj4fDu5Fq-xkv7gec6SjjW9LhB66Dt4hUarLkIDGLZpVDDAjGHaZ2xRL9Mre5DoQ" alt=""><figcaption></figcaption></figure>

## 8 Monitoring setting

<figure><img src="https://lh6.googleusercontent.com/jk5RWiyMEZ8NztVQN6lNxScOtEMn-vWdWlwSK93b-cPJj5BFTeJlZxfo36-zD0h6pOZTBQWUuTJwvvKUjcuU3hY5UGqgmjd2XeR1ILuSeJf6-iwbUl3KGLJAKn7hV8hXZZgDH2xbah400YJsk55PYcw" alt=""><figcaption></figcaption></figure>

<figure><img src="https://lh3.googleusercontent.com/VEz3JGAw1JAF64TPRttEXCH8ikaxrXYWScgbn5lxBaVJjAIPj3ReOTKP9bLwdRZTYAjmjitzQp6dtWLOiN9tto6HSswp2vfdLZIpIeHz178_VgGgO740E-NfdW_L415Wd85IX3jCUwh0LPlHszCSrfI" alt=""><figcaption></figcaption></figure>

So assign the user could perform the monitor action from the Workflow->Monitor


# 3 Initialize new leave application

Go to Workflow->New Request->HR01\_Leave Application

<figure><img src="https://lh6.googleusercontent.com/V_oZcyLr0ehxLvG5LAQKDNTc_w0FJ5cGncKWBCea0G5lu_lulLJ7eQK-XiF5wYukttTQEijoSmuQoOolIGp4EjK5qjAmZPWSL1qXtbPe1WLolTiwyePWHPync1tnyJ4c5tVAHUB7CSs77PlV4fsS3G4" alt=""><figcaption></figcaption></figure>

<figure><img src="https://lh3.googleusercontent.com/w4MC69YjmTSgnh4G4o7mVnLPNY2w7qNj2J3VDJreqXLAQ5ELTg939tK7Hb9sFfBnem-Zs2x6VeJ4ZbpZIjZTnEgw_kv1R1CTvx1ccdTAeAhcuqQ_h_khW1JHPAgJp7CvQ0-NGzy59pTkbXNpEMrdKjg" alt=""><figcaption></figcaption></figure>

Fill in necessary information in the form<br>

<figure><img src="https://lh4.googleusercontent.com/8AzHZnPrOJsjSYlVA1Oc_kTQuREG1_OvcnwnkAcovQVNbGj22jxHWR3Oj7Y20wrQneMpxIy5NHS58XW5lCmztmT9Nsm4SdkxH23OwryNV-dDJfzEa6iOVThyLve4Py-7qMCEvIHq4EKgefTcqBrcwmQ" alt=""><figcaption></figcaption></figure>

Check the Flowchart

\ <br>


# 4 Regular Expressions(Regex) in Field validation

During form design, we need to think about valid the user input to ensure the data quality, below is the place to validate the data format.

<figure><img src="https://1526800164-files.gitbook.io/~/files/v0/b/gitbook-x-prod.appspot.com/o/spaces%2F50DeL6mO9sNbAZBSEdaN%2Fuploads%2F9x3lTD1iNKIuHMwjuBHE%2FiShot_2023-12-15_10.16.17.png?alt=media&amp;token=4afd6a5f-b31e-4991-8a4d-0d55e56957ae" alt=""><figcaption></figcaption></figure>

## 1 Email&#x20;

```
^[A-Za-z0-9._%+-]+@[A-Za-z0-9.-]+\.[A-Za-z]{2,}$
```

## 2 URL&#x20;

```
^(https?:\/\/)?([a-z0-9]+([\-\.]{1}[a-z0-9]+)*\.[a-z]{2,5})(:[0-9]{1,5})?(\/.*)?$
```

## 3 Numeric

```
^\d+(?:\.\d+)?$
```

## 4. Date&#x20;

### 4.1 YYYY-MM-DD

```
^(?:19|20)\d\d-(?:0[1-9]|1[0-2])-(?:0[1-9]|[12][0-9]|3[01])$
```

### 4.2 DD-MM-YYYY or DD.MM.YYYY or DD/MM/YYYY

```
 ^(?:(?:31(\/|-|\.)(?:0?[13578]|1[02]))\1|(?:(?:29|30)(\/|-|\.)(?:0?[1,3-9]|1[0-2])\2))(?:(?:1[6-9]|[2-9]\d)?\d{2})$|^(?:29(\/|-|\.)0?2\3(?:(?:(?:1[6-9]|[2-9]\d)?(?:0[48]|[2468][048]|[13579][26])|(?:(?:16|[2468][048]|[3579][26])00))))$|^(?:0?[1-9]|1\d|2[0-8])(\/|-|\.)(?:(?:0?[1-9])|(?:1[0-2]))\4(?:(?:1[6-9]|[2-9]\d)?\d{2})$
```

## 4.3 DD-mmm-YYYY or DD.mmm.YYYY or DD/mmm/YYYY

```
^(?:(?:31(\/|-|\.)(?:0?[13578]|1[02]|(?:Jan|Mar|May|Jul|Aug|Oct|Dec)))\1|(?:(?:29|30)(\/|-|\.)(?:0?[1,3-9]|1[0-2]|(?:Jan|Mar|Apr|May|Jun|Jul|Aug|Sep|Oct|Nov|Dec))\2))(?:(?:1[6-9]|[2-9]\d)?\d{2})$|^(?:29(\/|-|\.)(?:0?2|(?:Feb))\3(?:(?:(?:1[6-9]|[2-9]\d)?(?:0[48]|[2468][048]|[13579][26])|(?:(?:16|[2468][048]|[3579][26])00))))$|^(?:0?[1-9]|1\d|2[0-8])(\/|-|\.)(?:(?:0?[1-9]|(?:Jan|Feb|Mar|Apr|May|Jun|Jul|Aug|Sep))|(?:1[0-2]|(?:Oct|Nov|Dec)))\4(?:(?:1[6-9]|[2-9]\d)?\d{2})$
```

## 5 Phone number

```
^\+?[1-9]\d{1,14}$
```

## 6 Postal code

There is no single regular express could handle all the postal code format around the word, but here is the list for each country(158 regex's in total)

<https://stackoverflow.com/questions/578406/what-is-the-ultimate-postal-code-and-zip-regex/7185241#7185241>


# App Studio - New Application

## 1 High-level understanding of APP Studio

<figure><img src="https://lh6.googleusercontent.com/w9qUnDUR_5SMGNE1_PvMEH7BBMZ4kOZ9IwXIpQsYBn4S-J-OTPf18KejnefdMTJ2mPonnsNyqXQ6mPJSNur6hDEgBxeXP0iZryub3LnNQQpLhmHS5R6wfom8EOzv7S5r2afudohW4ma_6hPkSZZFasw" alt=""><figcaption></figcaption></figure>

## 2 Login the system

Normally, if you are on the service machine, you could use 127.0.0.1:8010, but if the system bind with external ip address, then you could access the system by use: ip:8010

Default sysadmin administrator username: admin, password: 123456, please reminder to change the password once you login the system

<figure><img src="https://lh4.googleusercontent.com/Iz7Bv_cwgWeQJX-4I_Wqjce-q_spHqdkir7_pQ7CMMuriopcxGZqGclG1YVPSz6M2RirR3cJtvzMfL3x6D25cpxYjOFxj0UoQGmyNYKe2ge79Je7BJj3IkvIqPxsR0Ac7KQyXMdzuBrZchX5B8N1Uxs" alt=""><figcaption></figcaption></figure>

## 3 from the menu, select App Studio

<figure><img src="https://lh6.googleusercontent.com/4MhDiWQo76kXlAd7n7WfQ0CFy7ZmaM0po0_6q5Y8_seCExOvGZitvELj3yaetKqK7jaFF6497BjKPeGb3jLeNJBF7xa-NnPINR68QJiBFQmnEAabAudTIPCK3Hrdwmv6mquIW_1_JTLfSGjX7lVExk4" alt=""><figcaption></figcaption></figure>

## 4 Two options to create new applications

1. New Application - Create a new application from scratch
2. Import application - if you have any existing application or an application from testing environment, you could import into system directly

<figure><img src="https://lh3.googleusercontent.com/KRl_T4iDdf02SPgF_-fm2EScdk9k9cONwODQCNC-lZnCRs2aV1QztsFuriwCP0ZGuTJsiXXn6uSgFltU7hjElkQb6YvfkUuFWhPCIcrVkBXVzPMIv-U6GFkPc1s1DrNygr1ASxanDEo-8lpUWi9MtuQ" alt=""><figcaption></figcaption></figure>

\ <br>


# 1 New application - Customer Management

## 1 Click “New Application”&#x20;

to create a new application, and fill in basic information accordingly

<figure><img src="https://lh5.googleusercontent.com/gU59LpdD59UhfYC8w8GeFjvYEq22uvben1WB5p4mwdCew3bXX5EB4YzdlKYoxqrt-dyAYfD-SODiI2JTOHWJhzJYMNtJ4ln92YlGmjZt1CLh66R1Nxdw2FCWzn4H4Ats66EbYKcrQfirbi0lSgrTipE" alt=""><figcaption></figcaption></figure>

## 2 A new application “CRM” will be created like below

<figure><img src="https://lh6.googleusercontent.com/5fiL9PSz-e2Le52Kl9PGzDZyXvVNiKwmAHqztXTzEVYO-wDBbpLGAESHYwHzBx7gEO1zK_YRIB2Bn0fIV_rIsjXtS082-3sYRPewqZnMHXhMGuaECVSshi-cfw_SrbHmQ2Hh06PLU8aOAyjxejnMsCY" alt=""><figcaption></figcaption></figure>

## 3 Click the CRM application, to start create some modules and approval flow in system

<figure><img src="https://lh5.googleusercontent.com/moIp6_c13KEaZ74BlxGyqqoqCV6Y_UZP4wbAfkV3ihd1qdMMDTrS3c7aA4Ll-FjX8Cj92QU0_71YMehKtpe5o6NbRQb3og_5IHGAO9puV5WjUUH0xWM-G3cf01hi--RFqaUTbhrA-duVkM0z4U1BPnA" alt=""><figcaption></figcaption></figure>

## 4 Like we need a master table for customer information, so we should choose Module to create a module - “Customers”, and fill in basic information, choose blank, then you could design the customer fields

<figure><img src="https://lh4.googleusercontent.com/QEvUVGUKQRGjk6r1LFAJBub72d9uHXgVrYatrDt_bh_-Qpo9DN9QznaW17c-EG9yCKn_MqpzKwYr7Zdiqa3W_1pOLcugmALk-aEeT7FhASu-f6QQhOwBIhsCTwGQAXQ2UzLAQGj6DcmSaKhtjC1VLio" alt=""><figcaption></figcaption></figure>

## 5 You will have an designer page to create customer basic information

1. On the left side, which are common used control
2. On top, there are list of operation for this module
3. On the right side, you could edit the form field properties

<figure><img src="https://lh5.googleusercontent.com/hzJ_OWKBEQhCxyWycq2ig-5MxDk0HlnNa-SYHm9whvmKs_Mr7FHWvQ5_TtiZRCX172rt7G8X8q5X29gVSF-nqmksvpVre_lvlxzPctvirmkIA4iSr7Mg2i8uUU4bagXqW9M3nsEgG0vUYZxAyoJGiZo" alt=""><figcaption></figcaption></figure>

## 6 Based on requirement, create a customer information master table, include basic information and a repeat table for contact person

<figure><img src="https://lh3.googleusercontent.com/4Ps_27hNKU18gQfNluZK2iAosaBdpFQglK317Cdp3l2h6_poNR6-n5tXewnSYk5TEOfcYxAtWariiGr75ypdzc8B3Ov_MyrTKOmUaGqjZofg7cQ3GpPDSL1mmVjy86_5BIWW7qh6i_aUyU8k4Uw4ws0" alt=""><figcaption></figcaption></figure>

## 7 Preview the customer information directly (Web mode and Mobile mode)

<figure><img src="https://lh6.googleusercontent.com/j4D3S_W2KcQJd0IgYByAEfCFUjn_59Xtd6KomtOhqTKvb4YNSUiVDgdrmKi6FvmAJZkaBeTDOC3Wuno72U3AcIEtT1xiPAXij2sE5aFBlfbKAcQeS4fP17zLOD0NdGccgDpk7V0PKzt2XooUaiPmSbQ" alt=""><figcaption></figcaption></figure>

## 8 Base on current customer information, create a customer list report, which is a summary report for all customers

<figure><img src="https://lh4.googleusercontent.com/Ivzy-bvHQ14m80Pjmx97grpryEyWv-7w4QTxNXBm0yeQ1ghs1AlUsuMDOeDraRHYH2P4q4WA5kf4jjVtiBbxzA8OP7UGDH-yjzZPd_eABd7p3bVg-FKf7-kVE90iGVMHiqxdo6P_vB4pV_i1uP5Sft4" alt=""><figcaption></figcaption></figure>

## 9 Add some statistic here, like total customer, base on different status…

<figure><img src="https://lh5.googleusercontent.com/rx7IHA4hjxmoJDy9O5ywFofs6j6ra0J4r4taRZX0cFJTnlXLJXnfb6RlFleE83CWa5pQH9l369Qr3RsGujOvF5ReoiwCYXAvrCt1W6OuGd8oqjQ7PKhEvIOwt14lMSHukuJf18uLCwesXU34LcP3ta8" alt=""><figcaption></figcaption></figure>

## 10 Data verification help to valid the data before submission

<figure><img src="https://lh6.googleusercontent.com/_djdHB0OgZAG03r95kpwX_6jHJrFXGEgJRaAP-Izp479vdejZ3YJMOWwBfB-1rP2pOTrs3BhOcNwVU5BvwkmpG88KXgCvx3s4flFLWUfoQUaV0tTBzPogevSk0MqwuldeRGE9PTOw6Q4XJUj7XIb5PI" alt=""><figcaption></figcaption></figure>

## 11 If you data need collect from external or public, you could use the share link to collect data from public

<figure><img src="https://lh4.googleusercontent.com/mMcsYFGb-sxYuJh6jPMjQMS_YbX5GPyx90hVIyCTB2VHOMuEvgEihMgqomCpV3cVUu3qAmGTZiSBTSx4Z2AYaYbveHjLNeD0-H6-OiBqEWXDQBvbrUNSz9J2nyKBjGbChXyQTwnUph3Yazk-g9OItsQ" alt=""><figcaption></figcaption></figure>

## 12 Preview your customer information module

<figure><img src="https://lh3.googleusercontent.com/1SrC8oy5m2TIHKZFms1Pexuh4fuV-qlXL7ZlsqT3Ac0E6MAhWC_D96My1_K2lISZwKg28CiQnJ3eGApoqDs78kRVcXaqhD9qLNn_cyY5iPPQ2EbtyBCRqNyJf1xvWG4Jjz4eAwZREGkMg7cWi8flZOs" alt=""><figcaption><p>Click preview to view application lively</p></figcaption></figure>

<figure><img src="https://lh3.googleusercontent.com/S2bhyjiTR9b2sdCZCNGIOR3LoQ2AcOJq00OGUaY31Dniz3tOGTObBwnRRIHe06N7K7qXiQYkhgAtSieGs0jttrMMgjdr5MEoWvz-NPPWyEvIBpMdg_9Z_TWOTJ7_Lw0HZYL2UWeP_vGB8n-KBM9M4vY" alt=""><figcaption><p>Add new customer information </p></figcaption></figure>

<figure><img src="https://lh6.googleusercontent.com/Nn9xZGC8XjeWmaM2ofGoy6TupJVpCqV0RGwMTm6-gWS3mlriOJJTjOV4qamQIEjAsgVoPgqI_oRUyYLiZc-oyAtZCHbRpdTmGwAtw5uTA0PrB2Ydsy2RqA4kfinu_fmJM7KhZYJMEreqIUF3bJz0Z5I" alt=""><figcaption><p>Summary customer list report</p></figcaption></figure>

\ <br>


# 2 Approval flow

Before record the customer information, we could set up an approval flow for manager and director to approval it.

## 1 Back to Customer Application centre to create a new workflow

<figure><img src="https://lh5.googleusercontent.com/D7S2RJyTUAycXZyRcxaBMynB7-MV1nq_5PqiiEJ2d7AiakIB3ZXgkAAsxt_158JYFG5kKRsLri---MHwS-K4U7g3XM5DIXjFsem0_6oGlk99NYjwDYcvTMXLm3zpoKG6983KWivsoaPD_YBwnMLvjUk" alt=""><figcaption></figcaption></figure>

## 2 Create a new workflow form which similar with previous customer information

<figure><img src="https://lh4.googleusercontent.com/QTwcX8sdNYoM4oo5jQzmG48yxDyMntwuBkgd-oPcQf_H_2v69WJGIvqzIP6qxTbnuSQrWiCNftarR43M3NRLvPmoTf2hWdalea-IiGvs6yVsslt-aUcAwNY1TNSjvi2MfDQ7QTFrxl2y8i65fmPdpoA" alt=""><figcaption></figcaption></figure>

## 3 Design approval flow/workflow for this new customer creation

<figure><img src="https://lh6.googleusercontent.com/UGm7LxSIdGGK0LBSbfAr7QTTmtAGbYfQzi8SuPu48INYW5msEloYeVFvb36kmM6_yn__b3yyAj_BanPZRjzhy0jzkgbkTUnN_W7V_WbjEHfG8mxkf8QVNc8fbnfOvZjIlWdD68vOivUsi6xxnq0OceI" alt=""><figcaption></figcaption></figure>

## 4 Create node for each approver or role

<figure><img src="https://lh5.googleusercontent.com/eHfCbkULa98BuBroIH6mJhordmjbJLQow5Z44JQCQo5SWedNXpSQkrOhEuvUdcDRfESQ4ML4efSWDImPu_U8FmaBp4Dhhjh6TYo_Y2IzQiJSS-_3EogKLqZilX7fK-0QjdUcUIJ7_ELhFBK9DLJ3HfU" alt=""><figcaption></figcaption></figure>

There are 3 different mode to create workflow

<mark style="background-color:green;">Summary mode</mark>

<figure><img src="https://lh6.googleusercontent.com/V0quKVVyCUU4n0FmXdWEmNDnYt3_Ap5LoENmeAYXG5IbomscsgksbKwc_aNYkYBYbPD_tu4cLNvnBp1kdTZiKZSKTHLdvHlNJTprQKoUJ_JpzGRj_oDOGGg7XdmVoXfoPwJsdZTeGIAjK8OESkhAc5A" alt=""><figcaption></figcaption></figure>

<mark style="background-color:green;">List mode</mark>

<figure><img src="https://lh5.googleusercontent.com/qZ-LMLOqwn6utkL7ES4YRU0kl7zjlkblpTh9JYY_96RlAlGsHDBY-0l_aUHY_SWX6bGDZUV1gfq3qSJViaD8qeUdHkVML3aXAWXCZe_RZ5eZseCufsDQ1ze6tMHU8OC-GuBmjORg7kTCaXOvDvMH_Zw" alt=""><figcaption></figcaption></figure>

<mark style="background-color:green;">Flow chart mode</mark> - More visualised to view the approval flow

<figure><img src="https://lh3.googleusercontent.com/t-P4rjK5sI6P7w0z14uSmB5RGPZMrH6vJQ-uolIDFAH9hMyT_yR5F-yQbt_pSBWO0fML7oll4q-awteLKqmBXNKNjnoe7GI7vzlqptDN-zvSZWcugZLXKmtdhavPJqhaypoqQkcMLWkbXF4LW7bqmzE" alt=""><figcaption></figcaption></figure>

## 5 How to post data from workflow to module, Outsend data is used to update data from workflow to module

<figure><img src="https://lh5.googleusercontent.com/PovePAC21SCH-Ejzqr3bLvyoRcRC0DUjHzl8SnAqzJEtnec6xTDmXmSi7hYT5Rr9yshHEYBlGclUwYDeXBPjOAoUa7NVGJ5Kpjp_noraAxqCOLzBgi9z24tPgownYzyfQBoIeiE7TfN7vZeUSFkXkbM" alt=""><figcaption></figcaption></figure>

## 6 Set up field relationship

<figure><img src="https://lh6.googleusercontent.com/yrK9QzSgvqMasPccH_W31MnBQGKi8_ALJcuhBpwd1V1MrHhHfsgf5Qb_oyKM6wcv2D8dtH4g_KGJQzC42qtgDN_Yrx0H2WhNl-qAbhlPa4dinuAX2CSZ1lkMCYhaL0wGCA9-Ewz0Co835a9tmqP8qIM" alt=""><figcaption></figcaption></figure>

## 7 Set up field properties(Edit, non-edit, required)

<figure><img src="https://lh6.googleusercontent.com/BMabHG37ZAeoTx3kT1UotnbgpA1Pox9BmH0ivRmi6KBWUbw8rM5bjoswQQy2ETLzdE8sjNJqeChHReVbNHI3_IuE7l8D6SfwenZM7Wsc3KwrKYmdCscH1yEoWfHQVYFJfWj_oa8NN-BmRYfu_SFY-4s" alt=""><figcaption></figcaption></figure>

## 8 DEMO

### 8.1 Fill in a new customer request form

<figure><img src="https://lh5.googleusercontent.com/hiv1ifImxbmDLfO0dU4vBjO6IWmsxZbRp_TqayHp9IZkcgD9SgoyJeOu16MfFYxA-T0VpQN5jnF5R4g-wm4Tx_5yERTy_ApmfNx3I8hcWJVy1LiYe5Ku5g2sRrjZc9N5pLqvJOGSV3w-V0FGmtu3eag" alt=""><figcaption></figcaption></figure>

<figure><img src="https://lh4.googleusercontent.com/71MxaTkHodBPfSkgJAyl6RMNC1Z5SlaecOBb_oNdlVEUpY3Eg3PV409b3hjqwYeeUMFJahTXexVa9zww-jkoLNNLPyIOoFpvk4kCnRIRgs9YYcvD0WnPDY7FqZtYf8s3wqRcLMosjQUq3hWzb8ejuGE" alt=""><figcaption></figcaption></figure>

### 8.2 After approval submitted, go back to check the customer master, a new record will created

<figure><img src="https://lh6.googleusercontent.com/08l9Eq5o9D9gu-LbO7SIMeacrJBZkP0BlR6hFK3W7jFYoguisTVqGNW4utklEwcNgCDUlLCwO1AOfBCr9UqfjowbGTLhzdsZO7wyKU1rbLBIl1XIze-vgbDPY5PTAcgUrVarqhRHBJJlVXKQsBZcFDA" alt=""><figcaption></figcaption></figure>

\ <br>


# 3 User Menu

Once your application created, create a menu for end user to access from menu

## 1 Click the button “Configure Menu”

<figure><img src="https://lh5.googleusercontent.com/SS8lsPY-_UOE4A1TDpV4AcZj5kPq-5ErMgnoHnt3O7Wfz0nfRLXeilukFMMCYIP8-x-E2HVCSOGYhMvpIlyUGEDOX9mQEZrBm1ISx0XaTvx7uNmdbIq5YaSliwJjfKLpGacsEnQNkuq8T-cfgXS1rN8" alt=""><figcaption></figcaption></figure>

<figure><img src="https://lh6.googleusercontent.com/fr6ccbqa88z2gjBmGCWgLEuvolWEEj2aPUa51o_-mE4_w6JdPhudvFAJl72JjSI7YSljtddwItCVoKMgaPceUO9BCTomItH_aOb8yuHuUiwN-uHzM952l-n93nnuw8-rB8-PQrevBEDkT8qLFJQTuIU" alt=""><figcaption></figcaption></figure>

## 2 Add sub menu to new customer approval and customer master

<figure><img src="https://lh6.googleusercontent.com/HdBQ8KABhGd7u1VmIqyT-g1OLtADxLPwpm5ss58qgiWF2876B40_XX-OOdM68I8DyRUdmYa0SDtZk5UwIgBDsi7hXN9YUCplHexrXQZb3ues65sZLmgA0AwgTbWuwQJxVuEKuazcC6_pA2fpp6R7BpI" alt=""><figcaption></figcaption></figure>

## 3 A new application appear, if you set correctly, but can not see the menu, please log out the system and then login.

<figure><img src="https://lh6.googleusercontent.com/_GSJtZB0mlIQP6LwyF5lAXjPwc-m134_PWgXbqg_k3SyH92z2tSRFKCXh8K-5GoQsD6Dlrk6V-fakBP9vhUAptd9P-KU1m8K1M4IMnKhX-Ow0vVvekt2Zn5FOpB_omIpbSmPtiL6wXLUv8DNIaCv-ww" alt=""><figcaption></figcaption></figure>

## 4 Then you can start to use the new CRM functions

<figure><img src="https://lh4.googleusercontent.com/1yir1A0Vr-KOSHlzgghEO5940-UCs56XMG4Aq6mhme9A7gcii03xOD5UhPbSNI7qziXKsVbSQbvE6Q_qffdF5nJcbfS4JkkdGcrEB4gY-RsJy5EWEgjFd2PQ02S7dMvksZ0kG64tDrw-j5JkIC_0p50" alt=""><figcaption></figcaption></figure>

\ <br>


# 4 All the controls

## 1 Layout

### 1.1 Horizontal, all the control drag into this layout will be display in a horizontal direction, like image show below

<figure><img src="https://lh3.googleusercontent.com/ze3zJA5FtKhGBhGEaj6kQkyw0qP596tE9nNaape6UxJPIW7Ne6rrDjmnlWnWJaIHU9O8qb1M8cmsjxZPsWGWtWtXQi_pYnjV5wKOmGEmTF4SfDNivgiTVvaeV0bQ_wjzrssubJGhQWNTqvAbPMhzPaw" alt=""><figcaption></figcaption></figure>

### 1.2 Vertical, all the controls drag into this layout will be displayed in a vertical direction, like image show below

<figure><img src="https://lh3.googleusercontent.com/7fk2zgjmXUIOw-pv3GgnkD5VPtrS_ND-tJZcN_cVxqKnWBtCu-Hdpodi7weJLOl_aoLkxlxjeXJQr3VyWbJJeaLA59TMchU1HMUDXyfHa2_DCd4Y2XB1hh6xMotvtOXTrkkvI2JitgtgBgF4ZhaSiAI" alt=""><figcaption></figcaption></figure>

### 1.3 Details table

When create a new form, some information for a request with multiple items, like multiple invoice in a payment request, multiple material items in a purchase requisition request

<figure><img src="https://lh5.googleusercontent.com/21mL9Ny021wWGW5Fjc-Tgn8bOHme2Jtg5xaB5nC0v2LsOCE2zkBgPpMHoflqkEQZTomAscChY_vSjf_TmPkatLSK8BlA04AEOjWAT8riie9oOLJ0-bqmGyhGqVp5-tNhFgh7IOdrXDWL6v5rdaM3FIg" alt=""><figcaption></figcaption></figure>

When preview the result, it will show multiple row for user to input information

<figure><img src="https://lh3.googleusercontent.com/KEwcO7Bct4Z0b664FLB1K2d15-mnXxcCi_Q12ECiaiFGtFJYsQOHaXyjzb0TE5o7WWab9w9rFXuqjI45RfT1tL8e7gmiWw0tXPTGpb6IdH8_JQYVP18FeIcDanCC07Sh5A6It_DuIYa3dqFQZerf0XI" alt=""><figcaption></figcaption></figure>

#### 1.4 Tab layout

Specific to use when user input information fields get 50+, event 100+, to put then on a single page is too hard for user to read and fill in, then base on different category, to put them into different tab

<figure><img src="https://lh3.googleusercontent.com/9DPQpDlYgJ9gTOuQcGNOAcfaMlXDD3gPQFYFpJoA8cTZrphlKhrVo7aRmfpPMyNAtBhMIWdUOnbvH6fYo5zYJKsVpDf4YZoYiZvVYm0DgSsGoL_rVdjTq9lYrcTrJVUQ4oCjYPwpHhS_ARmCd_QRz9s" alt=""><figcaption></figcaption></figure>

### 1.5 Grid layout

For a more complex layout by grid system, you could define different layout by percentage, different columns as well

<figure><img src="https://lh6.googleusercontent.com/MsjrGBZiGAsugfOpd4wKqZUs5OIF5-s_I8PCqR2HxufFivoWAJnwn8qw3Y9sHbufEo5BAaUhe50Jr3EfqsJZyJhK_5fSI6BhEFZL5y5zHg5oJBfr6NIRqFQphF-TpwBLRbhxQLVppfB0HZO9kbT19sw" alt=""><figcaption></figcaption></figure>

## 2 Basic Controls

### 2.1 Textbox

1. Format as text, input free text

<figure><img src="https://lh6.googleusercontent.com/Uge0D6jhX9EXBIJRjnMa5vYG55qQy_MJf_kGqkqNt79RhNItS-bB6tUOGLnf4uSpbGlqLwObqpxfDBZKCsSHrKDlUihRKYCXq_iI2imo90TehF1c70LeT1Pq3fh72B-PgRMtBVmgil_fAwJYRRnYDa0" alt=""><figcaption></figcaption></figure>

2. Number

<figure><img src="https://lh6.googleusercontent.com/9kK-G5DFzodeqzGiNCgYPnJQx7ACV3UUA8Lr22PVkDr8RjYnmV_Zzm8CuB-CSDXTkJpU83H0VnKezVYdzcCvpSr9xe6ZqXia-OcnqqCihGHnKqSfvmHRaOce2IXTCQ2P2Au3wvXGedZWIe5pkbBC-6w" alt=""><figcaption></figcaption></figure>

3. Date

When define the textbox as date, user could view a date picker to choose the date from the pop up directly

<figure><img src="https://lh6.googleusercontent.com/b-N2W2ExkW8P62-TZMh8nHD3RcYFKO98Cf2wBRpiDz6iL0eQ32mX58B6CzHivQVIwnKaxww14tzkTABbK9aqJjfGKEvu2KbA9xCRUQjrTR4Sl73vqoBvL2_6ZagjEYZqXklwt2nkwmybf1xIAYgNISg" alt=""><figcaption></figcaption></figure>

4. Time

When define the textbox as time, user could view a time picker to choose the time from the pop up directly

<figure><img src="https://lh3.googleusercontent.com/GSP9LdiUbPnhqh7-2-J1SBst68t_j6kxRoiM9HWUMc34mqblP2hc_zmlnerSPmYqY4SQKJx_NzTO-knPDfqjgp-sOV9BLPplzbcWkKSCklQzRQ4ApqylK4rvkaluX068GUAlwX2GJZyp-ngV8zjE0eE" alt=""><figcaption></figcaption></figure>

5. Date & time

Select date & time at the same time

<figure><img src="https://lh3.googleusercontent.com/woEAnSr1lyGSTY8E5tcpleK3wHeakfSRuL-c9UKPU1COb-APS3OOPyXj-PrlZ6o7dD1QJzf7ykVd7LK6af_o4yxdr7ExBotqtafB0BNnLBfw3OUyxvLF8Fxo29f0197bT-Y1rg8YYp2c8Fc9cbO2La8" alt=""><figcaption></figcaption></figure>

6. URL

Ensure the user’s input is a url, if the input is not a url, then a error message will how below

<figure><img src="https://lh6.googleusercontent.com/hkgnxnHSAJSB4yNcnrd4pwARvzvXCEa4eohnf88tMS2f6ITCmm99eTS4FJfiOjltS8juojpbYkCtUPsMIyBizgqJnKSZiwTPqJZiylOMuRyvj-N-LhJHlxG8GfUF7atNTUJGj1R2_KiXTKLBKNtoN58" alt=""><figcaption></figcaption></figure>

7. Date & time calculation

<figure><img src="https://lh5.googleusercontent.com/4-GEEBRRmi1XgngiyzmgXrvreLyUcfknDcNf4Dj8eOER2i1IlfHYQcbK3nrQV6ryfvzgnQVQQmRKAy32rgnCj5sTqSKNlUDj5iTLMSsouYWLk6vlkY3Oe-H5ggken_4mMt1NJV2nO8jotGaoaTVHg1E" alt=""><figcaption></figcaption></figure>

With the user guide to calculate the different between two date or time

<figure><img src="https://lh6.googleusercontent.com/6zStts6CM5MJsGTVMhx8iqJ85jsMJgEu6BIoxHnsXz9Cz6Kk6KQlRk3e-Rq8c8A3QOSSVYcJS2g6BcNEHCxTheF8egnhFJQX8ijjnKzZrmOby8R38zUoV_Uu4L8erkPXv5ilD3Na4jE5EG6IYY_6rIA" alt=""><figcaption></figcaption></figure>

Example

<figure><img src="https://lh4.googleusercontent.com/oEYGC4wDxo7U8U5iSzllTH6T6iH3YrWV-v-6-VfALDsJWtDWmLYgKf97gyoUmJs-29-fCzB95MOkKcB1xi_kmkEooug3uTTPAGO1Q0sGUi5P8l3GzlTv8IZTJNqjCn1crXcpaw6rIXAVMa2Qb3Se_p4" alt=""><figcaption></figcaption></figure>

8. Email

Ensure the user’s input is a email address, else will give a error message

<figure><img src="https://lh4.googleusercontent.com/vwtJ0yGQdlTdw2CKKCiU8qbybQsLrTc9Q1IN7LJJpecVctcWjsIHg3te__QBlTgenao7C7wE9ZyzX1heAsfh9lWKcM3mnp5LNA9PAo9UvFohrrPZcAQ9H6kpL2rX4Sfnx68svatx3efo4nozyNGOJOU" alt=""><figcaption></figcaption></figure>

9. Customise

Some text format can not manage by the predefine rules, so you could define your own rules with regular expression, for more information about regular expression, please click [here](https://regex101.com/)

<figure><img src="https://lh6.googleusercontent.com/f1soDi9K91uF7nGL5ulfhjXHZVG7IVzD1DR0HOHYAHg6HDcSlM1NfateQoZ_gyP2EFAs9tJ-o6delK3A-cfjoqbwGYvTQkAjcmb7YEF-RLIFiunJB9ukD2X-wWMNOwskyl-oGilr6ylqD4BGNpg4IYY" alt=""><figcaption></figcaption></figure>

### 2.2 Textarea

<figure><img src="https://lh6.googleusercontent.com/hDlkkv9kLDN97IRkoQS6q8WrC65fRBOOoQpw6Mo4ceL9tcVhhwjgu30r_lMlEu2QdOwysvNnhgFsKT3fydJrZIjpIx_mQJ80bsrQ4cGWqjxgSDOidkhrFuXWUts-tnrXSOoemi0vtRyF_r6nxJA603c" alt=""><figcaption></figcaption></figure>

For use to input multiple line of free text, like a string, use to help user to fill in purchase requisition reason, leave reason, some remarks, etc.

### 2.3 Radio

<figure><img src="https://lh5.googleusercontent.com/atmDdGKm6OOHaN2_WyB0NtjPbt_A76DVjWzrU7_WzPV_Cz0hfUcNIgyQvYXV6_e-hWwFchRgiYkce6K3PPem0okGleD3lSMXvrtAKlf41wN3n5UcrR14X7gbEBoPqCv8a3dxO99UQM597Nq7RQNjsuE" alt=""><figcaption></figcaption></figure>

### 2.4 Checkbox

<figure><img src="https://lh4.googleusercontent.com/y1xbo6qGyvwHhw32b6YUwDB9a89SZKxukoR2sCA1V9Kwq9z8R_k0ZfTPQHoGMwhHoxPzVpXK2yoec2KWPgxnA08Vng6opUWJIameQWTCV8P57efC0A-15HPLG-3eoxRFAM5prRxyuYMbteXVpqSqXZM" alt=""><figcaption></figcaption></figure>

### 2.5 Dropdown

<figure><img src="https://lh3.googleusercontent.com/VZ2u9EczHl9IF96DkcL0TpTnQ1it73XqqbgGwSTuKqnKHQB-FOdI6szw62r6IbW5UIV6zc55frZLziyayvdcdiHt0ykCrG5kKIBbpDYjyZG2ecUyB5tgUInLtG_098dRfQO5RZVm8gr2hmZj8oFZseY" alt=""><figcaption></figcaption></figure>

User define option

<figure><img src="https://lh4.googleusercontent.com/iC0a-rkW-FX6ey4EeRA-dP1DzwFcA8So6caNfQ1nd8kpzw6jE1mBV0NegBWDtgLVs-L8Daz_pc5OABdnz4Z_mwgWL8kTVjj-vH5LA9yEAWaPBxomIFDSGt_30Y5eFSVQ5BkU0bGrrEa2iYQnjnSIHpo" alt=""><figcaption></figcaption></figure>

Connect with system master data

<figure><img src="https://lh3.googleusercontent.com/JrNvxlcEeYplOazWZmf0L01ZptbIUrABvzpuSNqmzGbeT-inLw5DGh7LlEoZLo1kVybazyuD2IY7EsqoCEFPFvdPQRe9WrC9X6oC2HYASSVw8LiDmmeuAyXJU_iGuAR6algTajsVkrZEFLjf7pE6MHA" alt=""><figcaption></figcaption></figure>

Define the dropdown is a single selection or multiple selection

<figure><img src="https://lh3.googleusercontent.com/qHydLkhxl2xPVm-1DaQeYj3HmJNmYPcAG2VA5Qg83sN372kmvi5oLOMtPaaF6frxasDCODi_ebXfUgqVzqYm03e_hFlJ-8F_3ZSJCv2pUKtw-rHeQTda_dL_8OzgcSxzxAF4b3TpHQEwrZ-rFg2ZZwA" alt=""><figcaption></figcaption></figure>

### 2.6 Casecader

For multiple level selection options, like country->State->City->...

<figure><img src="https://lh4.googleusercontent.com/yV0_H-VPS7UJJrchrMbwYIP-JdQeGzBQlhMFZEMlxAhkpShWGBKvE6nGyWoxCDRV2D62nLXknWoDRtkI0BK3xsdj-b6SsLTJce3BvH8mMJhm2qjYV7kSxAdjeKSq6g8t1ic9ZjjV3OdOl-18a7W-tcE" alt=""><figcaption></figcaption></figure>

Preview the options like below

<figure><img src="https://lh3.googleusercontent.com/NAq7ro2Nuvj0UfL9GhJRrknFnyhNVT4TgqmWhNL5M5TRFG61yNrqXHUFJO2KpErNgMY-A8sU-AF6gxu4MpIF4ZA5-rvXKAG3TzV_NdO4Bb9OtM-YFNpBu-iwVCRRm4S8lTlbfZ1rezuGtT5WhoU0bp0" alt=""><figcaption></figcaption></figure>

### 2.7 Links

Support to put some clickable links here for user to click

<figure><img src="https://lh4.googleusercontent.com/BkBiiRyNIf5BW7M-dUWndiN_Cde9GbK1HAhH9CHK69bVHMPcv0fIelusaSDtj_k0i0pgzfUur4PttHwH1KeTa_JM04NLoJcDKrJJ57gqHwtu83PKN867fTlZ48dPbKIoi0z5P3lENKz5vo3tSdRykv4" alt=""><figcaption></figcaption></figure>

### 2.8 Progress

For user easy to update the progress, like project completion rate, etc.

<figure><img src="https://lh6.googleusercontent.com/455RElnrLRKyqEm5atZX8ai1lsGPxJszKm0D9eGQjaryGT-u0gg6THehRbBRdKi_Gg6JUZjULhRojfoE_63Zcj0vWZ4nT-COoHJy868u63t8ShCvv45zRI17HaYfdTe-lBX6y1dYRo_kKi1VWXNcGA8" alt=""><figcaption></figcaption></figure>

Different layout

Circular view

<div align="left"><figure><img src="https://lh4.googleusercontent.com/r7iW9gakimlxGqOVANDf9f1aRNjgB2yDtym6xGpjmIraxL1cBOQkGz45_DUUbgJszHXlmcXvIuBY1QWkKMKdU7-K0F69B9ffJDGtJ2NpEpY-RoUmkGe9da3-SX18hFf7QnMEtZa_WeWGKM17zBgdQ5M" alt="" width="188"><figcaption></figcaption></figure></div>

Display text on top of the bar

<img src="https://lh6.googleusercontent.com/93ISTovGQD24wELREd6EBi43XtIPZPnj1_NZrBM2NSl0DUJWHRSGxqi6Kjgt8HZ3I0wNHZQSvPnr1SPnXnYyvMtZCVb_FA6KbbSxdIv5MQyf8bA-vQCOlDpSy25EgQM3taDP-VcUTgdGInrRVCU-wO4" alt="" data-size="original">

Display text on the right of the bar

![](https://lh3.googleusercontent.com/1TsJCW3Hlzg9C1keCCpRAUPiV5r06u-kcZHjdiUB7vCjSjNzhFU-OUtMB4USnzSacE9W3qzFRKONWEDp1t933Lxxa5xhdYTEL0nJD5UJEZRPqRcagvH2WAK1ICavI8fGrk1Wff8dPjYMZptouD2YwNk)

### 2.9 Rate

<figure><img src="https://lh5.googleusercontent.com/OIOM78m_P6Y4Cnb6wGB9zt5_f1jmoSmLIEUIX4Aks-XkSzQs6PIVcquQRPAGDzL1c3Ov-EOIK6o2GQBX4tLmwBtYn_I2_oIPXHzq_q3zJCU_zC7MAoPSFpkhaNR2d-f2Y13MdLJFlkf1Wd0Zrsg09os" alt=""><figcaption></figcaption></figure>

### 2.10 Maps

Allow user to submit there location form the pc or mobile

<figure><img src="https://lh6.googleusercontent.com/woXw4XRlbSwUmNzeTyVcMbY0Slfu_506pAVG-pES6mgDLWAS4XNIiDwDgQlRwijiHZZxf7Utc8lhceLooFbfLMAzOylS6vyEUKc0K-vdpnCFCjrRf_BBl3Ykf4SEbG3uadXLyXl8w0VOYGwcOcuZcB4" alt=""><figcaption></figcaption></figure>

Before to use the map control, please configure a proper google map api at setting->Map plugin->Google

<figure><img src="https://lh5.googleusercontent.com/D3cH4RrF3fvXDQW7J8nnHhS5JY4LGrftim4Y0hdgzfu-_4byuR9DzsNrn54qrvzppwlu1h_ra3c5UTpwgQuwuNDWrORX2k3bhfb631s-aaTtWqzxu2WuYzOFsOKzi4pGkkxry58XZ9LGS4qvOqo7K3U" alt=""><figcaption></figcaption></figure>

The result is like blow:

<figure><img src="https://lh3.googleusercontent.com/Sx7E3kQOaqdmVRCOaAPxTCX6Xe6As0HgAT4IVi301DVla9rxhSup0x_8eLkeXYSClJX7kIBBckaLa7TwK6VPMqt2gihy4TdtSr-wBVg8Q3hDn0eA1-4-Wmpwpi9B28wf4cOoHYBxX4jhi18MKWQejzI" alt=""><figcaption></figcaption></figure>

### 2.11 Split line

Use a line to split different content, easy for user to view different category information

<figure><img src="https://lh5.googleusercontent.com/zEQ2nhbw8iTpw5Kcn5WiWed7dNYRGvEvtptUgitHhq7A6uS81ZZjLMwnNrr2Qu9enviWPOR4bP8L5MbcRnomSxXiplCD0hscmOLDMGJqoNAKEQJI-rq13JR_wl6kMVcd95oR_KFl99Q2sd-JG4kCnw8" alt=""><figcaption></figcaption></figure>

Adjust the line style on the right

### 2.12 SN

Running number, auto generate document reference no.

<figure><img src="https://lh3.googleusercontent.com/X-8vcIYveuqMZycnS0oHx-vjUcEb6Pt7kCl4GTyX3F9HLQlfLqgwSDgIRmdCN7QJ9IIFnqC7llSODJSu2x_Gypx2CDhfi-9FrFMQjdFqmdKdszViiYHAm4aPmafwdlv0_GgELSZAr8wjoEijEDitVXQ" alt=""><figcaption></figcaption></figure>

Set up number generation rules with below tips.

<figure><img src="https://lh4.googleusercontent.com/Rser3jVZGGfSPqBPKy87t0pDhgAs2WmFAhP9koCLQ6uMFKfKy5E9GB_9dDT-KjzMLrcKBVRKxErZZl2WuxYy1VxZq_qhXPtu77eGLHQmT7I8IzPv4rnjiyRMHp1pbL8LvFTbsvHn0GPlXI-fT1pBGXQ" alt=""><figcaption></figcaption></figure>

\ <br>


# Open API


# 1 Overview

Please follow the following rules and combine the actual environment of OA, assemble the Api to call the complete path and initiate the request.

> Full path example: <http://127.0.0.1:8010/eoffice/server/public/api/open-api/get-token>

## Token Validatiion

`OPTIONS` `{eoffice addreee}eoffice/server/public/{api_url}`

For APIs that require token verification, it is necessary to additionally pass the token verification from the header or pass the parameter through api\_token; for the transfer method, refer to the following header and param parameter passing example.

#### Headers

| Name                                            | Type   | Description                                                                                                                                  |
| ----------------------------------------------- | ------ | -------------------------------------------------------------------------------------------------------------------------------------------- |
| Authorization<mark style="color:red;">\*</mark> | String | Pass the api\_token, which is the unique token for accessing the api, and splice 'Bearer' in front of the api\_token as shown in the example |

#### Request Body

| Name       | Type   | Description                          |
| ---------- | ------ | ------------------------------------ |
| api\_token | String | A unique token for accessing the api |

## Get token

<mark style="color:green;">`POST`</mark> `api/open-api/get-token`

In the \[Integration ] \[Open Platform] menu, create a new application, enter the application details through the edit button, and obtain the AgentId and Secret of this application as the input parameters of this interface;

The token returned by this route is a required parameter for subsequent route requests.

#### Request Body

| Name                                        | Type   | Description                                                                                                                                                                                                                              |
| ------------------------------------------- | ------ | ---------------------------------------------------------------------------------------------------------------------------------------------------------------------------------------------------------------------------------------- |
| agent\_id<mark style="color:red;">\*</mark> | string | The value of the AgentId field on an application details page in the open platform menu                                                                                                                                                  |
| secret<mark style="color:red;">\*</mark>    | string | In the open platform menu, on an application details page, the value of the Secret field                                                                                                                                                 |
| user<mark style="color:red;">\*</mark>      | string | User identity information identification basis; according to the "user identification field" configured by an application, a dynamic value is passed in, associated with the OA user, and a token corresponding to the user is generated |
| local                                       | string | Multilingual encoding; please pass in the internationalization management module, the encoding of the effective language pack in the language pack list                                                                                  |

{% tabs %}
{% tab title="200: OK " %}
{% tabs %}
{% tab title="Parameter" %}

| Field                       | Type   | Description                                                                   |
| --------------------------- | ------ | ----------------------------------------------------------------------------- |
| user                        | string | User ID                                                                       |
| refresh\_token              | string | refresh\_token                                                                |
| token                       | string | Authentication token for accessing the api                                    |
| expired\_in                 | string | The valid time of the verification token for accessing the API (unit: second) |
| refresh\_token\_expired\_in | string | refresh\_token valid time (unit: second)                                      |
| {% endtab %}                |        |                                                                               |

{% tab title="Example" %}

```json
{
    "status": 1,
    "data": {
        "token": "7d4bd6736c8f29b70126c9e5984c7239bcd51fdd031e...",
        "user": "admin",
        "refresh_token": "6d53dbb78499978d6c840ecfaf70b19864f14a...",
        "expired_in": 3600,
        "refresh_token_expired_in": 7200
    },
    "runtime": "0.245"
}
```

{% endtab %}
{% endtabs %}
{% endtab %}
{% endtabs %}

## List API

<mark style="color:blue;">`GET`</mark> `{api_list_url}`

The common parameters that need to be passed by the list API are as follows param.

#### Request Body

| Name      | Type  | Description                                                                     |
| --------- | ----- | ------------------------------------------------------------------------------- |
| PAGE      | int   | The number of pages to be paginated (when page is passed 0, it means no paging) |
| limit     | int   | Items per page                                                                  |
| order\_by | array | sort arry                                                                       |

{% tabs %}
{% tab title="200: OK Paging" %}
{% tabs %}
{% tab title="Return result(Paging)" %}

```json
{
 "total":10,
 "list":[
     {"user_id":"admin","user_name":"Sysadmin", ...},
     {"user_id":"admin1","user_name":"Syadmin1", ...},
     ...
 ]
}
```

{% endtab %}

{% tab title="Return result(No paging)" %}

```json
[
     {"user_id":"admin","user_name":"Sysadmin", ...},
     {"user_id":"admin1","user_name":"Sysadmin1", ...},
     ...
 ]
```

{% endtab %}
{% endtabs %}
{% endtab %}
{% endtabs %}

## Request to return public section GET

<mark style="color:blue;">`GET`</mark> `{api_url}`

{% tabs %}
{% tab title="200: OK success" %}
{% tabs %}
{% tab title="result" %}

| Field        | Type   | Description           |
| ------------ | ------ | --------------------- |
| status       | int    | return success status |
| data         | Object | return value          |
| {% endtab %} |        |                       |

{% tab title="Successful (with value)" %}

```json
{
 "status":1,//successful status
 "data":{
     ...
 }//return value
}
```

{% endtab %}

{% tab title="Successful (w/o valye)" %}

```json
{
    "status": 1
}
```

{% endtab %}
{% endtabs %}
{% endtab %}

{% tab title="400: Bad Request Bad request" %}
{% tabs %}
{% tab title="Result" %}

| Name         | Type  | Description            |
| ------------ | ----- | ---------------------- |
| status       | int   | return failure status  |
| errors       | array | return failure message |
| {% endtab %} |       |                        |

{% tab title="Failure return(with error message" %}

```json
{
  "status":0,//failure status
  "errors":[
     {
         "code": "0x003024",//error code
         "message": "该用户未开启动态令牌验证"//error message
     }
  ]
}
```

{% endtab %}

{% tab title="Failure return(w/o error message)" %}

```json
{
  "status":0,//Failure status
}
```

{% endtab %}
{% endtabs %}
{% endtab %}
{% endtabs %}

## Custom Query Criteria

<mark style="color:blue;">`GET`</mark> `{api_url}`

#### Headers

| Name   | Type | Description                                                                                                                                                                                                                                                                                               |
| ------ | ---- | --------------------------------------------------------------------------------------------------------------------------------------------------------------------------------------------------------------------------------------------------------------------------------------------------------- |
| search | json | <p>Query conditions, custom fields Freely configure query conditions according to the form modeling field list</p><p></p><p>{ "search": { "field\_1": \[ 1, "=" ], "field\_2": \[ \[ 1, 2 ], "in" ], "field\_3": \[ "name", "like" ], "field\_4": \[ \[ "2020-01-01", "2020-12-30" ], "between" ] } }</p> |

## pass in refresh\_token to refresh the token

<mark style="color:green;">`POST`</mark> `api/open-api/refresh-token`

#### Request Body

| Name                                             | Type   | Description                                            |
| ------------------------------------------------ | ------ | ------------------------------------------------------ |
| token<mark style="color:red;">\*</mark>          | string | Authentication token for accessing the api             |
| refresh\_token<mark style="color:red;">\*</mark> | string | Get the refresh\_token returned by the token interface |

{% tabs %}
{% tab title="200: OK " %}
{% tabs %}
{% tab title="Result" %}

| Field        | Type   | Description                                                                   |
| ------------ | ------ | ----------------------------------------------------------------------------- |
| token        | string | Authentication token for accessing the api                                    |
| expired\_in  | string | The valid time of the verification token for accessing the API (unit: second) |
| {% endtab %} |        |                                                                               |

{% tab title="Successful return value" %}

```json
{
    "status": 1,
    "data": {
        "token": "5925324b80604039d394c1451abff4ccd0eb4fd400de...",
        "expired_in": 3600
    },
    "runtime": "0.245"
}
```

{% endtab %}
{% endtabs %}
{% endtab %}
{% endtabs %}

## Get the user information corresponding to the token and refresh the token

<mark style="color:blue;">`GET`</mark> `api/auth/login-info/refresh`

#### Request Body

| Name                                    | Type   | Description                                                                                                                                              |
| --------------------------------------- | ------ | -------------------------------------------------------------------------------------------------------------------------------------------------------- |
| token<mark style="color:red;">\*</mark> | string | Authentication token for accessing the api                                                                                                               |
| refresh\_new\_token                     | string | By default, only the user information corresponding to the current token is returned; if "true" is passed in, a new token will be generated and returned |

{% tabs %}
{% tab title="200: OK " %}
{% tabs %}
{% tab title="Result" %}

| Field         | Type   | Description                                                                                                                            |
| ------------- | ------ | -------------------------------------------------------------------------------------------------------------------------------------- |
| current\_user | string | User information corresponding to the current token                                                                                    |
| token         | string | If the refresh parameter is passed in, the new token is returned here, otherwise, the original token is returned with a refresh\_token |

* <br>

{% endtab %}

{% tab title="Example" %}

```json
{
  "status": 1,
  "data": {
      "current_user": {
          "user_id": "admin", // User ID
          "user_name": "System Admin", // username
          "user_accounts": "admin", // user system account
          "dept_id": 2, // Department ID
          "dept_name": "IT Department", // Department Name
          "phone_number": "15601931531", // Mobile
          ...
      },
      ...
      "token": "5f3a3be8d1e89f5d97c2f0f3d917dfb3dd916a424057...",
      "refresh_token": true
  },
  "runtime": "0.750"
}
```

{% endtab %}
{% endtabs %}
{% endtab %}
{% endtabs %}


# 2 Attachment

## Get a list of attachments

<mark style="color:green;">`POST`</mark> `api/attachment/list`

#### Request Body

| Name        | Type  | Description              |
| ----------- | ----- | ------------------------ |
| attach\_ids | array | Attachment ID Collection |

{% tabs %}
{% tab title="200: OK " %}
{% tabs %}
{% tab title="Result" %}

{% endtab %}

{% tab title="Example" %}

```json
{
 "status": 1,
 "data": [
[
'id' => 1600, //Primary id
'attachment_id' => '61bb77aa7c4eb8e3bb8b20c0ac72ab1e', //attachmetn id
'attachment_name' => '图20160314105710.png', //Attachment name
'affect_attachment_name' => '9a28e37c0a9bae896ea2fa9bce07fe1c.png', //Attachment system name, avoid user copy from server
'attachment_relative_path' => '2018/05/31/61bb77aa7c4eb8e3bb8b20c0ac72ab1e/', //Attachment path
'attachment_type' => 'png', //Attachment type
'attachment_mark' => 1, //Attachment mark
'category' => 1, //Attachment category
'relation_table' => "document_content", //Related table
'thumb_attachment_name' => "data:image/png;base64,iVBORw0K.....==", //Attachment Thumbnail
'attachment_size' => 2250, //Size
'attachment_time' => "2018-05-31 16:40:30", //Upload time
'attachment_path' => "attachment\index\61bb77aa7c4eb8e3bb8b20c0ac72ab1e", //Download path
],
......
]
}
```

{% endtab %}
{% endtabs %}
{% endtab %}

{% tab title="400: Bad Request " %}
{% tabs %}
{% tab title="Result" %}

{% endtab %}

{% tab title="Example" %}

```json
{
    "status": 0,
    "errors": [
        {
            "code": "0x000003",
            "message": "未知错误"
        }
    ]
}
```

{% endtab %}
{% endtabs %}
{% endtab %}
{% endtabs %}

| Name   | Type    | Description                  |
| ------ | ------- | ---------------------------- |
| status | boolean | (0) Access failed            |
| errors | array   | Access failure error message |

| Field  | Type    | Description              |
| ------ | ------- | ------------------------ |
| status | boolean | (1) Access is successful |
| data   | array   | back to attachment       |

## Attachment Upload

<mark style="color:blue;">`GET`</mark> `api/attachment/upload`

#### Request Body

| Name              | Type   | Description                                                                                                                   |
| ----------------- | ------ | ----------------------------------------------------------------------------------------------------------------------------- |
| name              | string | File name If this value is passed in, use this value as the file name, otherwise generate a name based on the uploaded file   |
| Filedata          | file   | The value of the file upload name is fixed as Filedata, and the uploaded file information is $\_FILES\['Filedata']            |
| attachment\_table | string | Association table name, optional, if this value is passed in, this attachment will be associated with the corresponding table |
| chunks            | int    | The number of all uploaded slices                                                                                             |
| chunk             | int    | The index of the currently uploaded slice, starting from 0                                                                    |

{% tabs %}
{% tab title="200: OK " %}
{% tabs %}
{% tab title="Result" %}

{% endtab %}

{% tab title="Example" %}

```json
{
 "status": 1,
 "data": {
     "attachment_id": "61bb77aa7c4eb8e3bb8b20c0ac72ab1e", //attachment id
     "attachment_name": "图20160314105710.png"  //file name
  }
}
```

{% endtab %}
{% endtabs %}
{% endtab %}

{% tab title="400: Bad Request " %}
{% tabs %}
{% tab title="Result" %}

{% endtab %}

{% tab title="Example" %}

```json
{
    "status": 0,
    "errors": [
        {
            "code": "0x000003",
            "message": "未知错误"
        }
    ]
}
```

{% endtab %}
{% endtabs %}
{% endtab %}
{% endtabs %}

| Name   | Type    | Description                  |
| ------ | ------- | ---------------------------- |
| status | boolean | (0) Access failed            |
| errors | array   | Access failure error message |

| Field  | Type    | Description                        |
| ------ | ------- | ---------------------------------- |
| status | boolean | (1) uploaded successfully          |
| data   | array   | Returns the attachment id and name |

## Get Attachments

<mark style="color:blue;">`GET`</mark> `api/attachment/index/{attachmentId}`

#### Path Parameters

| Name           | Type   | Description                  |
| -------------- | ------ | ---------------------------- |
| encrypt        | string | Fixed value: 0               |
| attachment\_id | string | Attachment ID                |
| operate        | string | The fixed value is: download |

{% tabs %}
{% tab title="200: OK " %}
{% tabs %}
{% tab title="Result" %}

{% endtab %}
{% endtabs %}
{% endtab %}

{% tab title="400: Bad Request " %}
{% tabs %}
{% tab title="Result" %}

{% endtab %}

{% tab title="Example" %}

```json
{
    "status": 0,
    "errors": [
        {
            "code": "0x011017",
            "message": "文件不存在"
        }
    ]
}
```

{% endtab %}
{% endtabs %}
{% endtab %}
{% endtabs %}

| Name   | Type    | Description                  |
| ------ | ------- | ---------------------------- |
| status | boolean | (0) Access failed            |
| errors | array   | Access failure error message |

| Field      | Type     | Description              |
| ---------- | -------- | ------------------------ |
| status     | boolean  | (1) Access is successful |
| attachment | resource | back to attachment       |


# 3 User Management

## get user list

<mark style="color:blue;">`GET`</mark> `api/user/users`

<mark style="background-color:blue;">Parameter Example</mark>

`{ autoFixPage: 1 limit: 10 order_by: {"list_number":"desc"} page: 2 search: {"user_name":["System","like"],"phone_number":["123123","like"]} }`

#### Request Body

| Name        | Type | Description              |
| ----------- | ---- | ------------------------ |
| autoFixPage | int  | start page               |
| search      | json | Query conditions         |
| page        | int  | page number              |
| order\_by   | json | sort                     |
| limit       | int  | display records per page |

{% tabs %}
{% tab title="200: OK " %}
{% tabs %}
{% tab title="Result" %}

{% endtab %}

{% tab title="Example" %}

```json
{
     "status": 1,
     "data": {
         "total": 669, // Total users
         "list": [ // User list
             {
                 "user_id": "admin", // User ID non-admin user start with WV
                 "user_accounts": "admin", // Username
                 "user_name": "System admin", // Real name
                 "user_name_py": "xitongguanliyuan",
                 "user_name_zm": "xtgly",
                 "user_job_number": "2058", // Personal no.
                 "list_number": null, // Series no.
                 "user_position": 4, // Position ID
                 "user_has_many_role": [
                     {
                         "user_id": "admin",
                         "role_id": 1,
                         "created_at": "2018-05-11 16:13:17",
                         "updated_at": "2018-05-11 16:13:17",
                         "deleted_at": null,
                         "has_one_role": {
                             "role_id": 1,
                             "role_name": "OA Admin", // User Admin, if user with multiple roles, then user_has_many_role get multiple roles
                             "role_no": 0,
                             "role_name_py": "OAguanliyuan",
                             "role_name_zm": "OAgly",
                             "created_at": "2015-11-18 05:21:37",
                             "updated_at": "2017-03-05 15:35:54",
                             "deleted_at": null
                         }
                     }
                 ],
                 "user_has_one_info": {
                     "user_id": "admin",
                     "sex": "1", // Gender 1-Male 0-Female
                     "birthday": "0000-00-00", // Birth date
                     "dept_phone_number": "", // Department Tel.
                     "faxes": "", // Fax
                     "home_address": "", // Home address
                     "home_zip_code": "", // Postal code
                     "home_phone_number": "", //Home tel
                     "phone_number": "", // Mobile
                     "weixin": "", // Wechat
                     "email": "", // email
                     "oicq_no": "", // QQ
                     "msn": "msn", // msn
                     "notes": "",
                     "theme": "theme7",
                     "sms_on": "0",
                     "menu_hide": "2",
                     "avatar_source": "",
                     "avatar_thumb": "",
                     "signature_picture": "",
                     "created_at": "2015-08-25 04:05:45",
                     "updated_at": "2018-05-29 15:53:02",
                     "deleted_at": null
                 },
                 "user_has_one_system_info": {
                     "user_id": "admin",
                     "dept_id": 2, // User department ID
                     "max_role_no": 0,
                     "post_priv": "1",
                     "post_dept": "",
                     "duty_type": 1,
                     "last_login_time": "2018-06-15 14:13:14",
                     "last_pass_time": "2018-04-24 10:54:15",
                     "shortcut": "2,3,57,98,252,5,",
                     "sms_login": "0",
                     "wap_allow": 1,
                     "login_usbkey": "0",
                     "usbkey_pin": "",
                     "user_status": 1, // User status, all user here will be active users
                     "is_autohrms": 1,
                     "created_at": "2015-08-25 04:05:45",
                     "updated_at": "2018-06-15 14:13:14",
                     "deleted_at": null,
                     "user_system_info_belongs_to_department": {
                         "dept_id": 2,
                         "dept_name": "IT Department", // User department
                         "tel_no": "",
                         "fax_no": "",
                         "parent_id": 59,
                         "dept_name_py": "yanfabu",
                         "dept_name_zm": "yfb",
                         "arr_parent_id": "0,59",
                         "has_children": 0,
                         "dept_sort": 1,
                         "deleted_at": null,
                         "created_at": "2015-11-10 11:22:22",
                         "updated_at": "2017-05-16 02:40:34"
                     }
                 },
                 "user_has_one_attendance_scheduling_info": {
                     "scheduling_id": 1,
                     "user_id": "admin"
                 },
                 "user_position_name": "IT Manager" // User's position
             },
         ...
     }
}
```

{% endtab %}
{% endtabs %}
{% endtab %}

{% tab title="400: Bad Request " %}
{% tabs %}
{% tab title="Result" %}

{% endtab %}

{% tab title="Example" %}

```json
{
    "status": 0,
    "errors": [
        {
            "code": "0x000003",
            "message": "未知错误"
        }
    ]
}
```

{% endtab %}
{% endtabs %}
{% endtab %}
{% endtabs %}

| Name   | Type    | Description                  |
| ------ | ------- | ---------------------------- |
| status | boolean | (0) Access failed            |
| errors | array   | Access failure error message |

| Field  | Type    | Description              |
| ------ | ------- | ------------------------ |
| status | boolean | (1) Access is successful |


# Customisation

1\. Workflow outsend data

Sometime, after workflow approved or ended, data need to update to 3rd party system

1. Outsend type -> URL
2. Outsend address -> the php file path

<figure><img src="https://1526800164-files.gitbook.io/~/files/v0/b/gitbook-x-prod.appspot.com/o/spaces%2F50DeL6mO9sNbAZBSEdaN%2Fuploads%2FnW5vTmTKY9thrN5A4rSy%2Fworkflow%20outsend%20data%20via%20url.gif?alt=media&amp;token=a8a551ef-847e-4fb4-8018-78a83dae567b" alt=""><figcaption></figcaption></figure>

1. Reimbursement workflow complete, generate finance voucher in accouting system
2. Leave application completed, update leave days in HR system

Here is an example to outsend data for license generate

```php
<?php
/**
 * Send data to external system demo
 * Outsend data to url address example： http://127.0.0.1:8010/eoffice/server/ext/data_out/data_outsend.php
 * @author Weaver International
 * @Date 06/12/2023
 */

// $_REQUEST Workflow outsend data，the data structure example in POST
/*
{
    // Database table id
    "id": "2",
    // Workflow id, unicode
    "run_id": "2313",
    // Format： DATA_(number)  mean the form control data, DATA_(Number) means control id
    "DATA_1": "Sysadmin",
    "DATA_2": "IT Department",
    "DATA_3": "Meeting title",
    "DATA_4": "",
    "DATA_5": "",
    "DATA_6": "2018-03-15",
    "DATA_7": "00:00",
    "DATA_8": "2018-03-16",
    "DATA_9": "00:00",
    // Control type: user selector, value is user id concat string
    "DATA_10": "WV00000009,WV00000002,WV00000001",
    // DATA_10 Control corresponding user name string, match with user id
    "DATA_10_TEXT": "Mike Tan,Sheily Wong,John David",
    "DATA_14": "Approval",
    // Countersign control, each element is a countersign content
    "DATA_15": [
        {
            // countersign_id
            "countersign_id": "384",
            // Content
            "countersign_content": "<p>Approve</p>",
            // countersign_user_id
            "countersign_user_id": "admin",
            // countersign_user complete information, user_id and username
            "countersign_user": {
                "user_id": "admin",
                "user_name": "System admin"
            },
            // countersign_time
            "countersign_time": "2018-03-15 14:49:33",
            // Workflow id
            "run_id": "2313",
            // Step id
            "process_id": "1",
            // Node id
            "flow_process": "709",
            // countersign_control_id
            "countersign_control_id": "DATA_15"
        }
    ],
    //Workflow name
    "run_name": "cesi-copy-Meeting application(system intetration)(2018-03-15 14:49:33:System admin)",
    // workflow id
    "flow_id": "3131",
    // Form id
    "form_id": "2008",
    // workflow node name
    "process_name": "Meeting application",
    // Current user information
    "userInfo": {
        // user id
        "user_id": "admin",
        // username
        "user_name": "System admin",
        // Account
        "user_accounts": "admin",
        // Department
        "dept_name": "IT Department",
        // Department id
        "dept_id": "25",
        // Role name, if multiple role, split by comma
        "role_name": "[OA Admin,Accounting]",
        // Role id，if multiple role, split by comma
        "role_id": "[1,37]"
    }
}
*/

/**
 * Default method，import laravel related environment, the path is relevant path, adjust base on actual case
 * __DIR__ value example： D:\e-office11\www\eoffice\server\ext\data_out
 * Complete path： D:\e-office11\www\eoffice\server\bootstrap\app.php
 */
require __DIR__ . '/../../bootstrap/app.php';
// Default, import database
use Illuminate\Support\Facades\DB;

// Via $_REQUEST method to get relevant data
$data = (isset($_REQUEST) && !empty($_REQUEST)) ? $_REQUEST : [];
// log file path： D:\e-office11\www\eoffice\server\storage\logs\
$logDir = base_path('/storage/') . 'logs/';
if(empty($data)) {
    // If there is not data, record error message in D:\e-office11\www\eoffice\server\storage\logs\licenseDownQuery_log.txt 
    file_put_contents($logDir."licenseDownQuery_log.txt","Data error, outsend failed",FILE_APPEND);
    exit();
}
// Get outsend data example
// workflow id
$run_id    = isset($data["run_id"]) ? $data["run_id"] : "";
// Workflow current node
$flow_prcs = isset($data["node_id"]) ? $data["node_id"] : "";
// Workflow step id
$prcs_id   = isset($data["process_id"]) ? $data["process_id"] : "";

// Concat parameter base on business requirements
// license identification code, relevant control id DATA_100, other control is the same
$serverCode = isset($data["DATA_100"]) ? $data["DATA_100"] : "";
$serverCode = trim($serverCode);
// Get customer id
$customerId = isset($data["DATA_101"]) ? $data["DATA_101"] : "";
// Based on customer id，get customer information in customer table
$customerInfo = DB::select("select * from customer where customer_id = '".$customerId."'");
$customerInfo = json_decode(json_encode($customerInfo),true);
if(count($customerInfo) && !empty($customerInfo[0])) {
    $customerInfo = $customerInfo[0];
}
// Customer name
$customerName = isset($customerInfo["customer_name"]) ? $customerInfo["customer_name"] : "";
if($customerName == "") {
    // Exception, record error message
    file_put_contents($logDir."licenseDownQuery_log.txt","Customer name is black，outsend faild；workflow id：".$run_id."。",FILE_APPEND);
    exit();
}
// Server name with customer name
$serverName = $customerName;
// license file end date
$expireDate = isset($data["DATA_102"]) ? $data["DATA_102"] : "";
if(!$expireDate || $expireDate == "")
    $expireDate = "2115-05-25";
// Server address
$serverIp = isset($data["DATA_103"]) ? $data["DATA_103"] : "";
// port
$serverPort = isset($data["DATA_104"]) ? $data["DATA_104"] : "";
// Server key word eoffice
$serverKey = "Weaver eoffice";
// license Mobile concurrent uer license
$maxUserOnlineCount = "";
// license user license
$maxUserCount = isset($data["DATA_105"]) ? $data["DATA_105"] : "";
$maxUserCount = trim($maxUserCount);
if(!$maxUserCount || $maxUserCount == "")
    $maxUserCount = "0";
// other parameter
$isuseplate = 0;
// Mobile relevant product
$pluginType = "1";
// Whether control concurrent
$concurrentFlag = "0";
// Client type--iphone,ipad,android,webclient
$clients = "iphone,ipad,android,webclient";
// Module, default value
$modules = "1,2,3,4,5,6,7,8,9,10,11,13";
// generate business logical url
$licenseUrl = "http://127.0.0.1:1000/server/createLicense.do?serverCode=".$serverCode."&serverName=".implode(",",unpack('c*', $serverName))."&customerName=".implode(",",unpack('c*', $customerName))."&expireDate=".$expireDate."&serverIp=".implode(",",unpack('c*', $serverIp))."&serverPort=".implode(",",unpack('c*', $serverPort))."&serverKey=".implode(",",unpack('c*', $serverKey))."&maxUserOnlineCount=".$maxUserOnlineCount."&maxUserCount=".$maxUserCount."&isuseplate=".$isuseplate."&pluginType=".$pluginType."&concurrentFlag=".$concurrentFlag."&clients=".$clients."&modules=".$modules."";
// Write url in log
file_put_contents($logDir."licenseDownQuery_log.txt",$licenseUrl."@*@",FILE_APPEND);
// get data from url, can change to http request
$licenseReturnString = file_get_contents($licenseUrl);
// Return result to log
file_put_contents($logDir."licenseDownQuery_log.txt",$licenseReturnString."@*@",FILE_APPEND);
// Check return result
$licenseReturnArray = explode(";", $licenseReturnString);
if(count($licenseReturnArray) > 0 && $licenseReturnArray[0] == "true") {
    // get licenseId
    $licenseId = $licenseReturnArray[1];
    // Generate feedback
    $feedbackInfo = [
        "content"      => '<a href="http://127.0.0.1/server/getLicense.do?id='.$licenseId.'" style="font-family: Arial; line-height: 12px; white-space: normal;" target="_blank">Succeefully, please click to download license</a>',
        "flow_process" => $flow_prcs,
        "process_id"   => $prcs_id,
        "run_id"       => $run_id,
        "user_id"      => $user_id,
    ];
    // Logs
    file_put_contents($logDir."licenseDownQuery_log.txt",json_encode($feedbackInfo)."\r\n",FILE_APPEND);
    // Call service : FlowService ，inser feedback data
    app('App\EofficeApp\Flow\Services\FlowService')->createFlowFeedbackService($feedbackInfo);
}

?>
```

## 2 Salary item from file

### 2.1 Original Requirements:

Calculate lunch allowance, night shift allowance, and weekend holiday lunch meals.

### 2.2 Requirement details :

1. Monday to Sunday, mid-shift : 16:00 to 0:00, work for 3 consecutive hours, then the allowance is 15 yuan (17:00 to 19:00 is also counted as 15 yuan, because there is a meal time);
2. Monday to weekend, night shift: 0:00 to 8:30, work for 3 consecutive hours, then the subsidy is 20 yuan;
3. weekend, noon: 9:30 to 12:30, work 3 hours, then the subsidy of 20 yuan;
4. production synthesis department shift system, day shift: 8:30 to 20:30 (15 yuan). This if it is Saturday and Sunday overtime (9:30-12:30), lunch 20 yuan is to be given. That is: Monday to Friday day shift: 8:30 to 20:30 ($15), Saturday and Sunday day shift: 8:30 to 20:30 ($15+20=35).

### 2.3 Remarks:

1. overtime clocking problems, cell phone and time machine clocking in and out signing in at the latest time to start counting, signing out at the earliest time to start counting.

### 2.4 Demand analysis:

1. Use the "payroll items from the file", in the two-open file, according to the personnel attendance data, statistics out of the "need for meal allowances / allowances" and return;
2. Calculate the "number of allowances" by the "amount of allowance" using the formula to get the value of the allowance.

### 2.5 Salary item confirmation

<figure><img src="https://1526800164-files.gitbook.io/~/files/v0/b/gitbook-x-prod.appspot.com/o/spaces%2F50DeL6mO9sNbAZBSEdaN%2Fuploads%2Fq2OPdxmpmzPhCXZ4soiK%2FSalary%20items%20coding.gif?alt=media&amp;token=6f293a9d-6661-4390-87d3-7073788186ee" alt=""><figcaption></figcaption></figure>

<table><thead><tr><th width="255">Salary item</th><th width="191">Setting</th><th>Value</th></tr></thead><tbody><tr><td>Weekend  allowance rate</td><td>{Fix value}</td><td>20</td></tr><tr><td>Mid-shift  allowance rate</td><td>{Fix value}</td><td>15</td></tr><tr><td>Night shift  allowance rate</td><td>{Fix value}</td><td>20</td></tr><tr><td>Weekend allowance times</td><td>{From file}</td><td><a href="http://127.0.0.1:8010/eoffice/server/ext/salary/attend.php?type=weekend">http://127.0.0.1:8010/eoffice/server/ext/salary/attend.php?type=weekend</a></td></tr><tr><td>Mid-shift allowance times</td><td>{From file}</td><td><a href="http://127.0.0.1:8010/eoffice/server/ext/salary/attend.php?type=day">http://127.0.0.1:8010/eoffice/server/ext/salary/attend.php?type=day</a></td></tr><tr><td>Night shift allowance times</td><td>{From file}</td><td><a href="http://127.0.0.1:8010/eoffice/server/ext/salary/attend.php?type=night">http://127.0.0.1:8010/eoffice/server/ext/salary/attend.php?type=night</a></td></tr><tr><td>Weekend allowance</td><td>Weekend  allowance rate * Weekend allowance time</td><td></td></tr><tr><td>Mid-shift allowance</td><td>Mid-shift  allowance rate * Mid-shift allowance times</td><td></td></tr><tr><td>Night shift allowance</td><td>Night shift  allowance rate * Night shift allowance times</td><td></td></tr></tbody></table>

```php
<?php
// attend.php
//author: Weaver internationa;
//date: 06/12/2023
class Attendance
{
    private $year;
    private $month;
    private $userId;
    //Department ID
    private $deptId = 2;
    //Statistic type
    private $type;
    private $data = [
        //Weekend
        'weekend' => 0,
        //Day shift
        'day' => 0,
        //Night shift
        'night' => 0
    ];

    private $userRepository;
    private $attendanceRecordsRepository;

    public function __construct()
    {
        $this->userRepository = 'App\EofficeApp\User\Repositories\UserRepository';
        $this->attendanceRecordsRepository = 'App\EofficeApp\Attendance\Repositories\AttendanceRecordsRepository';

        if (!$request = Utils::bindRequest('year', 'month', 'user_id', 'type')) {
            return $this->response();
        }
        list($this->year, $this->month, $this->userId, $this->type) = $request;
    }

    public function run()
    {
        $userDeptId = $this->getUserDeptId();
        if (!$userDeptId) {
            return $this->response();
        }
        list($startDate, $endDate) = Utils::getMonthStartEnd($this->year, $this->month);
        $parsms = ['sign_date' => [[$startDate, $endDate], 'between'], 'user_id' => [$this->userId]];
        $records = app($this->attendanceRecordsRepository)->getRecords($parsms)->toArray();
        if (!$records) {
            return $this->response();
        }
        $dateGroup = array();
        foreach ($records as $record) {
            $signDate = Utils::has($record, 'sign_date');
            $signIn = Utils::has($record, 'sign_in_time');
            $signOut = Utils::has($record, 'sign_out_time');
            if ($signDate && $signIn && $signOut) {
                $dateGroup[$signDate] = [$signIn, $signOut];
            }
        }
        if (!$dateGroup) {
            return $this->response();
        }
        $ruleType = $userDeptId == $this->deptId ? 'dept' : 'common';
        foreach ($dateGroup as $date => $sign) {
            $rules = $this->getRules($date, $ruleType);
            list($signIn, $signOut) = $sign;
            $isWeekEnd = Utils::isWeekEnd($date);
            foreach ($rules as $type => $rule) {
                foreach ($rule as $item) {
                    $needWeekend = $item['weekend'];//Whether for weekend only
                    $hour = $item['hour'];//Allowance hours
                    $time = $item['time']; //Allowance time
                    $secords = Utils::getIntersetTime($signIn, $signOut, $time[0], $time[1]);
                    if ($secords < $hour * 3600) {
                        continue;
                    }
                    if (!$needWeekend || ($needWeekend && $isWeekEnd)) {
                        $this->data[$type]++;
                        break;
                    };
                }
            }
        }
        return $this->response();
    }

    public function response()
    {
        echo $this->data[$this->type] ?? 0;
        exit();
    }


    private function getUserDeptId()
    {
        return app($this->userRepository)->getUserDeptIdAndRoleIdByUserId($this->userId)['dept_id'] ?? null;
    }

    private function getRules($date, $type)
    {
        $nextDate = Utils::getNextDate($date);
        $rules = [
            'common' => [
                'day' => [
                    ['weekend' => false, 'hour' => 3, 'time' => [$date . ' 16:00:00', $nextDate . ' 00:00:00']],
                    ['weekend' => false, 'hour' => 2, 'time' => [$date . ' 17:00:00', $date . ' 19:00:00']]
                ],
                'night' => [
                    ['weekend' => false, 'hour' => 3, 'time' => [$date . ' 00:00:00', $date . ' 08:30:00']]
                ],
                'weekend' => [
                    ['weekend' => true, 'hour' => 3, 'time' => [$date . ' 09:30:00', $date . ' 12:30:00']]
                ]
            ],
            'dept' => [
                'day' => [
                    ['weekend' => false, 'hour' => 12, 'time' => [$date . ' 08:30:00', $date . ' 20:30:00']]
                ],
                'weekend' => [
                    ['weekend' => true, 'hour' => 3, 'time' => [$date . ' 09:30:00', $date . ' 12:30:00']]
                ]
            ]
        ];
        return $rules[$type];
    }
}

class Utils
{
    public static function bindRequest(...$keys)
    {
        $array = array();
        foreach ($keys as $key) {
            if (!$v = static::has($_REQUEST, $key)) {
                return false;
            } else {
                $array[] = $v;
            }
        }
        return $array;
    }

    public static function has($array, $key)
    {
        return (isset($array[$key]) && !empty($array[$key])) ? $array[$key] : false;
    }

    public static function getMonthStartEnd($year, $month)
    {
        $date = $year . '-' . $month . '-01';
        $startDate = date('Y-m-01', strtotime($date));
        $endDate = date('Y-m-t', strtotime($date));
        return [$startDate, $endDate];
    }

    public static function getNextDate($date = false)
    {
        if ($date) {
            return date('Y-m-d', strtotime("+1 day", strtotime($date)));
        }
        return date('Y-m-d', strtotime("+1 day"));
    }

    public static function isWeekEnd($date)
    {
        if ((date('w', strtotime($date)) == 6) || (date('w', strtotime($date)) == 0)) {
            return true;
        } else {
            return false;
        }
    }

    public static function getIntersetTime($start1, $end1, $start2, $end2)
    {
        $intersetTime = 0;
        if ($end2 > $start1 && $start2 < $end1) {
            $beginTime = static::getBigData($start1, $start2);
            $endTime = static::getSmallData($end2, $end1);
            $intersetTime = strtotime($endTime) - strtotime($beginTime);
        }
        return $intersetTime;
    }

    protected static function getSmallData($one, $two)
    {
        return $one < $two ? $one : $two;
    }

    protected static function getBigData($one, $two)
    {
        return $one < $two ? $two : $one;
    }
}

require_once __DIR__ . '/../../bootstrap/app.php';
$attendance = new Attendance();
$attendance->run();
?>

```

## 3 Workflow data verification

<figure><img src="https://1526800164-files.gitbook.io/~/files/v0/b/gitbook-x-prod.appspot.com/o/spaces%2F50DeL6mO9sNbAZBSEdaN%2Fuploads%2FMtgMWuHysmOWivb5NDzK%2Fworkflow%20field%20validation.gif?alt=media&amp;token=c488bfc8-b09b-4a57-871a-634bc601d5e5" alt=""><figcaption></figcaption></figure>

```php
<?php
/**
 * This example is limited to PHP development language, also supports external system interfaces, or interfaces developed in other languages, if you open the data validation file validation and configuration of the current file address, the process flow will run some of the parameters of the process and the form data are passed to the file, through the $_REQUEST can be exported to see all the incoming parameters.
 */
// Framework startup file for the framework of the startup and auto-load configuration, if the entire code logic is not used in the framework of the method, you do not need to introduce this file, the introduction of this file path needs to be adjusted according to the current location of the file stored, if it is in accordance with the current validation of the address of the path stored in the example, according to the example of the relative path can be.
require __DIR__ . '/../../bootstrap/app.php'; 
// If the code needs to operate the database, you can selectively introduce this facade, the specific operation of the database method see Laravel documentation: https://laravelacademy.org/post/22012; if the address is invalid, you can search for Laravel documentation to check.
use Illuminate\Support\Facades\DB; 

/**
 * Data Validation File Validation Address Configuration Example: /eoffice/server/ext/customer_name/data_validate_example.php?check_control_id=DATA_1
 * 1、File Address Path Note: The customer_name in the path is recommended to use the full spelling of the customer's name or abbreviation, or named according to the role of the demand, as far as possible to ensure that the folder name uniqueness, do not conflict with the name of the folder under the ext directory, to avoid subsequent upgrades to the system to cover or delete the folder.
 * 2、File address parameter description: address parameter configuration is optional, check_control_id here to provide an example of parameters, such as the current development of the file need to reuse different processes, different processes need to determine the form control ID or need to query the data table fields are different, you can configure the address parameter configuration passed in to achieve the file reuse.
 */

// Get the parameters configured on the file address
$checkControlId     = $_REQUEST['check_control_id'] ?? 'DATA_1'; // Parameters can be obtained if they are configured on the file address.

// Getting incoming data
$checkControlIdData = $_REQUEST[$checkControlId] ?? ''; // If you configure a parameter on the file address, get the ID of the configured form control or table name, table field, etc., and then use this parameter to get the corresponding data in the incoming parameter.
$checkControlIdData = $_REQUEST['DATA_1'] ?? ''; // Or get process form data directly.

// database operation example
$list = DB::table('xxx')->select('xxx')->where('xxx')->get();

// data process, code here base on real business requirement

// return result example
echo 1;exit; // pass
echo 'true';exit; // pass
echo 'xxx';exit; // Beside 1 and 'true'，Returns all other content for the verification does not pass, if the data verification is not configured to prompt the content of the text, the content returned at this time will be used as a reminder of the information, if the data verification is configured to prompt the text of the configured text prompts.
?>
```


# Expense

### &#x20;<a href="#zipb2" id="zipb2"></a>


# My expenses

My expenses consist of reimbursed and incurred expenses, and users can filter by type as needed by clicking on the drop-down box.

<figure><img src="https://1526800164-files.gitbook.io/~/files/v0/b/gitbook-x-prod.appspot.com/o/spaces%2F50DeL6mO9sNbAZBSEdaN%2Fuploads%2FaiXaRhi6J39GAOzCeTPZ%2Fimage.png?alt=media&amp;token=b38e3c2d-7c8b-453d-a9a5-0f97b3fb99be" alt=""><figcaption></figcaption></figure>

**Remark:**

My reimbursed: Expenses that the current user is the reimburser;&#x20;

My incurred: Current user is the expense beneficiary user of that expenses.

## 1 Overview

### 1.1 View

#### 1.1.1 Table

Click on the reimbursement amount in the table to go to the detailed list.

<figure><img src="https://1526800164-files.gitbook.io/~/files/v0/b/gitbook-x-prod.appspot.com/o/spaces%2F50DeL6mO9sNbAZBSEdaN%2Fuploads%2FMvoMRhiQn0boTjNefeGr%2Fimage.png?alt=media&amp;token=8d3e914d-701f-4a2c-b9c4-5ff40477523e" alt=""><figcaption></figcaption></figure>

Click on the reimbursement amount in the table to go to the detailed list.

<figure><img src="https://1526800164-files.gitbook.io/~/files/v0/b/gitbook-x-prod.appspot.com/o/spaces%2F50DeL6mO9sNbAZBSEdaN%2Fuploads%2FLPqmda2FtppSzbqKlafy%2Fimage.png?alt=media&amp;token=aa295667-49c5-4306-bc81-84992dddd78b" alt=""><figcaption></figcaption></figure>

#### 1.1.2 Chart

Displays reimbursements in a bar chart.

<figure><img src="https://1526800164-files.gitbook.io/~/files/v0/b/gitbook-x-prod.appspot.com/o/spaces%2F50DeL6mO9sNbAZBSEdaN%2Fuploads%2FanvPcLh3aiQTInuy92G8%2Fimage.png?alt=media&amp;token=89a2396b-82b5-4eb2-a40d-97ba1e898a0d" alt=""><figcaption></figcaption></figure>

**Remark:**

* The blue values in the table indicate the reimbursement amount, and clicking on the amount will redirect the user to the corresponding chart.
* The default display of the primary expense category allows you to click on the relevant bar to enter the secondary expense category, and so on.

<figure><img src="https://1526800164-files.gitbook.io/~/files/v0/b/gitbook-x-prod.appspot.com/o/spaces%2F50DeL6mO9sNbAZBSEdaN%2Fuploads%2FDGD06utdF4Rw3u8r3R0F%2Fimage.png?alt=media&amp;token=e31a527b-3efe-4620-aca4-d35e7bd814db" alt=""><figcaption></figcaption></figure>

### 1.2 Filter <a href="#vj0so" id="vj0so"></a>

#### 1.2.1 Primary Filter <a href="#vj0so" id="vj0so"></a>

The first filter level allows the current user to filter the expenses relevant to them for the corresponding year, quarter, or month.

<figure><img src="https://1526800164-files.gitbook.io/~/files/v0/b/gitbook-x-prod.appspot.com/o/spaces%2F50DeL6mO9sNbAZBSEdaN%2Fuploads%2FPVGu8HA5Lna4HTDCIx2J%2Fimage.png?alt=media&amp;token=71c843fd-16cc-4dc6-a3b3-767685550b3a" alt=""><figcaption></figcaption></figure>

#### 1.2.2 Secondary Filter <a href="#y0d77" id="y0d77"></a>

Allows the user to filter data for \[My reimbursed] and \[My incurred] corresponding to the selected period. The user can click on \[X] to clear the conditions.

<figure><img src="https://1526800164-files.gitbook.io/~/files/v0/b/gitbook-x-prod.appspot.com/o/spaces%2F50DeL6mO9sNbAZBSEdaN%2Fuploads%2FRwkB4inb4mdwmSgtLP8r%2Fimage.png?alt=media&amp;token=6022d6db-603e-4acd-84a2-b364f2b85e01" alt=""><figcaption></figcaption></figure>

**Remark:**

* Default displays my reimbursement for the current year.&#x20;
* If the user wants to display all expenses, they may remove the year and reimbursement filters.

#### 1.2.3 Sum primary category

The default sum functionality aggregates values across all categories to show only the overall total. By checking the box, additional rows is added to display the sum for each primary category individually.

<figure><img src="https://1526800164-files.gitbook.io/~/files/v0/b/gitbook-x-prod.appspot.com/o/spaces%2F50DeL6mO9sNbAZBSEdaN%2Fuploads%2FGQdgs4i9fwVqOodZzUCJ%2Fimage.png?alt=media&amp;token=a254b8cb-a740-45ef-be47-acab587a41bb" alt=""><figcaption></figcaption></figure>

### 1.3 Edit

Step 1: Click on the Category/Period's amount to view the details.

<figure><img src="https://1526800164-files.gitbook.io/~/files/v0/b/gitbook-x-prod.appspot.com/o/spaces%2F50DeL6mO9sNbAZBSEdaN%2Fuploads%2FbocYTErAfaoCQn1rJ82a%2Fimage.png?alt=media&amp;token=3e0cfe7f-840d-431e-8610-abde17e314f3" alt=""><figcaption></figcaption></figure>

Step 2: On the left side of the data row, click \[···] for more options, and then click "Edit".

<figure><img src="https://1526800164-files.gitbook.io/~/files/v0/b/gitbook-x-prod.appspot.com/o/spaces%2F50DeL6mO9sNbAZBSEdaN%2Fuploads%2Fr34hKxeV8QXfvdkaR8YY%2Fimage.png?alt=media&amp;token=e9c63651-33fe-417f-859b-97ec87498a19" alt=""><figcaption></figcaption></figure>

Step 3: In the \[Edit expenses] page, modify the reimbursement details, and click "Submit".

<figure><img src="https://1526800164-files.gitbook.io/~/files/v0/b/gitbook-x-prod.appspot.com/o/spaces%2F50DeL6mO9sNbAZBSEdaN%2Fuploads%2FRph2ibP7RjzBzqDCxAO5%2Fimage.png?alt=media&amp;token=de135a97-89af-43b1-be67-1a93ad842f75" alt=""><figcaption></figcaption></figure>

### 1.4 Delete

Step 1: On the desired data row, click more ···, then click "Delete".

<figure><img src="https://1526800164-files.gitbook.io/~/files/v0/b/gitbook-x-prod.appspot.com/o/spaces%2F50DeL6mO9sNbAZBSEdaN%2Fuploads%2FYEHUPZQKQU88JBglAHab%2Fimage.png?alt=media&amp;token=7ab92bd0-dc40-4ead-8b31-f604c5d68940" alt=""><figcaption></figcaption></figure>

Step 2: Click "Confirm" to proceed with the deletion.

<figure><img src="https://1526800164-files.gitbook.io/~/files/v0/b/gitbook-x-prod.appspot.com/o/spaces%2F50DeL6mO9sNbAZBSEdaN%2Fuploads%2FMYY7g7lcHjekDtGyaXfR%2Fimage.png?alt=media&amp;token=6d8c7b4a-0ff7-4a57-96a3-b0024c23a99f" alt="" width="288"><figcaption></figcaption></figure>

### 1.5 Export

Export data in table mode\
Step 1: In the top-right corner of the page, click "Export".

<figure><img src="https://1526800164-files.gitbook.io/~/files/v0/b/gitbook-x-prod.appspot.com/o/spaces%2F50DeL6mO9sNbAZBSEdaN%2Fuploads%2FFNm0env77LlrqTcbRxh3%2Fimage.png?alt=media&amp;token=b96cb5c8-fcaa-43d4-af35-a23c54b95ef0" alt=""><figcaption></figcaption></figure>

The system will automatically generate and download the exported data in Excel format onto the user's device. If the user's browser settings does not allow pop-up, the user can download manually from the **Instant Messenger** (IM).

<figure><img src="https://1526800164-files.gitbook.io/~/files/v0/b/gitbook-x-prod.appspot.com/o/spaces%2F50DeL6mO9sNbAZBSEdaN%2Fuploads%2FrQYaaCeAao1fFhPGWy8X%2Fimage.png?alt=media&amp;token=b5a14469-7ec3-4aeb-997d-06df88e74c22" alt="" width="375"><figcaption></figcaption></figure>

<figure><img src="https://1526800164-files.gitbook.io/~/files/v0/b/gitbook-x-prod.appspot.com/o/spaces%2F50DeL6mO9sNbAZBSEdaN%2Fuploads%2FEwSzft8oXErMhDCThTYH%2Fimage.png?alt=media&amp;token=faff7751-74f1-484f-ba6f-1ca827048168" alt=""><figcaption></figcaption></figure>

**Remark:**

The user can export the desired data by filtering, searching, and applying query conditions before the export.

## 2 Details <a href="#md8kk" id="md8kk"></a>

### 2.1 My reimbursed <a href="#md8kk" id="md8kk"></a>

The current user is the reimburser (person who logged the expenses).

<figure><img src="https://1526800164-files.gitbook.io/~/files/v0/b/gitbook-x-prod.appspot.com/o/spaces%2F50DeL6mO9sNbAZBSEdaN%2Fuploads%2F9H0zYCWynqZ9FUILAwUV%2Fimage.png?alt=media&amp;token=42a43543-63c5-4e4c-97a3-cdaa424f749e" alt=""><figcaption></figcaption></figure>

**Remark:**

If the current user lacks permission to view the beneficiary project, they also cannot view the project's incurred expenses.

#### 2.1.1 View

Users can access all data in the list.

Step 1: Click "View" or on the row directly.

<figure><img src="https://1526800164-files.gitbook.io/~/files/v0/b/gitbook-x-prod.appspot.com/o/spaces%2F50DeL6mO9sNbAZBSEdaN%2Fuploads%2FaZLgIRC0Ui0d3hUbo3tQ%2Fimage.png?alt=media&amp;token=93fbb65e-3862-4cc5-ad2f-b059c3720bd9" alt=""><figcaption></figcaption></figure>

The details will appear on the right side of the page.

<figure><img src="https://1526800164-files.gitbook.io/~/files/v0/b/gitbook-x-prod.appspot.com/o/spaces%2F50DeL6mO9sNbAZBSEdaN%2Fuploads%2FUl8fpJPBELWiTooYUB2H%2Fimage.png?alt=media&amp;token=0a5b4a96-9baa-47b4-8710-03e03848e262" alt=""><figcaption></figcaption></figure>

#### 2.1.2 Edit

Step 1: Go to the end of the desired row, click more ···, and click "Edit".

<figure><img src="https://1526800164-files.gitbook.io/~/files/v0/b/gitbook-x-prod.appspot.com/o/spaces%2F50DeL6mO9sNbAZBSEdaN%2Fuploads%2F2gZ523fY6ryDnVUflGFz%2Fimage.png?alt=media&amp;token=9d546110-f90c-4f11-b59f-4b6b621f6dfc" alt=""><figcaption></figcaption></figure>

Step 2: Make the necessary details and click "Submit" to save the changes.&#x20;

<figure><img src="https://1526800164-files.gitbook.io/~/files/v0/b/gitbook-x-prod.appspot.com/o/spaces%2F50DeL6mO9sNbAZBSEdaN%2Fuploads%2FcOYepO9ajuHYKVQME4mH%2Fimage.png?alt=media&amp;token=fd688d28-a475-46ca-af79-f1ac9cba93ce" alt=""><figcaption></figcaption></figure>

**Remark:**

Data created with workflow cannot be edited.

#### 2.1.3 Delete

Step 1: On the desired data row, click more ···, then click "Delete".

<figure><img src="https://1526800164-files.gitbook.io/~/files/v0/b/gitbook-x-prod.appspot.com/o/spaces%2F50DeL6mO9sNbAZBSEdaN%2Fuploads%2F3IajI19ZjjtVXgCRIkOV%2Fimage.png?alt=media&amp;token=40d909a8-f961-4976-9b84-f21037fe9c43" alt=""><figcaption></figcaption></figure>

Step 2: Click "Confirm" to proceed with the data deletion.

<figure><img src="https://1526800164-files.gitbook.io/~/files/v0/b/gitbook-x-prod.appspot.com/o/spaces%2F50DeL6mO9sNbAZBSEdaN%2Fuploads%2FYlTDwuqWtlkwihNIpfcF%2Fimage.png?alt=media&amp;token=54c0a987-8a83-467d-bf06-1f07cbc23401" alt="" width="295"><figcaption></figcaption></figure>

**Remark:**

* Data created with workflow cannot be deleted.
* Only the system adminstrator can delete all data

#### 2.1.4 Export

Step 1: At the top-right corner of the page, click "Export".

<figure><img src="https://1526800164-files.gitbook.io/~/files/v0/b/gitbook-x-prod.appspot.com/o/spaces%2F50DeL6mO9sNbAZBSEdaN%2Fuploads%2FtLIlavJrsvKpdEKEPbPg%2Fimage.png?alt=media&amp;token=462959db-c679-45e1-9ae1-883b40cb62d4" alt=""><figcaption></figcaption></figure>

The system will automatically generate and download the exported data in Excel format onto the user's device. If the user's browser settings does not allow pop-up, the user can download manually from the **Instant Messenger** (IM).

**Remark:**

The user can export the desired data by filtering, searching, and applying query conditions before the export.

#### **2.1.5 Filter/Search**

#### 2.1.5.1 Filtering

The filter function allows users to refine or narrow down the data list based on the selected criteria.

Click on "More filters" to view more filtering options available.

<figure><img src="https://1526800164-files.gitbook.io/~/files/v0/b/gitbook-x-prod.appspot.com/o/spaces%2F50DeL6mO9sNbAZBSEdaN%2Fuploads%2FwgKGEgw49jIB7hlaxRdL%2Fimage.png?alt=media&amp;token=f5ce3758-8ab2-4e92-8c3f-857ea10bab09" alt=""><figcaption></figcaption></figure>

**Remark:**

* Beneficiary: Project (If the current user does not have the access to Project module then this option will not be displayed.)
* The list displays data corresponding to the totals linked in the table. For example, clicking on a category total will show the reimbursement details for that category.

#### 2.1.5.2 Search

The user can search reimbursement details based on reasons that match or are similar to the text entered in the search box or using the \[Advance Query] to create complex searches or filters by specifying detailed conditions and criteria.

<figure><img src="https://1526800164-files.gitbook.io/~/files/v0/b/gitbook-x-prod.appspot.com/o/spaces%2F50DeL6mO9sNbAZBSEdaN%2Fuploads%2FIZnaoqPb2AOmSiNNaHxL%2Fimage.png?alt=media&amp;token=a9e21e70-0a77-4d5d-a95e-7514ab276f33" alt=""><figcaption></figcaption></figure>

### 2.2 My incurred <a href="#wwmsy" id="wwmsy"></a>

Where the current user is the expense beneficiary

<figure><img src="https://1526800164-files.gitbook.io/~/files/v0/b/gitbook-x-prod.appspot.com/o/spaces%2F50DeL6mO9sNbAZBSEdaN%2Fuploads%2F7XmNlPioVLXcfN1vmc98%2Fimage.png?alt=media&amp;token=5da4c1c2-e19b-48df-8d88-2adf3e785991" alt=""><figcaption></figcaption></figure>

<figure><img src="https://1526800164-files.gitbook.io/~/files/v0/b/gitbook-x-prod.appspot.com/o/spaces%2F50DeL6mO9sNbAZBSEdaN%2Fuploads%2FVNz1RVRpFNkFiJc8Cd6A%2Fimage.png?alt=media&amp;token=adc09199-f794-4342-9ef1-b56137715a0a" alt=""><figcaption></figcaption></figure>

#### **2.2.1 View**

Users can access all data in the list.

Step 1: Click "View" or on the row directly and the details will appear on the right side of the page.

<figure><img src="https://1526800164-files.gitbook.io/~/files/v0/b/gitbook-x-prod.appspot.com/o/spaces%2F50DeL6mO9sNbAZBSEdaN%2Fuploads%2FU1u3OUmOGnJyEzd3xLTi%2Fimage.png?alt=media&amp;token=9286dfc5-8a9c-4e22-aeba-7a8b7c0952f2" alt=""><figcaption></figcaption></figure>

#### **2.2.2 Edit**

At the end of the desired row, click more ···, and click "Edit".

<figure><img src="https://1526800164-files.gitbook.io/~/files/v0/b/gitbook-x-prod.appspot.com/o/spaces%2F50DeL6mO9sNbAZBSEdaN%2Fuploads%2FZNcE8Pjhl9mgXOWaRJBn%2Fimage.png?alt=media&amp;token=fa4289c3-ae18-426c-8a24-46566ed28244" alt=""><figcaption></figcaption></figure>

#### **2.2.3 Delete**

At the end of the desired row, click more ···, and click delete to remove this data.

<figure><img src="https://1526800164-files.gitbook.io/~/files/v0/b/gitbook-x-prod.appspot.com/o/spaces%2F50DeL6mO9sNbAZBSEdaN%2Fuploads%2FIbTWtdt5J2XD28SWjkSs%2Fimage.png?alt=media&amp;token=e117a95b-ff08-4c68-8255-094f94945b18" alt=""><figcaption></figcaption></figure>

**Remark:**

* Delete button is displayed according to the reimburser's permissions.
* Only data that the reimburser has delete permission and that was not generated with the workflow can be deleted.
* Data that are generated with workflow can be deleted.

#### **2.2.4 Export**

Step 1: In the top-right corner of the page, click "Export".

<figure><img src="https://1526800164-files.gitbook.io/~/files/v0/b/gitbook-x-prod.appspot.com/o/spaces%2F50DeL6mO9sNbAZBSEdaN%2Fuploads%2FEmM2byNJQ0rLMqodiMME%2Fimage.png?alt=media&amp;token=4bae1ab9-70a3-4dee-b65c-1fcd0027ff3d" alt=""><figcaption></figcaption></figure>

The system will automatically generate and download the exported data in Excel format onto the user's device. If the user's browser settings does not allow pop-up, the user can download manually from the **Instant Messenger** (IM).

**Remark:**

The user can export the desired data by filtering, searching, and applying query conditions before the export.

#### 2.2.5 Filtering/Searching

**2.2.5.1 Filtering**&#x20;

The filter function allows users to refine or narrow down the data list based on the selected criteria. Click on "More filters" to view more filtering options available.

<figure><img src="https://1526800164-files.gitbook.io/~/files/v0/b/gitbook-x-prod.appspot.com/o/spaces%2F50DeL6mO9sNbAZBSEdaN%2Fuploads%2F7lVKswuuR6eTkRsTN6VO%2Fimage.png?alt=media&amp;token=223f5b58-1bd0-4104-b2df-77553947a713" alt=""><figcaption></figcaption></figure>

2.2.5.2 Search&#x20;

The user can search reimbursement details based on reasons that match or are similar to the text entered in the search box or using the \[Advance Query] to create complex searches or filters by specifying detailed conditions and criteria.

<figure><img src="https://1526800164-files.gitbook.io/~/files/v0/b/gitbook-x-prod.appspot.com/o/spaces%2F50DeL6mO9sNbAZBSEdaN%2Fuploads%2FHQLyJJD548761k0DChYY%2Fimage.png?alt=media&amp;token=8f59bb49-e54b-435f-a258-22f56519bb11" alt=""><figcaption></figcaption></figure>


# Expense List

Statistic for the current user to track the reimbursement data within their permission scope.

## 1 Overview

Expense list consist of reimbursed and incurred expenses, and users can filter by type as needed by clicking on the drop-down box.

<figure><img src="https://1526800164-files.gitbook.io/~/files/v0/b/gitbook-x-prod.appspot.com/o/spaces%2F50DeL6mO9sNbAZBSEdaN%2Fuploads%2F6N1shDHiNBBSBW4DUyMw%2Fimage.png?alt=media&amp;token=dd353877-09f9-45b4-aa00-488fda128a56" alt=""><figcaption></figcaption></figure>

My reimbursed: Expenses that the current user is the reimburser;

My incurred: Current user is the expense beneficiary user of that expenses.

### 1.1 View

#### 1.1.1 Table

This is the default view of Expense list, the data is displayed according to the \[Reimburser]'s permission scope in Settings-Permission.

<figure><img src="https://1526800164-files.gitbook.io/~/files/v0/b/gitbook-x-prod.appspot.com/o/spaces%2F50DeL6mO9sNbAZBSEdaN%2Fuploads%2Fk6a2Tx2UNtOW8UuXmTpk%2Fimage.png?alt=media&amp;token=e4d06e5d-598f-4352-af4f-4992a96202ea" alt=""><figcaption></figcaption></figure>

Click on the reimbursement amount in the table to go to the detailed list.

<figure><img src="https://1526800164-files.gitbook.io/~/files/v0/b/gitbook-x-prod.appspot.com/o/spaces%2F50DeL6mO9sNbAZBSEdaN%2Fuploads%2FK2rwzKKYybfnsu5OKzzj%2Fimage.png?alt=media&amp;token=32ed4010-69d7-4223-ba96-ec8a5169498e" alt=""><figcaption></figcaption></figure>

#### 1.1.2 Chart

Displays reimbursements in a bar chart.

<figure><img src="https://1526800164-files.gitbook.io/~/files/v0/b/gitbook-x-prod.appspot.com/o/spaces%2F50DeL6mO9sNbAZBSEdaN%2Fuploads%2FrCpUJU0Mw6JvVhBhMnyc%2Fimage.png?alt=media&amp;token=efbfd66f-48f1-410e-bd1d-b0a94eeb8ac1" alt=""><figcaption></figcaption></figure>

**Remark:**

* The bar in the table indicate the reimbursement amount, and clicking on the amount will redirect the user to the corresponding chart.
* The default display of the primary expense category allows you to click on the relevant bar to enter the secondary expense category, and so on.

<figure><img src="https://1526800164-files.gitbook.io/~/files/v0/b/gitbook-x-prod.appspot.com/o/spaces%2F50DeL6mO9sNbAZBSEdaN%2Fuploads%2FaFTnhsi9r3mWp6LGp5YV%2Fimage.png?alt=media&amp;token=e032e4e0-fae0-44ab-b220-0c748e1d9bfc" alt=""><figcaption></figcaption></figure>

### 1.2 Filter

**1.2.1 Primary Filter**

The first filter level allows the current user to filter the expenses relevant to them for the corresponding year, quarter, or month.

<figure><img src="https://1526800164-files.gitbook.io/~/files/v0/b/gitbook-x-prod.appspot.com/o/spaces%2F50DeL6mO9sNbAZBSEdaN%2Fuploads%2FE0cRLa6Am0aTNtkUQszt%2Fimage.png?alt=media&amp;token=c3fbbbfb-3a4d-4366-a593-1dd1daca6720" alt=""><figcaption></figcaption></figure>

**1.2.2 Secondary Filter**

Allows the user to filter data for \[By reimburser] and \[By exoense beneficiary] corresponding to the selected period. The user can click on \[X] to clear the conditions.

<figure><img src="https://1526800164-files.gitbook.io/~/files/v0/b/gitbook-x-prod.appspot.com/o/spaces%2F50DeL6mO9sNbAZBSEdaN%2Fuploads%2FMn19K5tEXzbYvA30Qn6h%2Fimage.png?alt=media&amp;token=179a14cb-f4e5-4587-8493-0540c10043fe" alt=""><figcaption></figcaption></figure>

#### 1.2.3 Sum primary category

The default sum functionality aggregates values across all categories to show only the overall total. By checking the box, additional rows is added to display the sum for each primary category individually.

<figure><img src="https://1526800164-files.gitbook.io/~/files/v0/b/gitbook-x-prod.appspot.com/o/spaces%2F50DeL6mO9sNbAZBSEdaN%2Fuploads%2FPwpane6PnJtlpVryVCnP%2Fimage.png?alt=media&amp;token=781037be-4036-4dff-b1e0-76007e2c7231" alt=""><figcaption></figcaption></figure>

### 1.3  Edit Expense

Step 1: Click on the Category/Period's amount to view the details.

<figure><img src="https://1526800164-files.gitbook.io/~/files/v0/b/gitbook-x-prod.appspot.com/o/spaces%2F50DeL6mO9sNbAZBSEdaN%2Fuploads%2FBqlNcxrI5HD5PBUyqULw%2Fimage.png?alt=media&amp;token=956c4f55-cfaa-4508-95ca-df76020c0e33" alt=""><figcaption></figcaption></figure>

Step 2: On the left side of the data row, click \[···] for more options, and then click "Edit".

<figure><img src="https://1526800164-files.gitbook.io/~/files/v0/b/gitbook-x-prod.appspot.com/o/spaces%2F50DeL6mO9sNbAZBSEdaN%2Fuploads%2FJt6bVN8tvpQDHL7DeqjW%2Fimage.png?alt=media&amp;token=3c91159c-18a1-4850-9ab6-84bf0c48b537" alt=""><figcaption></figcaption></figure>

Step 3: In the \[Edit expenses] page, modify the reimbursement details, and click "Submit".

<figure><img src="https://1526800164-files.gitbook.io/~/files/v0/b/gitbook-x-prod.appspot.com/o/spaces%2F50DeL6mO9sNbAZBSEdaN%2Fuploads%2FXluIj7rCJV7TAYBa9zpR%2Fimage.png?alt=media&amp;token=74f32cc2-9f3b-4604-a643-27f9f657cbe6" alt=""><figcaption></figcaption></figure>

### 1.4 Delete Expense

Step 1: On the desired data row, click more ···, then click "Delete".

<figure><img src="https://1526800164-files.gitbook.io/~/files/v0/b/gitbook-x-prod.appspot.com/o/spaces%2F50DeL6mO9sNbAZBSEdaN%2Fuploads%2Faupfk5eXEwmLrnva3oqJ%2Fimage.png?alt=media&amp;token=6946085f-d02b-4e3d-a6c6-c05562e8f183" alt=""><figcaption></figcaption></figure>

Step 2: Click "Confirm" to proceed with the deletion.

<figure><img src="https://1526800164-files.gitbook.io/~/files/v0/b/gitbook-x-prod.appspot.com/o/spaces%2F50DeL6mO9sNbAZBSEdaN%2Fuploads%2Fanfe1l1N6ryTVMs0Tq6L%2Fimage.png?alt=media&amp;token=dfbc6afc-70ff-4bf2-8e6a-744f0e8b0985" alt="" width="288"><figcaption></figcaption></figure>

### 1.5 Export&#x20;

Step 1: In the top-right corner of the page, click "Export".

<figure><img src="https://1526800164-files.gitbook.io/~/files/v0/b/gitbook-x-prod.appspot.com/o/spaces%2F50DeL6mO9sNbAZBSEdaN%2Fuploads%2FbWM4io8Jb5UZURiO7fJM%2Fimage.png?alt=media&amp;token=81e0f5da-2a58-4f72-931a-4efaf6cb94f5" alt=""><figcaption></figcaption></figure>

The system will automatically generate and download the exported data in Excel format onto the user's device. If the user's browser settings does not allow pop-up, the user can download manually from the **Instant Messenger** (IM).

<figure><img src="https://1526800164-files.gitbook.io/~/files/v0/b/gitbook-x-prod.appspot.com/o/spaces%2F50DeL6mO9sNbAZBSEdaN%2Fuploads%2FH8NUBl6AGSi61H71EyjU%2Fimage.png?alt=media&amp;token=5c9c6d6c-e1c8-4618-8b8c-e9e44e97b31b" alt="" width="375"><figcaption></figcaption></figure>

<figure><img src="https://1526800164-files.gitbook.io/~/files/v0/b/gitbook-x-prod.appspot.com/o/spaces%2F50DeL6mO9sNbAZBSEdaN%2Fuploads%2Fhj9BBLOp6L3sQd1BJftU%2Fimage.png?alt=media&amp;token=8187b5d4-5972-460a-9639-b611c2f5408b" alt=""><figcaption></figcaption></figure>

**Remark:**

* Data can only be exported in table mode.

## 2 Details

### 2.1 By reimburser

The list displays the corresponding data based on the data clicked by the user, they can view the data they created or access other reimbursers based on their permissions.

<figure><img src="https://1526800164-files.gitbook.io/~/files/v0/b/gitbook-x-prod.appspot.com/o/spaces%2F50DeL6mO9sNbAZBSEdaN%2Fuploads%2Fmvfq3yDdRmTNTstT5eqm%2Fimage.png?alt=media&amp;token=5105e4eb-14c3-4eb0-83b2-4df7a2866970" alt=""><figcaption></figcaption></figure>

**Remark:**

* If the current user does not have the access to Project module, they will not be able to view project related expenses.

#### 2.1.1 View

Users can access all data in the list.

Step 1: Click "View" or click on the row directly.

<figure><img src="https://1526800164-files.gitbook.io/~/files/v0/b/gitbook-x-prod.appspot.com/o/spaces%2F50DeL6mO9sNbAZBSEdaN%2Fuploads%2FpzzkpQi8vY2megm35fa7%2Fimage.png?alt=media&amp;token=46e6f6c2-9f75-4b38-abb8-120bce58153d" alt=""><figcaption></figcaption></figure>

The details will appear on the right side of the page.

<figure><img src="https://1526800164-files.gitbook.io/~/files/v0/b/gitbook-x-prod.appspot.com/o/spaces%2F50DeL6mO9sNbAZBSEdaN%2Fuploads%2FXhwUGePA59f6mZDomZbz%2Fimage.png?alt=media&amp;token=64546b2c-9b39-41c3-8ca1-901b7b87bbe7" alt=""><figcaption></figcaption></figure>

#### 2.1.2 Edit

Step 1: Go to the end of the desired row, click more ···, and click "Edit".

<figure><img src="https://1526800164-files.gitbook.io/~/files/v0/b/gitbook-x-prod.appspot.com/o/spaces%2F50DeL6mO9sNbAZBSEdaN%2Fuploads%2FZmJcawgkFa41d7Cd4MTE%2Fimage.png?alt=media&amp;token=9b8c22d8-9d5f-4d75-a138-88e1ee65e1a7" alt=""><figcaption></figcaption></figure>

Step 2: Make the necessary details and click "Submit" to save the changes.

<figure><img src="https://1526800164-files.gitbook.io/~/files/v0/b/gitbook-x-prod.appspot.com/o/spaces%2F50DeL6mO9sNbAZBSEdaN%2Fuploads%2FzmfKMgaaWhKzfkAdU3G0%2Fimage.png?alt=media&amp;token=57bbe15b-8595-4e92-8c6b-9ff71ec9a5dc" alt=""><figcaption></figcaption></figure>

**Remark:**

Data created with workflow cannot be edited.

#### 2.1.3 Delete

Step 1: On the desired data row, click more ···, then click "Delete".

<figure><img src="https://1526800164-files.gitbook.io/~/files/v0/b/gitbook-x-prod.appspot.com/o/spaces%2F50DeL6mO9sNbAZBSEdaN%2Fuploads%2F7DrsvSn7dlwg07l8ypHE%2Fimage.png?alt=media&amp;token=55ee967d-e52d-45bf-bded-d235a444690a" alt=""><figcaption></figcaption></figure>

Step 2: Click "Confirm" to proceed with the data deletion.

<figure><img src="https://1526800164-files.gitbook.io/~/files/v0/b/gitbook-x-prod.appspot.com/o/spaces%2F50DeL6mO9sNbAZBSEdaN%2Fuploads%2FqjvQKWEvKNkZvaX56xao%2Fimage.png?alt=media&amp;token=922a307d-d82a-4692-ad34-86bb981c257a" alt="" width="259"><figcaption></figcaption></figure>

**Remark:**

* Data created with workflow cannot be deleted.
* Only the system adminstrator can delete all data

#### 2.1.4 Export

Step 1: In the top-right corner of the page, click "Export".

<figure><img src="https://1526800164-files.gitbook.io/~/files/v0/b/gitbook-x-prod.appspot.com/o/spaces%2F50DeL6mO9sNbAZBSEdaN%2Fuploads%2F7HtuIXu78SikfwbnWlvK%2Fimage.png?alt=media&amp;token=0610ba41-40b8-4c41-bfc1-2c0d450e13eb" alt=""><figcaption></figcaption></figure>

The system will automatically generate and download the exported data in Excel format onto the user's device. If the user's browser settings does not allow pop-up, the user can download manually from the **Instant Messenger** (IM).

<figure><img src="https://1526800164-files.gitbook.io/~/files/v0/b/gitbook-x-prod.appspot.com/o/spaces%2F50DeL6mO9sNbAZBSEdaN%2Fuploads%2FFm5dTyNg11nNsZ1wN5zk%2Fimage.png?alt=media&amp;token=1bc8d51c-2a11-4ce0-ae44-e289875a821d" alt=""><figcaption></figcaption></figure>

#### 2.1.5 Filtering/Searching

**2.1.5.1 Filter**

The filter function allows users to refine or narrow down the data list based on the selected criteria.

Click on "More filters" to view more filtering options available.

<figure><img src="https://1526800164-files.gitbook.io/~/files/v0/b/gitbook-x-prod.appspot.com/o/spaces%2F50DeL6mO9sNbAZBSEdaN%2Fuploads%2FsR2vPVAufecL9r4MllgI%2Fimage.png?alt=media&amp;token=cd2cb1b0-9a10-43ae-9fd3-7323697ef950" alt=""><figcaption></figcaption></figure>

**2.1.5.2 Search**

The user can search reimbursement details based on reimburser or reasons that match or are similar to the text entered in the search box or using the \[Advance Query] to create complex searches or filters by specifying detailed conditions and criteria.

<figure><img src="https://1526800164-files.gitbook.io/~/files/v0/b/gitbook-x-prod.appspot.com/o/spaces%2F50DeL6mO9sNbAZBSEdaN%2Fuploads%2FD2p4AZfW99JS0ymNzSBO%2Fimage.png?alt=media&amp;token=a0fb6d51-dbd2-4f3a-838c-ada4b7717aa4" alt=""><figcaption></figcaption></figure>

### 2.2 By beneficiary

The filtered results are based on the expense beneficiary, while the viewing permission is determined by the reimburser.

#### 2.2.1 View

Users can access all data in the list.

Step 1: On the desired data row, click more ···, then click "View or click on the row directly.

<figure><img src="https://1526800164-files.gitbook.io/~/files/v0/b/gitbook-x-prod.appspot.com/o/spaces%2F50DeL6mO9sNbAZBSEdaN%2Fuploads%2FqTuLBVG3VA4nXbrx28jo%2Fimage.png?alt=media&amp;token=0814db31-bc06-4d5f-b584-2dcde057c6bb" alt=""><figcaption></figcaption></figure>

The details will appear on the right side of the page.

<figure><img src="https://1526800164-files.gitbook.io/~/files/v0/b/gitbook-x-prod.appspot.com/o/spaces%2F50DeL6mO9sNbAZBSEdaN%2Fuploads%2FKh8eEZTYkTzdzlZnywm9%2Fimage.png?alt=media&amp;token=b3d85faa-a345-40c3-8293-d41cc89d78c8" alt=""><figcaption></figcaption></figure>

#### 2.2.2 Edit

Step 1: Go to the end of the desired row, click more ···, and click "Edit".

<figure><img src="https://1526800164-files.gitbook.io/~/files/v0/b/gitbook-x-prod.appspot.com/o/spaces%2F50DeL6mO9sNbAZBSEdaN%2Fuploads%2FRv3NmiSQVlETej2W28xY%2Fimage.png?alt=media&amp;token=5d1b6408-99e4-48ba-bdf4-5707de9618da" alt=""><figcaption></figcaption></figure>

Step 2: Make the necessary details and click "Submit" to save the changes.

<figure><img src="https://1526800164-files.gitbook.io/~/files/v0/b/gitbook-x-prod.appspot.com/o/spaces%2F50DeL6mO9sNbAZBSEdaN%2Fuploads%2FeyAUNfxwaBUiDIdxJgQN%2Fimage.png?alt=media&amp;token=f522ccd4-a2c8-4ebe-ae4c-a6f51d025313" alt=""><figcaption></figcaption></figure>

#### Remark:

* The "Edit" button for each row of data is displayed based on the user's scope of permission.
* Data created with workflow cannot be edited.

#### 2.2.3 Delete

Step 1: On the desired data row, click more ···, then click "Delete".

<figure><img src="https://1526800164-files.gitbook.io/~/files/v0/b/gitbook-x-prod.appspot.com/o/spaces%2F50DeL6mO9sNbAZBSEdaN%2Fuploads%2FrCJdEwey8NeRH3Bb98BO%2Fimage.png?alt=media&amp;token=8e8bad08-428a-4196-ad76-e06bc84c6886" alt=""><figcaption></figcaption></figure>

Step 2: Click "Confirm" to proceed with the data deletion.

<figure><img src="https://1526800164-files.gitbook.io/~/files/v0/b/gitbook-x-prod.appspot.com/o/spaces%2F50DeL6mO9sNbAZBSEdaN%2Fuploads%2FZi8p1wc8xQvABCUaA8jx%2Fimage.png?alt=media&amp;token=ca990c48-21a4-435e-92b0-d09751b21a49" alt="" width="295"><figcaption></figcaption></figure>

**Remark:**

* Data created with workflow cannot be deleted.
* Only the system adminstrator can delete all data

#### 2.2.4 Export

Step 1: At the top-right corner of the page, click "Export".

<figure><img src="https://1526800164-files.gitbook.io/~/files/v0/b/gitbook-x-prod.appspot.com/o/spaces%2F50DeL6mO9sNbAZBSEdaN%2Fuploads%2F5tOGNdqaeQnpQBzyUNOl%2Fimage.png?alt=media&amp;token=62f43f0d-e7bf-4fc1-8d26-6122d6603913" alt=""><figcaption></figcaption></figure>

The system will automatically generate and download the exported data in Excel format onto the user's device. If the user's browser settings does not allow pop-up, the user can download manually from the **Instant Messenger** (IM).

<figure><img src="https://1526800164-files.gitbook.io/~/files/v0/b/gitbook-x-prod.appspot.com/o/spaces%2F50DeL6mO9sNbAZBSEdaN%2Fuploads%2FecsLFKPLsFuN8Nzf8dkb%2Fimage.png?alt=media&amp;token=0e3ab33a-b698-4401-9f84-dbdc4c1318bb" alt="" width="375"><figcaption></figcaption></figure>

<figure><img src="https://1526800164-files.gitbook.io/~/files/v0/b/gitbook-x-prod.appspot.com/o/spaces%2F50DeL6mO9sNbAZBSEdaN%2Fuploads%2FeabsLBIoWw7iRTypBD1l%2Fimage.png?alt=media&amp;token=4b2d8d9a-e838-4dd4-82e5-c2c18cc86d51" alt=""><figcaption></figcaption></figure>

#### 2.2.5 Filtering/Searching

**2.2.5.1 Filter**

The filter function allows users to refine or narrow down the data list based on the selected criteria.

Click on "More filters" to view more filtering options available.

<figure><img src="https://1526800164-files.gitbook.io/~/files/v0/b/gitbook-x-prod.appspot.com/o/spaces%2F50DeL6mO9sNbAZBSEdaN%2Fuploads%2Fqm2b4F9XPRtLXIIU6EBF%2Fimage.png?alt=media&amp;token=8b1d6575-2905-4e7a-bbf1-4c1565806e40" alt=""><figcaption></figcaption></figure>

**2.2.5.2 Search**

The user can search reimbursement details based on reimbursers or reasons that match or are similar to the text entered in the search box or using the \[Advance Query] to create complex searches or filters by specifying detailed conditions and criteria.

<figure><img src="https://1526800164-files.gitbook.io/~/files/v0/b/gitbook-x-prod.appspot.com/o/spaces%2F50DeL6mO9sNbAZBSEdaN%2Fuploads%2FGWZDry3uc8iW4neQAnDb%2Fimage.png?alt=media&amp;token=6661c9ef-3e28-4da8-b759-3f89e50002de" alt=""><figcaption></figcaption></figure>


# Enter expense

Create Expense Entry

Allow users to enter the reimbursement data for users, departments, companies, and projects.

## 1 Single Entry

In the **\[Enter Expense]** menu, fill in the required fields and click **"Submit"** to create a new expense entry. If there are additional expenses to log, the user can click **"Save and Next"** to proceed with the next entry.

<figure><img src="https://1526800164-files.gitbook.io/~/files/v0/b/gitbook-x-prod.appspot.com/o/spaces%2F50DeL6mO9sNbAZBSEdaN%2Fuploads%2Fqu9R17wlpSfVTsxOjeKT%2Fimage.png?alt=media&amp;token=54976cff-6010-46d8-ac98-515938029ad4" alt=""><figcaption></figcaption></figure>

**Field Explanation:**

* Reimburser: The individual making the reimbursement; Defaults as current user, mandatory, can only select one user, and resigned users cannot be selected.
* Budget used: Budget this expense will utilise to deduct from.
* Reason: Justification for the reimbursement.
* Reimbursement Date: Date when the expense was incurred; Defaults to today's date and is mandatory.
* Reimbursement amount: Total amount being reimbursed for this expense.
* Reimbursement category: Indicates the expense category being reimbursed. If categories are hierarchical, only the lowest-level category can be selected.
* Expense beneficiary: Specifies who benefited from the expense; Options can include a department, individual user, company, or project.

## 2 Multi-enter

If there are several entries to be recorded at once, the user can use the **Multi-Enter** function to log several entries simultaneously.

Step 1: Click on the "**Multi enter**" on the top-right side of the page.

<figure><img src="https://1526800164-files.gitbook.io/~/files/v0/b/gitbook-x-prod.appspot.com/o/spaces%2F50DeL6mO9sNbAZBSEdaN%2Fuploads%2FlgdrM9t0HKqPpeq1h70r%2Fimage.png?alt=media&amp;token=f61f2d85-1669-4210-a330-0ca15108607b" alt=""><figcaption></figcaption></figure>

Step 2: Fill in the entries and click on **"Submit"** to create them.

<figure><img src="https://1526800164-files.gitbook.io/~/files/v0/b/gitbook-x-prod.appspot.com/o/spaces%2F50DeL6mO9sNbAZBSEdaN%2Fuploads%2FKF1VrTkfso3VRMIb3wim%2Fimage.png?alt=media&amp;token=7826d7d9-19e4-40e2-9e6d-ffaff985bb62" alt=""><figcaption></figcaption></figure>

**Remark:**&#x20;

The user will still have to fill in the scope of **Expense beneficiary** based on the options selected.

<figure><img src="https://1526800164-files.gitbook.io/~/files/v0/b/gitbook-x-prod.appspot.com/o/spaces%2F50DeL6mO9sNbAZBSEdaN%2Fuploads%2FXNxF17tfwdEDbGrW6MYb%2Fimage.png?alt=media&amp;token=b6c4c3ac-76cf-454e-97fd-61573f4b1294" alt="" width="375"><figcaption></figcaption></figure>

## 3 Import

Step 1: In the top-right corner of the page, click "Import".

Step 2: Export the template by clicking on "Export template"

<figure><img src="https://1526800164-files.gitbook.io/~/files/v0/b/gitbook-x-prod.appspot.com/o/spaces%2F50DeL6mO9sNbAZBSEdaN%2Fuploads%2FIKgYUWbzClWe9tartQVA%2Fimage.png?alt=media&amp;token=830c30bc-6014-4d5d-b49f-453f8c895774" alt=""><figcaption></figcaption></figure>

Step 3: Fill up the Excel template

<figure><img src="https://1526800164-files.gitbook.io/~/files/v0/b/gitbook-x-prod.appspot.com/o/spaces%2F50DeL6mO9sNbAZBSEdaN%2Fuploads%2FiG0NVmEieFCixbVzVEQT%2Fimage.png?alt=media&amp;token=c72b4c96-17f0-4da4-aec6-f20ff8aa2f6d" alt=""><figcaption></figcaption></figure>

Step 4: Select the updated Excel file by double-clicking on the file or click on the file and click "Open".

<figure><img src="https://1526800164-files.gitbook.io/~/files/v0/b/gitbook-x-prod.appspot.com/o/spaces%2F50DeL6mO9sNbAZBSEdaN%2Fuploads%2FTb4He4S8ozFkUgR3n37v%2Fimage.png?alt=media&amp;token=418be201-1053-459a-adf1-c24cf66dff31" alt=""><figcaption></figcaption></figure>

Step 5: Click "Start importing" to begin the import.

<figure><img src="https://1526800164-files.gitbook.io/~/files/v0/b/gitbook-x-prod.appspot.com/o/spaces%2F50DeL6mO9sNbAZBSEdaN%2Fuploads%2F6g4pT29Xt0J7avLknXFQ%2Fimage.png?alt=media&amp;token=9baa1f8f-6f66-407f-bf03-21c23d411d34" alt=""><figcaption></figcaption></figure>

When the import is complete, an Excel file will be generated to inform the user of the import status of all rows.

**Remark:**

* The system will check if the current expense entry will exceed the budget if submitted. Reminder will be prompted and entry may be blocked based the budget settings.


# Budget Statistics

**Purpose:**\
The Budget Statistics function is designed to help users monitor, compare, and manage budgets effectively for improved financial outcomes.

## **1 Overview**

Provides a quick summary of all budgets, offering insights into their utilization and remaining balances. Users can click on a specific budget to view detailed data on the current cycle.&#x20;

<figure><img src="https://1526800164-files.gitbook.io/~/files/v0/b/gitbook-x-prod.appspot.com/o/spaces%2F50DeL6mO9sNbAZBSEdaN%2Fuploads%2F3wn9fMJtmBlxstsXfJI1%2Fimage.png?alt=media&amp;token=29bbaa90-7ed6-4959-95f9-5527a70cf210" alt=""><figcaption></figcaption></figure>

### 1.1 Field Explanation

* **Budget Name**: The name of the budget, helping to distinguish between different budget allocations.
* **Year**: The year in which the budget was allocated.
* **Period**: The timeframe for the budget (Yearly, Quarterly, Monthly, or Custom).
* **Budget Amount**: The total amount allocated for this budget period.
* **Incurred Amount**: The total expenses reported against this budget during the selected period.
* **Remaining**: The leftover amount in the budget after deducting incurred expenses.
* **Used Ratio**: A percentage representing how much of the budget has been utilized, calculated as:

<figure><img src="https://1526800164-files.gitbook.io/~/files/v0/b/gitbook-x-prod.appspot.com/o/spaces%2F50DeL6mO9sNbAZBSEdaN%2Fuploads%2FxAE18RxXVnOr0PkhcRRk%2Fimage.png?alt=media&amp;token=20b0f677-0eb3-4bf6-be41-7a2d2ec09580" alt=""><figcaption></figcaption></figure>

### 1.2 Export

Export the budget statistic overview.&#x20;

Step 1: In the top-right corner of the page, click "Export".

<figure><img src="https://1526800164-files.gitbook.io/~/files/v0/b/gitbook-x-prod.appspot.com/o/spaces%2F50DeL6mO9sNbAZBSEdaN%2Fuploads%2F39AYda0KaICzhKIxfyST%2Fimage.png?alt=media&amp;token=5b1bb287-d043-4393-9aba-586fd03790ec" alt=""><figcaption></figcaption></figure>

The system will automatically generate and download the exported data in Excel onto the user's device.&#x20;

<figure><img src="https://1526800164-files.gitbook.io/~/files/v0/b/gitbook-x-prod.appspot.com/o/spaces%2F50DeL6mO9sNbAZBSEdaN%2Fuploads%2FCV6dFxOljrowKbTlO0bx%2Fimage.png?alt=media&amp;token=0cf5d2a2-9eac-41f9-ac51-0bcab0d8bb4b" alt=""><figcaption></figcaption></figure>

If the user's browser settings does not allow pop-up, the user can download manually from the **Instant Messenger** (IM).

<figure><img src="https://1526800164-files.gitbook.io/~/files/v0/b/gitbook-x-prod.appspot.com/o/spaces%2F50DeL6mO9sNbAZBSEdaN%2Fuploads%2FioGkJRyAApNvpABvgt1U%2Fimage.png?alt=media&amp;token=98114c48-1f61-4982-ad74-233000abe3e9" alt="" width="375"><figcaption></figcaption></figure>

<figure><img src="https://1526800164-files.gitbook.io/~/files/v0/b/gitbook-x-prod.appspot.com/o/spaces%2F50DeL6mO9sNbAZBSEdaN%2Fuploads%2FLMHaE482yW9NwibEYnPB%2Fimage.png?alt=media&amp;token=f44d08cd-e297-4f10-960e-311182f5785e" alt=""><figcaption></figcaption></figure>

## 2 Details

### 2.1 **Current Cycle**

**Purpose:** Provides detailed information about the expenses recorded within the current active budgeting period.

#### 1.1.1 View

Step 1: Go to the end of the desired row, click more ···, then click on "Current cycle".

<figure><img src="https://1526800164-files.gitbook.io/~/files/v0/b/gitbook-x-prod.appspot.com/o/spaces%2F50DeL6mO9sNbAZBSEdaN%2Fuploads%2FBaZspUxKswLf0HBhetpE%2Fimage.png?alt=media&amp;token=d3e26620-82dc-4691-9a89-2784e27903b8" alt=""><figcaption></figcaption></figure>

<figure><img src="https://1526800164-files.gitbook.io/~/files/v0/b/gitbook-x-prod.appspot.com/o/spaces%2F50DeL6mO9sNbAZBSEdaN%2Fuploads%2FTT423YLa6qfVHJLW5nS5%2Fimage.png?alt=media&amp;token=28c4814d-89cd-4530-bf14-9c018b2b69f5" alt=""><figcaption></figcaption></figure>

#### 1.1.2 Field Explanation:

* **Reimburser:** The individual who submitted the reimbursement request.
* **Reimburser's Department:** The department to which the reimburser belongs.
* **Category Name:** The expense category which the reimbursement is recorded.
* **Category No.:** A unique identifier or code associated with the expense category.
* **Reimbursement Amount:** The amount reimbursed for the expense.
* **Reimbursement Date:** The date when the expense occurred or was reimbursed.
* **Expense Beneficiary:** The entity (e.g., user, department, project) that benefited from the expense.
* **Source:** The origin of the expense, such as from workflow or enter expense menu.
* **Budget Utilized:** The portion of the budget that has been consumed by this reimbursement.

#### 2.1.3 Export

Export the current cycle details overview.&#x20;

Step 1: In the top-right corner of the page, click "Export".

<figure><img src="https://1526800164-files.gitbook.io/~/files/v0/b/gitbook-x-prod.appspot.com/o/spaces%2F50DeL6mO9sNbAZBSEdaN%2Fuploads%2Fldcrx6006Fp6YRwt8mtx%2Fimage.png?alt=media&amp;token=af258a10-9ed9-4604-a572-868d5226aece" alt=""><figcaption></figcaption></figure>

The system will automatically generate and download the exported data in Excel onto the user's device.&#x20;

<figure><img src="https://1526800164-files.gitbook.io/~/files/v0/b/gitbook-x-prod.appspot.com/o/spaces%2F50DeL6mO9sNbAZBSEdaN%2Fuploads%2FXw97N5pIRgvl2Vtu465c%2Fimage.png?alt=media&amp;token=4df4af8d-da3d-478f-b9d3-07918044cc97" alt=""><figcaption></figcaption></figure>

If the user's browser settings does not allow pop-up, the user can download manually from the **Instant Messenger** (IM).

<figure><img src="https://1526800164-files.gitbook.io/~/files/v0/b/gitbook-x-prod.appspot.com/o/spaces%2F50DeL6mO9sNbAZBSEdaN%2Fuploads%2FYC0pdhiWeIShxr7pEaBE%2Fimage.png?alt=media&amp;token=26e7de53-c316-4fe4-b9d4-db325b827dc5" alt="" width="375"><figcaption></figcaption></figure>

<figure><img src="https://1526800164-files.gitbook.io/~/files/v0/b/gitbook-x-prod.appspot.com/o/spaces%2F50DeL6mO9sNbAZBSEdaN%2Fuploads%2FERGHaIh2yLriNPGcwLIc%2Fimage.png?alt=media&amp;token=b7eb8823-3cda-40b7-9d65-e34b039b09b9" alt=""><figcaption></figcaption></figure>

#### 2.1.4 Switch Tab

From Current Cycle, users can switch to the All Cycles tab to view historical data for all previous and future cycles.

<figure><img src="https://1526800164-files.gitbook.io/~/files/v0/b/gitbook-x-prod.appspot.com/o/spaces%2F50DeL6mO9sNbAZBSEdaN%2Fuploads%2FmpHgQXd2QIsyUw7vgJUn%2Fimage.png?alt=media&amp;token=0eb42e5f-a334-4c36-b4aa-932f4f542a13" alt=""><figcaption></figcaption></figure>

### **2.2 All Cycles**

**Purpose:** Consolidates the expense data across all budget cycles, providing a comprehensive overview of historical and ongoing budget utilization.

#### 2.2.1 View

Step 1: Go to the end of the desired row, click more ···, then click on "All cycles".

<figure><img src="https://1526800164-files.gitbook.io/~/files/v0/b/gitbook-x-prod.appspot.com/o/spaces%2F50DeL6mO9sNbAZBSEdaN%2Fuploads%2FpuWRRxi9P7GInuPkVnXo%2Fimage.png?alt=media&amp;token=210e1dfc-f811-4a71-925d-e4844d755a64" alt=""><figcaption></figcaption></figure>

<figure><img src="https://1526800164-files.gitbook.io/~/files/v0/b/gitbook-x-prod.appspot.com/o/spaces%2F50DeL6mO9sNbAZBSEdaN%2Fuploads%2Fz0ezej3FLos3SeYgwpMn%2Fimage.png?alt=media&amp;token=c86087d8-7b90-4a99-9562-b4deff6d7523" alt=""><figcaption></figcaption></figure>

#### 2.2.2 Field Explanation:

* **Reimburser:** The individual who submitted the reimbursement request.
* **Reimburser's Department:** The department to which the reimburser belongs.
* **Category Name:** The expense category which the reimbursement is recorded.
* **Category No.:** A unique identifier or code associated with the expense category.
* **Reimbursement Amount:** The amount reimbursed for the expense.
* **Reimbursement Date:** The date when the expense occurred or was reimbursed.
* **Expense Beneficiary:** The entity (e.g., user, department, project) that benefited from the expense.
* **Source:** The origin of the expense, such as from workflow or enter expense menu.
* **Budget Utilized:** The portion of the budget that has been consumed by this reimbursement.

#### 2.2.3 Export

Export All cycles budget use details.&#x20;

Step 1: In the top-right corner of the page, click "Export".

<figure><img src="https://1526800164-files.gitbook.io/~/files/v0/b/gitbook-x-prod.appspot.com/o/spaces%2F50DeL6mO9sNbAZBSEdaN%2Fuploads%2FoWYgiUWKyhC5XseMNQJH%2Fimage.png?alt=media&amp;token=6c0d5433-f310-4703-925e-084cb4587f0b" alt=""><figcaption></figcaption></figure>

The system will automatically generate and download the exported data in Excel onto the user's device.&#x20;

<figure><img src="https://1526800164-files.gitbook.io/~/files/v0/b/gitbook-x-prod.appspot.com/o/spaces%2F50DeL6mO9sNbAZBSEdaN%2Fuploads%2F2G1VClX44CtLhJcfgyLp%2Fimage.png?alt=media&amp;token=ca32b39a-187e-427f-a864-1c0deffb9633" alt=""><figcaption></figcaption></figure>

If the user's browser settings does not allow pop-up, the user can download manually from the **Instant Messenger** (IM).

<figure><img src="https://1526800164-files.gitbook.io/~/files/v0/b/gitbook-x-prod.appspot.com/o/spaces%2F50DeL6mO9sNbAZBSEdaN%2Fuploads%2FP8jxopV3Erfk2tUFkzNU%2Fimage.png?alt=media&amp;token=3676289c-3c25-4e00-a023-f146b743da63" alt="" width="375"><figcaption></figcaption></figure>

<figure><img src="https://1526800164-files.gitbook.io/~/files/v0/b/gitbook-x-prod.appspot.com/o/spaces%2F50DeL6mO9sNbAZBSEdaN%2Fuploads%2F2IndHhxsYhxabkc4eN8e%2Fimage.png?alt=media&amp;token=14b49dd7-5780-47a9-a2c4-cb851f10c28d" alt=""><figcaption></figcaption></figure>

#### 2.2.4 Switch Tab

From All Cycles, users can switch to the Current Cycle tab to focus on the details of the active budget period.

<figure><img src="https://1526800164-files.gitbook.io/~/files/v0/b/gitbook-x-prod.appspot.com/o/spaces%2F50DeL6mO9sNbAZBSEdaN%2Fuploads%2F3k8XuI7SvecxZykDDMVF%2Fimage.png?alt=media&amp;token=86a530f5-3e20-46a8-acbb-9ff243558489" alt=""><figcaption></figcaption></figure>

### **2.3 Budget details**

**Purpose:** Display budget details based on reimbursement data, enabling detailed comparisons of budget execution values to support informed decisions on financial planning, resource allocation, and cost control with real-time insights.

#### 2.3.1 View&#x20;

Step 1: Go to the end of the desired row, click more ···, then click on "Budget details".

<figure><img src="https://1526800164-files.gitbook.io/~/files/v0/b/gitbook-x-prod.appspot.com/o/spaces%2F50DeL6mO9sNbAZBSEdaN%2Fuploads%2FkzfhYsq9YZZXHiqswre7%2Fimage.png?alt=media&amp;token=27ecc411-c5bd-42ab-895d-baddd605b389" alt=""><figcaption></figcaption></figure>

<figure><img src="https://1526800164-files.gitbook.io/~/files/v0/b/gitbook-x-prod.appspot.com/o/spaces%2F50DeL6mO9sNbAZBSEdaN%2Fuploads%2F0PIZXNmZbw45WvkjPzTz%2Fimage.png?alt=media&amp;token=7d24f9e0-51a9-40c7-985f-1262568a25b5" alt=""><figcaption></figcaption></figure>

#### **2.3.2 Field Explanation:**

* **Period:** Represents the budgeting period, such as Year, Quarter, Month, or a Custom time range.
* **Node:** A specific segment of the budget, such as Department, Personal, Expense Category, or Project, as defined by the user.
* **Brought Forward:** The remaining budget carried over from the previous cycle (if carry-forward is enabled).
* **Original:** The initial budget amount allocated for the period.
* **Add-on:** Any additional budget allocated to this node during the period.
* **Deducted:** Budget amount reduced during the period, such as for reallocation or adjustments.
* **Total Budget for This Period:** The sum of the Brought Forward, Original, Add-on, and Deducted amounts, representing the final budget for this cycle.
* **Incurred Amount:** The total amount of expenses recorded against this budget during the period.
* **Carried Forward:** The remaining budget that will be transferred to the next cycle (if applicable).
* **Remaining:** The unused budget after deducting the Incurred Amount from the Total Budget for This Period.
* **Used Ratio:** The percentage of the total budget utilized during the period

<figure><img src="https://1526800164-files.gitbook.io/~/files/v0/b/gitbook-x-prod.appspot.com/o/spaces%2F50DeL6mO9sNbAZBSEdaN%2Fuploads%2F8iA4CZb9gs0QbgND7gvE%2Fimage.png?alt=media&amp;token=d894644c-49ef-401c-90bb-9dca8bc5ed06" alt=""><figcaption></figcaption></figure>

**Remark:**

**Add-on** and **deduction** are only applicable for adjustments using workflow.

#### 2.3.3 Export

Export the budget statistic overview.&#x20;

Step 1: In the top-right corner of the page, click "Export".

<figure><img src="https://1526800164-files.gitbook.io/~/files/v0/b/gitbook-x-prod.appspot.com/o/spaces%2F50DeL6mO9sNbAZBSEdaN%2Fuploads%2FdlSSh4zZ4ooqAw6GvjEa%2Fimage.png?alt=media&amp;token=cbf630f9-4fbf-4e03-9fa0-7cc712dcd5e6" alt=""><figcaption></figcaption></figure>

The system will automatically generate and download the exported data in Excel onto the user's device.&#x20;

<figure><img src="https://1526800164-files.gitbook.io/~/files/v0/b/gitbook-x-prod.appspot.com/o/spaces%2F50DeL6mO9sNbAZBSEdaN%2Fuploads%2F64zKqQOeHT676B7JDMeI%2Fimage.png?alt=media&amp;token=887b889c-222f-47dd-a20c-58ce3bbc7eeb" alt=""><figcaption></figcaption></figure>

If the user's browser settings does not allow pop-up, the user can download manually from the Instant Messenger (IM).

<figure><img src="https://1526800164-files.gitbook.io/~/files/v0/b/gitbook-x-prod.appspot.com/o/spaces%2F50DeL6mO9sNbAZBSEdaN%2Fuploads%2FmUc0XXJKGoq2m1xNslJX%2Fimage.png?alt=media&amp;token=413b1d9d-cabd-47fd-97ee-8783503b7ff1" alt="" width="375"><figcaption></figcaption></figure>

<figure><img src="https://1526800164-files.gitbook.io/~/files/v0/b/gitbook-x-prod.appspot.com/o/spaces%2F50DeL6mO9sNbAZBSEdaN%2Fuploads%2FKgMwmYsP8tmjgWX8Mgav%2Fimage.png?alt=media&amp;token=fcffa68e-2a08-48d3-b493-9b23d7e44ee4" alt=""><figcaption></figcaption></figure>


# Setting


# Budget

## 1 **Budget Overview**

Displays essential details such as Budget Name, Year, Period, Carry Forward Control, and Budget Amount for an at-a-glance understanding of active budgets.

<figure><img src="https://1526800164-files.gitbook.io/~/files/v0/b/gitbook-x-prod.appspot.com/o/spaces%2F50DeL6mO9sNbAZBSEdaN%2Fuploads%2FJhWwTsU0abrq9mtwbHAQ%2Fimage.png?alt=media&amp;token=df3a4b0f-415f-4067-95b1-f26073cc75ef" alt=""><figcaption></figcaption></figure>

**Remark:**

* Budget amount can be set individually for each year, quarter, and month.
* Budgets are independent of each other, even if they belong to the same year or quarter.
* The Budget Amount within the same budget can vary across different quarters or months.

### **1.1 Change Budget Name**

Step 1: Go to the end of the intended budget, click more ···, then click "Modify budget name".&#x20;

<figure><img src="https://1526800164-files.gitbook.io/~/files/v0/b/gitbook-x-prod.appspot.com/o/spaces%2F50DeL6mO9sNbAZBSEdaN%2Fuploads%2FnYU4hM0TzGTxWfikKlsM%2Fimage.png?alt=media&amp;token=e9dfd6e4-2d1d-48d9-b668-ba7220e96b32" alt=""><figcaption></figcaption></figure>

Step 2: Modify the budget name and click "Save" to make the change

<figure><img src="https://1526800164-files.gitbook.io/~/files/v0/b/gitbook-x-prod.appspot.com/o/spaces%2F50DeL6mO9sNbAZBSEdaN%2Fuploads%2Fz0o3wc8hoImMAYsL6qi2%2Fimage.png?alt=media&amp;token=ecb49968-308c-47ed-899f-7a3625ec7d2a" alt=""><figcaption></figcaption></figure>

### **1.2 Delete Budget**

To delete a budget

Step 1: Go to the end of the intended budget, click more ···, then click "Delete".&#x20;

<figure><img src="https://1526800164-files.gitbook.io/~/files/v0/b/gitbook-x-prod.appspot.com/o/spaces%2F50DeL6mO9sNbAZBSEdaN%2Fuploads%2FQ8b7zTVp1kYmjex9ntpZ%2Fimage.png?alt=media&amp;token=7b6b94d1-887c-49df-b7b3-433f9b0b647b" alt=""><figcaption></figcaption></figure>

Step 2: Click "Confirm" to proceed.

<figure><img src="https://1526800164-files.gitbook.io/~/files/v0/b/gitbook-x-prod.appspot.com/o/spaces%2F50DeL6mO9sNbAZBSEdaN%2Fuploads%2F5fo6owBZOd7jCbeF2XPs%2Fimage.png?alt=media&amp;token=53dae3b7-b276-49e6-b315-2eaa4528f662" alt="" width="288"><figcaption></figcaption></figure>

**Remark:**

* If there are **expense records** linked to this budget, the budget **cannot be deleted**.

<figure><img src="https://1526800164-files.gitbook.io/~/files/v0/b/gitbook-x-prod.appspot.com/o/spaces%2F50DeL6mO9sNbAZBSEdaN%2Fuploads%2FBgozyGabGrPhe9Rv94Dh%2Fimage.png?alt=media&amp;token=dd5ca805-63d8-4eb7-9bbf-d5599d13c68c" alt=""><figcaption></figcaption></figure>

### **1.3 Edit budget**

Allow the users to modify budget details, add new nodes, adjust budget amounts, etc.

Step 1: Go to the end of the intended budget, click more ···, then click "Set budget breakdown".&#x20;

<figure><img src="https://1526800164-files.gitbook.io/~/files/v0/b/gitbook-x-prod.appspot.com/o/spaces%2F50DeL6mO9sNbAZBSEdaN%2Fuploads%2FcM2cUmWLxC3chGy5lapj%2Fimage.png?alt=media&amp;token=7b298c5b-9faa-4ea2-a3d8-0ec8bc0726a8" alt=""><figcaption></figcaption></figure>

Step 2: Modify the budget details, then click "Save" to save the new changes.

<figure><img src="https://1526800164-files.gitbook.io/~/files/v0/b/gitbook-x-prod.appspot.com/o/spaces%2F50DeL6mO9sNbAZBSEdaN%2Fuploads%2FOmgS9a090NMQq5kYh40J%2Fimage.png?alt=media&amp;token=0167ae54-fca9-4326-996c-4ea75d68d6e4" alt=""><figcaption></figcaption></figure>

## **2 Create Budget**

Step 1: Click on the "Create" button located on the top-right side of the page.

<figure><img src="https://1526800164-files.gitbook.io/~/files/v0/b/gitbook-x-prod.appspot.com/o/spaces%2F50DeL6mO9sNbAZBSEdaN%2Fuploads%2FJRihoPuwplc1pJ1hoza6%2Fimage.png?alt=media&amp;token=6f6543c6-c784-471e-bef1-4046d4449623" alt=""><figcaption></figcaption></figure>

Step 2: Enter the required details:

<figure><img src="https://1526800164-files.gitbook.io/~/files/v0/b/gitbook-x-prod.appspot.com/o/spaces%2F50DeL6mO9sNbAZBSEdaN%2Fuploads%2FHRtPSvgNhud08al9aHYK%2Fimage.png?alt=media&amp;token=f3ff4535-0203-4290-8ce0-4b135f7f85cb" alt=""><figcaption></figcaption></figure>

**Field Explanation:**&#x20;

**Budget Name**: To differentiate and identify various budgets within the system.

**Year**: Select the year (from 2024 onwards). Allows creating budgets for future years in advance.

**Period**: Select the budget period: Year, Quarterly, Monthly, or a Custom time range.

**Carry Forward**: Allows the system to transfer the remaining budget balance to the next cycle.

**Remark:**

* Only Quarterly, Monthly, and Custom time range options can enable the Carry forward control.
  * For example, in Monthly budgets, November and December will be treated as different cycles.

Step 3: Set up the budget allocation and reminders

<figure><img src="https://1526800164-files.gitbook.io/~/files/v0/b/gitbook-x-prod.appspot.com/o/spaces%2F50DeL6mO9sNbAZBSEdaN%2Fuploads%2FJ2VMzT9ktPvzRAPfQYuC%2Fimage.png?alt=media&amp;token=f50b4507-4574-478b-91f6-06516dac5f07" alt=""><figcaption></figcaption></figure>

**Field Explanation:**

* **Node:** Divide your budget into categories such as Department, Personal, Expense Category, or Project. Allows the user to set up multiple levels for a detailed breakdown.

* **Reminder Ratio:** Allows user to choose when they want to be reminded.
  * Options: Do not remind, 50%, 60%, 70%, 80%, 90%.
  * The system will send a reminder to the budget creator or based on permission settings when the budget used reaches the selected percentage of the total assigned budget.

* **Overcommit Control:** Defines what happens when the budget limit is exceeded:
  * **Reject Submission**: The system prevents any new submissions if the budget limit is exceeded.
  * **Allow Submission and Send Reminder**: Submissions are allowed, but a reminder is sent when the budget limit is exceeded.
  * **Allow Submission and No Reminder**: Submissions are allowed without sending any reminder when the budget limit is exceeded.

* **Period Columns:**

  * For Yearly budgets, only one column will appear for 2024.

  <figure><img src="https://1526800164-files.gitbook.io/~/files/v0/b/gitbook-x-prod.appspot.com/o/spaces%2F50DeL6mO9sNbAZBSEdaN%2Fuploads%2FGPCZivg3dXlouVvCTcrt%2Fimage.png?alt=media&amp;token=34fcb6f7-ceae-4c73-bfc5-669f67cf5234" alt=""><figcaption></figcaption></figure>

  * For Quarterly budgets, four columns will appear: Q1, Q2, Q3, Q4.

  <figure><img src="https://1526800164-files.gitbook.io/~/files/v0/b/gitbook-x-prod.appspot.com/o/spaces%2F50DeL6mO9sNbAZBSEdaN%2Fuploads%2FvKqhEWr8qQ3m7ypMcTaQ%2Fimage.png?alt=media&amp;token=e958042e-aee7-4980-b05e-13544d02f88a" alt=""><figcaption></figcaption></figure>

  * For Monthly budgets, twelve columns will appear, one for each month from January to December.

  <figure><img src="https://1526800164-files.gitbook.io/~/files/v0/b/gitbook-x-prod.appspot.com/o/spaces%2F50DeL6mO9sNbAZBSEdaN%2Fuploads%2FaNi2kcuNAGWRPsaVNBnx%2Fimage.png?alt=media&amp;token=926e3c89-8ad4-481b-8a80-271b6fec5882" alt=""><figcaption></figcaption></figure>

* The user can divide the budget into smaller sections. Refer to [**3.1 Split Budget**](#id-3.1-split-budget) for more details.

Step 4: Click on the "Save" button located on the top-right side of the page.

<figure><img src="https://1526800164-files.gitbook.io/~/files/v0/b/gitbook-x-prod.appspot.com/o/spaces%2F50DeL6mO9sNbAZBSEdaN%2Fuploads%2FwmZrhslgWh5aOTyPJ5jh%2Fimage.png?alt=media&amp;token=a2c908dd-7ccd-4c1d-9ed0-329ed97ecc64" alt=""><figcaption></figcaption></figure>

## 3 Budget details

### **3.1 Split Budget**

Supports spliting budget into different level and dimension to meet diversified needs

Step 1: Go to the end of the intended budget node, click more ···, then hover over "Split budget".

<figure><img src="https://1526800164-files.gitbook.io/~/files/v0/b/gitbook-x-prod.appspot.com/o/spaces%2F50DeL6mO9sNbAZBSEdaN%2Fuploads%2FbGsIVxCv4X3WUDmXchm8%2Fimage.png?alt=media&amp;token=485a21c0-8b94-496f-8718-7618d7957e77" alt=""><figcaption></figcaption></figure>

Step 2: Select the respective dimension for the parent budget to be split into.&#x20;

<figure><img src="https://1526800164-files.gitbook.io/~/files/v0/b/gitbook-x-prod.appspot.com/o/spaces%2F50DeL6mO9sNbAZBSEdaN%2Fuploads%2FrDvlA6rNnatalWa9OIZq%2Fimage.png?alt=media&amp;token=e3071baf-9c5b-4d02-a114-488b5815323b" alt=""><figcaption></figcaption></figure>

Step 3: Click "Save" to save the changes when done.

<figure><img src="https://1526800164-files.gitbook.io/~/files/v0/b/gitbook-x-prod.appspot.com/o/spaces%2F50DeL6mO9sNbAZBSEdaN%2Fuploads%2FrXi4POUvAen5rSVSqHxt%2Fimage.png?alt=media&amp;token=9c4e3c82-bd3a-440e-bb80-54cd521ca0fb" alt=""><figcaption></figcaption></figure>

**Remark:**

* Budget can be split into four (4) dimensions: department, user, expense account, and project.
* The sub-budget amount must be less than or equal to the parent's budget amount, if not an error message will be prompted.

<figure><img src="https://1526800164-files.gitbook.io/~/files/v0/b/gitbook-x-prod.appspot.com/o/spaces%2F50DeL6mO9sNbAZBSEdaN%2Fuploads%2F4Eqv0rURlcPOAIye5Gyq%2Fimage.png?alt=media&amp;token=8c35a4a9-40b5-4a79-9999-d808f2f91a2d" alt=""><figcaption></figcaption></figure>

### **3.2 Delete Budget Node**

To delete a budget node

Step 1: Go to the end of the intended budget, click more ···, then click "Set budget breakdown" or click on it directly.&#x20;

<figure><img src="https://1526800164-files.gitbook.io/~/files/v0/b/gitbook-x-prod.appspot.com/o/spaces%2F50DeL6mO9sNbAZBSEdaN%2Fuploads%2Fi5QZ3Q3xUd5gveBcJv1v%2Fimage.png?alt=media&amp;token=84ba470e-2902-4afe-a65d-650133333024" alt=""><figcaption></figcaption></figure>

Step 2: Go to the end of the intended node, click more ···, then click "Delete".

<figure><img src="https://1526800164-files.gitbook.io/~/files/v0/b/gitbook-x-prod.appspot.com/o/spaces%2F50DeL6mO9sNbAZBSEdaN%2Fuploads%2FUIGjmcl2OpMa8qajSbtj%2Fimage.png?alt=media&amp;token=f3018c90-daa4-4323-bce0-74ae6c0fd31c" alt=""><figcaption></figcaption></figure>

Step 3: Click "Confirm" to proceed.

<figure><img src="https://1526800164-files.gitbook.io/~/files/v0/b/gitbook-x-prod.appspot.com/o/spaces%2F50DeL6mO9sNbAZBSEdaN%2Fuploads%2FALon6IkwC3yEUzESVupB%2Fimage.png?alt=media&amp;token=83bd8782-7013-494c-a50d-1cb72c588d7f" alt="" width="288"><figcaption></figcaption></figure>

**Remark:**

* If there are expense records linked to this node, the budget cannot be deleted.

<figure><img src="https://1526800164-files.gitbook.io/~/files/v0/b/gitbook-x-prod.appspot.com/o/spaces%2F50DeL6mO9sNbAZBSEdaN%2Fuploads%2Fn0dBOAuG5Iq0eHw7Ctgf%2Fimage.png?alt=media&amp;token=1074e86c-2c4f-4014-b9c1-9ab19bebedc5" alt="" width="270"><figcaption></figcaption></figure>

### **3.3 Export Budget Node**

Export the current budget's details

Step 1: In the top-right corner of the page, click "Export".

<figure><img src="https://1526800164-files.gitbook.io/~/files/v0/b/gitbook-x-prod.appspot.com/o/spaces%2F50DeL6mO9sNbAZBSEdaN%2Fuploads%2F55H2Ql2obLKF8PxzM4it%2Fimage.png?alt=media&amp;token=59279961-37bf-4e0f-a6f0-ce627e607896" alt=""><figcaption></figcaption></figure>

The system will automatically generate and download the exported data in Excel onto the user's device. If the user's browser settings does not allow pop-up, the user can download manually from the **Instant Messenger** (IM).

<figure><img src="https://1526800164-files.gitbook.io/~/files/v0/b/gitbook-x-prod.appspot.com/o/spaces%2F50DeL6mO9sNbAZBSEdaN%2Fuploads%2FmzhnqE1om1KjAsEkDrkx%2Fimage.png?alt=media&amp;token=d46994b5-c255-467c-a360-8157a3442775" alt="" width="375"><figcaption></figcaption></figure>

<figure><img src="https://1526800164-files.gitbook.io/~/files/v0/b/gitbook-x-prod.appspot.com/o/spaces%2F50DeL6mO9sNbAZBSEdaN%2Fuploads%2FJO5XPJcRcWlAMzJEVyml%2Fimage.png?alt=media&amp;token=2dd32a21-7e29-4429-909a-f2636335af8d" alt=""><figcaption></figcaption></figure>


# Permission


# Expense List

## 1 Data Permission <a href="#id-1-data-permission" id="id-1-data-permission"></a>

**Purpose**: Controls access to specific expense details based on the user's relationship to the data.

<figure><img src="https://1526800164-files.gitbook.io/~/files/v0/b/gitbook-x-prod.appspot.com/o/spaces%2F50DeL6mO9sNbAZBSEdaN%2Fuploads%2FbAEV8fBVYDHiL1J4CMVU%2Fimage.png?alt=media&amp;token=01b5b631-ab44-442a-b386-ab2cb29041ec" alt=""><figcaption></figcaption></figure>

<figure><img src="https://1526800164-files.gitbook.io/~/files/v0/b/gitbook-x-prod.appspot.com/o/spaces%2F50DeL6mO9sNbAZBSEdaN%2Fuploads%2F2N7KYgUpmMeAcY9lcfDo%2Fimage.png?alt=media&amp;token=87ed12c2-a1f6-4358-9603-fea48ece6f98" alt=""><figcaption></figcaption></figure>

### 1.1 Associated field <a href="#id-1.1-relation-control" id="id-1.1-relation-control"></a>

**Creator**: The user who created the expense record.

**Reimburser**: The individual submitting the expense for reimbursement.

**Reimburser's department**: The department to which the reimburser belongs.

**Expense beneficiary user**: The user who directly benefited from the expense.

**Expense beneficiary department:** The department that benefited from the expense.

### **1.2 Data Penetration** <a href="#id-1.2-operations" id="id-1.2-operations"></a>

Defines the relationship between other parties and the associated user that determines their permission to access the data.

* **Myself**: The associated user have access to data directly related themselves.
* **Superior**: The user’s direct supervisor have access to the data.
* **All Superiors**: All higher-ups in the organization hierarchy have access to the data.
* **Subordinates**: Users reporting directly to the associated user have access to the data.
* **All Subordinates**: All users lower in the organizational hierarchy have access to the data.
* **HOD (Head of Department):** The department head has access to the data.&#x20;
* **Same Department:** Users from the same department have access to the data.
* **Same Role**: Users with the same role have access to the data.

### **1.3 Operations** <a href="#id-1.2-operations" id="id-1.2-operations"></a>

**Purpose:** Allows to configure the actions that the users are authorized to perform.

**View**: Provides read-only access to expense details.

**Edit**: Allows users to modify existing expense details.

**Delete**: Grants users the ability to remove expense details from the system permanently.

## 2 Monitoring Permission <a href="#id-2-monitoring-permission" id="id-2-monitoring-permission"></a>

**Purpose**: Provides the ability to monitor and manage data at various organizational levels.

<figure><img src="https://1526800164-files.gitbook.io/~/files/v0/b/gitbook-x-prod.appspot.com/o/spaces%2F50DeL6mO9sNbAZBSEdaN%2Fuploads%2F453YbwDCX20h1SPF1FBZ%2Fimage.png?alt=media&amp;token=a986b417-4399-4baf-bd34-4acae2d3f0b8" alt=""><figcaption></figcaption></figure>

<figure><img src="https://1526800164-files.gitbook.io/~/files/v0/b/gitbook-x-prod.appspot.com/o/spaces%2F50DeL6mO9sNbAZBSEdaN%2Fuploads%2FzAGHFZFknniDdPG8N6vi%2Fimage.png?alt=media&amp;token=31dcb134-0277-4355-a070-848bf9f10222" alt=""><figcaption></figcaption></figure>

### **2.1 User Scope** <a href="#id-1.1-user-scope" id="id-1.1-user-scope"></a>

**All Users**: Permissions apply to all users.

**Specific User**: Permissions granted based on individuals.

**Specific Role**: Permissions granted based on role.

**Specific Department**: Permissions granted based on department.

### **2.2 Data Penetration** <a href="#id-1.2-data-penetration" id="id-1.2-data-penetration"></a>

Defines the scope of data a user can access based on their hierarchical position within the organization.

* **Myself**: Access to data directly related to the user.
* **Superior**: Access to data created by the user’s direct supervisor.
* **All Superiors**: Access to data created by all higher-ups in the organization hierarchy.
* **Subordinates**: Access to data created by the user's subordinate.
* **All Subordinates**: Access to data created by the user’s direct subordinates and their subordinates (i.e., the entire reporting chain under the user).
* **HOD (Head of Department):** Access to data created by the department head.
* **Same Department:** Access to data created by all users within the same department
* **Same Role**: Access to data created by users holding the same role, even if they are in different departments.

### **2.3 Operations** <a href="#id-1.2-operations" id="id-1.2-operations"></a>

**Purpose:** Allows to configure the actions that the users are authorized to perform.

**View**: Provides read-only access to expense details.

**Edit**: Allows users to modify existing expense details.

**Delete**: Grants users the ability to remove expense details from the system permanently.

## 3 Page Permission <a href="#id-3-page-permission" id="id-3-page-permission"></a>

**Purpose**: Manages access to different features or functionalities within the Expense list.

<figure><img src="https://1526800164-files.gitbook.io/~/files/v0/b/gitbook-x-prod.appspot.com/o/spaces%2F50DeL6mO9sNbAZBSEdaN%2Fuploads%2FrPq23lqF10x5wqrobnlN%2Fimage.png?alt=media&amp;token=01e7f703-fdee-4c74-b13b-68c606336d4b" alt=""><figcaption></figcaption></figure>

<figure><img src="https://1526800164-files.gitbook.io/~/files/v0/b/gitbook-x-prod.appspot.com/o/spaces%2F50DeL6mO9sNbAZBSEdaN%2Fuploads%2FWPo9hEhplQvDn7DOOUT5%2Fimage.png?alt=media&amp;token=6727b66d-5d3b-4b46-8ce6-3c5cb52d2e79" alt=""><figcaption></figcaption></figure>

### **3.1 User Scope** <a href="#id-3.1-operations" id="id-3.1-operations"></a>

**All Users**: Permissions apply to all users.

**Specific User**: Permissions granted based on individuals.

**Specific Role**: Permissions granted based on role.

**Specific Department**: Permissions granted based on department.

### **3.2 Operation**

**Purpose:** Allows to configure the actions that the users are authorized to perform.

**Add**: Grants the ability to create new expense records.

**Batch create:** Enables the user to create multiple expense records simultaneously.

**Batch delete:** Allows the user to remove multiple expense records at once.

**Import**: Allows batch creation of records by uploading data from an Excel file.

**Export**: Allows the user to download data in Excel format from the OA system to local devices.

## 4 Log <a href="#id-4-log" id="id-4-log"></a>

### 4.1 Timeline

The log is defaulted to displayed as a timeline chart, with the time of occurrence shown on the left and the operation type and details displayed on the right.&#x20;

### 4.2 List

<figure><img src="https://1526800164-files.gitbook.io/~/files/v0/b/gitbook-x-prod.appspot.com/o/spaces%2F50DeL6mO9sNbAZBSEdaN%2Fuploads%2FQToZ6MGeAfeiDgfGkQKf%2Fimage.png?alt=media&amp;token=3857e7a1-ae39-4e3f-8fa2-e2a0125ee6eb" alt=""><figcaption></figcaption></figure>

### 4.3 Filtering/Searching

#### **4.3.1 Filter**

In both view, the log can be filtered by operation type, by the creation time using the existing time filter, or by customizing the range with the "Time range" button.&#x20;

<figure><img src="https://1526800164-files.gitbook.io/~/files/v0/b/gitbook-x-prod.appspot.com/o/spaces%2F50DeL6mO9sNbAZBSEdaN%2Fuploads%2FXcgWo4trsyk3bcpiPYUf%2Fimage.png?alt=media&amp;token=acade3f8-759c-4d29-89a1-5bfb416a28cb" alt=""><figcaption></figcaption></figure>

#### **4.3.2 Search**

The user can search log based on log content or operating target that match or are similar to the text entered in the search box.

<figure><img src="https://1526800164-files.gitbook.io/~/files/v0/b/gitbook-x-prod.appspot.com/o/spaces%2F50DeL6mO9sNbAZBSEdaN%2Fuploads%2FOmcjg6Ytw59bb3aU5NZ1%2Fimage.png?alt=media&amp;token=e2f9bda7-3c7e-4adb-9168-762d35b0cd7e" alt=""><figcaption></figcaption></figure>

## 5 View permission details

**Purpose:** To provide clear overview of who is granted specific permissions and grouping the data by different dimensions.

<figure><img src="https://1526800164-files.gitbook.io/~/files/v0/b/gitbook-x-prod.appspot.com/o/spaces%2F50DeL6mO9sNbAZBSEdaN%2Fuploads%2F1Xp9Zqnf1yXiahRpPKjV%2Fimage.png?alt=media&amp;token=b1b29548-d2f3-4c93-bf31-155347d92f52" alt=""><figcaption></figcaption></figure>

### 5.1 Permission <a href="#id-5.1-permission" id="id-5.1-permission"></a>

**Purpose**: This dimension provides an overview of the specific types of permissions assigned (e.g., Add, Edit, Delete) and to whom they are granted.

<figure><img src="https://1526800164-files.gitbook.io/~/files/v0/b/gitbook-x-prod.appspot.com/o/spaces%2F50DeL6mO9sNbAZBSEdaN%2Fuploads%2FQSfXCrBW0hHRfYeCp5A9%2Fimage.png?alt=media&amp;token=db62bdaf-1b46-41da-ae52-b1e15540bb63" alt=""><figcaption></figcaption></figure>

**Remark:**

* **Permission Type**: The type of action or permission granted (e.g., View, Edit, Delete, etc.).
* **Scope**: Defines who the permission applies to (e.g., specific user, role, department, all users).
* **Data Filtering**: This refers to any restrictions applied to the data a user can access based on specific criteria (e.g., only data related to their department, subordinates, or specific customers).

### 5.2 User <a href="#id-5.2-user" id="id-5.2-user"></a>

**Purpose**: Shows the individual users and the specific permissions they have, along with the extent to which they can access or modify data.

<figure><img src="https://1526800164-files.gitbook.io/~/files/v0/b/gitbook-x-prod.appspot.com/o/spaces%2F50DeL6mO9sNbAZBSEdaN%2Fuploads%2Ff4VIoywnw9EtsqVmbGDJ%2Fimage.png?alt=media&amp;token=fb2d6cef-7edd-40e0-b03a-e274559aadde" alt=""><figcaption></figcaption></figure>

**Remark:**

**User**: The specific person (e.g., Axel, Matthew).

**Data penetration:** Indicates how deep the user's permissions reach (e.g., whether they can see only their own data, their subordinates' data, or a broader range).

**Existing permissions**: Lists the actions the user can perform (e.g., View, Edit).

**Data Filtering**: Specifies the data the user can access based on filtering conditions (e.g., only customers from a specific region).

### 5.3 Role <a href="#id-5.3-role" id="id-5.3-role"></a>

**Purpose**: Provides a role-based view of permissions, useful for managing large groups of users. It defines what permissions are granted to users based on their role in the organization.

<figure><img src="https://1526800164-files.gitbook.io/~/files/v0/b/gitbook-x-prod.appspot.com/o/spaces%2F50DeL6mO9sNbAZBSEdaN%2Fuploads%2FJL6TXrJbUJT4gMaTrGuc%2Fimage.png?alt=media&amp;token=0f3d9253-c7c4-40c0-93ff-795cb8a3c9e6" alt=""><figcaption></figcaption></figure>

**Remark:**

**Role**: Specifies the role (e.g., Account Manager, Support Engineer).

**Data Penetration**: Indicates how deep the role's permissions reach (e.g., whether they can see only their own data, their subordinates' data, or a broader range).

**Existing permissions**: Lists the actions the user can perform (e.g., View, Edit).

**Data Filtering**: Specifies the data the role can access based on filtering conditions (e.g., only customers from a specific region).

### 5.4 Department <a href="#id-5.4-department" id="id-5.4-department"></a>

**Purpose**: Provides a department-wide view of permissions, often used to grant broader access to users within a specific functional area (e.g., sales, support).

<figure><img src="https://1526800164-files.gitbook.io/~/files/v0/b/gitbook-x-prod.appspot.com/o/spaces%2F50DeL6mO9sNbAZBSEdaN%2Fuploads%2FEJLvGf9dnKtsCrnRsX6w%2Fimage.png?alt=media&amp;token=39641ed9-9924-4171-9535-6f3d654befea" alt=""><figcaption></figcaption></figure>

**Remark:**

**Department**: Specifies the department (e.g., Sales, Purchase).

**Data Penetration**: Indicates how deep the department's permissions reach (e.g., whether they can see only their own data, their subordinates' data, or a broader range).

**Existing permissions**: Lists the actions the user can perform (e.g., View, Edit).

**Data Filtering**: Specifies the data the role can access based on filtering conditions (e.g., only customers from a specific region).

### 5.5 Fields <a href="#id-5.5-fields" id="id-5.5-fields"></a>

**Purpose**: Allows permissions to be controlled based on the relation of the user to specific data fields.

<figure><img src="https://1526800164-files.gitbook.io/~/files/v0/b/gitbook-x-prod.appspot.com/o/spaces%2F50DeL6mO9sNbAZBSEdaN%2Fuploads%2Fddm67RRPNa47naTKK9T0%2Fimage.png?alt=media&amp;token=bfb3cb04-be63-4670-98eb-2c55d9d860f0" alt=""><figcaption></figcaption></figure>

**Remarks:**

**Associated field:** Defines the user’s relationship to the data (e.g., Creator, Reimburser, Expense beneficiary).

**Data Penetration**: Indicates how deep the department's permissions reach (e.g., whether they can see only their own data, their subordinates' data, or a broader range).

**Existing permissions**: Lists the actions the user can perform (e.g., View, Edit).

**Data Filtering**: Specifies the data the role can access based on filtering conditions (e.g., only customers from a specific region).


# Budget Statistics

## 1 Data Permission <a href="#id-1-data-permission" id="id-1-data-permission"></a>

**Purpose**: Controls access to budget statistics based on the user's relationship to the data.

<figure><img src="https://1526800164-files.gitbook.io/~/files/v0/b/gitbook-x-prod.appspot.com/o/spaces%2F50DeL6mO9sNbAZBSEdaN%2Fuploads%2FeKamGVPgr5AO4RQyXODI%2Fimage.png?alt=media&amp;token=76fa1e6a-874b-4a54-967f-05533fd9bd5e" alt=""><figcaption></figcaption></figure>

<figure><img src="https://1526800164-files.gitbook.io/~/files/v0/b/gitbook-x-prod.appspot.com/o/spaces%2F50DeL6mO9sNbAZBSEdaN%2Fuploads%2FJ7GX8QAuh3wPABLLezaV%2Fimage.png?alt=media&amp;token=4a01ec0d-6240-4dbb-9ade-72d0263abe64" alt=""><figcaption></figcaption></figure>

### 1.1 Associated field <a href="#id-1.1-relation-control" id="id-1.1-relation-control"></a>

**Creator**: The user who created the budget.

### **1.2 Data Penetration** <a href="#id-1.2-operations" id="id-1.2-operations"></a>

Defines the relationship between other parties and the associated user that determines their permission to access the data.

* **Myself**: The associated user have access to data directly related themselves.
* **Superior**: The user’s direct supervisor have access to the data.
* **All Superiors**: All higher-ups in the organization hierarchy have access to the data.
* **Subordinates**: Users reporting directly to the associated user have access to the data.
* **All Subordinates**: All users lower in the organizational hierarchy have access to the data.
* **HOD (Head of Department):** The department head has access to the data.&#x20;
* **Same Department:** Users from the same department have access to the data.
* **Same Role**: Users with the same role have access to the data.

### **1.3 Operations** <a href="#id-1.2-operations" id="id-1.2-operations"></a>

**View**: Provides read-only access to budget statistics.

## 2 Monitoring Permission <a href="#id-2-monitoring-permission" id="id-2-monitoring-permission"></a>

**Purpose**: Provides the ability to monitor and manage data at various organizational levels.

<figure><img src="https://1526800164-files.gitbook.io/~/files/v0/b/gitbook-x-prod.appspot.com/o/spaces%2F50DeL6mO9sNbAZBSEdaN%2Fuploads%2F8Nq5GhmmWc2xUxGFB0wE%2Fimage.png?alt=media&amp;token=be06a539-bf9f-4fa1-a070-fd7eb2d0e5fd" alt=""><figcaption></figcaption></figure>

<figure><img src="https://1526800164-files.gitbook.io/~/files/v0/b/gitbook-x-prod.appspot.com/o/spaces%2F50DeL6mO9sNbAZBSEdaN%2Fuploads%2F6KihpPNlIhcXNw8rDArr%2Fimage.png?alt=media&amp;token=1fa3842e-7018-4896-a5b8-5135651f172e" alt=""><figcaption></figcaption></figure>

### **2.1 User Scope** <a href="#id-1.1-user-scope" id="id-1.1-user-scope"></a>

**All Users**: Permissions apply to all users.

**Specific User**: Permissions granted based on individuals.

**Specific Role**: Permissions granted based on role.

**Specific Department**: Permissions granted based on department.

### **2.2 Data Penetration** <a href="#id-1.2-data-penetration" id="id-1.2-data-penetration"></a>

Defines the scope of data a user can access based on their hierarchical position within the organization.

* **Myself**: Access to data directly related to the user.
* **Superior**: Access to data created by the user’s direct supervisor.
* **All Superiors**: Access to data created by all higher-ups in the organization hierarchy.
* **Subordinates**: Access to data created by the user's subordinate.
* **All Subordinates**: Access to data created by the user’s direct subordinates and their subordinates (i.e., the entire reporting chain under the user).
* **HOD (Head of Department):** Access to data created by the department head.
* **Same Department:** Access to data created by all users within the same department
* **Same Role**: Access to data created by users holding the same role, even if they are in different departments.

### **2.3 Operations** <a href="#id-1.2-operations" id="id-1.2-operations"></a>

**Purpose:** Allows to configure the actions that the users are authorized to perform.

**View**: Provides read-only access to budget statistics.

## 3 Page Permission <a href="#id-3-page-permission" id="id-3-page-permission"></a>

**Purpose**: Manages access to different features or functionalities within the budget statistics.

<figure><img src="https://1526800164-files.gitbook.io/~/files/v0/b/gitbook-x-prod.appspot.com/o/spaces%2F50DeL6mO9sNbAZBSEdaN%2Fuploads%2FLrj312v4Q97PNTJgeaLw%2Fimage.png?alt=media&amp;token=e4a8597e-f72f-48c5-be21-96bc05ed3e60" alt=""><figcaption></figcaption></figure>

<figure><img src="https://1526800164-files.gitbook.io/~/files/v0/b/gitbook-x-prod.appspot.com/o/spaces%2F50DeL6mO9sNbAZBSEdaN%2Fuploads%2FEO0oeC15BmHWvC7FNwYl%2Fimage.png?alt=media&amp;token=b55d88c1-eed0-43f2-839d-a7e6d99ce92d" alt=""><figcaption></figcaption></figure>

### **3.1 User Scope** <a href="#id-3.1-operations" id="id-3.1-operations"></a>

**All Users**: Permissions apply to all users.

**Specific User**: Permissions granted based on individuals.

**Specific Role**: Permissions granted based on role.

**Specific Department**: Permissions granted based on department.

### **3.2 Operation**

**Purpose:** Allows to configure the actions that the users are authorized to perform.

**Export**: Allows the user to download the budget statistics in Excel format from the OA system to local devices.

## 4 Log <a href="#id-4-log" id="id-4-log"></a>

### 4.1 View option

#### 4.1.1 **Timeline View**

Displays permission log in a **chronological timeline**, allowing users to see when each permission was created and track its history over time.

#### 4.1.2 **List View**

Presents permission log in a **detailed list format**, typically showing columns with permission details such as source, operation time, operation date, and etc.

### 4.2 List

### 4.3 Filtering/Searching

#### **4.3.1 Filter**

In both view, the log can be filtered by operation type, by the creation time using the existing time filter, or by customizing the range with the "Time range" button.&#x20;

<figure><img src="https://1526800164-files.gitbook.io/~/files/v0/b/gitbook-x-prod.appspot.com/o/spaces%2F50DeL6mO9sNbAZBSEdaN%2Fuploads%2FZ06piPGFdJETwpw4BNkX%2Fimage.png?alt=media&amp;token=01830c1b-b73a-4adb-bcb5-111201749965" alt=""><figcaption></figcaption></figure>

#### **4.3.2 Search**

The user can search log based on log content or operating target that match or are similar to the text entered in the search box.

<figure><img src="https://1526800164-files.gitbook.io/~/files/v0/b/gitbook-x-prod.appspot.com/o/spaces%2F50DeL6mO9sNbAZBSEdaN%2Fuploads%2FblHtlg7SPCh8zAnJ4jol%2Fimage.png?alt=media&amp;token=c8a4720d-dadb-4afc-b706-39411dd53d01" alt=""><figcaption></figcaption></figure>

## 5 View permission details

**Purpose:** To provide clear overview of who is granted specific permissions and grouping the data by different dimensions.

<figure><img src="https://1526800164-files.gitbook.io/~/files/v0/b/gitbook-x-prod.appspot.com/o/spaces%2F50DeL6mO9sNbAZBSEdaN%2Fuploads%2FacEz9DsfmGR8Lb17g27W%2Fimage.png?alt=media&amp;token=40c7419a-db13-4c08-a079-ed8092f3408d" alt=""><figcaption></figcaption></figure>

### 5.1 Permission <a href="#id-5.1-permission" id="id-5.1-permission"></a>

**Purpose**: This dimension provides an overview of the specific types of permissions assigned (e.g., Add, Edit, Delete) and to whom they are granted.

<figure><img src="https://1526800164-files.gitbook.io/~/files/v0/b/gitbook-x-prod.appspot.com/o/spaces%2F50DeL6mO9sNbAZBSEdaN%2Fuploads%2FKquUOecgBr2qBq88tlJi%2Fimage.png?alt=media&amp;token=c0497fd1-d1cc-4939-8135-5459cfef45b7" alt=""><figcaption></figcaption></figure>

**Remark:**

* **Permission Type**: The type of action or permission granted (e.g., View, Edit, Delete, etc.).
* **Scope**: Defines who the permission applies to (e.g., specific user, role, department, all users).
* **Data Filtering**: This refers to any restrictions applied to the data a user can access based on specific criteria (e.g., only data related to their department, subordinates, or specific customers).

### 5.2 User <a href="#id-5.2-user" id="id-5.2-user"></a>

**Purpose**: Shows the individual users and the specific permissions they have, along with the extent to which they can access or modify data.

<figure><img src="https://1526800164-files.gitbook.io/~/files/v0/b/gitbook-x-prod.appspot.com/o/spaces%2F50DeL6mO9sNbAZBSEdaN%2Fuploads%2FDMmUWHkoczGfZL98UaQl%2Fimage.png?alt=media&amp;token=a3dfc57b-c5bb-4f01-9e95-a8333a2607f5" alt=""><figcaption></figcaption></figure>

**Remark:**

**User**: The specific person (e.g., Axel, Matthew).

**Data penetration:** Indicates how deep the user's permissions reach (e.g., whether they can see only their own data, their subordinates' data, or a broader range).

**Existing permissions**: Lists the actions the user can perform (e.g., View, Edit).

**Data Filtering**: Specifies the data the user can access based on filtering conditions (e.g., only customers from a specific region).

### 5.3 Role <a href="#id-5.3-role" id="id-5.3-role"></a>

**Purpose**: Provides a role-based view of permissions, useful for managing large groups of users. It defines what permissions are granted to users based on their role in the organization.

<figure><img src="https://1526800164-files.gitbook.io/~/files/v0/b/gitbook-x-prod.appspot.com/o/spaces%2F50DeL6mO9sNbAZBSEdaN%2Fuploads%2F8BD3PF3fcuo8bjATv09G%2Fimage.png?alt=media&amp;token=c7ce70a8-3a5e-4086-995e-5c2a90b77525" alt=""><figcaption></figcaption></figure>

**Remark:**

**Role**: Specifies the role (e.g., Account Manager, Support Engineer).

**Data Penetration**: Indicates how deep the role's permissions reach (e.g., whether they can see only their own data, their subordinates' data, or a broader range).

**Existing permissions**: Lists the actions the user can perform (e.g., View, Edit).

**Data Filtering**: Specifies the data the role can access based on filtering conditions (e.g., only customers from a specific region).

### 5.4 Department <a href="#id-5.4-department" id="id-5.4-department"></a>

**Purpose**: Provides a department-wide view of permissions, often used to grant broader access to users within a specific functional area (e.g., sales, support).

<figure><img src="https://1526800164-files.gitbook.io/~/files/v0/b/gitbook-x-prod.appspot.com/o/spaces%2F50DeL6mO9sNbAZBSEdaN%2Fuploads%2FR1VgUSyTnXFSteVXvaiS%2Fimage.png?alt=media&amp;token=8751475d-959e-4159-b5ca-8e2c980673c5" alt=""><figcaption></figcaption></figure>

**Remark:**

**Department**: Specifies the department (e.g., Sales, Purchase).

**Data Penetration**: Indicates how deep the department's permissions reach (e.g., whether they can see only their own data, their subordinates' data, or a broader range).

**Existing permissions**: Lists the actions the user can perform (e.g., View, Edit).

**Data Filtering**: Specifies the data the role can access based on filtering conditions (e.g., only customers from a specific region).

### 5.5 Fields <a href="#id-5.5-fields" id="id-5.5-fields"></a>

**Purpose**: Allows permissions to be controlled based on the relation of the user to specific data fields.

<figure><img src="https://1526800164-files.gitbook.io/~/files/v0/b/gitbook-x-prod.appspot.com/o/spaces%2F50DeL6mO9sNbAZBSEdaN%2Fuploads%2F2wLYCtjQsGLg0DjSlsyi%2Fimage.png?alt=media&amp;token=76a5c970-8dea-4c81-9e46-02db2a9462d2" alt=""><figcaption></figcaption></figure>

**Remarks:**

**Associated field:** Defines the user’s relationship to the data.

**Data Penetration**: Indicates how deep the department's permissions reach (e.g., whether they can see only their own data, their subordinates' data, or a broader range).

**Existing permissions**: Lists the actions the user can perform (e.g., View, Edit).

**Data Filtering**: Specifies the data the role can access based on filtering conditions (e.g., only customers from a specific region).


# Expense Category

## 1 Data Permission <a href="#id-1-data-permission" id="id-1-data-permission"></a>

**Purpose**: Controls access to expense cateogory based on the user's relationship to the data.

<figure><img src="https://1526800164-files.gitbook.io/~/files/v0/b/gitbook-x-prod.appspot.com/o/spaces%2F50DeL6mO9sNbAZBSEdaN%2Fuploads%2FSGgfhWg4tL9cSJWCmX3w%2Fimage.png?alt=media&amp;token=e4be5fd2-d50d-4dc8-9f16-afd1dd68578c" alt=""><figcaption></figcaption></figure>

<figure><img src="https://1526800164-files.gitbook.io/~/files/v0/b/gitbook-x-prod.appspot.com/o/spaces%2F50DeL6mO9sNbAZBSEdaN%2Fuploads%2FxX05iP04AMZxrBBBvXS3%2Fimage.png?alt=media&amp;token=eee1978e-c692-4e7b-8a89-6b20cf9fc656" alt=""><figcaption></figcaption></figure>

### 1.1 Associated field <a href="#id-1.1-relation-control" id="id-1.1-relation-control"></a>

**Creator**: The user who created the category.

### **1.2 Data Penetration** <a href="#id-1.2-operations" id="id-1.2-operations"></a>

Defines the relationship between other parties and the associated user that determines their permission to access the data.

* **Myself**: The associated user have access to data directly related themselves.
* **Superior**: The user’s direct supervisor have access to the data.
* **All Superiors**: All higher-ups in the organization hierarchy have access to the data.
* **Subordinates**: Users reporting directly to the associated user have access to the data.
* **All Subordinates**: All users lower in the organizational hierarchy have access to the data.
* **HOD (Head of Department):** The department head has access to the data.&#x20;
* **Same Department:** Users from the same department have access to the data.
* **Same Role**: Users with the same role have access to the data.

### **1.3 Operations** <a href="#id-1.2-operations" id="id-1.2-operations"></a>

**Use selector**: Allows users to select an expense category, enabling them to choose the appropriate category when entering or managing expense records.

**Remark:**&#x20;

Without use selector permission, the user will not be able to view the category while reimbursing expenses.

## 2 Monitoring Permission <a href="#id-2-monitoring-permission" id="id-2-monitoring-permission"></a>

**Purpose**: Provides the ability to monitor and manage data at various organizational levels.

<figure><img src="https://1526800164-files.gitbook.io/~/files/v0/b/gitbook-x-prod.appspot.com/o/spaces%2F50DeL6mO9sNbAZBSEdaN%2Fuploads%2FgPGObvQAzttX9KAGF190%2Fimage.png?alt=media&amp;token=bcca52d9-a7c8-4c9d-97ad-398cefa4b9c8" alt=""><figcaption></figcaption></figure>

<figure><img src="https://1526800164-files.gitbook.io/~/files/v0/b/gitbook-x-prod.appspot.com/o/spaces%2F50DeL6mO9sNbAZBSEdaN%2Fuploads%2FFIVwB83hUoHz1skIIN7D%2Fimage.png?alt=media&amp;token=1a236254-1b3d-4756-aa09-44ad6a2f3763" alt=""><figcaption></figcaption></figure>

### **2.1 User Scope** <a href="#id-1.1-user-scope" id="id-1.1-user-scope"></a>

**All Users**: Permissions apply to all users.

**Specific User**: Permissions granted based on individuals.

**Specific Role**: Permissions granted based on role.

**Specific Department**: Permissions granted based on department.

### **2.2 Data Penetration** <a href="#id-1.2-data-penetration" id="id-1.2-data-penetration"></a>

Defines the scope of data a user can access based on their hierarchical position within the organization.

* **Myself**: Access to data directly related to the user.
* **Superior**: Access to data created by the user’s direct supervisor.
* **All Superiors**: Access to data created by all higher-ups in the organization hierarchy.
* **Subordinates**: Access to data created by the user's subordinate.
* **All Subordinates**: Access to data created by the user’s direct subordinates and their subordinates (i.e., the entire reporting chain under the user).
* **HOD (Head of Department):** Access to data created by the department head.
* **Same Department:** Access to data created by all users within the same department
* **Same Role**: Access to data created by users holding the same role, even if they are in different departments.

### **2.3 Operations** <a href="#id-1.2-operations" id="id-1.2-operations"></a>

**Purpose:** Allows to configure the actions that the users are authorized to perform.

**Use selector**: Allows users to select an expense category, enabling them to choose the appropriate category when entering or managing expense records.

## 3 Page Permission <a href="#id-3-page-permission" id="id-3-page-permission"></a>

**Purpose**: Manages access to different features or functionalities within the expense category.

<figure><img src="https://1526800164-files.gitbook.io/~/files/v0/b/gitbook-x-prod.appspot.com/o/spaces%2F50DeL6mO9sNbAZBSEdaN%2Fuploads%2F95HpBVSTiOGcAt2pwzeH%2Fimage.png?alt=media&amp;token=6dc6cbf9-7d61-4938-91ee-8e7d5e58f413" alt=""><figcaption></figcaption></figure>

<figure><img src="https://1526800164-files.gitbook.io/~/files/v0/b/gitbook-x-prod.appspot.com/o/spaces%2F50DeL6mO9sNbAZBSEdaN%2Fuploads%2FWHiQLedlty9WsPe8f32S%2Fimage.png?alt=media&amp;token=d9fa280d-45fe-4f4d-9672-3f7e2049e53a" alt=""><figcaption></figcaption></figure>

### **3.1 User Scope** <a href="#id-3.1-operations" id="id-3.1-operations"></a>

**All Users**: Permissions apply to all users.

**Specific User**: Permissions granted based on individuals.

**Specific Role**: Permissions granted based on role.

**Specific Department**: Permissions granted based on department.

### **3.2 Operation**

**Purpose:** Allows to configure the actions that the users are authorized to perform.

**Import**: Allows batch creation of records by uploading data from an Excel file.

## 4 Log <a href="#id-4-log" id="id-4-log"></a>

### 4.1 View option

#### 4.1.1 **Timeline View**

Displays permission log in a **chronological timeline**, allowing users to see when each permission was created and track its history over time.

#### 4.1.2 **List View**

Presents permission log in a **detailed list format**, typically showing columns with permission details such as source, operation time, operation date, and etc.

### 4.2 List

### 4.3 Filtering/Searching

#### **4.3.1 Filter**

In both view, the log can be filtered by operation type, by the creation time using the existing time filter, or by customizing the range with the "Time range" button.&#x20;

<figure><img src="https://1526800164-files.gitbook.io/~/files/v0/b/gitbook-x-prod.appspot.com/o/spaces%2F50DeL6mO9sNbAZBSEdaN%2Fuploads%2Fgkk6vWzeqeCrwY6A3uqM%2Fimage.png?alt=media&amp;token=39f69bcb-10cd-4d65-8e52-fefd9cf702a7" alt=""><figcaption></figcaption></figure>

#### **4.3.2 Search**

The user can search log based on log content or operating target that match or are similar to the text entered in the search box.

<figure><img src="https://1526800164-files.gitbook.io/~/files/v0/b/gitbook-x-prod.appspot.com/o/spaces%2F50DeL6mO9sNbAZBSEdaN%2Fuploads%2FPDa0MEjX9Asot5nKa70A%2Fimage.png?alt=media&amp;token=b2bf0532-214b-4809-96fb-e005c1fcd51a" alt=""><figcaption></figcaption></figure>

## 5 View permission details

**Purpose:** To provide clear overview of who is granted specific permissions and grouping the data by different dimensions.

### 5.1 Permission <a href="#id-5.1-permission" id="id-5.1-permission"></a>

**Purpose**: This dimension provides an overview of the specific types of permissions assigned and to whom they are granted.

<figure><img src="https://1526800164-files.gitbook.io/~/files/v0/b/gitbook-x-prod.appspot.com/o/spaces%2F50DeL6mO9sNbAZBSEdaN%2Fuploads%2FYSQLyv3D3ZE44tfYzZII%2Fimage.png?alt=media&amp;token=2ceccb6b-ecc3-4512-b871-ad0fdba8cc3b" alt=""><figcaption></figcaption></figure>

**Remark:**

* **Permission Type**: The type of action or permission granted (e.g., View, Edit, Delete, etc.).
* **Scope**: Defines who the permission applies to (e.g., specific user, role, department, all users).
* **Data Filtering**: This refers to any restrictions applied to the data a user can access based on specific criteria (e.g., only data related to their department, subordinates, or specific customers).

### 5.2 User <a href="#id-5.2-user" id="id-5.2-user"></a>

**Purpose**: Shows the individual users and the specific permissions they have, along with the extent to which they can access or modify data.

<figure><img src="https://1526800164-files.gitbook.io/~/files/v0/b/gitbook-x-prod.appspot.com/o/spaces%2F50DeL6mO9sNbAZBSEdaN%2Fuploads%2FBgAvAkN3sGsFAycRI2EW%2Fimage.png?alt=media&amp;token=14e1f09e-1f6e-4890-9d49-27cd631bb7af" alt=""><figcaption></figcaption></figure>

**Remark:**

**User**: The specific person (e.g., Axel, Matthew).

**Data penetration:** Indicates how deep the user's permissions reach (e.g., whether they can see only their own data, their subordinates' data, or a broader range).

**Existing permissions**: Lists the actions the user can perform (e.g., Import).

**Data Filtering**: Specifies the data the user can access based on filtering conditions (e.g., only customers from a specific region).

### 5.3 Role <a href="#id-5.3-role" id="id-5.3-role"></a>

**Purpose**: Provides a role-based view of permissions, useful for managing large groups of users. It defines what permissions are granted to users based on their role in the organization.

<figure><img src="https://1526800164-files.gitbook.io/~/files/v0/b/gitbook-x-prod.appspot.com/o/spaces%2F50DeL6mO9sNbAZBSEdaN%2Fuploads%2FaKEnsTKaKgoxT8Wpd9Je%2Fimage.png?alt=media&amp;token=b721734b-5b98-49eb-bbe8-fb4aa5af2ca8" alt=""><figcaption></figcaption></figure>

**Remark:**

**Role**: Specifies the role (e.g., Account Manager, Support Engineer).

**Data Penetration**: Indicates how deep the role's permissions reach (e.g., whether they can see only their own data, their subordinates' data, or a broader range).

**Existing permissions**: Lists the actions the user can perform.

**Data Filtering**: Specifies the data the role can access based on filtering conditions (e.g., only customers from a specific region).

### 5.4 Department <a href="#id-5.4-department" id="id-5.4-department"></a>

**Purpose**: Provides a department-wide view of permissions, often used to grant broader access to users within a specific functional area (e.g., sales, support).

<figure><img src="https://1526800164-files.gitbook.io/~/files/v0/b/gitbook-x-prod.appspot.com/o/spaces%2F50DeL6mO9sNbAZBSEdaN%2Fuploads%2Ft72jXkG7gcGqjBNdzQEb%2Fimage.png?alt=media&amp;token=a91dd5eb-5dc6-44c4-a439-49b68c47322e" alt=""><figcaption></figcaption></figure>

**Remark:**

**Department**: Specifies the department (e.g., Sales, Purchase).

**Data Penetration**: Indicates how deep the department's permissions reach (e.g., whether they can see only their own data, their subordinates' data, or a broader range).

**Existing permissions**: Lists the actions the user can perform (e.g., View, Edit).

**Data Filtering**: Specifies the data the role can access based on filtering conditions (e.g., only customers from a specific region).

### 5.5 Fields <a href="#id-5.5-fields" id="id-5.5-fields"></a>

**Purpose**: Allows permissions to be controlled based on the relation of the user to specific data fields.

<figure><img src="https://1526800164-files.gitbook.io/~/files/v0/b/gitbook-x-prod.appspot.com/o/spaces%2F50DeL6mO9sNbAZBSEdaN%2Fuploads%2FFJVrgSK3gpjYGIdXrSAI%2Fimage.png?alt=media&amp;token=692040e0-de2b-4a6d-a23d-6af4d0174b19" alt=""><figcaption></figcaption></figure>

**Remarks:**

**Associated field:** Defines the user’s relationship to the data.

**Data Penetration**: Indicates how deep the department's permissions reach (e.g., whether they can see only their own data, their subordinates' data, or a broader range).

**Existing permissions**: Lists the actions the user can perform.

**Data Filtering**: Specifies the data the role can access based on filtering conditions (e.g., only customers from a specific region).


# Basic Settings

## 1 Budget

Toggle to enable or disable budget utilisation.

<figure><img src="https://1526800164-files.gitbook.io/~/files/v0/b/gitbook-x-prod.appspot.com/o/spaces%2F50DeL6mO9sNbAZBSEdaN%2Fuploads%2F1S2m9OGUSxeglag9Z7bz%2Fimage.png?alt=media&amp;token=2156db4e-6d0b-41d9-82ae-737dc1d98177" alt=""><figcaption></figcaption></figure>

**Remark:**

When disabled the budget's data will not be erased, but the expense entry can no longer utilize the budget.

## 2 Carry forward

Allows the user to configure the date and time for the budget to be carried forward to the next cycle.

### 2.1 Premilinary - Budget

When creating new budget in Settings > Budget create, tick on the \[Budget balance can be carried forward to the next cycle] to enable this function.

<figure><img src="https://1526800164-files.gitbook.io/~/files/v0/b/gitbook-x-prod.appspot.com/o/spaces%2F50DeL6mO9sNbAZBSEdaN%2Fuploads%2F6Dm73vloKvuC7YfuuCA0%2Fimage.png?alt=media&amp;token=6383de84-af96-426c-9fb3-0f544202ba89" alt=""><figcaption></figcaption></figure>

Remark:

This is only available for Quarter, Month, and Customised periods.&#x20;

### 2.2 Carry-over budget settings <a href="#x0nhw" id="x0nhw"></a>

Allows the user to configure the date and time for the budget to be carried forward to the next cycle.

<figure><img src="https://1526800164-files.gitbook.io/~/files/v0/b/gitbook-x-prod.appspot.com/o/spaces%2F50DeL6mO9sNbAZBSEdaN%2Fuploads%2FB83WZFDK7QcnqEYT5ZHF%2Fimage.png?alt=media&amp;token=edde9efc-34f8-44ff-ae4b-08557889c8fe" alt=""><figcaption></figcaption></figure>

**Remark:**

* If the budget period is quarterly and the carry forward control is enabled, the remaining budget amount can be carry forward to the next cycle on the set date during January, April, July, and October.&#x20;
* If the budget period is monthly and the carry forward control is enabled, the remaining budget amount can be carry forward to the next cycle on the configured date.

### 2.3 Budget Details <a href="#x0nhw" id="x0nhw"></a>

In Budget Statistics > Budget Details, if there is a remaining value from the previous cycle, the carried forward value will be added to the Total budget for this period as the new budget value for the current cycle.

<figure><img src="https://1526800164-files.gitbook.io/~/files/v0/b/gitbook-x-prod.appspot.com/o/spaces%2F50DeL6mO9sNbAZBSEdaN%2Fuploads%2FoXxvbbj2gvFFRnP7Evg3%2Fimage.png?alt=media&amp;token=6efebe28-80bd-40ad-ba65-cece5af8237d" alt=""><figcaption></figcaption></figure>

**Remark:**

* Each cycle’s budget will only be carried forward once, and it will not be carried over multiple times.
* Only amounts greater than 0 will be carried forward.
* After carryover, modifying the current cycle's budget amount (whether increasing or decreasing) or adjusting the budget amount will not affect the carried-forward amount from the previous cycle.
  * For example, if in May, the original budget is 1000, and the remaining budget is 500, then for June, the budget will be 1500. If the budget amount for June is modified to 2000, June's budget will be 2500.


# Expense category

The **expense category** is to categorize expenses into specific groups for better tracking, analysis, reporting, and decision-making. It is a **multi-level** categorization, providing detailed levels within each category.&#x20;

## 1 Create expense category

Step 1: Click on \[All category] to create a primary category or click on a parent-category to create a sub-category under an existing category

<figure><img src="https://1526800164-files.gitbook.io/~/files/v0/b/gitbook-x-prod.appspot.com/o/spaces%2F50DeL6mO9sNbAZBSEdaN%2Fuploads%2FWnzoPEeY9JMxafaVwxTJ%2Fimage.png?alt=media&amp;token=e9b4e78e-599d-4cc3-b7fd-e994b928358a" alt=""><figcaption></figcaption></figure>

Step 2: After entering the name and category no., click on the "Save" button on the top-right side of the page to ensure the new category is created.

<figure><img src="https://1526800164-files.gitbook.io/~/files/v0/b/gitbook-x-prod.appspot.com/o/spaces%2F50DeL6mO9sNbAZBSEdaN%2Fuploads%2F3xergPuqYmXcCb7jfeTA%2Fimage.png?alt=media&amp;token=d6abe40c-cfbf-43ac-b21d-0aad3ca96f69" alt=""><figcaption></figcaption></figure>

<figure><img src="https://1526800164-files.gitbook.io/~/files/v0/b/gitbook-x-prod.appspot.com/o/spaces%2F50DeL6mO9sNbAZBSEdaN%2Fuploads%2FfblHO2vSU9zNfxUfYbym%2Fimage.png?alt=media&amp;token=07d822bc-2401-48da-94fd-47a13ae22c1d" alt=""><figcaption></figcaption></figure>

**Remark:**

* The user can adjust the sequence of the category by drag and dropping them to match the desired sequence.&#x20;

### 1.1 Field Explanation

**Category name**: Cannot be filled in. Indication of the upper-level category within the hierarchy.

**Category no**.:Cannot be filled in. Indication of the upper-level category number, used for accounting system integration.

**Enable category**: Cannot be toggled. This setting determines whether the parent-category can be seen in my expenses, the expense list, included in reports, and displayed in the category selector.

**Sub-category name**: Can be filled. This is the name of the sub-category that falls under the upper-level category.

**Sub-category no.**: Can be filled. This is the identification number of the sub-category.

**Enable sub-category**: Can be toggled. This setting determines whether the sub-category is enabled and available for selection in the system.

## 2 Edit category

Step 1: Click on the parent-category to see all options available

<figure><img src="https://1526800164-files.gitbook.io/~/files/v0/b/gitbook-x-prod.appspot.com/o/spaces%2F50DeL6mO9sNbAZBSEdaN%2Fuploads%2FG9p0TnZB5JQ9GdcRP1qF%2Fimage.png?alt=media&amp;token=b977c30a-1d7e-4804-bd5c-ac183a44094a" alt=""><figcaption></figcaption></figure>

Step 2: Make the changes and click "Save" on the top-right of the page.

To add a new row, click on the (+) button or by pressing enter on your keyboard.

<figure><img src="https://1526800164-files.gitbook.io/~/files/v0/b/gitbook-x-prod.appspot.com/o/spaces%2F50DeL6mO9sNbAZBSEdaN%2Fuploads%2FxKh1DwrRI5An0C1T8Eq7%2Fimage.png?alt=media&amp;token=121ade2b-c0d2-46fe-83d6-d82866877dbb" alt=""><figcaption></figcaption></figure>

To delete row, simply click on the (x) next to the desire row to be removed.&#x20;

<figure><img src="https://1526800164-files.gitbook.io/~/files/v0/b/gitbook-x-prod.appspot.com/o/spaces%2F50DeL6mO9sNbAZBSEdaN%2Fuploads%2FuWZm9jNZBFugye6Ev5SJ%2Fimage.png?alt=media&amp;token=97ddba3f-8925-4956-9ee4-31bfb61caa4c" alt=""><figcaption></figcaption></figure>

Re-adjust sequence by drag and dropping the category on the list.

<figure><img src="https://1526800164-files.gitbook.io/~/files/v0/b/gitbook-x-prod.appspot.com/o/spaces%2F50DeL6mO9sNbAZBSEdaN%2Fuploads%2FuGQbNcjk9rBtwFBtYXPW%2Fimage.png?alt=media&amp;token=abc235b6-d979-4e6b-8d5b-5fc670065e06" alt=""><figcaption></figcaption></figure>

**Before**

<figure><img src="https://1526800164-files.gitbook.io/~/files/v0/b/gitbook-x-prod.appspot.com/o/spaces%2F50DeL6mO9sNbAZBSEdaN%2Fuploads%2FUHmATzgLRmU4bKrMdD82%2Fimage.png?alt=media&amp;token=1976a7f8-0f84-4185-aa08-1a3949dd5d4c" alt=""><figcaption></figcaption></figure>

**After**

<figure><img src="https://1526800164-files.gitbook.io/~/files/v0/b/gitbook-x-prod.appspot.com/o/spaces%2F50DeL6mO9sNbAZBSEdaN%2Fuploads%2FTD8ZspOOYmAYwPmk551O%2Fimage.png?alt=media&amp;token=16d70e28-027d-4892-ba8d-3ec080c31dd2" alt=""><figcaption></figcaption></figure>

**Remark:**

This will affect the sequence presented in a table report.&#x20;

## 3 Import

Step 1: In the top-right corner of the page, click "Import".

<figure><img src="https://1526800164-files.gitbook.io/~/files/v0/b/gitbook-x-prod.appspot.com/o/spaces%2F50DeL6mO9sNbAZBSEdaN%2Fuploads%2FrO6yyiObP8SEEW5DOYRN%2Fimage.png?alt=media&amp;token=81971723-c36c-48e5-9b9c-dd282966d214" alt=""><figcaption></figcaption></figure>

Step 2: Export the template by clicking on "Export template".

<figure><img src="https://1526800164-files.gitbook.io/~/files/v0/b/gitbook-x-prod.appspot.com/o/spaces%2F50DeL6mO9sNbAZBSEdaN%2Fuploads%2FCLwJIj6c5u2XTS8BwyZT%2Fimage.png?alt=media&amp;token=ef48cba8-618f-407b-8c8b-532c605c5da5" alt=""><figcaption></figcaption></figure>

Step 3: Fill up the Excel template

Step 4: Select the filled Excel file by double-clicking on the file or click on the file and click "Open".

<figure><img src="https://1526800164-files.gitbook.io/~/files/v0/b/gitbook-x-prod.appspot.com/o/spaces%2F50DeL6mO9sNbAZBSEdaN%2Fuploads%2F0fv4zRVJ8knHTLavfnWT%2Fimage.png?alt=media&amp;token=9a6da8cc-fc9e-4551-914d-bfc396cab083" alt=""><figcaption><p><br></p></figcaption></figure>

Step 5: Select whether you would like to add new data or update the existing data, once done, click on "Start importing" to begin the import.

<figure><img src="https://1526800164-files.gitbook.io/~/files/v0/b/gitbook-x-prod.appspot.com/o/spaces%2F50DeL6mO9sNbAZBSEdaN%2Fuploads%2Fte1soJhTV5diOSqhnCEz%2Fimage.png?alt=media&amp;token=8e3409c4-0c95-4288-9fb3-dc3ec23dca91" alt=""><figcaption></figcaption></figure>


# Expense Report

This section provides visual insights into reimbursement data through various charts and graphs, allowing users to analyze spending patterns across multiple dimensions.

The permission to view the report is set in the Statistic module > Report Management > Advance settings > View permission

## 1 Monthly Expense Trend

The **Line Chart** provides a visual representation of total monthly spending for the current year. It allows users to track, analyze, and compare expense trends over time.&#x20;

<figure><img src="https://1526800164-files.gitbook.io/~/files/v0/b/gitbook-x-prod.appspot.com/o/spaces%2F50DeL6mO9sNbAZBSEdaN%2Fuploads%2FWxsleeQ5r3AlZtqtRJd6%2Fimage.png?alt=media&amp;token=afd198ac-c0ac-4e6d-a6d5-8498d7986987" alt=""><figcaption></figcaption></figure>

**Remark:**

* Displays a "No data" message if no data source is available for this report.

### 1.1 Data Representation

* Each data point on the chart represents the total spending for a specific month.
* The x-axis displays the months (January through December).
* The y-axis displays the total spending amount of the system's default currency.
* The chart is based on submitted expense entries.

### 1.2 Details&#x20;

Click on the data point to view the exact spending amount for that month.

<figure><img src="https://1526800164-files.gitbook.io/~/files/v0/b/gitbook-x-prod.appspot.com/o/spaces%2F50DeL6mO9sNbAZBSEdaN%2Fuploads%2F8UeFJxEylxsyvS3sTWtb%2Fimage.png?alt=media&amp;token=1c7a809b-3797-4d92-a75f-34e01aafb9ff" alt=""><figcaption></figcaption></figure>

### **1.3 Export**

The chart can be exported as an image for reporting purposes.

<figure><img src="https://1526800164-files.gitbook.io/~/files/v0/b/gitbook-x-prod.appspot.com/o/spaces%2F50DeL6mO9sNbAZBSEdaN%2Fuploads%2FPmWnzQMKdJhOzQLWlFDl%2Fimage.png?alt=media&amp;token=35e1f22c-de49-40a2-b5d5-d34739c4c773" alt=""><figcaption></figcaption></figure>

<figure><img src="https://1526800164-files.gitbook.io/~/files/v0/b/gitbook-x-prod.appspot.com/o/spaces%2F50DeL6mO9sNbAZBSEdaN%2Fuploads%2FWODwyLV6NrkwmL5Rw02c%2Fimage.png?alt=media&amp;token=8983e6fc-94ba-4b24-bced-61ebc7f1c5fd" alt=""><figcaption></figcaption></figure>

## 2 User Spending Ratio

This chart provides a visual representation of total reimbursement amounts categorized by user. Each segment of the pie represents a user's share of the total expenses within the selected time frame.

<figure><img src="https://1526800164-files.gitbook.io/~/files/v0/b/gitbook-x-prod.appspot.com/o/spaces%2F50DeL6mO9sNbAZBSEdaN%2Fuploads%2FM36lMS3QHuRmtUus2kih%2Fimage.png?alt=media&amp;token=422513e6-28dd-451c-8efd-2983cf2dfc08" alt=""><figcaption></figcaption></figure>

**Remark:**

The user can view the exact amount and percentage for a user by hovering over the respective part.

### 2.1 Details

Click on the specific section to open a detailed view of expenses by user.

<figure><img src="https://1526800164-files.gitbook.io/~/files/v0/b/gitbook-x-prod.appspot.com/o/spaces%2F50DeL6mO9sNbAZBSEdaN%2Fuploads%2FCIs41x7LQ5LS66HPs6pi%2Fimage.png?alt=media&amp;token=f26bc2ca-d03a-471b-851e-4d70df6eb7c8" alt=""><figcaption></figcaption></figure>

### **2.2 Filter**

Allows the user to filter the data by time period.

* **All**: Shows all-time data.
* **This Year**: Data for the current calendar year.
* **Last Year**: Data for the previous calendar year.
* **This Month**: Data for the current month.
* **Last Month**: Data for the previous month.

### **2.3 Export**

Chart can be exported to image.

<figure><img src="https://1526800164-files.gitbook.io/~/files/v0/b/gitbook-x-prod.appspot.com/o/spaces%2F50DeL6mO9sNbAZBSEdaN%2Fuploads%2F7U45lZII0spe90Sc6Jlv%2Fimage.png?alt=media&amp;token=b2153f90-cf5e-4ce8-adf8-5061559dd609" alt=""><figcaption></figcaption></figure>

## 3 Department Spending Ratio

Displays reimbursement amounts distributed across departments. Each segment corresponds to a department's spending ratio for the selected period.

<figure><img src="https://1526800164-files.gitbook.io/~/files/v0/b/gitbook-x-prod.appspot.com/o/spaces%2F50DeL6mO9sNbAZBSEdaN%2Fuploads%2FoC3eSwVj1ZBnheLO6imX%2Fimage.png?alt=media&amp;token=8d5a8388-d3d4-4390-81c3-56ba499a0e00" alt="" width="375"><figcaption></figcaption></figure>

**Remark:**

Hover to view exact figures and percentages for each department.

### 3.1 Details

Click on the specific section to open a detailed view of expenses by department.

<figure><img src="https://1526800164-files.gitbook.io/~/files/v0/b/gitbook-x-prod.appspot.com/o/spaces%2F50DeL6mO9sNbAZBSEdaN%2Fuploads%2F5w6euRmY4F8hVBHWvpPO%2Fimage.png?alt=media&amp;token=4372af17-47f9-46e1-ae81-aa14f4a05140" alt=""><figcaption></figcaption></figure>

### 3.2 Filter

Allows the user to filter the data by time period, default **This Month**.

* **All**: Shows all-time data.
* **This Year**: Data for the current calendar year.
* **Last Year**: Data for the previous calendar year.
* **This Month**: Data for the current month.
* **Last Month**: Data for the previous month.

### 3.3 Export

Chart can be exported to image.

<figure><img src="broken://files/dCcojOoZ3m9biPnCtLDF" alt=""><figcaption></figcaption></figure>

## 4 Project Spending Ratio

A pie chart summarizing expenses attributed to various projects, showing their proportion relative to total reimbursements.

<figure><img src="https://1526800164-files.gitbook.io/~/files/v0/b/gitbook-x-prod.appspot.com/o/spaces%2F50DeL6mO9sNbAZBSEdaN%2Fuploads%2Fc8AlQJxg4gpP87rzptv1%2Fimage.png?alt=media&amp;token=fbb9e473-99fd-464a-841c-1c31881e9011" alt="" width="375"><figcaption></figcaption></figure>

**Remark:**

The user can view the exact amount and percentage for a project by hovering over the respective part.

### 4.1 Details

Click on the specific section to open a detailed view of expenses by project.

<figure><img src="https://1526800164-files.gitbook.io/~/files/v0/b/gitbook-x-prod.appspot.com/o/spaces%2F50DeL6mO9sNbAZBSEdaN%2Fuploads%2FeNLVMEQbIegicRHJCmSh%2Fimage.png?alt=media&amp;token=d4ff1293-f949-4536-9d2a-63daa784bc59" alt=""><figcaption></figcaption></figure>

### 4.2 Filter

Allows the user to filter the data by time period, default **This Month**.

* **All**: Shows all-time data.
* **This Year**: Data for the current calendar year.
* **Last Year**: Data for the previous calendar year.
* **This Month**: Data for the current month.
* **Last Month**: Data for the previous month.

### 4.3 Export

Chart can be exported to image.

<figure><img src="https://1526800164-files.gitbook.io/~/files/v0/b/gitbook-x-prod.appspot.com/o/spaces%2F50DeL6mO9sNbAZBSEdaN%2Fuploads%2FBWWerCUY46axEC2bZITo%2Fimage.png?alt=media&amp;token=1bccb271-9d26-4ee1-8481-dd3ea9392e09" alt=""><figcaption></figcaption></figure>

## 5 Category Spending Ratio

Provides an overview of expenses grouped by reimbursement categories. Each segment of the pie represents an expense category's contribution to the total reimbursement amount.

<figure><img src="https://1526800164-files.gitbook.io/~/files/v0/b/gitbook-x-prod.appspot.com/o/spaces%2F50DeL6mO9sNbAZBSEdaN%2Fuploads%2FfT73VyfIm1Xn3mtf6w4c%2Fimage.png?alt=media&amp;token=5e6b2dba-66b2-4d26-90e7-428b30e09908" alt="" width="375"><figcaption></figcaption></figure>

**Remark:**

The user can view the exact amount and percentage for a category by hovering over the respective part.

### 5.1 Details

Click on the specific section to open a detailed view of expenses by category.

<figure><img src="https://1526800164-files.gitbook.io/~/files/v0/b/gitbook-x-prod.appspot.com/o/spaces%2F50DeL6mO9sNbAZBSEdaN%2Fuploads%2FqpCKVwRRXdK6AsWuQks6%2Fimage.png?alt=media&amp;token=ffb99dcb-21c5-4916-b06a-dbce4002c8c6" alt=""><figcaption></figcaption></figure>

### 5.2 Filter

Allows the user to filter the data by time period, default this month

* **All**: Shows all-time data.
* **This Year**: Data for the current calendar year.
* **Last Year**: Data for the previous calendar year.
* **This Month**: Data for the current month.
* **Last Month**: Data for the previous month.

### 5.3 Export

Chart can be exported to image.

<figure><img src="https://1526800164-files.gitbook.io/~/files/v0/b/gitbook-x-prod.appspot.com/o/spaces%2F50DeL6mO9sNbAZBSEdaN%2Fuploads%2FSxzXEQjSnl875VX3JQjD%2Fimage.png?alt=media&amp;token=344e1130-3b4c-4308-ba04-b6f484b874eb" alt=""><figcaption></figcaption></figure>

## 6 Expense Beneficiary Department Statistics by Category

A bar chart that breaks down reimbursement amounts by beneficiary department and further classifies them by expense category.

<figure><img src="https://1526800164-files.gitbook.io/~/files/v0/b/gitbook-x-prod.appspot.com/o/spaces%2F50DeL6mO9sNbAZBSEdaN%2Fuploads%2Fr52mYe3Bj8sDRTyhrnPP%2Fimage.png?alt=media&amp;token=dbfa0575-ec0f-4844-9c33-e67432b28322" alt=""><figcaption></figcaption></figure>

Remark:

* Hover over a bar segment to view details like department name, category, and amount.

### 6.1 Details

Click on the specific section to open a detailed view of expenses by department.

<figure><img src="https://1526800164-files.gitbook.io/~/files/v0/b/gitbook-x-prod.appspot.com/o/spaces%2F50DeL6mO9sNbAZBSEdaN%2Fuploads%2FGq2YAiBXx84Qx4r0PtuB%2Fimage.png?alt=media&amp;token=5584741b-87ee-4900-97d9-0c910720887e" alt=""><figcaption></figcaption></figure>

### 6.2 Filter

Allows the user to filter the data by time period, default this month

* **All**: Shows all-time data.
* **This Year**: Data for the current calendar year.
* **Last Year**: Data for the previous calendar year.
* **This Month**: Data for the current month.
* **Last Month**: Data for the previous month.

### 6.3 Export

Chart can be exported to image.

<figure><img src="https://1526800164-files.gitbook.io/~/files/v0/b/gitbook-x-prod.appspot.com/o/spaces%2F50DeL6mO9sNbAZBSEdaN%2Fuploads%2F9f2vYVfJ9CaoEAwYIEDK%2Fimage.png?alt=media&amp;token=600fab02-c0ae-41df-a030-3d09139a3b49" alt=""><figcaption></figcaption></figure>

## 7 Annual Expense statistics

A histogram displaying the total reimbursement amounts for the year, segmented by quarter. Each quarter is represented by a distinct color to easily differentiate spending trends.

<figure><img src="https://1526800164-files.gitbook.io/~/files/v0/b/gitbook-x-prod.appspot.com/o/spaces%2F50DeL6mO9sNbAZBSEdaN%2Fuploads%2FWyi1RutO6soQJhapmiHB%2Fimage.png?alt=media&amp;token=1ca26278-b2a4-4b6b-8151-2031031120d8" alt=""><figcaption></figcaption></figure>

**Remark:**

Hover over a bar to see exact figures for the quarter.

### 7.1 Data Representation

* Each quarter uses a different color for quick visual identification.

### 7.2 Details

Click on the specific section to open a detailed view of all expense entries of the year.

<figure><img src="https://1526800164-files.gitbook.io/~/files/v0/b/gitbook-x-prod.appspot.com/o/spaces%2F50DeL6mO9sNbAZBSEdaN%2Fuploads%2FjHTk5hKEErkrZYKiAAQU%2Fimage.png?alt=media&amp;token=73c5d664-c931-4272-b4d8-ee625ae09eb0" alt=""><figcaption></figcaption></figure>

### 7.3 Export

Chart can be exported to image.

<figure><img src="https://1526800164-files.gitbook.io/~/files/v0/b/gitbook-x-prod.appspot.com/o/spaces%2F50DeL6mO9sNbAZBSEdaN%2Fuploads%2FfgFkhP5EwbSvEAWmH9gB%2Fimage.png?alt=media&amp;token=a117ef02-e753-4cd5-8c43-0ba4a1440972" alt=""><figcaption></figcaption></figure>


# Project


# My project

In this menu, all the projects the current user participated are listed.

<figure><img src="https://1526800164-files.gitbook.io/~/files/v0/b/gitbook-x-prod.appspot.com/o/spaces%2F50DeL6mO9sNbAZBSEdaN%2Fuploads%2F4WsIHzTwoEKEfJ2j2bPU%2Fimage.png?alt=media&amp;token=190a2a00-7ffe-42bd-bd1b-a9538dc17489" alt=""><figcaption></figcaption></figure>

## 1 List Data

### 1.1 View Project

The user can choose one of the two modes \[Card View] and \[List View] as display options

#### 1.1.1 Card View

<figure><img src="https://1526800164-files.gitbook.io/~/files/v0/b/gitbook-x-prod.appspot.com/o/spaces%2F50DeL6mO9sNbAZBSEdaN%2Fuploads%2Fmi6guF9mYKjtSO6EBXVc%2Fimage.png?alt=media&amp;token=b63116b3-a17f-47ed-8776-8b88f4b71d7d" alt=""><figcaption></figcaption></figure>

#### 1.1.2 List View

<figure><img src="https://1526800164-files.gitbook.io/~/files/v0/b/gitbook-x-prod.appspot.com/o/spaces%2F50DeL6mO9sNbAZBSEdaN%2Fuploads%2FqpPPpDA9y2lov1xSeozN%2Fimage.png?alt=media&amp;token=75bffa9e-e908-4268-9439-fc6da24fdd2f" alt=""><figcaption></figcaption></figure>

### 1.2 Sort Project

The project list supports sorting by different columns, such as Project No., status, progress, and the time of progress changes, in ascending or descending order.

<figure><img src="https://1526800164-files.gitbook.io/~/files/v0/b/gitbook-x-prod.appspot.com/o/spaces%2F50DeL6mO9sNbAZBSEdaN%2Fuploads%2Ft1XAtXuLSLK1fJe2cFku%2Fimage.png?alt=media&amp;token=bb65d305-5791-4786-adee-fdf5d869d5c6" alt=""><figcaption></figcaption></figure>

### 1.3 Batch change of personnel&#x20;

User will only be able to view this function under the relevant project template, this function is not available in \[All].

Step 1:  Select the project, then click "Batch adjustment of personnel" on the bottom-left of the page to execute the modifications.

<figure><img src="https://1526800164-files.gitbook.io/~/files/v0/b/gitbook-x-prod.appspot.com/o/spaces%2F50DeL6mO9sNbAZBSEdaN%2Fuploads%2FeIcWcWasplfY0OICJeTY%2Fimage.png?alt=media&amp;token=01ec7d01-8d99-4849-a339-dc4040692dc6" alt=""><figcaption></figcaption></figure>

Step 2: Select the personnel field to be changed.

<figure><img src="https://1526800164-files.gitbook.io/~/files/v0/b/gitbook-x-prod.appspot.com/o/spaces%2F50DeL6mO9sNbAZBSEdaN%2Fuploads%2FKvgDYx6uUVK4y8MmXMTC%2Fimage.png?alt=media&amp;token=adc278d4-7abc-457f-a358-31c99a317efb" alt=""><figcaption></figcaption></figure>

Step 3: Select the Edit Type.

<figure><img src="https://1526800164-files.gitbook.io/~/files/v0/b/gitbook-x-prod.appspot.com/o/spaces%2F50DeL6mO9sNbAZBSEdaN%2Fuploads%2FYHpzHRVkRr8Xlrsp81RC%2Fimage.png?alt=media&amp;token=351645ec-2775-406a-8702-7a5e18000431" alt=""><figcaption></figcaption></figure>

Project Team Before

<figure><img src="https://1526800164-files.gitbook.io/~/files/v0/b/gitbook-x-prod.appspot.com/o/spaces%2F50DeL6mO9sNbAZBSEdaN%2Fuploads%2FM3tOJBQkEC4ThTvvJSUL%2Fimage.png?alt=media&amp;token=cf2948fa-a082-428d-ba45-1e99e073ff8f" alt=""><figcaption></figcaption></figure>

#### 1.3.1  Modify to new value

Functionality: Changes all existing personnel members with another of a specific role within the project team.

Step 1: Select "Modify to new value" as the edit type, then select the user to replace the current personnel with in \[Change to], and click "Confirm" to save the new changes.&#x20;

<figure><img src="https://1526800164-files.gitbook.io/~/files/v0/b/gitbook-x-prod.appspot.com/o/spaces%2F50DeL6mO9sNbAZBSEdaN%2Fuploads%2FGmTdrTnZbaCYUrfd4mME%2Fimage.png?alt=media&amp;token=2eb1696c-c479-4351-a9f7-202af4f926cb" alt=""><figcaption></figcaption></figure>

Project Team After

<figure><img src="https://1526800164-files.gitbook.io/~/files/v0/b/gitbook-x-prod.appspot.com/o/spaces%2F50DeL6mO9sNbAZBSEdaN%2Fuploads%2Fr5hQzPD4F6jd4WfBcA9Q%2Fimage.png?alt=media&amp;token=8ea03f2f-d411-4ab5-ac9b-c1cc9794a43b" alt=""><figcaption></figcaption></figure>

#### 1.3.2 Replace content

Functionality: Replaces the existing user of a role within the project team, without changing the other assigned individual.

Step 1: Select "Replace content" as the edit type and the user to be replaced with in {Change} and the personnel to replace them with in {To}.

Step 2: Click "Confirm" to save the new changes.&#x20;

<figure><img src="https://1526800164-files.gitbook.io/~/files/v0/b/gitbook-x-prod.appspot.com/o/spaces%2F50DeL6mO9sNbAZBSEdaN%2Fuploads%2FgKYKjVyGPs5hTNUXBv6m%2Fimage.png?alt=media&amp;token=2b47518e-708b-4f23-803b-499a450b93a8" alt=""><figcaption></figcaption></figure>

Project Team After

<figure><img src="https://1526800164-files.gitbook.io/~/files/v0/b/gitbook-x-prod.appspot.com/o/spaces%2F50DeL6mO9sNbAZBSEdaN%2Fuploads%2FnGU7PG1zI7K12ZPQVoB7%2Fimage.png?alt=media&amp;token=be20d71a-66f1-46b3-a08c-f01a1a442f58" alt=""><figcaption></figcaption></figure>

Remark:

The user can select one or more personnel to be replaced by one or more other personnel.

*Project Team Before*

<figure><img src="https://1526800164-files.gitbook.io/~/files/v0/b/gitbook-x-prod.appspot.com/o/spaces%2F50DeL6mO9sNbAZBSEdaN%2Fuploads%2FEhuFJNgNiinxUcV0hxaA%2Fimage.png?alt=media&amp;token=107a801b-7d6a-4a8e-a05f-c8f0f31781e3" alt=""><figcaption></figcaption></figure>

*Select the Project Manager and select the new project managers to replace the current one with.*

<figure><img src="https://1526800164-files.gitbook.io/~/files/v0/b/gitbook-x-prod.appspot.com/o/spaces%2F50DeL6mO9sNbAZBSEdaN%2Fuploads%2FfAjj5VnoxsrxCnrkDkxo%2Fimage.png?alt=media&amp;token=ee36e1a9-637b-48d3-b7c1-af73c10d9447" alt=""><figcaption></figcaption></figure>

Project Team After

<figure><img src="https://1526800164-files.gitbook.io/~/files/v0/b/gitbook-x-prod.appspot.com/o/spaces%2F50DeL6mO9sNbAZBSEdaN%2Fuploads%2FUJq3XznzhroeI7ex0S6b%2Fimage.png?alt=media&amp;token=4fc48d7b-a4cb-48ec-8a13-3ce422cef624" alt=""><figcaption></figcaption></figure>

#### 1.3.3 Clear content

Functionality: Resets all roles (Project Manager, Project Monitor, etc.) for the project team.

Step 1: Select "Clear content" as the \[Edit type], then click "Confirm" to proceed.

Remark: Only the project manager field cannot be cleared; the other team personnel fields can be cleared to blank.

<figure><img src="https://1526800164-files.gitbook.io/~/files/v0/b/gitbook-x-prod.appspot.com/o/spaces%2F50DeL6mO9sNbAZBSEdaN%2Fuploads%2FiwFdKzDFsIpuMbLYEw0M%2Fimage.png?alt=media&amp;token=2d9d9340-8183-445b-a58a-57efc4ce1db2" alt=""><figcaption></figcaption></figure>

Project Team After

<figure><img src="https://1526800164-files.gitbook.io/~/files/v0/b/gitbook-x-prod.appspot.com/o/spaces%2F50DeL6mO9sNbAZBSEdaN%2Fuploads%2FxNDfEGuBeCEnurAa3n24%2Fimage.png?alt=media&amp;token=b29b64cd-19ec-494d-9c7b-d718e5611c63" alt=""><figcaption></figcaption></figure>

#### 1.3.4 Add option

Functionality: Allows the addition of personnel to specific roles within the project team.

Step 1: Select "Add option" as the edit type and the user to be added to the role in {Select Add Option}, then click "Confirm" to proceed with the new changes.&#x20;

<figure><img src="https://1526800164-files.gitbook.io/~/files/v0/b/gitbook-x-prod.appspot.com/o/spaces%2F50DeL6mO9sNbAZBSEdaN%2Fuploads%2FtbtLPH07TU67zar7RCIk%2Fimage.png?alt=media&amp;token=2ee2d27b-22fe-4154-8fbe-d7d75b07b187" alt=""><figcaption></figcaption></figure>

Project Team After

<figure><img src="https://1526800164-files.gitbook.io/~/files/v0/b/gitbook-x-prod.appspot.com/o/spaces%2F50DeL6mO9sNbAZBSEdaN%2Fuploads%2FgVkWRNYVFmXl5K3X6ZvU%2Fimage.png?alt=media&amp;token=3594f6ca-4890-4759-80d6-7df3aba18547" alt=""><figcaption></figcaption></figure>

#### 1.3.5 Delete option

Functionality: Removes the specific personnel assigned to a specific role within the project team.

Step 1: Select "Delete option" as the edit type and the user to be remove from the field in {Select Delete Option}, then click "Confirm" to proceed with the new changes.&#x20;

<figure><img src="https://1526800164-files.gitbook.io/~/files/v0/b/gitbook-x-prod.appspot.com/o/spaces%2F50DeL6mO9sNbAZBSEdaN%2Fuploads%2Fx25h1bZdt3hCSsFI1Ajz%2Fimage.png?alt=media&amp;token=f733cba6-7cfa-4398-a136-745b00f37400" alt=""><figcaption></figcaption></figure>

Project Team After

<figure><img src="https://1526800164-files.gitbook.io/~/files/v0/b/gitbook-x-prod.appspot.com/o/spaces%2F50DeL6mO9sNbAZBSEdaN%2Fuploads%2FWoP47TmlpkHL9V6hK4Ar%2Fimage.png?alt=media&amp;token=f9a10c53-c771-48bb-bbb7-d757e0e682d8" alt=""><figcaption></figcaption></figure>

### 1.4 Delete Project

#### 1.4.1 Single Delete

Step 1: Select the project. Go to the end of the row, click more ···, and click delete.

<figure><img src="https://1526800164-files.gitbook.io/~/files/v0/b/gitbook-x-prod.appspot.com/o/spaces%2F50DeL6mO9sNbAZBSEdaN%2Fuploads%2FTR8vSORnuiZzMeoY3iIN%2Fimage.png?alt=media&amp;token=8c4e7fd6-7101-43d4-aa1a-8a920b4af4eb" alt=""><figcaption></figcaption></figure>

Step 2: Confirm the deletion

<figure><img src="https://1526800164-files.gitbook.io/~/files/v0/b/gitbook-x-prod.appspot.com/o/spaces%2F50DeL6mO9sNbAZBSEdaN%2Fuploads%2F7w0SIEYIslkDEApcHBdz%2Fimage.png?alt=media&amp;token=700ce77a-f8c5-4d75-af79-ac0fd35192c1" alt="" width="295"><figcaption></figcaption></figure>

<figure><img src="https://1526800164-files.gitbook.io/~/files/v0/b/gitbook-x-prod.appspot.com/o/spaces%2F50DeL6mO9sNbAZBSEdaN%2Fuploads%2FX6wEsZSVHZDk7qQfdpYO%2Fimage.png?alt=media&amp;token=115bfbf4-4084-45b8-a7bd-9014d6d200b1" alt="" width="278"><figcaption></figcaption></figure>

#### 4.1.2 Batch Delete

Step 1: Select the project, then click "Batch Delete" on the bottom-left of the page to execute the deletion of projects.

<figure><img src="https://1526800164-files.gitbook.io/~/files/v0/b/gitbook-x-prod.appspot.com/o/spaces%2F50DeL6mO9sNbAZBSEdaN%2Fuploads%2FJ0soqsM87RpJF6ylKVmF%2Fimage.png?alt=media&amp;token=646814ef-6383-4856-bcbc-a4fdca1a6ee5" alt=""><figcaption></figcaption></figure>

Step 2: Confirm the deletion

<figure><img src="https://1526800164-files.gitbook.io/~/files/v0/b/gitbook-x-prod.appspot.com/o/spaces%2F50DeL6mO9sNbAZBSEdaN%2Fuploads%2FP4K6a6ZwgH2PUd2zfhtn%2Fimage.png?alt=media&amp;token=226a0fb5-036d-42bf-8f84-44140d9561b1" alt="" width="295"><figcaption></figcaption></figure>

<figure><img src="https://1526800164-files.gitbook.io/~/files/v0/b/gitbook-x-prod.appspot.com/o/spaces%2F50DeL6mO9sNbAZBSEdaN%2Fuploads%2FFRvVMTVS7a9cjGSspfbX%2Fimage.png?alt=media&amp;token=0b993465-3e39-43ee-8226-182c0e20f173" alt="" width="278"><figcaption></figcaption></figure>

Remark:

* Projects cannot be deleted in Card View, only in List View.&#x20;
* Only the Project Manager can delete the project.
* Please note that if a project has been deleted, it can no longer be retrieved!

## 2 Filtering/Searching

### 2.1 Filter

System will default to display all projects that the current user has permission to access/view but they can filter the corresponding projects by project template (category) or by using additional options in the more filters, such as "involved with me" and "managed by me".

<figure><img src="https://1526800164-files.gitbook.io/~/files/v0/b/gitbook-x-prod.appspot.com/o/spaces%2F50DeL6mO9sNbAZBSEdaN%2Fuploads%2F7f7KxwUJgReiAiync4S9%2Fimage.png?alt=media&amp;token=97fd6769-be1f-40c5-abf6-312b2aa5faf9" alt=""><figcaption></figcaption></figure>

### 2.2 Search

#### 2.2.1 Simple Query

The users is able to filter project with project name that are similar/matched to the text entered in the search box.

<figure><img src="https://1526800164-files.gitbook.io/~/files/v0/b/gitbook-x-prod.appspot.com/o/spaces%2F50DeL6mO9sNbAZBSEdaN%2Fuploads%2FAPSKQPI9RMIQa7tUzMMO%2Fimage.png?alt=media&amp;token=4f491e86-fef0-4c7b-9ee3-52990ca4e909" alt=""><figcaption></figcaption></figure>

#### 2.2.2 Advanced Query

The \[Advance Query] allows the users to create complex searches or filters by specifying detailed conditions and criteria.

<figure><img src="https://1526800164-files.gitbook.io/~/files/v0/b/gitbook-x-prod.appspot.com/o/spaces%2F50DeL6mO9sNbAZBSEdaN%2Fuploads%2Flo4CKj5BTz8sr0zqeGeI%2Fimage.png?alt=media&amp;token=ef90cd38-6e3c-47d2-af28-87205d834b7a" alt=""><figcaption></figcaption></figure>

## 3 Export/Import

### 3.1 Export

Step 1: In the top-right corner of the page, click "Export".

<figure><img src="https://1526800164-files.gitbook.io/~/files/v0/b/gitbook-x-prod.appspot.com/o/spaces%2F50DeL6mO9sNbAZBSEdaN%2Fuploads%2F1zyuFBxx2zCljUDgj2Ay%2Fimage.png?alt=media&amp;token=cae233f5-59c4-4e16-811e-c40e961a8fae" alt=""><figcaption></figcaption></figure>

Step 2: Select or de-select fields to be exported, and click "Confirm" to begin the process.

<figure><img src="https://1526800164-files.gitbook.io/~/files/v0/b/gitbook-x-prod.appspot.com/o/spaces%2F50DeL6mO9sNbAZBSEdaN%2Fuploads%2Fqblv1GBysEdSVMqv5Cet%2Fimage.png?alt=media&amp;token=e67beee8-adc7-4fa9-8eca-94ecd957ee67" alt=""><figcaption></figcaption></figure>

### 3.2 Import

As different project categories may have different fields or field requirements, the import button will only be available under specific categories.

Step 1: In the top-right corner of the page, click "Import".

<figure><img src="https://1526800164-files.gitbook.io/~/files/v0/b/gitbook-x-prod.appspot.com/o/spaces%2F50DeL6mO9sNbAZBSEdaN%2Fuploads%2FB01hunqeIXuP9LWwOzLM%2Fimage.png?alt=media&amp;token=23b22614-6719-4d9c-b667-b3936260f723" alt=""><figcaption></figcaption></figure>

Step 2: Export the template by clicking on "Export template".

<figure><img src="https://1526800164-files.gitbook.io/~/files/v0/b/gitbook-x-prod.appspot.com/o/spaces%2F50DeL6mO9sNbAZBSEdaN%2Fuploads%2FHox2RDvKvz1XRCmegNoC%2Fimage.png?alt=media&amp;token=81edaf50-96a6-40f7-a124-6e49e61330b0" alt=""><figcaption></figcaption></figure>

Step 3: Fill up the Excel template.

<figure><img src="https://1526800164-files.gitbook.io/~/files/v0/b/gitbook-x-prod.appspot.com/o/spaces%2F50DeL6mO9sNbAZBSEdaN%2Fuploads%2FVDWvsaGLgBCO8w2hxizQ%2Fimage.png?alt=media&amp;token=0f9f4c8d-7365-41dd-9790-9c920373c79f" alt=""><figcaption></figcaption></figure>

Step 4: Select the updated Excel file by double-clicking on the file or click on the file and click "Open".

<figure><img src="https://1526800164-files.gitbook.io/~/files/v0/b/gitbook-x-prod.appspot.com/o/spaces%2F50DeL6mO9sNbAZBSEdaN%2Fuploads%2FltQLG9Aoqw5LonZyTW32%2Fimage.png?alt=media&amp;token=b7a0adf9-f1a1-4e91-b49d-aff214adb001" alt=""><figcaption></figcaption></figure>

Step 5: Click on "Start importing" to begin the import.

<figure><img src="https://1526800164-files.gitbook.io/~/files/v0/b/gitbook-x-prod.appspot.com/o/spaces%2F50DeL6mO9sNbAZBSEdaN%2Fuploads%2F8Y5f74ChJQjl49gAQ5FY%2Fimage.png?alt=media&amp;token=c2c8486d-bad2-46b8-8aac-a280d321fdf9" alt=""><figcaption></figcaption></figure>

When the import is complete, an Excel file will be generated to inform the user of the import status of all rows.


# Project Details

1 Task

### 1.1 View

#### 1.1.1 List View

Displays tasks in a structured table format with columns for key task fields.

<figure><img src="https://1526800164-files.gitbook.io/~/files/v0/b/gitbook-x-prod.appspot.com/o/spaces%2F50DeL6mO9sNbAZBSEdaN%2Fuploads%2FcoP7vx2AQmleHHnUXAOi%2Fimage.png?alt=media&amp;token=3135d78e-1fbb-4cac-b861-fe8847b35b49" alt=""><figcaption></figcaption></figure>

#### 1.1.2 Kanban

The Task KANBAN provides a flexible and visual way to manage tasks, allowing users to organize and update tasks based on customizable categories and statuses.

<figure><img src="https://1526800164-files.gitbook.io/~/files/v0/b/gitbook-x-prod.appspot.com/o/spaces%2F50DeL6mO9sNbAZBSEdaN%2Fuploads%2F0FtDGH7d0AxbESgRH6fq%2Fimage.png?alt=media&amp;token=26b2d3a5-b398-47ac-a5a7-9ce413c5b72d" alt=""><figcaption></figcaption></figure>

* **Columns for custom categories:** Each column represents a category, such as "To Do," "In Progress," and "Completed."
* **Task Cards:** Individual cards represent tasks and display essential details like Task name, Due date, Progress
* **Drag-and-Drop Functionality:** Users can drag task cards between columns to update their status or category..

#### 1.1.3 Gantt Chart

Provides a visual representation of task timelines and progress, helping users track the status of tasks within the project.&#x20;

<figure><img src="https://1526800164-files.gitbook.io/~/files/v0/b/gitbook-x-prod.appspot.com/o/spaces%2F50DeL6mO9sNbAZBSEdaN%2Fuploads%2FStiFBPnsZAgEoepBUBqz%2Fimage.png?alt=media&amp;token=4c8e2bfe-424e-4098-9725-ff496d54108a" alt=""><figcaption></figcaption></figure>

**Remark:**

Tasks are color-coded based on their current status for easy identification.

**Red:** Overdue task; **Green:** Task completed on time; **Blue:** Progressing task;

### 1.2 View Task Details

Clicking on a task to open a detailed view or at the end of the task, click more ···, click "Details" to open up task details.&#x20;

<figure><img src="https://1526800164-files.gitbook.io/~/files/v0/b/gitbook-x-prod.appspot.com/o/spaces%2F50DeL6mO9sNbAZBSEdaN%2Fuploads%2FhNIV1W5r7z0kcjopHUHy%2Fimage.png?alt=media&amp;token=76c46933-1c2e-4f47-95f5-5010c61ada68" alt=""><figcaption></figcaption></figure>

### 1.3 Create New Task

Step 1: Click "New task" on the top-right side of the page.&#x20;

<figure><img src="https://1526800164-files.gitbook.io/~/files/v0/b/gitbook-x-prod.appspot.com/o/spaces%2F50DeL6mO9sNbAZBSEdaN%2Fuploads%2Fr3pMRBc4iN9mlL3UJb8x%2Fimage.png?alt=media&amp;token=c67cafbc-bb3a-40e4-8376-b5edccffee14" alt=""><figcaption></figcaption></figure>

Step 2: Fill in the details and click "Submit" to create the task.&#x20;

<figure><img src="https://1526800164-files.gitbook.io/~/files/v0/b/gitbook-x-prod.appspot.com/o/spaces%2F50DeL6mO9sNbAZBSEdaN%2Fuploads%2FTIbwECJeCWoswhNIo3Qz%2Fimage.png?alt=media&amp;token=8055cd49-b765-4dbc-aea3-f04c711fe5cb" alt=""><figcaption></figcaption></figure>

**Task field**

* **Predecessor Task**: Represents a task that must be completed before the current task can begin.
* **Task Name:** Task name
* **Sorting:** Determines the order in which tasks are displayed in the task list.
* **Priority**: Indicates the importance of the task.
* **Milestone:** A label used to mark important stages or goals within the task.
* **Task Start Date:** The date when the task is scheduled to begin.
* **Task End Date**: The date when the task is scheduled to be completed.
* **Duration:** The time span between the start and end dates.
* **Details**: Provides a detailed description of the task. (The editor allows users to add images, links, files, and text, with customizable font options for formatting.)
* **Note:** Similar to "Details," but used for additional notes or reminders.&#x20;
* **Overdue**: Indicates whether the task is overdue. (If the task is 100% complete or marked as done after the end date, the task will be marked as "Overdue.")
* **Creator:** The user who created the task.
* **Creation Time:** The date and time when the task was created.
* **Attachment:** Allows users to upload and link files related to the task.

### 1.4 Edit Task

Step 1: On the end of the row, click more ···, and click on "Edit".

<figure><img src="https://1526800164-files.gitbook.io/~/files/v0/b/gitbook-x-prod.appspot.com/o/spaces%2F50DeL6mO9sNbAZBSEdaN%2Fuploads%2FrdAdXfZrEvaLYlnealxO%2Fimage.png?alt=media&amp;token=44cf3129-9f66-4332-be3d-5659649c428b" alt=""><figcaption></figcaption></figure>

Step 2: Edit the details, and click "Submit" to save the changes.

<figure><img src="https://1526800164-files.gitbook.io/~/files/v0/b/gitbook-x-prod.appspot.com/o/spaces%2F50DeL6mO9sNbAZBSEdaN%2Fuploads%2FS7lTwIxZB5B5jiYxogrO%2Fimage.png?alt=media&amp;token=6135f681-b947-411c-b8ec-6e6a8f4e36f0" alt=""><figcaption></figcaption></figure>

### 1.5 Delete Task&#x20;

Step 1: On the end of the row, click more ···, and click on "Delete".

<figure><img src="https://1526800164-files.gitbook.io/~/files/v0/b/gitbook-x-prod.appspot.com/o/spaces%2F50DeL6mO9sNbAZBSEdaN%2Fuploads%2FmP77JOQzTsd4rLKL4Qo8%2Fimage.png?alt=media&amp;token=36dff433-4666-4eb5-bbc7-d5235a278854" alt=""><figcaption></figcaption></figure>

Step 2: Click "Confirm" to proceed to delete the task.

<figure><img src="https://1526800164-files.gitbook.io/~/files/v0/b/gitbook-x-prod.appspot.com/o/spaces%2F50DeL6mO9sNbAZBSEdaN%2Fuploads%2FAs5lstAZb9DqHn5jlVM1%2Fimage.png?alt=media&amp;token=c368aa68-5ea7-422a-8ef0-b8c9913571d1" alt="" width="295"><figcaption></figcaption></figure>

### 1.6 Mark as done

**Method 1:**&#x20;

Step 1: Navigate to the task you want to mark as complete, click to view the details.

Step 2: Click the **Mark Done**, and the task status will immediately update to "Done."

<figure><img src="https://1526800164-files.gitbook.io/~/files/v0/b/gitbook-x-prod.appspot.com/o/spaces%2F50DeL6mO9sNbAZBSEdaN%2Fuploads%2FlYxtCXsNn9XtLlGRkopL%2Fimage.png?alt=media&amp;token=8e6d91e7-dca0-4ce1-8daa-9f2bcdf52318" alt=""><figcaption></figcaption></figure>

**Method 2:**

Step 1: Go to the task details view and locate the **feeback** Tab.

<figure><img src="https://1526800164-files.gitbook.io/~/files/v0/b/gitbook-x-prod.appspot.com/o/spaces%2F50DeL6mO9sNbAZBSEdaN%2Fuploads%2FT42cC0ammZHgkWSabRyr%2Fimage.png?alt=media&amp;token=c68310d0-b733-4f2b-b2fc-fd77697b0bb1" alt=""><figcaption></figcaption></figure>

Step 2: Click and drag the progress bar to **100%** and the system automatically marks the task as "Done."

<figure><img src="https://1526800164-files.gitbook.io/~/files/v0/b/gitbook-x-prod.appspot.com/o/spaces%2F50DeL6mO9sNbAZBSEdaN%2Fuploads%2FBh0wjXKrKYr4XQ6xi0YR%2Fimage.png?alt=media&amp;token=a82e4e9f-52c9-4ffe-a839-cf79770d31ab" alt=""><figcaption></figcaption></figure>

### 1.7 Create new subtask

For the users to break down a larger task into smaller, manageable components.

**Method 1:**&#x20;

Step 1: Navigate to the task to create a subtask for, click to view the task details, and click on "**New Subtask"**.

<figure><img src="https://1526800164-files.gitbook.io/~/files/v0/b/gitbook-x-prod.appspot.com/o/spaces%2F50DeL6mO9sNbAZBSEdaN%2Fuploads%2FqkwtwclrEhr06gOj1Gtp%2Fimage.png?alt=media&amp;token=d895c432-545f-4276-9ea7-0f17f4db7c0c" alt=""><figcaption></figcaption></figure>

**Method 2:**

Step 1: Navigate to the task to create a subtask for, at the end of the row, click ··· more and click on **"New subtask"**.

<figure><img src="https://1526800164-files.gitbook.io/~/files/v0/b/gitbook-x-prod.appspot.com/o/spaces%2F50DeL6mO9sNbAZBSEdaN%2Fuploads%2Fa97AohYbDrGaFT1lv5Dx%2Fimage.png?alt=media&amp;token=3207f550-eeb9-476a-9b21-26ed2762deb9" alt=""><figcaption></figcaption></figure>

**Step 2:**  Fill in the required fields for the subtask and save the Subtask.

**Remark:**

* Subtasks are visually nested under their parent task.
* Completing subtasks updates the overall progress of the parent task.
* Each subtask can have unique fields, such as start and end dates, assignees, and attachments.

### 1.8 Urge

Allows users to send reminders to task executors, creators, or selected users to prompt them about a task's progress or deadlines.

Step 1: Navigate to the task to be urged in the task list, click the **"Press to do"** button.

<figure><img src="https://1526800164-files.gitbook.io/~/files/v0/b/gitbook-x-prod.appspot.com/o/spaces%2F50DeL6mO9sNbAZBSEdaN%2Fuploads%2FxlZeWZAoYaydU3LWrK92%2Fimage.png?alt=media&amp;token=c8429575-85fb-468c-b867-db39f6902220" alt=""><figcaption></figcaption></figure>

Step 2: Fill in the details and click "Submit" to send the reminder.

<figure><img src="https://1526800164-files.gitbook.io/~/files/v0/b/gitbook-x-prod.appspot.com/o/spaces%2F50DeL6mO9sNbAZBSEdaN%2Fuploads%2FpW8C9j6HZsNiMnMCWxDC%2Fimage.png?alt=media&amp;token=8ea0642a-f0b3-4a2b-92b6-8d030b9051be" alt=""><figcaption></figcaption></figure>

**Remark:**

Prompt Content: Allows the user to customize Reminder Content

Select Recipients: Choose who will receive the reminder:

* **Task Executor**: The user assigned to the task.
* **Task Creator**: The user who created the task.
* **Selected User(s)**: Other relevant users who need to be reminded.

Set Reminder Method: Select the preferred method for sending the reminder:

### 1.9 Import/Export

#### 1.9.1 Import

Step 1: In the top-right corner of the page, click "Import".

<figure><img src="https://1526800164-files.gitbook.io/~/files/v0/b/gitbook-x-prod.appspot.com/o/spaces%2F50DeL6mO9sNbAZBSEdaN%2Fuploads%2FW7qfIb88iA9g2X31PhJS%2Fimage.png?alt=media&amp;token=4b002427-7c06-4eae-991a-ab0ba9f0abe2" alt=""><figcaption></figcaption></figure>

Step 2: Export the template by clicking on "Export template"

<figure><img src="https://1526800164-files.gitbook.io/~/files/v0/b/gitbook-x-prod.appspot.com/o/spaces%2F50DeL6mO9sNbAZBSEdaN%2Fuploads%2FJQaf1kLQ92pTdHbyR9cn%2Fimage.png?alt=media&amp;token=d1cd3f40-3374-427f-9b5b-05c28d139ca6" alt=""><figcaption></figcaption></figure>

Step 3: Fill up the Excel template

<figure><img src="https://1526800164-files.gitbook.io/~/files/v0/b/gitbook-x-prod.appspot.com/o/spaces%2F50DeL6mO9sNbAZBSEdaN%2Fuploads%2FftnPqSYRWoD3oTZHqFYK%2Fimage.png?alt=media&amp;token=490753ea-05d2-4c1d-b893-8f6a1880ec61" alt=""><figcaption></figcaption></figure>

Step 4: Select the updated Excel file by double-clicking on the file or click on the file and click "Open".

<figure><img src="https://1526800164-files.gitbook.io/~/files/v0/b/gitbook-x-prod.appspot.com/o/spaces%2F50DeL6mO9sNbAZBSEdaN%2Fuploads%2FUDVn2d2mbnI4YiQKDIgS%2Fimage.png?alt=media&amp;token=ef116a44-b9e6-46ea-a6b2-a9e45e575be2" alt=""><figcaption></figcaption></figure>

When the import is complete, an Excel file will be generated to inform the user of the import status of all rows and provide an error message if the import failed.

#### 1.9.2 Export

Step 1: In the top-right corner of the page, click "Export".

<figure><img src="https://1526800164-files.gitbook.io/~/files/v0/b/gitbook-x-prod.appspot.com/o/spaces%2F50DeL6mO9sNbAZBSEdaN%2Fuploads%2FRPFOUElK94R7x9dmOPMB%2Fimage.png?alt=media&amp;token=80367c9f-42de-49de-9e3d-ed9042639bfa" alt=""><figcaption></figcaption></figure>

Step 2: Select or de-select fields to be exported, and click "Confirm" to begin the process.

<figure><img src="https://1526800164-files.gitbook.io/~/files/v0/b/gitbook-x-prod.appspot.com/o/spaces%2F50DeL6mO9sNbAZBSEdaN%2Fuploads%2FFxSGA7rYZA6UyE9dpf6D%2Fimage.png?alt=media&amp;token=c47feb88-8cdf-47fb-9700-ae342e8142ef" alt=""><figcaption></figcaption></figure>

**Remark:**

* All project team personnel can export the tasks by default
* Other personnel needs export permission to be enabled separately
* All tasks of a project can be exported, including tasks without viewing permission.
* Supports exporting tasks after filtering
* Supports exporting customized fields in the task fields.
* If there is an attachment, it will be exported in a zip.

### 1.10 Filter/Search

#### 1.10.1 Filtering

The filter function allows users to refine or narrow down the data list based on the selected criteria.

Click on "More filters" to view more filtering options available.

<figure><img src="https://1526800164-files.gitbook.io/~/files/v0/b/gitbook-x-prod.appspot.com/o/spaces%2F50DeL6mO9sNbAZBSEdaN%2Fuploads%2FLv9qg80AbKpA5yMnI4kg%2Fimage.png?alt=media&amp;token=3fb0a122-e0b9-4071-ab0e-36bea0c09566" alt=""><figcaption></figcaption></figure>

By entering relevant text regarding contact names in the search box, users will be able to filter contacts with task name that are similar/matched to the text entered.

<figure><img src="https://1526800164-files.gitbook.io/~/files/v0/b/gitbook-x-prod.appspot.com/o/spaces%2F50DeL6mO9sNbAZBSEdaN%2Fuploads%2FRDM14t6HpDjuH01eIs10%2Fimage.png?alt=media&amp;token=fbaf0447-cff1-460f-9874-a0d04fba8641" alt=""><figcaption></figcaption></figure>

## 2 Team

This tab displays the project name and team members. Users with permission can add or remove personnel from each role.

<figure><img src="https://1526800164-files.gitbook.io/~/files/v0/b/gitbook-x-prod.appspot.com/o/spaces%2F50DeL6mO9sNbAZBSEdaN%2Fuploads%2FneGZMbdFSV9y8DXZQXRz%2Fimage.png?alt=media&amp;token=55fda6e8-fe5c-4536-aa4d-65331fc86221" alt=""><figcaption></figcaption></figure>

## 3 Discussion

Project team members can discuss project-related topics here, and the content can be deleted, quoted, edited, or replied to.

### 3.1 New Discussion

The discussion box is a control that offers formatting tools to enhance text, typically used for extensive content requiring highlighted formats or embedded images and videos.

Step 1: Fill in the discussion content ad click "Post" to create. &#x20;

<figure><img src="https://1526800164-files.gitbook.io/~/files/v0/b/gitbook-x-prod.appspot.com/o/spaces%2F50DeL6mO9sNbAZBSEdaN%2Fuploads%2FOpZgCXQpayfdbamdqJZ0%2Fimage.png?alt=media&amp;token=a756fe7f-9934-4ef5-9410-fcb1e13ec503" alt=""><figcaption></figcaption></figure>

### 3.1 Quote

<figure><img src="https://1526800164-files.gitbook.io/~/files/v0/b/gitbook-x-prod.appspot.com/o/spaces%2F50DeL6mO9sNbAZBSEdaN%2Fuploads%2FGmfiCdG57PlFPSnd0vo7%2Fimage.png?alt=media&amp;token=5921d37f-c90f-46ae-928b-739334088e58" alt=""><figcaption></figcaption></figure>

### 3.2 Reply&#x20;

<figure><img src="https://1526800164-files.gitbook.io/~/files/v0/b/gitbook-x-prod.appspot.com/o/spaces%2F50DeL6mO9sNbAZBSEdaN%2Fuploads%2FaqhdoluPo72pFDtACqI0%2Fimage.png?alt=media&amp;token=e7025a66-9d99-4f32-88dc-9e897a2d015a" alt=""><figcaption></figcaption></figure>

### 3.3 Edit

Step 1: Click on "Edit"

<figure><img src="https://1526800164-files.gitbook.io/~/files/v0/b/gitbook-x-prod.appspot.com/o/spaces%2F50DeL6mO9sNbAZBSEdaN%2Fuploads%2FMsNvWHB53rMyMKPhn74T%2Fimage.png?alt=media&amp;token=ee431e9a-ae86-4cb1-8134-29832851d84b" alt=""><figcaption></figcaption></figure>

Step 2: Amend the discussion content as required.&#x20;

<figure><img src="https://1526800164-files.gitbook.io/~/files/v0/b/gitbook-x-prod.appspot.com/o/spaces%2F50DeL6mO9sNbAZBSEdaN%2Fuploads%2FGfVecLaTFanJFtVYr0H1%2Fimage.png?alt=media&amp;token=e62ba581-601b-4042-a44c-3a8d08d948cb" alt=""><figcaption></figcaption></figure>

<figure><img src="https://1526800164-files.gitbook.io/~/files/v0/b/gitbook-x-prod.appspot.com/o/spaces%2F50DeL6mO9sNbAZBSEdaN%2Fuploads%2FYhzbh2fOCqjnLQnTpkxD%2Fimage.png?alt=media&amp;token=eef13850-1eb6-45a3-a75f-9ec77f774e35" alt=""><figcaption></figcaption></figure>

### 3.4 Delete

Step 1: Click on "Delete".

<figure><img src="https://1526800164-files.gitbook.io/~/files/v0/b/gitbook-x-prod.appspot.com/o/spaces%2F50DeL6mO9sNbAZBSEdaN%2Fuploads%2FQ918qJh2iWfPRoi0DkhO%2Fimage.png?alt=media&amp;token=85de201b-89f3-4c4e-8a8c-211e35504c45" alt=""><figcaption></figcaption></figure>

Step 2: Click "Confirm" to delete.

<figure><img src="https://1526800164-files.gitbook.io/~/files/v0/b/gitbook-x-prod.appspot.com/o/spaces%2F50DeL6mO9sNbAZBSEdaN%2Fuploads%2F67L0CdWCdYKdMeuC1cci%2Fimage.png?alt=media&amp;token=41d2ab35-6f50-4368-9c7e-6f903088e212" alt="" width="296"><figcaption></figcaption></figure>

**Remark:**&#x20;

Discussion that has been replied to or quoted cannot be deleted.&#x20;

## 4 Issues

Allows users to log, track, and manage project-related issues efficiently. Each issue can be associated with tasks, and details about the issue are recorded for resolution.

<figure><img src="https://1526800164-files.gitbook.io/~/files/v0/b/gitbook-x-prod.appspot.com/o/spaces%2F50DeL6mO9sNbAZBSEdaN%2Fuploads%2Fi9eWJwBEJMwSdWtKCiDR%2Fimage.png?alt=media&amp;token=453b42e3-bda8-465f-99d6-6bd143282e18" alt=""><figcaption></figcaption></figure>

### 4.1 Create

Step 1: Click the "New problem" button in the top-right corner to create the issue.

<figure><img src="https://1526800164-files.gitbook.io/~/files/v0/b/gitbook-x-prod.appspot.com/o/spaces%2F50DeL6mO9sNbAZBSEdaN%2Fuploads%2FOctWYrR8rVCf14BR7SKE%2Fimage.png?alt=media&amp;token=b6866841-550a-4eba-9744-8c53ae478256" alt=""><figcaption></figcaption></figure>

Step 2: Enter the issue details and click "Save" to create a draft or "Submit" to send it for handling.

<figure><img src="https://1526800164-files.gitbook.io/~/files/v0/b/gitbook-x-prod.appspot.com/o/spaces%2F50DeL6mO9sNbAZBSEdaN%2Fuploads%2Fr2ATw1nDOeLFb0rQXwsw%2Fimage.png?alt=media&amp;token=05bc408f-b68d-4e15-8b3e-5ad743c0ebae" alt=""><figcaption></figcaption></figure>

Remark:

* Save as draft: Issue status update to **Not submitted**, need to edit and submit the draft in edit mode.&#x20;
* Submit:  Issue status update to **In Progress**.

#### **Issue field:**

Affiliation Tasks: Task(s) related to the problem. - Not mandatory

Question Title: Summarise the issue.

Expire Date: Set the deadline for resolving the problem.

Proposer: Indicates the user who reported the problem.

Dealer: Select the team personnel responsible for handling the problem.

Question Type: Categorize the problem by type.

Priority Level: Indicate the urgency of the issue.

Problem Description: Provide detailed information about the issue.

Attachment: Attach relevant files or documents to support the issue report.

Created By: Displays the user who logged the issue.

Created At: Displays the timestamp when the issue was created.

### 4.2 Solution&#x20;

Handle review the problem details in the Issues tab, and post the solution for it.&#x20;

Step 1: Under the desired solution, click on "Solve" to provide solution to the issue.

<figure><img src="https://1526800164-files.gitbook.io/~/files/v0/b/gitbook-x-prod.appspot.com/o/spaces%2F50DeL6mO9sNbAZBSEdaN%2Fuploads%2FlfmEUzHL1wOaghznBBRZ%2Fimage.png?alt=media&amp;token=94aaeb3a-29fb-4810-962b-37f6931e9776" alt=""><figcaption></figcaption></figure>

Step 2: Enter the proposed solution and attach any relevant files or evidence of resolution, click "Submit" to log the resolution.

<figure><img src="https://1526800164-files.gitbook.io/~/files/v0/b/gitbook-x-prod.appspot.com/o/spaces%2F50DeL6mO9sNbAZBSEdaN%2Fuploads%2FEe2IMGQmGKBQIZUusrIw%2Fimage.png?alt=media&amp;token=892dc052-800a-4907-a4c1-3d52281a4c6d" alt=""><figcaption></figcaption></figure>

Remark: Issue status update to **In Progress**.

### 4.3 Receipt

The Proposer will be notified once the solution is posted then they will need to review the solution and confirm whether the issue has been resolved.

Step 1: Under the desired solution, click on "Receipt".

<figure><img src="https://1526800164-files.gitbook.io/~/files/v0/b/gitbook-x-prod.appspot.com/o/spaces%2F50DeL6mO9sNbAZBSEdaN%2Fuploads%2Fwi77O7HhWKxMPCYJhrGO%2Fimage.png?alt=media&amp;token=3a865498-82e1-44e3-a293-ef622d887eef" alt=""><figcaption></figcaption></figure>

Step 2: Enter your comment and attach any relevant files or evidence of resolution. Click "Submit" to close the issue or "Reject" to return to the previous personnel if the issue remains unresolved.

<figure><img src="https://1526800164-files.gitbook.io/~/files/v0/b/gitbook-x-prod.appspot.com/o/spaces%2F50DeL6mO9sNbAZBSEdaN%2Fuploads%2FjtAyN9BsJ2wx0Sew0143%2Fimage.png?alt=media&amp;token=8b318a7a-80ed-412f-8ac0-69927a615bbc" alt=""><figcaption></figcaption></figure>

Remark:

Reject: Issue status update to **Not Solved**

Submit: Issue status update to **Solved** and issue is closed.&#x20;

## 5 Documents&#x20;

Documents can be managed using folder, the folder is only for the project, only personnel with the permission to view this project can view, create folder under the project.&#x20;

### 5.1 Folder&#x20;

Folders are used to organize and manage documents in the system. Folders can be nested to create unlimited folder levels.&#x20;

#### 5.1.1 Create Folder

Step 1: Click the  "..." icon on the end of the folder name and click "New".

<figure><img src="https://1526800164-files.gitbook.io/~/files/v0/b/gitbook-x-prod.appspot.com/o/spaces%2F50DeL6mO9sNbAZBSEdaN%2Fuploads%2FyYAp26fQRdTlZCLFRBAI%2Fimage.png?alt=media&amp;token=5b73509c-4e8f-40f1-8771-3d162ff10550" alt=""><figcaption></figcaption></figure>

Step 2: Fill in the folder name and sorting then click "Save" to create a new folder within the selected folder.

<figure><img src="https://1526800164-files.gitbook.io/~/files/v0/b/gitbook-x-prod.appspot.com/o/spaces%2F50DeL6mO9sNbAZBSEdaN%2Fuploads%2F9xmwAicIlxtloXIgxO9R%2Fimage.png?alt=media&amp;token=ee04b318-6fc7-4993-9d52-3375188ef95e" alt=""><figcaption></figcaption></figure>

#### 5.1.2 Edit Folder

Step 1: Click "**Edit**".

<figure><img src="https://1526800164-files.gitbook.io/~/files/v0/b/gitbook-x-prod.appspot.com/o/spaces%2F50DeL6mO9sNbAZBSEdaN%2Fuploads%2FJSNQcNvgSnzajkOWkhbe%2Fimage.png?alt=media&amp;token=a502d68f-2c8e-4531-a747-c917ac80a486" alt=""><figcaption></figcaption></figure>

Step 2: Modify the folder’s name or sorting then click "Save".

<figure><img src="https://1526800164-files.gitbook.io/~/files/v0/b/gitbook-x-prod.appspot.com/o/spaces%2F50DeL6mO9sNbAZBSEdaN%2Fuploads%2FyV3IuPj3jSCV5ZjMCUVG%2Fimage.png?alt=media&amp;token=ebadc44a-44eb-44f2-88e8-c8f6d4775155" alt=""><figcaption></figcaption></figure>

#### 5.1.3 Delete Folder

The **Delete** option is only available if the folder has no subfolders and contains no documents.

<figure><img src="https://1526800164-files.gitbook.io/~/files/v0/b/gitbook-x-prod.appspot.com/o/spaces%2F50DeL6mO9sNbAZBSEdaN%2Fuploads%2F4R3Fg5zW3XxKIw2TryHu%2Fimage.png?alt=media&amp;token=1f39436a-8bc6-4b1f-82b7-1e73682cf21b" alt=""><figcaption></figcaption></figure>

### 5.2 Document

#### 5.2.1 Create Document

Step 1: On the top-right of the page, click "New document".&#x20;

<figure><img src="https://1526800164-files.gitbook.io/~/files/v0/b/gitbook-x-prod.appspot.com/o/spaces%2F50DeL6mO9sNbAZBSEdaN%2Fuploads%2F14safNLVz0wSJno0LhzG%2Fimage.png?alt=media&amp;token=0bac3559-ecc5-4586-a5de-0728519d619d" alt=""><figcaption></figcaption></figure>

Step 2: Set up the new document, and click "Submit" to create the document under the associated folder.

<figure><img src="https://1526800164-files.gitbook.io/~/files/v0/b/gitbook-x-prod.appspot.com/o/spaces%2F50DeL6mO9sNbAZBSEdaN%2Fuploads%2FsRUnuz95dOZzT6mIovzk%2Fimage.png?alt=media&amp;token=305b4969-9af1-42d1-8458-48b82c119600" alt=""><figcaption></figcaption></figure>

**Remark:**

When creating a new document without selecting a folder, the document will automatically be placed in the Public Folder.

#### 5.2.2 Edit Document

<figure><img src="https://1526800164-files.gitbook.io/~/files/v0/b/gitbook-x-prod.appspot.com/o/spaces%2F50DeL6mO9sNbAZBSEdaN%2Fuploads%2FD2oX76fFmALiCx9TVvHH%2Fimage.png?alt=media&amp;token=cfe22179-6e62-4946-af3e-bc7bc29f5c69" alt=""><figcaption></figcaption></figure>

**Remark:**

When editing a document, you can change its assigned folder. After submitting the changes, the document will appear in the new folder/subfolder list.

#### 5.2.23 Delete Document

<figure><img src="https://1526800164-files.gitbook.io/~/files/v0/b/gitbook-x-prod.appspot.com/o/spaces%2F50DeL6mO9sNbAZBSEdaN%2Fuploads%2Fy1t9xNi4Lvj9dHPOGEqX%2Fimage.png?alt=media&amp;token=a42b7823-8602-42da-b8c4-50e71a8b4636" alt=""><figcaption></figcaption></figure>

### 5.3 Operation

#### 5.3.1 Download

Click **Download All Attachments** to download all attachments within the folder in a compressed ZIP file. The attachments will be organized by document name.

<figure><img src="https://1526800164-files.gitbook.io/~/files/v0/b/gitbook-x-prod.appspot.com/o/spaces%2F50DeL6mO9sNbAZBSEdaN%2Fuploads%2FTngR2D6ydfRq5WWdvg58%2Fimage.png?alt=media&amp;token=0e4975c6-0537-402a-86c7-254e07ebbad8" alt=""><figcaption></figcaption></figure>

**Remark:**

This button will only appear if the folder contains documents with attachments.

#### 5.3.2 Filtering/Searching

**Filtering**

The filter function allows users to refine or narrow down the data list based on the selected criteria.

Click on "More filters" to view more filtering options available.

<figure><img src="https://1526800164-files.gitbook.io/~/files/v0/b/gitbook-x-prod.appspot.com/o/spaces%2F50DeL6mO9sNbAZBSEdaN%2Fuploads%2FjlCEmyECPzGdeLMdgn6C%2Fimage.png?alt=media&amp;token=d4d6508b-07d6-49b9-864a-7cec983ab5b0" alt=""><figcaption></figcaption></figure>

The users is able to filter document with document name that are similar/matched to the text entered in the search box.

<figure><img src="https://1526800164-files.gitbook.io/~/files/v0/b/gitbook-x-prod.appspot.com/o/spaces%2F50DeL6mO9sNbAZBSEdaN%2Fuploads%2FddNeqy0TjX4kM5HuZHHv%2Fimage.png?alt=media&amp;token=87c8b226-9866-4c37-b00e-57aecafb573a" alt=""><figcaption></figcaption></figure>

## 6 Details

The details tab shows project information such as type, status, and priority. Users with the appropriate permissions can edit project details or end the project.

<figure><img src="https://1526800164-files.gitbook.io/~/files/v0/b/gitbook-x-prod.appspot.com/o/spaces%2F50DeL6mO9sNbAZBSEdaN%2Fuploads%2FJ7dnuaZ3IoctelHI9XET%2Fimage.png?alt=media&amp;token=08ef3eaf-5abf-41df-8d14-1413f2ed0b05" alt=""><figcaption></figcaption></figure>

## 7 Assessment

This tab allows the project manager to rate project performance with an integer score.

<figure><img src="https://1526800164-files.gitbook.io/~/files/v0/b/gitbook-x-prod.appspot.com/o/spaces%2F50DeL6mO9sNbAZBSEdaN%2Fuploads%2FE4lMM50t6pHOiiHlTOA5%2Fimage.png?alt=media&amp;token=ff2301ee-043a-45d9-b1a4-bc3a38d30712" alt=""><figcaption></figcaption></figure>

## 8 Log&#x20;

The project log tracks the creation, modification, and deletion of projects, tasks, issues, and documents, along with changes in task weightage. It records the operator, operation time, and actions taken. Users can filter by operation type, operation, and log content to meet their needs.

<figure><img src="https://1526800164-files.gitbook.io/~/files/v0/b/gitbook-x-prod.appspot.com/o/spaces%2F50DeL6mO9sNbAZBSEdaN%2Fuploads%2FySqg03xurBZjlLptWkOX%2Fimage.png?alt=media&amp;token=3e61ba2c-89eb-4217-9364-fb2c522f5b77" alt=""><figcaption></figcaption></figure>

## 9 Expense

The expense list mainly records the details of each expense and can be divided into annual, quarterly, and monthly statistical displays.

<figure><img src="https://1526800164-files.gitbook.io/~/files/v0/b/gitbook-x-prod.appspot.com/o/spaces%2F50DeL6mO9sNbAZBSEdaN%2Fuploads%2FJSNcPsrlhY2PCNn1vuGw%2Fimage.png?alt=media&amp;token=6da41d59-bdab-4281-92e8-25ef3dd7a6dc" alt=""><figcaption></figcaption></figure>

<figure><img src="https://1526800164-files.gitbook.io/~/files/v0/b/gitbook-x-prod.appspot.com/o/spaces%2F50DeL6mO9sNbAZBSEdaN%2Fuploads%2FLkVLgcLqBC77KmBqMdhB%2Fimage.png?alt=media&amp;token=7ffb7939-8800-4fbc-8b0e-87fff7a167e1" alt=""><figcaption></figcaption></figure>

**Remark:**

Expense listed the project's costs; click on the monthly amount to access the expense module for more information.


# New project

## 1 Create new project

Step 1: Select the project template.

<figure><img src="https://1526800164-files.gitbook.io/~/files/v0/b/gitbook-x-prod.appspot.com/o/spaces%2F50DeL6mO9sNbAZBSEdaN%2Fuploads%2FWHQfpAUQElYAj2i0Tzsu%2Fimage.png?alt=media&amp;token=7a963faf-e08b-40a5-8c98-1a5ed37e75b4" alt=""><figcaption></figcaption></figure>

**Remark:**

* If there is only one project template, the system will display the create page right away.
* Go to link to create new project template.&#x20;

Step 2: Enter the relevant information and click "Submit" to create a new project.

<figure><img src="https://1526800164-files.gitbook.io/~/files/v0/b/gitbook-x-prod.appspot.com/o/spaces%2F50DeL6mO9sNbAZBSEdaN%2Fuploads%2FtrHd6gXskLGRDanY8YXd%2Fimage.png?alt=media&amp;token=254d5b10-00bb-4a9b-92a9-cf623d57b516" alt=""><figcaption></figcaption></figure>

Remark:

* &#x20;The project's status is defaulted to Designing once created
* The Project Approver will need to approve the project to kick-start it.
* Projects that are yet to be approved will not be abled to view by project team members.&#x20;
* Project Status:&#x20;
  * Approved: Designing -> Submit Review -> Approved -> Progress -> End
  * Rejected: Designing -> Submit to Review -> Rejected -> Designing
* Refer to [2.2 Drop-down box ](#id-2.2-new-project-drop-down-box)to change the options for Priority and Urgency.

## 2 Preparatory

### 2.1 Project template

The Project Template is a predefined blueprint for setting up new projects. It includes structured elements like customized permissions, fields, tabs, and reminders to streamline creation and management while allowing easy adaptation to various project categories.

#### Create new project template (Link)

### 2.2 Drop-down box configuration

The drop-down box selections for urgency and priority can be configured in&#x20;

Step 1: Go to \[Setting] -> Drop-down box.

<figure><img src="https://1526800164-files.gitbook.io/~/files/v0/b/gitbook-x-prod.appspot.com/o/spaces%2F50DeL6mO9sNbAZBSEdaN%2Fuploads%2Fez4kJHzYJPcamFSULFCK%2Fimage.png?alt=media&amp;token=eaf63ce1-1a54-4ca1-817f-9f946aa835bb" alt=""><figcaption></figcaption></figure>

Step 2: Click the blue right arrow to reveal all options, where Urgency and Priority can be found in the Project category. Click on them to display their options.&#x20;

<figure><img src="https://1526800164-files.gitbook.io/~/files/v0/b/gitbook-x-prod.appspot.com/o/spaces%2F50DeL6mO9sNbAZBSEdaN%2Fuploads%2FVfVazmVjLgwn0rLOa5YZ%2Fimage.png?alt=media&amp;token=82f57f06-b3f8-4263-8322-074c65d3f809" alt=""><figcaption></figcaption></figure>

Step 3: The user can modify existing options directly or add new ones by clicking the (+) button. Click "Submit" in the top-right corner to implement the changes.

<figure><img src="https://1526800164-files.gitbook.io/~/files/v0/b/gitbook-x-prod.appspot.com/o/spaces%2F50DeL6mO9sNbAZBSEdaN%2Fuploads%2F1HtwPxRYts7nGtj3PGvD%2Fimage.png?alt=media&amp;token=93d563fe-f4af-4df0-9e75-a31c6d2f09bf" alt=""><figcaption></figcaption></figure>

#### 2.2.1 Priority Drop-down box

<figure><img src="https://1526800164-files.gitbook.io/~/files/v0/b/gitbook-x-prod.appspot.com/o/spaces%2F50DeL6mO9sNbAZBSEdaN%2Fuploads%2F7ctpAWDMTwOIWww6SHeQ%2Fimage.png?alt=media&amp;token=6dbab3c1-a05e-4be2-973b-dc9873fd8790" alt=""><figcaption></figcaption></figure>

#### 2.2.2 Urgency Drop-down box

<figure><img src="https://1526800164-files.gitbook.io/~/files/v0/b/gitbook-x-prod.appspot.com/o/spaces%2F50DeL6mO9sNbAZBSEdaN%2Fuploads%2Fcm3OlxC1tnNjEE7gS8FG%2Fimage.png?alt=media&amp;token=b9b6eee4-2f07-41b6-a79f-56c815a03b6e" alt=""><figcaption></figcaption></figure>


# Project Task

## 1 My task&#x20;

Displays all tasks across projects visible to the current user.

### 1.1 Table View

This is the default view for task.&#x20;

<figure><img src="https://1526800164-files.gitbook.io/~/files/v0/b/gitbook-x-prod.appspot.com/o/spaces%2F50DeL6mO9sNbAZBSEdaN%2Fuploads%2FEYSR0HuNF3W44QZKpzpB%2Fimage.png?alt=media&amp;token=f3554105-6202-4c11-a690-36fc20f987d6" alt=""><figcaption></figcaption></figure>

Note: Tasks in Table View are sorted by the \[Sorting] field by default.

### 1.2 Kanban View

<figure><img src="https://1526800164-files.gitbook.io/~/files/v0/b/gitbook-x-prod.appspot.com/o/spaces%2F50DeL6mO9sNbAZBSEdaN%2Fuploads%2FLKnOROPWqQs1ZFi3M8XW%2Fimage.png?alt=media&amp;token=0994ebfe-1a17-443d-ba24-11b0f091004d" alt=""><figcaption></figcaption></figure>

### 1.3 Gantt Chart

<figure><img src="https://1526800164-files.gitbook.io/~/files/v0/b/gitbook-x-prod.appspot.com/o/spaces%2F50DeL6mO9sNbAZBSEdaN%2Fuploads%2FDJxSUFKOoZL45A1VT0eE%2Fimage.png?alt=media&amp;token=83ee197f-7736-42ac-9883-7db24d833257" alt=""><figcaption></figcaption></figure>

## 2 Subordinate's tasks&#x20;

Statistics on tasks in ongoing and completed projects involving the current user's subordinates, separated by each subordinate.

<figure><img src="https://1526800164-files.gitbook.io/~/files/v0/b/gitbook-x-prod.appspot.com/o/spaces%2F50DeL6mO9sNbAZBSEdaN%2Fuploads%2FBVvXyoXm3VHgYh9vEyF5%2Fimage.png?alt=media&amp;token=032a00b8-5f36-4c1c-9005-e157693e4c0c" alt=""><figcaption></figcaption></figure>

**Remark:**&#x20;

* The default display is Table View and can be switched to Gantt Chart.
* Only individuals with the project's permission can click to access the project detail page.

## 3 Task analysis&#x20;

This analysis only includes tasks for which the current user is the executor.

<figure><img src="https://1526800164-files.gitbook.io/~/files/v0/b/gitbook-x-prod.appspot.com/o/spaces%2F50DeL6mO9sNbAZBSEdaN%2Fuploads%2FB6xA04Nm9buJInoK8Q79%2Fimage.png?alt=media&amp;token=617a6c62-a6d1-45f5-9a3f-a6582707627b" alt=""><figcaption></figcaption></figure>

### 3.1 Task Report (Bar Chart)

Displays the total number of tasks, along with their current status: completed, in progress (handling), and overdue, for an at-a-glance view of task distribution.

<figure><img src="https://1526800164-files.gitbook.io/~/files/v0/b/gitbook-x-prod.appspot.com/o/spaces%2F50DeL6mO9sNbAZBSEdaN%2Fuploads%2F4vg9CWgtFVOYgJBM031F%2Fimage.png?alt=media&amp;token=285dc524-1b27-4816-bf5b-afaec9eeccb1" alt=""><figcaption></figcaption></figure>

### 3.2 **Task Completion Status (Circle Graph)**

Illustrates the proportion of completed tasks versus those currently in progress (handling), providing a quick visual of task completion rates.

<figure><img src="https://1526800164-files.gitbook.io/~/files/v0/b/gitbook-x-prod.appspot.com/o/spaces%2F50DeL6mO9sNbAZBSEdaN%2Fuploads%2Fac8aV8oQj4OvAsamyeYi%2Fimage.png?alt=media&amp;token=b7a857fd-e305-41ff-80be-19a6d9772051" alt=""><figcaption></figcaption></figure>

### 3.3 Task Trend (Scatter Plot)

Tracks task trends over a 7-day cycle, showing the number of new tasks, completed tasks, and tasks remaining, to analyze workload and performance patterns.

<figure><img src="https://1526800164-files.gitbook.io/~/files/v0/b/gitbook-x-prod.appspot.com/o/spaces%2F50DeL6mO9sNbAZBSEdaN%2Fuploads%2Fr0dLnJhzwvLYLASjZLBt%2Fimage.png?alt=media&amp;token=63389196-d488-4e19-bd63-c9860f56ff0c" alt=""><figcaption></figcaption></figure>

## 4 Task report

Statistics of ongoing and completed projects.

### 4.1 List

<figure><img src="https://1526800164-files.gitbook.io/~/files/v0/b/gitbook-x-prod.appspot.com/o/spaces%2F50DeL6mO9sNbAZBSEdaN%2Fuploads%2Fl19QlINH8JeAvQNE4pO5%2Fimage.png?alt=media&amp;token=3e2adf3c-0027-434a-aa99-458c1c50e7de" alt=""><figcaption></figcaption></figure>

### 4.2 Export

Step 1: In the top-right corner of the page, click "Export".

<figure><img src="https://1526800164-files.gitbook.io/~/files/v0/b/gitbook-x-prod.appspot.com/o/spaces%2F50DeL6mO9sNbAZBSEdaN%2Fuploads%2F69v4dB2HlGWbLXz7Acv4%2Fimage.png?alt=media&amp;token=88511206-b09c-4e42-913f-44a4bdfda01b" alt=""><figcaption></figcaption></figure>

Step 2: Select or de-select fields to be exported, and click "Confirm" to begin the process.

<figure><img src="https://1526800164-files.gitbook.io/~/files/v0/b/gitbook-x-prod.appspot.com/o/spaces%2F50DeL6mO9sNbAZBSEdaN%2Fuploads%2FaLCmsKjVUVYIDfUEaHze%2Fimage.png?alt=media&amp;token=6ddd5145-efe3-4785-ad87-fb56215b28c2" alt=""><figcaption></figcaption></figure>

Exported file

<figure><img src="https://1526800164-files.gitbook.io/~/files/v0/b/gitbook-x-prod.appspot.com/o/spaces%2F50DeL6mO9sNbAZBSEdaN%2Fuploads%2FSpZK9CW3ZTpu2iMIe0ug%2Fimage.png?alt=media&amp;token=2816e26d-2eb7-4995-b929-bb8bfd7e8071" alt=""><figcaption></figcaption></figure>


# Report Management

## 1 Members Report

This report provides user-focused statistics, includes each user's department, total projects involved, projects monitored/managed/reviewed/executed, overdue projects and tasks, overdue rate, and additional details.

<figure><img src="https://1526800164-files.gitbook.io/~/files/v0/b/gitbook-x-prod.appspot.com/o/spaces%2F50DeL6mO9sNbAZBSEdaN%2Fuploads%2FE3GBUdZIEYFhsqQFbBh9%2Fimage.png?alt=media&amp;token=a92e715e-9815-47d0-915f-ae534827a9ae" alt=""><figcaption></figcaption></figure>

### 1.1 Report Details

Field Description:&#x20;

* Manage projects: Total projects managed
* Examine project: Total projects approved
* Monitor projects: Total projects monitored
* Execute projects: Total projects as task's executor
* Total projects: Total of the four items above
* Projects Overdue: Projects where the “end cycle” has passed
* Project overdue percent: *Overdue tasks/Total projects*&#x20;
* Total tasks: Total tasks as executor
* Tasks overdue: Task where the “end date” has passed
* Task overdue percent: overdue tasks / total tasks.&#x20;
* 7 days of mission time (day):&#x20;
  * Task Duration for the Next 7 Days (Day) - Calculates task duration for the next 7 days, with a maximum cap of 7 days per task. If the task duration is less than 7 days, actual duration is used; if it exceeds 7 days, only 7 days are counted.
* Working ratio in the next 7 days
  * Task Duration Ratio for the Next 7 Days (Day) - Task duration for the next 7 days / 7
* 30 days of mission time (day)
  * Task Duration for the Next 30 Days (Day) - Calculates task duration for the next 30 days, with a maximum cap of 30 days per task. If the task duration is less than 30 days, actual duration is used; if it exceeds 30 days, only 30 days are counted.
* Working ratio in the next 30 days
  * Task Duration for the Next 30 Days (Day) - Task duration for the next 30 days / 30

### 1.2 Export&#x20;

The displayed data can be exported as an Excel file.

Step 1: In the top-right corner of the page, click "Export".&#x20;

<figure><img src="https://1526800164-files.gitbook.io/~/files/v0/b/gitbook-x-prod.appspot.com/o/spaces%2F50DeL6mO9sNbAZBSEdaN%2Fuploads%2F9TczcPndrMmxNsmRkS7X%2Fimage.png?alt=media&amp;token=1efd51f4-b25e-4dc7-b198-3230004ba2d8" alt=""><figcaption></figcaption></figure>

Step 2: Select or de-select fields to be exported, and click "Confirm" to begin the process.

<figure><img src="https://1526800164-files.gitbook.io/~/files/v0/b/gitbook-x-prod.appspot.com/o/spaces%2F50DeL6mO9sNbAZBSEdaN%2Fuploads%2F7q0qCMGHX24P4GDBNYPo%2Fimage.png?alt=media&amp;token=82fcf53a-5670-40b6-b41d-114500f3e7e4" alt=""><figcaption></figcaption></figure>

### 1.3 Filter

System will default to display all projects. The data can be filtered by project's status: \[Completed] or \[In progress] or user's status: \[In-service] or \[Departure].

<figure><img src="https://1526800164-files.gitbook.io/~/files/v0/b/gitbook-x-prod.appspot.com/o/spaces%2F50DeL6mO9sNbAZBSEdaN%2Fuploads%2FuYRYtD9uKyzUwLMyfWBA%2Fimage.png?alt=media&amp;token=56094354-fb57-4025-b543-048b482a5a67" alt=""><figcaption></figcaption></figure>

### 1.4 Search

#### 1.4.1 Simple Query

The users is able to filter report with username or department that are similar/matched to the text entered in the search box.

<figure><img src="https://1526800164-files.gitbook.io/~/files/v0/b/gitbook-x-prod.appspot.com/o/spaces%2F50DeL6mO9sNbAZBSEdaN%2Fuploads%2FqHzjZa8En92yGwej1kCx%2Fimage.png?alt=media&amp;token=e5d4ad7b-57c0-410f-8e8f-ac29f784c443" alt=""><figcaption></figcaption></figure>

#### 1.4.2 Advanced Query

The \[Advance Query] allows the users to create complex searches or filters by specifying detailed conditions and criteria.

<figure><img src="https://1526800164-files.gitbook.io/~/files/v0/b/gitbook-x-prod.appspot.com/o/spaces%2F50DeL6mO9sNbAZBSEdaN%2Fuploads%2Fvlh44dCLoMyNpKhiDNuS%2Fimage.png?alt=media&amp;token=494babd6-70e3-4b03-8c1d-0319a4e355df" alt=""><figcaption></figcaption></figure>

## 2 Project Report

This report offers project-focused statistics, covering project status, progress, and totals for related details such as tasks, issues, and documents.

<figure><img src="https://1526800164-files.gitbook.io/~/files/v0/b/gitbook-x-prod.appspot.com/o/spaces%2F50DeL6mO9sNbAZBSEdaN%2Fuploads%2FpLAm2Cd0LUK0TGdp2zUd%2Fimage.png?alt=media&amp;token=d092dc09-f158-46b1-b3e2-374ede77d114" alt=""><figcaption></figcaption></figure>

### 2.1 Report Details

Field Description:

* Progress:&#x20;
  * Calculations involve task weightage
  * Equation: (Progress of each task × task weightage) / total weightage
  * Example:&#x20;

| Task Name        | Weightage    | Task Progress  |
| ---------------- | ------------ | -------------- |
| <p>Task1<br></p> | <p>1<br></p> | <p>39%<br></p> |
| <p>Task2<br></p> | <p>2<br></p> | <p>22%<br></p> |
| <p>Task3<br></p> | <p>3<br></p> | <p>51%<br></p> |
| <p>Task4<br></p> | <p>2<br></p> | 40%            |
| <p>Task5<br></p> | <p>1<br></p> | <p>34%<br></p> |

This project's progress calculation will be:

<figure><img src="https://1526800164-files.gitbook.io/~/files/v0/b/gitbook-x-prod.appspot.com/o/spaces%2F50DeL6mO9sNbAZBSEdaN%2Fuploads%2F2Rp9UKrsLUd3n58u67IP%2Fimage.png?alt=media&amp;token=ab705789-58d1-4c82-befe-d63c8ea04fdf" alt=""><figcaption></figcaption></figure>

*Note: The parent task's progress is calculated similarly when subtasks are present.*

* Tasks: Total task under the project
* Problems: Total issue under the project
* Documents: Total folder under the project
* Task in progress: Task not marked as completed
* Completed: Task marked as completed
* Completed percent: No. of tasks completed / Total tasks
* Task overdue: Task with a passed end time
* Task overdue percent: No. of tasks overdue/ Total tasks
* Task executor: No. of task executor in this project

### 2.2 Export

The displayed data can be exported as an Excel file.

Step 1: In the top-right corner of the page, click "Export".&#x20;

<figure><img src="https://1526800164-files.gitbook.io/~/files/v0/b/gitbook-x-prod.appspot.com/o/spaces%2F50DeL6mO9sNbAZBSEdaN%2Fuploads%2FJpXRtqlkNCHPwFv2hohZ%2Fimage.png?alt=media&amp;token=594aa222-0839-4469-bf66-155801123172" alt=""><figcaption></figcaption></figure>

Step 2: Select or de-select fields to be exported, and click "Confirm" to begin the process.

<figure><img src="https://1526800164-files.gitbook.io/~/files/v0/b/gitbook-x-prod.appspot.com/o/spaces%2F50DeL6mO9sNbAZBSEdaN%2Fuploads%2FiiGT7dqixzefM3INKr2w%2Fimage.png?alt=media&amp;token=3dedb4d1-9073-434e-a2de-e8a7f0663406" alt=""><figcaption></figcaption></figure>

### 2.3 Filter&#x20;

System will default to display all projects. The data can be filtered by project's status: \[Completed] or \[In progress].

<figure><img src="https://1526800164-files.gitbook.io/~/files/v0/b/gitbook-x-prod.appspot.com/o/spaces%2F50DeL6mO9sNbAZBSEdaN%2Fuploads%2FSIQbaxWl8VPqXOv9m3BQ%2Fimage.png?alt=media&amp;token=b120110e-3469-43b3-8840-1b490decf606" alt=""><figcaption></figcaption></figure>

### 2.4 Search

#### 2.4.1 Simple Query

The user is able to filter reports with project names that are similar to or match the text entered in the search box.

#### 2.4.2 Advanced Query

The \[Advance Query] allows the users to create complex searches or filters by specifying detailed conditions and criteria.

<figure><img src="https://1526800164-files.gitbook.io/~/files/v0/b/gitbook-x-prod.appspot.com/o/spaces%2F50DeL6mO9sNbAZBSEdaN%2Fuploads%2Frnu6c1TxjsAikL7QYQvs%2Fimage.png?alt=media&amp;token=6edd781e-fea9-4789-b9b4-3fe6fdb3b1d6" alt=""><figcaption></figcaption></figure>


# Settings

## 1 Project template

For the users to create new project templates and set permissions, and task templates.

### 1.1 New Project Template

Step 1: Click the (+) in the upper right of the center column to create a new project template.

<figure><img src="https://1526800164-files.gitbook.io/~/files/v0/b/gitbook-x-prod.appspot.com/o/spaces%2F50DeL6mO9sNbAZBSEdaN%2Fuploads%2FWxkNREt5wvzO2p4vu3gO%2Fimage.png?alt=media&amp;token=9d06f82f-c31f-43d1-8187-24e152895119" alt=""><figcaption></figcaption></figure>

Step 2: Fill in the new template's name, select the template icon (non-mandatory) and click "Save".

<figure><img src="https://1526800164-files.gitbook.io/~/files/v0/b/gitbook-x-prod.appspot.com/o/spaces%2F50DeL6mO9sNbAZBSEdaN%2Fuploads%2FfJpVRsiABQQQy0Znmgg2%2Fimage.png?alt=media&amp;token=1ff6b86e-9b1a-4acf-b5ed-589a9fee77b0" alt=""><figcaption></figcaption></figure>

Remark:&#x20;

* Template icon is system default
* Template icon can be changed after the template is created.&#x20;

### 1.2 Permission

Each project template can have its permissions individually configured.

<figure><img src="https://1526800164-files.gitbook.io/~/files/v0/b/gitbook-x-prod.appspot.com/o/spaces%2F50DeL6mO9sNbAZBSEdaN%2Fuploads%2FGx6X4qKoeLdrbAdhPk1L%2Fimage.png?alt=media&amp;token=db33bc9f-6da1-4c97-b8ed-56acd451bff8" alt=""><figcaption></figcaption></figure>

Select the relevant project template from the middle list and set its permissions on the right side of the page.

<figure><img src="https://1526800164-files.gitbook.io/~/files/v0/b/gitbook-x-prod.appspot.com/o/spaces%2F50DeL6mO9sNbAZBSEdaN%2Fuploads%2FA6XDy9i55uWVIeRXtRt2%2Fimage.png?alt=media&amp;token=8b88b6a7-1680-4bfa-9b30-53ebd6314050" alt=""><figcaption></figcaption></figure>

**Remark:**

* Users with "Project report" menu permissions can view all projects and their details by default.&#x20;
* Users with only "list" permission cannot view project details, while those with only "detail" permission cannot access the project list.

#### 1.2.1 Data permission&#x20;

**Purpose**: Controls access to specific project based on the user's relationship to the data (e.g., project manager or assigned team).

<figure><img src="https://1526800164-files.gitbook.io/~/files/v0/b/gitbook-x-prod.appspot.com/o/spaces%2F50DeL6mO9sNbAZBSEdaN%2Fuploads%2FGZVtTETQ6AOGf7d1dX71%2Fimage.png?alt=media&amp;token=42a5b705-8b89-4a5c-93a5-482137c725d8" alt=""><figcaption></figcaption></figure>

#### 1.2.2 Monitor

**Purpose**: Provides the ability to monitor and manage project at various organizational levels.

<figure><img src="https://1526800164-files.gitbook.io/~/files/v0/b/gitbook-x-prod.appspot.com/o/spaces%2F50DeL6mO9sNbAZBSEdaN%2Fuploads%2F7KiDQXzI1m63kD3dveav%2Fimage.png?alt=media&amp;token=ab149a70-e38d-4db5-b38d-579a6d5940b8" alt=""><figcaption></figcaption></figure>

**Remark:**&#x20;

Users with only monitoring permissions and data penetrators set to data permission will not receive message reminders.

### 1.3 Field Settings

#### 1.3.1 Form design&#x20;

Enables users to add or remove controls on the create new project page.

<figure><img src="https://1526800164-files.gitbook.io/~/files/v0/b/gitbook-x-prod.appspot.com/o/spaces%2F50DeL6mO9sNbAZBSEdaN%2Fuploads%2FEUdPDf2V7TEObmIWzEUi%2Fimage.png?alt=media&amp;token=f041db07-5d22-4e1d-9232-de9e240ac654" alt=""><figcaption></figcaption></figure>

#### 1.3.2 List

Allows setting of data visualization methods, displayed fields, advanced query fields, etc.

<figure><img src="https://1526800164-files.gitbook.io/~/files/v0/b/gitbook-x-prod.appspot.com/o/spaces%2F50DeL6mO9sNbAZBSEdaN%2Fuploads%2FWJ9SSlRVQ0vMzc5YT1Hr%2Fimage.png?alt=media&amp;token=2551ac94-f8b7-43a6-a216-b3e686cec8d0" alt=""><figcaption></figcaption></figure>

#### 1.3.3 Field control

Users can adjust whether a field is editable or mandatory.

<figure><img src="https://1526800164-files.gitbook.io/~/files/v0/b/gitbook-x-prod.appspot.com/o/spaces%2F50DeL6mO9sNbAZBSEdaN%2Fuploads%2FlzlsEi9hs2MngwRTjUw9%2Fimage.png?alt=media&amp;token=3bfcf6c0-415c-4aaf-9bf4-252fcd85014c" alt=""><figcaption></figcaption></figure>

#### &#x20;1.3.4 Data validation

Validations can be applied to project fields, such as ensuring the project end time is not earlier than the start time.

<figure><img src="https://1526800164-files.gitbook.io/~/files/v0/b/gitbook-x-prod.appspot.com/o/spaces%2F50DeL6mO9sNbAZBSEdaN%2Fuploads%2FbybOlnrRqs3BFauCOoPi%2Fimage.png?alt=media&amp;token=a51be9ea-98d8-4619-ab4b-383d6651ce4e" alt=""><figcaption></figcaption></figure>

#### &#x20;1.3.5 Linked data

Users can rename tabs, sort them via drag and drop, view statistics (e.g., task count), and set permissions, or to enable or disable tab display in My Projects.

<figure><img src="https://1526800164-files.gitbook.io/~/files/v0/b/gitbook-x-prod.appspot.com/o/spaces%2F50DeL6mO9sNbAZBSEdaN%2Fuploads%2F0UjXtN9rYBBQFZhaKZw2%2Fimage.png?alt=media&amp;token=56aeb423-09fc-4351-8695-619f7f0888ab" alt=""><figcaption></figcaption></figure>

#### 1.3.6 Reminder settings

Customize reminders for task dates and times, with content tailored to task fields.

<figure><img src="https://1526800164-files.gitbook.io/~/files/v0/b/gitbook-x-prod.appspot.com/o/spaces%2F50DeL6mO9sNbAZBSEdaN%2Fuploads%2FCCCQNe8CYdccsLElFc2Z%2Fimage.png?alt=media&amp;token=b934cae2-0b84-40a5-8496-13ed9cb6f215" alt=""><figcaption></figcaption></figure>

### 1.4 Task Template

The task template is presented as cards, the user can click to access the task list to create a new task under the template.

<figure><img src="https://1526800164-files.gitbook.io/~/files/v0/b/gitbook-x-prod.appspot.com/o/spaces%2F50DeL6mO9sNbAZBSEdaN%2Fuploads%2Fg8iu6oBN2RwQGHIhfacb%2Fimage.png?alt=media&amp;token=e25db33d-d925-41db-b02c-e22fa826977b" alt=""><figcaption></figcaption></figure>

<figure><img src="https://1526800164-files.gitbook.io/~/files/v0/b/gitbook-x-prod.appspot.com/o/spaces%2F50DeL6mO9sNbAZBSEdaN%2Fuploads%2FfmDDnTU0tEoA85xycvru%2Fimage.png?alt=media&amp;token=9358e68d-ac7e-498c-81e1-cc5afa769560" alt=""><figcaption></figcaption></figure>

## 2 Task fields

Enables users to configure new task page fields, display settings, query options, and data visualization methods.

### 2.1 Form Design

Enables users to add or remove fields in the task interface.

<figure><img src="https://1526800164-files.gitbook.io/~/files/v0/b/gitbook-x-prod.appspot.com/o/spaces%2F50DeL6mO9sNbAZBSEdaN%2Fuploads%2FdUXM7YtaA1iuRK3sYfae%2Fimage.png?alt=media&amp;token=6bba474f-4bfe-429f-bd3f-44b37a56f070" alt=""><figcaption></figcaption></figure>

### 2.2 List&#x20;

Set data visualization methods, field displays, and advanced query fields.&#x20;

The following pages can be configured: Project Task List, My Task List, Subordinate Task List, Sub Task List, and a selector for system data to choose project tasks.

<figure><img src="https://1526800164-files.gitbook.io/~/files/v0/b/gitbook-x-prod.appspot.com/o/spaces%2F50DeL6mO9sNbAZBSEdaN%2Fuploads%2FvPy7pV379w4BRUlnrifu%2Fimage.png?alt=media&amp;token=49c3e689-a2e1-49c3-9c9c-af85eb9a3402" alt=""><figcaption></figcaption></figure>

### 2.3 Field control&#x20;

Set editing permission and specify if a field is mandatory.

<figure><img src="https://1526800164-files.gitbook.io/~/files/v0/b/gitbook-x-prod.appspot.com/o/spaces%2F50DeL6mO9sNbAZBSEdaN%2Fuploads%2FrTo0rnw7P0H8YUB129fk%2Fimage.png?alt=media&amp;token=099c2b22-1c6b-4eb9-8dfc-e438892dec81" alt=""><figcaption></figcaption></figure>

### 2.4 Validation&#x20;

Data validation can be applied to task fields.

<figure><img src="https://1526800164-files.gitbook.io/~/files/v0/b/gitbook-x-prod.appspot.com/o/spaces%2F50DeL6mO9sNbAZBSEdaN%2Fuploads%2FpeCHEcoP7bd4ahxfo698%2Fimage.png?alt=media&amp;token=95eab099-1a5f-4a6f-8a20-d7454b5040e8" alt=""><figcaption></figcaption></figure>

### 2.5 Reminder settings

Set customized reminders for task dates and times, with content tailored to task fields.

<figure><img src="https://1526800164-files.gitbook.io/~/files/v0/b/gitbook-x-prod.appspot.com/o/spaces%2F50DeL6mO9sNbAZBSEdaN%2Fuploads%2FsclVU6vgKPzXrEwXuNig%2Fimage.png?alt=media&amp;token=9abb4827-6aa1-4767-a5ea-ffce81c767ec" alt=""><figcaption></figcaption></figure>

## 3 Basic Settings

<figure><img src="https://1526800164-files.gitbook.io/~/files/v0/b/gitbook-x-prod.appspot.com/o/spaces%2F50DeL6mO9sNbAZBSEdaN%2Fuploads%2FN7fBn1vL08vXFB5V4Xa2%2Fimage.png?alt=media&amp;token=82c66662-8412-42ee-9b09-9de172297ef5" alt=""><figcaption></figcaption></figure>

### 3.1 Percentage

<figure><img src="https://1526800164-files.gitbook.io/~/files/v0/b/gitbook-x-prod.appspot.com/o/spaces%2F50DeL6mO9sNbAZBSEdaN%2Fuploads%2FVmuJ2elkFTQClfWR2E9g%2Fimage.png?alt=media&amp;token=f3f705b7-f2f1-44a3-84c5-3b6fa1c99d63" alt=""><figcaption></figcaption></figure>

Task progress can be adjusted by dragging the progress bar.

<figure><img src="https://1526800164-files.gitbook.io/~/files/v0/b/gitbook-x-prod.appspot.com/o/spaces%2F50DeL6mO9sNbAZBSEdaN%2Fuploads%2FV7dANcZist5L1H2Z1tJw%2Fimage.png?alt=media&amp;token=8ffa4f5e-3ed8-4ac9-a1a7-57d641973679" alt=""><figcaption></figcaption></figure>

### 3.2 Complete/Incomplete

<figure><img src="https://1526800164-files.gitbook.io/~/files/v0/b/gitbook-x-prod.appspot.com/o/spaces%2F50DeL6mO9sNbAZBSEdaN%2Fuploads%2FUz1RKBDwrGyEG5RHJheD%2Fimage.png?alt=media&amp;token=93c34559-5813-4d21-a692-cb6c158015f9" alt=""><figcaption></figcaption></figure>

Mark the task as complete by checking the checkbox.

<figure><img src="https://1526800164-files.gitbook.io/~/files/v0/b/gitbook-x-prod.appspot.com/o/spaces%2F50DeL6mO9sNbAZBSEdaN%2Fuploads%2F1Zdp57OXJTYuaVwFBjD0%2Fimage.png?alt=media&amp;token=b7159cff-8e60-4006-b7ff-a7a4fe346117" alt=""><figcaption></figcaption></figure>


# CRM

## 1 What is CRM

CRM is an abbreviation for Customer Relationship Management. In e-office, it is a module that assists in effectively managing interactions with customer and potential customer.

## 2 Terms

### 2.1 Leads&#x20;

Lead refers to a potential customer who has shown interest in a product or service.

### 2.2 Opportunity&#x20;

Opportunity refers to a potential sales deal or a chance to engage a customer that could lead to a sale. It involves identifying customers who have shown interest in a product or service, thus creating a possibility for future business.

### 2.3 Contact Log&#x20;

A Contact Log is a record-keeping tool used by salespeople to document their interactions with customers. It helps track communications, follow-ups, and the status of customer relationships.

## 3 CRM Module's functionality

<figure><img src="https://1526800164-files.gitbook.io/~/files/v0/b/gitbook-x-prod.appspot.com/o/spaces%2F50DeL6mO9sNbAZBSEdaN%2Fuploads%2Fqr3kKSNnowWAeFz7FmGs%2FCustomer%20Pool.png?alt=media&amp;token=dfca045b-7ed4-4992-a29c-8e7772db7fa6" alt=""><figcaption></figcaption></figure>


# CRM Homepage

The Customer Homepage is activated by utilizing the same portal functions as the OA Homepage. It functions as a KANBAN, allowing users to engage with a business, access resources, services, and inform

## 2.1 Default Home Page

### 2.1.1 Overall

The system offers a default home page that includes the Customer Summary, Contract Summary, Opportunity Summary, Calendar, My Customer Reports, and Follow-up Reminders. Users have the option to customize the design of the home page under \[Settings]-\[Homepage Configuration].

<figure><img src="https://1526800164-files.gitbook.io/~/files/v0/b/gitbook-x-prod.appspot.com/o/spaces%2F50DeL6mO9sNbAZBSEdaN%2Fuploads%2Fpo6mHd3r3Fn2rhYZ7CNC%2FCRM%20HOME.png?alt=media&amp;token=b30fc21e-68e2-44c9-98af-fb90dcbb42e8" alt=""><figcaption></figcaption></figure>

### 2.1.2 Customer Summary

The statistics blocks displays the number of current customers, formal customers, new customers, and follow-up customers. Users has the ability to filter the data to view information created in the last 3 days, last 7 days, or last 30 days.

<figure><img src="https://1526800164-files.gitbook.io/~/files/v0/b/gitbook-x-prod.appspot.com/o/spaces%2F50DeL6mO9sNbAZBSEdaN%2Fuploads%2FAsCJGFbqz7QmmNsfHP2v%2FCustomer%20Summary.png?alt=media&amp;token=065db49a-de99-4d14-b634-74aa4d5d8940" alt=""><figcaption></figcaption></figure>

### 2.1.3 Contract Summary

The statistics block displays the number of new contracts created and the total sum of new contracts. Users has the ability to filter the data to view information created in the last 3 days, last 7 days, or last 30 days.

<figure><img src="https://1526800164-files.gitbook.io/~/files/v0/b/gitbook-x-prod.appspot.com/o/spaces%2F50DeL6mO9sNbAZBSEdaN%2Fuploads%2FAA1xu8w5TA7CGf7FMFoa%2FContract%20Summary.png?alt=media&amp;token=e751e59d-8709-4fa0-9ae0-ce9cace81bd4" alt=""><figcaption></figcaption></figure>

### 2.1.4 Opportunity Summary&#x20;

The statistics block displays both the number and total sum of new opportunities. Users have the ability to filter the data to view information created in the last 3 days, last 7 days, or last 30 days.

<figure><img src="https://1526800164-files.gitbook.io/~/files/v0/b/gitbook-x-prod.appspot.com/o/spaces%2F50DeL6mO9sNbAZBSEdaN%2Fuploads%2FOl2Vk8BojEkCu7oOJatz%2FOpportunity%20Summary.png?alt=media&amp;token=ba9719ec-6ba0-47ee-b1a8-2008906f0774" alt=""><figcaption></figcaption></figure>

### 2.1.5 Calendar

Display the current user's schedule with a clear view of tasks that need to be completed. Additionally, quickly create new schedules by clicking on the add button located on the top right of the calendar.

<figure><img src="https://1526800164-files.gitbook.io/~/files/v0/b/gitbook-x-prod.appspot.com/o/spaces%2F50DeL6mO9sNbAZBSEdaN%2Fuploads%2FPsTZO1iBDkWEi5epFVGY%2FCalendar.png?alt=media&amp;token=9df239a7-f366-4982-ad28-153ebe89fe79" alt=""><figcaption></figcaption></figure>

### 2.1.6 My Customer Reports

#### **2.1.6.1** No. of Customer by Create Time

This report displays the count of the number of customers that can be viewed by the current user, based on their creation time.

<figure><img src="https://1526800164-files.gitbook.io/~/files/v0/b/gitbook-x-prod.appspot.com/o/spaces%2F50DeL6mO9sNbAZBSEdaN%2Fuploads%2FAm2plgPGihR37FMvgyeZ%2FNo.%20of%20customer%20by%20create%20time.png?alt=media&amp;token=9e778237-425c-4ea3-87a3-5679783d528a" alt=""><figcaption></figcaption></figure>

#### 2.1.6.2  Customer Contract Value by Start Date

This report displays the customer contracts value that are viewable by the current user, categorized by the year in which the contracts started.

#### 2.1.6.3  No. of customer by customer status

This report display the count of the current users' customers based on their customer status.

<figure><img src="https://1526800164-files.gitbook.io/~/files/v0/b/gitbook-x-prod.appspot.com/o/spaces%2F50DeL6mO9sNbAZBSEdaN%2Fuploads%2FbcUeu4IlNFkO3SYsJSgq%2Fby%20customer%20status.png?alt=media&amp;token=ea3c92db-2b3a-4b28-afbd-46f30227247b" alt="" width="275"><figcaption></figcaption></figure>

#### 2.1.6.4 No. of customer by customer type

This report displays the count of the current user's customers based on their customer type.

<figure><img src="https://1526800164-files.gitbook.io/~/files/v0/b/gitbook-x-prod.appspot.com/o/spaces%2F50DeL6mO9sNbAZBSEdaN%2Fuploads%2FygYNUIbnQZbNzketNp50%2Fby%20customer%20type.png?alt=media&amp;token=be046171-126f-4ca8-aa22-ac50dadcfd18" alt="" width="269"><figcaption></figcaption></figure>

### 2.1.7 Follow-up Reminders

The statistics block displays the number of customers who have not been followed up with for 3 days, one week, one month, and today. Additionally, data is provided on customers who have been contacted within the last 7 days and last month. Users can also filter the statistics based on customers they have "Followed".

<figure><img src="https://1526800164-files.gitbook.io/~/files/v0/b/gitbook-x-prod.appspot.com/o/spaces%2F50DeL6mO9sNbAZBSEdaN%2Fuploads%2FYlqKe7N4O0Im01sCwhs0%2FFollow-up%20Reminder.png?alt=media&amp;token=dd6704ab-ecc9-4a8d-9466-dadefaf64434" alt="" width="269"><figcaption></figcaption></figure>

## 2.2 Homepage Configuration

**Path: CRM > Settings > Homepage Configuration**

The user who has menu access to this can edit CRM homepage by clicking on the center of the home page or by clicking on the "Set element" button to enter the element settings page.

<figure><img src="https://1526800164-files.gitbook.io/~/files/v0/b/gitbook-x-prod.appspot.com/o/spaces%2F50DeL6mO9sNbAZBSEdaN%2Fuploads%2FXMmWNXA7XrsKNSli2Og6%2FCRM%20PORTAL.png?alt=media&amp;token=d33a5c6a-60d4-4832-9917-6689345ef79a" alt=""><figcaption></figcaption></figure>

The page can be configured according to preferences, similar to \[Setting] >> \[Portal management].&#x20;

<figure><img src="https://1526800164-files.gitbook.io/~/files/v0/b/gitbook-x-prod.appspot.com/o/spaces%2F50DeL6mO9sNbAZBSEdaN%2Fuploads%2FXtTiCpqNzEBEqOVPlT56%2FHome.png?alt=media&amp;token=0ef92784-8faa-4db9-a9f8-5879c3c3ee66" alt=""><figcaption></figcaption></figure>

Permissions can be set by clicking on \[Edit homepage].

<figure><img src="https://1526800164-files.gitbook.io/~/files/v0/b/gitbook-x-prod.appspot.com/o/spaces%2F50DeL6mO9sNbAZBSEdaN%2Fuploads%2FjLem9897GTo2luVe6t6t%2FPortal%20edit.png?alt=media&amp;token=c9ebd3f0-0f9b-49c3-8a17-9514fa08b0c5" alt=""><figcaption></figcaption></figure>

<figure><img src="https://1526800164-files.gitbook.io/~/files/v0/b/gitbook-x-prod.appspot.com/o/spaces%2F50DeL6mO9sNbAZBSEdaN%2Fuploads%2FJZpflLGZhRLskAItXv30%2FSetting%20permission.png?alt=media&amp;token=220f38f4-f667-4dd5-a90b-7123d5304771" alt=""><figcaption></figcaption></figure>


# New Customer

Purpose: Record new customer data and allow the centralisation of all customer data, making it easier to manage and access important information like contact details, purchase history, and communication logs.

## 1. Related Fields

### 1.1 System Default Fields

<figure><img src="https://1526800164-files.gitbook.io/~/files/v0/b/gitbook-x-prod.appspot.com/o/spaces%2F50DeL6mO9sNbAZBSEdaN%2Fuploads%2FDOwmZWXfZwunuS4tVzMD%2Fimage.png?alt=media&amp;token=46c8a05a-c50c-439e-abce-4dbb7ed1e427" alt=""><figcaption></figcaption></figure>

1. Customer Name: Full name of the customer (individual or company). <mark style="color:red;">Required</mark>
2. Customer No.: A unique identifier for the customer.
3. Account Executive: <mark style="color:green;">Defaulted as Creator.</mark> The person responsible for managing the customer relationship. This is typically the primary point of contact between the company and the customer, handling communication, sales, and account growth.
4. Customer Service Representative: The individual responsible for providing support to the customer, addressing inquiries, resolving issues, and ensuring a positive customer experience.
5. Customer Source: Indicates where or how the customer was acquired, such as through marketing campaigns, referrals, organic search, events, or partnerships. It helps track the effectiveness of lead generation efforts.
6. Customer Status: Describes the current state of the customer relationship, such as Intended Purchase, Close Follow, or Wait till further notice.
7. Customer Type: Categorizes customers based on their nature, such as Customer, High-Value Customer, and Lead.
8. Customer Attributes: Specific characteristics that define the customer, such as their preferences, behaviors, or other relevant data points. This field helps in segmenting customers for more personalized service.
9. Industry: Specifies the sector or field in which the customer operates.
10. Region: Refers to the geographic area where the customer is located.
11. Contact No.: The primary phone number for reaching the customer or their representative.
12. Fax No.: The fax number for sending or receiving official documents from the customer. Although less common today, this may still be relevant in some industries.
13. Official Website: The customer’s official company website, which can provide additional information about their business and serve as a point of reference for understanding their needs.
14. Legal Person: The individual legally responsible for the customer company, often the CEO or another executive who is accountable for contracts and legal matters.
15. Postal Code: The postal or zip code for the customer’s location. It is important for mailing purposes and verifying the customer's address.
16. E-mail: The primary email address for communicating with the customer. It is often used for sending important updates, documents, and marketing materials.
17. Company Address: The physical address of the customer’s company. This is used for shipping, billing, and any official correspondence.
18. Location: More specific information about the customer's geographic presence, possibly including coordinates or landmarks, useful for logistics or sales planning.
19. Company Size: Describes the scale of the customer’s company, usually categorized by the number of employees or other metrics like market share, which helps tailor sales and support strategies.
20. Annual Sales: The yearly revenue generated by the customer’s company. This metric is important for understanding the customer’s financial capacity and determining the potential business opportunity.
21. Create Date<mark style="color:green;">: Default as the date and time when the customer record is created.</mark> <mark style="color:red;">Cannot be modified.</mark>
22. Company Logo: Allow user to upload, view, edit, delete the customer's company logo.
23. Customer introduction: Allows the users to create a detailed introduction for the customer, with full customization capabilities for text and formatting.
24. Creator: <mark style="color:green;">Default current user that is creating the customer record.</mark> <mark style="color:red;">Cannot be modified.</mark>
25. Last Contacted Time: <mark style="color:green;">The date time of the latest record in the contact log.</mark> <mark style="color:red;">Cannot be modified.</mark>
26. Last back time: <mark style="color:green;">The most recent date time when the customer was returned from the assigned Account Executive back into the pool of available customers.</mark> <mark style="color:red;">Cannot be modified.</mark>
27. Days without contact: *<mark style="color:green;">Current Date - Last Contacted Time</mark>* <mark style="color:green;"></mark><mark style="color:green;">(If the customer was never contacted, the system will calculate based on the customer creation date).</mark> <mark style="color:red;">Cannot be modified.</mark>

**Remark:**

1. Customer No.: If the user did not assign a value for this, the system will automatically assign it with an increment from 1 based on C-NO-0000000001. It takes the maximum value of *customer\_id* of the auto-increment number and adds 1.
2. The customer name and customer number will be validated for their uniqueness; an error will be prompted if not.
3. Customer source, status, type, attribute, and industry can be managed in Settings > Dropdown box > CRM

<figure><img src="https://1526800164-files.gitbook.io/~/files/v0/b/gitbook-x-prod.appspot.com/o/spaces%2F50DeL6mO9sNbAZBSEdaN%2Fuploads%2F2nuA5H5KMJgFzKYISeq9%2Fimage.png?alt=media&amp;token=93e575fa-5625-4547-a3d4-6ed948f142c0" alt=""><figcaption></figcaption></figure>

### 1.2 Field Setting

Path: CRM > Settings > Field Setting > Tab: Customer information > Form Design&#x20;

This page functions the same way as form design in the Workflow module.

<figure><img src="https://1526800164-files.gitbook.io/~/files/v0/b/gitbook-x-prod.appspot.com/o/spaces%2F50DeL6mO9sNbAZBSEdaN%2Fuploads%2FHgB48JV0JLOzZsY2HeJF%2Fimage.png?alt=media&amp;token=825aa868-b0d0-4aca-983a-bb1370c2da45" alt=""><figcaption></figcaption></figure>

* This page allows the user to add and remove fields, set field attributes, configure the form layout, and sort, which includes sorting mode, list display, advanced query settings, fields for filtering, and other settings.

## 2. Similar Customer

This feature is implemented todetects similarities in customer names during data entry to prevent duplicate customer entries in the system.

### 2.1 Configuration

Form Design > Field: Customer Name > Control, under ***Display*** settings, make sure that the "Show similar customers" is checked to be available.&#x20;

<figure><img src="https://1526800164-files.gitbook.io/~/files/v0/b/gitbook-x-prod.appspot.com/o/spaces%2F50DeL6mO9sNbAZBSEdaN%2Fuploads%2FnZx3NkgCcfOn42p69rUm%2Fimage.png?alt=media&amp;token=985c715e-cb62-4236-891c-465c415c79fc" alt=""><figcaption></figcaption></figure>

### 2.2 Result

#### **2.2.1 Enabled**

When "Show similar customers" is enabled, in create or edit customer mode, and the customer name is filled in, the system will display a list of similar customers.

<figure><img src="https://1526800164-files.gitbook.io/~/files/v0/b/gitbook-x-prod.appspot.com/o/spaces%2F50DeL6mO9sNbAZBSEdaN%2Fuploads%2FyxytmdbItAPLwVvdeexL%2Fimage.png?alt=media&amp;token=f071c262-4d6e-4950-991b-d633c450a01e" alt=""><figcaption></figcaption></figure>

* The list will display the Customer Name. Account Executive, Customer Service Representative, Create Date and Last Contact Time.

#### **2.2.2 Disabled**

When "Show similar customers" is enabled, in create or edit customer mode, and the customer name is filled in, the system will not search for similar customer.

<figure><img src="https://1526800164-files.gitbook.io/~/files/v0/b/gitbook-x-prod.appspot.com/o/spaces%2F50DeL6mO9sNbAZBSEdaN%2Fuploads%2FpdDlaPzvcHF8UM2bqGmN%2Fimage.png?alt=media&amp;token=58198368-fd9f-41ed-a064-ff45628c58e6" alt=""><figcaption></figcaption></figure>

### 2.3 Similar Customer List

<figure><img src="https://1526800164-files.gitbook.io/~/files/v0/b/gitbook-x-prod.appspot.com/o/spaces%2F50DeL6mO9sNbAZBSEdaN%2Fuploads%2F2w4HKcGzvL1lLB3E85nG%2Fimage.png?alt=media&amp;token=393913e4-715f-46ce-a38f-acc70abe364e" alt=""><figcaption></figcaption></figure>

#### 2.3.1 View

**2.3.1.1 No permission to view the customer, but the user has applied for sharing.**

<figure><img src="https://1526800164-files.gitbook.io/~/files/v0/b/gitbook-x-prod.appspot.com/o/spaces%2F50DeL6mO9sNbAZBSEdaN%2Fuploads%2FC3ro8HD1Vkol7KywD71c%2Fimage.png?alt=media&amp;token=c7c209f5-918e-45fc-98fb-34a45170b6f4" alt=""><figcaption></figcaption></figure>

<figure><img src="https://1526800164-files.gitbook.io/~/files/v0/b/gitbook-x-prod.appspot.com/o/spaces%2F50DeL6mO9sNbAZBSEdaN%2Fuploads%2FDBzezuzXqvpWbdS5LEjP%2Fimage.png?alt=media&amp;token=26e306f0-11d1-4b99-abc1-485c0d7ec732" alt=""><figcaption></figcaption></figure>

Error: "No view permission" will be prompted when the user click on the customer.

<figure><img src="https://1526800164-files.gitbook.io/~/files/v0/b/gitbook-x-prod.appspot.com/o/spaces%2F50DeL6mO9sNbAZBSEdaN%2Fuploads%2Fl7fHRwPmBv7ghWEhCrEt%2Fimage.png?alt=media&amp;token=6dd49b17-0570-4d50-a603-93550b012250" alt=""><figcaption></figcaption></figure>

**2.3.1.3 Have the permission to view**&#x20;

Click on the list data, a new page will be opened and the customer details will be displayed.

<figure><img src="https://1526800164-files.gitbook.io/~/files/v0/b/gitbook-x-prod.appspot.com/o/spaces%2F50DeL6mO9sNbAZBSEdaN%2Fuploads%2FLmYijwct6PxnmRxFj4XK%2Fimage.png?alt=media&amp;token=40a66d86-8e52-478c-814b-2f74c43b4a7a" alt=""><figcaption></figcaption></figure>

#### 2.3.2 Pick Up

For customers who do not have an account executive and customer service executive can be picked up directly. Only for user who are in the pool, the user who are not in the respective pool will not see the "Pick up" button.

<figure><img src="https://1526800164-files.gitbook.io/~/files/v0/b/gitbook-x-prod.appspot.com/o/spaces%2F50DeL6mO9sNbAZBSEdaN%2Fuploads%2FyH2bFsXKfAOfwaML9dUg%2Fimage.png?alt=media&amp;token=25d7443d-8b32-4814-b18c-41c1579f8606" alt=""><figcaption></figcaption></figure>

#### Remark:

Whether or not the pick up will be successful will be according to the settings in Pool Configuration [/pages/sbktA3nNKZVIJGX4F6qG#id-3.3-recycling-mechanism](https://eohelp.weaver.com.co/pages/sbktA3nNKZVIJGX4F6qG#id-3.3-recycling-mechanism "mention").

#### 2.3.3 Request to Share&#x20;

Purpose: To have the permission to view the customer information by the current user.

Step 1: On the Similiar Customer List data row, click more, click "Sharing" to apply for the customer to be shared.

<figure><img src="https://1526800164-files.gitbook.io/~/files/v0/b/gitbook-x-prod.appspot.com/o/spaces%2F50DeL6mO9sNbAZBSEdaN%2Fuploads%2FdrGw8gvmmUamqZOoIEAi%2Fimage.png?alt=media&amp;token=25e4a9d8-ad9c-40ab-a560-b3fe077d268a" alt=""><figcaption></figcaption></figure>

<figure><img src="https://1526800164-files.gitbook.io/~/files/v0/b/gitbook-x-prod.appspot.com/o/spaces%2F50DeL6mO9sNbAZBSEdaN%2Fuploads%2F1ag9etFOlst5Hj8w0jad%2Fimage.png?alt=media&amp;token=cbd31f0b-0b8b-4fe8-82ee-f529a12a0154" alt=""><figcaption></figcaption></figure>

Once the application has been approved, then the user will be able to view the customer.

Click on the "View application" to view the customer data.

<figure><img src="https://1526800164-files.gitbook.io/~/files/v0/b/gitbook-x-prod.appspot.com/o/spaces%2F50DeL6mO9sNbAZBSEdaN%2Fuploads%2FJPqT6q939FE0C6ur8iGy%2Fimage.png?alt=media&amp;token=e87679fd-2092-4cc2-b13d-ef48f53ed616" alt=""><figcaption></figcaption></figure>

#### 2.3.4 Apply as CSR

As long as the current user is not the Customer Service Representative, they will be able to apply as one.&#x20;

Step 1:  Click "Apply Customer Service Representative"

<figure><img src="https://1526800164-files.gitbook.io/~/files/v0/b/gitbook-x-prod.appspot.com/o/spaces%2F50DeL6mO9sNbAZBSEdaN%2Fuploads%2FJeM9NHf0gTcFBzPjR3iI%2Fimage.png?alt=media&amp;token=311c93b5-edb0-4712-882d-c0e9b228b036" alt=""><figcaption></figcaption></figure>

Step 2: Enter the \[Application reason] and click "Submit".

<figure><img src="https://1526800164-files.gitbook.io/~/files/v0/b/gitbook-x-prod.appspot.com/o/spaces%2F50DeL6mO9sNbAZBSEdaN%2Fuploads%2FsCqZYKBrp5YqHaRcehBg%2Fimage.png?alt=media&amp;token=d2eb6e7a-6f84-4fe8-b341-a63a7dbac15a" alt=""><figcaption></figcaption></figure>

<figure><img src="https://1526800164-files.gitbook.io/~/files/v0/b/gitbook-x-prod.appspot.com/o/spaces%2F50DeL6mO9sNbAZBSEdaN%2Fuploads%2FKZ4Bbfg2fKSXr7opGcQC%2Fimage.png?alt=media&amp;token=450ea55c-274f-4194-b8d0-9dfdb798638f" alt="" width="276"><figcaption></figcaption></figure>

When the application has not been processed, the current user will not be able to reapply (the process includes rejection and application deletion).

<figure><img src="https://1526800164-files.gitbook.io/~/files/v0/b/gitbook-x-prod.appspot.com/o/spaces%2F50DeL6mO9sNbAZBSEdaN%2Fuploads%2FqitY3H8c1zR5u96sDeFD%2Fimage.png?alt=media&amp;token=41f507ad-0872-4d13-8b80-1d5bb28b43ad" alt=""><figcaption></figcaption></figure>

**Request Approved**

<figure><img src="https://1526800164-files.gitbook.io/~/files/v0/b/gitbook-x-prod.appspot.com/o/spaces%2F50DeL6mO9sNbAZBSEdaN%2Fuploads%2FI0s0srViyc2fmxZV7aW8%2Fimage.png?alt=media&amp;token=6b98db65-93d0-4be4-987a-52655c8d54af" alt=""><figcaption></figcaption></figure>

**Request Rejected**

<figure><img src="https://1526800164-files.gitbook.io/~/files/v0/b/gitbook-x-prod.appspot.com/o/spaces%2F50DeL6mO9sNbAZBSEdaN%2Fuploads%2FhlsEJtoB4FYULMDSeMPB%2Fimage.png?alt=media&amp;token=8bd0374f-158b-4d77-8c5c-746e793fbdd0" alt=""><figcaption></figcaption></figure>

#### 2.3.5 Apply as Account Executive

As long as the current user is not the Account Executive, they will be able to apply as one.&#x20;

Step 1:  Click "Apply Account Executive"

<figure><img src="https://1526800164-files.gitbook.io/~/files/v0/b/gitbook-x-prod.appspot.com/o/spaces%2F50DeL6mO9sNbAZBSEdaN%2Fuploads%2FW8B1Up3hJfjFOwPHU51O%2Fimage.png?alt=media&amp;token=cb887edf-8a98-4c2f-bf21-136237be3eb3" alt=""><figcaption></figcaption></figure>

Step 2: Enter the \[Application reason] and click "Submit".

<figure><img src="https://1526800164-files.gitbook.io/~/files/v0/b/gitbook-x-prod.appspot.com/o/spaces%2F50DeL6mO9sNbAZBSEdaN%2Fuploads%2FsCqZYKBrp5YqHaRcehBg%2Fimage.png?alt=media&amp;token=d2eb6e7a-6f84-4fe8-b341-a63a7dbac15a" alt=""><figcaption></figcaption></figure>

<figure><img src="https://1526800164-files.gitbook.io/~/files/v0/b/gitbook-x-prod.appspot.com/o/spaces%2F50DeL6mO9sNbAZBSEdaN%2Fuploads%2FKZ4Bbfg2fKSXr7opGcQC%2Fimage.png?alt=media&amp;token=450ea55c-274f-4194-b8d0-9dfdb798638f" alt="" width="276"><figcaption></figcaption></figure>

When the application has not been processed, the current user will not be able to reapply (the process includes rejection and application deletion).

<figure><img src="https://1526800164-files.gitbook.io/~/files/v0/b/gitbook-x-prod.appspot.com/o/spaces%2F50DeL6mO9sNbAZBSEdaN%2Fuploads%2FI5dNlB2P9CfDGaB9gYXg%2Fimage.png?alt=media&amp;token=8989a261-90d3-49fc-94a2-6a13441ac8cb" alt=""><figcaption></figcaption></figure>

**Request Approved**

<figure><img src="https://1526800164-files.gitbook.io/~/files/v0/b/gitbook-x-prod.appspot.com/o/spaces%2F50DeL6mO9sNbAZBSEdaN%2Fuploads%2FTMaFXfSEtDxoOmoOsfIU%2Fimage.png?alt=media&amp;token=02ba7994-f246-466a-952a-66c3c8a1fbeb" alt=""><figcaption></figcaption></figure>

**Request Rejected**

<figure><img src="https://1526800164-files.gitbook.io/~/files/v0/b/gitbook-x-prod.appspot.com/o/spaces%2F50DeL6mO9sNbAZBSEdaN%2Fuploads%2FF7bsPnmoiaycfrx5mr1P%2Fimage.png?alt=media&amp;token=372bf45b-4055-426e-b347-7275a69342b1" alt=""><figcaption></figcaption></figure>


# Details

{% content-ref url="/pages/Jp4zAG1i0BcsVoCeAG35" %}
[Customer List](https://eohelp.weaver.com.co/crm/details/customer-list)
{% endcontent-ref %}

{% content-ref url="/pages/t6uRKSr8xHKvL0LgzRzm" %}
[Contact](https://eohelp.weaver.com.co/crm/details/contact)
{% endcontent-ref %}

{% content-ref url="/pages/vb6UK5bNPEjjn07gm5oN" %}
[Contact Log](https://eohelp.weaver.com.co/crm/details/contact-log)
{% endcontent-ref %}

{% content-ref url="/pages/g4Sp2gHR7yJdde6PA9Qs" %}
[Opportunity](https://eohelp.weaver.com.co/crm/details/opportunity)
{% endcontent-ref %}

{% content-ref url="/pages/4ZV2FNXfCPUnWabYaBmp" %}
[Sales Record](https://eohelp.weaver.com.co/crm/details/sales-record)
{% endcontent-ref %}

{% content-ref url="/pages/qqcEt5CkbvK4KxYJQIjf" %}
[Contracts](https://eohelp.weaver.com.co/crm/details/contracts)
{% endcontent-ref %}

{% content-ref url="/pages/N1LpeoRIswMqs4apNawc" %}
[Customer Pool](https://eohelp.weaver.com.co/crm/details/customer-pool)
{% endcontent-ref %}


# Customer List

{% content-ref url="/pages/gxjM9NRrx9uklFtsQ24R" %}
[List Data](https://eohelp.weaver.com.co/crm/details/customer-list/list-data)
{% endcontent-ref %}

{% content-ref url="/pages/ib9gVe7iBOhvWdSy823s" %}
[Data Operation](https://eohelp.weaver.com.co/crm/details/customer-list/data-operation)
{% endcontent-ref %}

{% content-ref url="/pages/2OwFZrzZrHb6frYCLlp8" %}
[Customer Detail](https://eohelp.weaver.com.co/crm/details/customer-list/customer-detail)
{% endcontent-ref %}


# List Data

## 1 Customer List

<figure><img src="https://1526800164-files.gitbook.io/~/files/v0/b/gitbook-x-prod.appspot.com/o/spaces%2F50DeL6mO9sNbAZBSEdaN%2Fuploads%2FSHzwr1NYLAKhDjndwFTT%2Fimage.png?alt=media&amp;token=99057dbc-dd4a-429a-b04b-cd3486846adc" alt=""><figcaption></figcaption></figure>

Customers in the customer list:

1. Customer who had the current user as account executive and/or customer service representative.
2. The current user's direct subordinates is the customers' account executive.
3. Customer who is shared to the current user.
4. According to the current user's permission settings.

## 2. Stats Block

### 2.1 Description

<figure><img src="https://1526800164-files.gitbook.io/~/files/v0/b/gitbook-x-prod.appspot.com/o/spaces%2F50DeL6mO9sNbAZBSEdaN%2Fuploads%2FZwc3oYG1cR96WU373g5e%2Fimage.png?alt=media&amp;token=b1c92f11-e037-4a44-a929-b8c6cac085f1" alt=""><figcaption></figcaption></figure>

* Current customers Number: All customers
* Formal customer numbers: Customer whose type is "Customer".
* No. of new customers this month: Number of customers that is created in this month.
* Follow up this month: Customers who have been followed up with this month.

### 2.2 Enable/Disable

Settings > Field Settings > Customer Information > List

Page Name: Customer Information

On the left side of the page, under Form, click on the toggle to enable or disable the stats block.

#### **2.2.1 Enable**

<figure><img src="https://1526800164-files.gitbook.io/~/files/v0/b/gitbook-x-prod.appspot.com/o/spaces%2F50DeL6mO9sNbAZBSEdaN%2Fuploads%2FYWQZJpS8kF50yoqjPsLh%2Fimage.png?alt=media&amp;token=6055e8ed-92a7-4f38-b9c0-1ec8b881157b" alt=""><figcaption></figcaption></figure>

#### **2.2.2 Disable**

<figure><img src="https://1526800164-files.gitbook.io/~/files/v0/b/gitbook-x-prod.appspot.com/o/spaces%2F50DeL6mO9sNbAZBSEdaN%2Fuploads%2FnaQ0YUzynSkcOKlRfuSb%2Fimage.png?alt=media&amp;token=52e98bdc-4803-41f6-80e6-89c94f8f1198" alt=""><figcaption></figcaption></figure>

### **2.3 Stat Block Configuration**

Click on the desired Stat Block, and on the left side of the page, under Control, the user can configure its properties.

Here, the user can configure the statistic block, such as data source, statistics (count, total, average, etc.), icon, block title, unit, color, and click event.

<figure><img src="https://1526800164-files.gitbook.io/~/files/v0/b/gitbook-x-prod.appspot.com/o/spaces%2F50DeL6mO9sNbAZBSEdaN%2Fuploads%2FjjN2zXXhVJYNCuZO5Afc%2Fimage.png?alt=media&amp;token=33eaebe7-6303-4cfd-9e68-c5d06bc78091" alt=""><figcaption></figcaption></figure>

## 3 Create New Customer

Purpose: Record new customer data and allow the centralisation of all customer data, making it easier to manage and access important information like contact details, purchase history, and communication logs.

<figure><img src="https://1526800164-files.gitbook.io/~/files/v0/b/gitbook-x-prod.appspot.com/o/spaces%2F50DeL6mO9sNbAZBSEdaN%2Fuploads%2FNzHcV2UarxaxRzKFr7Zq%2Fimage.png?alt=media&amp;token=e6d2cc52-6b93-4606-a43d-ea3fed6a8cf9" alt=""><figcaption></figcaption></figure>

1. Customer Name: Full name of the customer (individual or company). <mark style="color:red;">Required</mark>
2. Customer No.: A unique identifier for the customer.
3. Account Executive: <mark style="color:green;">Defaulted as Creator.</mark> The person responsible for managing the customer relationship. This is typically the primary point of contact between the company and the customer, handling communication, sales, and account growth.
4. Customer Service Representative: The individual responsible for providing support to the customer, addressing inquiries, resolving issues, and ensuring a positive customer experience.
5. Customer Source: Indicates where or how the customer was acquired, such as through marketing campaigns, referrals, organic search, events, or partnerships. It helps track the effectiveness of lead generation efforts.
6. Customer Status: Describes the current state of the customer relationship, such as Intended Purchase, Close Follow, or Wait till further notice.
7. Customer Type: Categorizes customers based on their nature, such as Customer, High-Value Customer, and Lead.
8. Customer Attributes: Specific characteristics that define the customer, such as their preferences, behaviors, or other relevant data points. This field helps in segmenting customers for more personalized service.
9. Industry: Specifies the sector or field in which the customer operates.
10. Region: Refers to the geographic area where the customer is located.
11. Contact No.: The primary phone number for reaching the customer or their representative.
12. Fax No.: The fax number for sending or receiving official documents from the customer. Although less common today, this may still be relevant in some industries.
13. Official Website: The customer’s official company website, which can provide additional information about their business and serve as a point of reference for understanding their needs.
14. Legal Person: The individual legally responsible for the customer company, often the CEO or another executive who is accountable for contracts and legal matters.
15. Postal Code: The postal or zip code for the customer’s location. It is important for mailing purposes and verifying the customer's address.
16. E-mail: The primary email address for communicating with the customer. It is often used for sending important updates, documents, and marketing materials.
17. Company Address: The physical address of the customer’s company. This is used for shipping, billing, and any official correspondence.
18. Location: More specific information about the customer's geographic presence, possibly including coordinates or landmarks, useful for logistics or sales planning.
19. Company Size: Describes the scale of the customer’s company, usually categorized by the number of employees or other metrics like market share, which helps tailor sales and support strategies.
20. Annual Sales: The yearly revenue generated by the customer’s company. This metric is important for understanding the customer’s financial capacity and determining the potential business opportunity.
21. Create Date<mark style="color:green;">: Default as the date and time when the customer record is created.</mark> <mark style="color:red;">Cannot be modified.</mark>
22. Company Logo: Allow user to upload, view, edit, delete the customer's company logo.
23. Customer introduction: Allows the users to create a detailed introduction for the customer, with full customization capabilities for text and formatting.
24. Creator: <mark style="color:green;">Default current user that is creating the customer record.</mark> <mark style="color:red;">Cannot be modified.</mark>
25. Last Contacted Time: <mark style="color:green;">The date time of the latest record in the contact log.</mark> <mark style="color:red;">Cannot be modified.</mark>
26. Last back time: <mark style="color:green;">The most recent date time when the customer was returned from the assigned Account Executive back into the pool of available customers.</mark> <mark style="color:red;">Cannot be modified.</mark>
27. Days without contact: *<mark style="color:green;">Current Date - Last Contacted Time</mark>* <mark style="color:green;"></mark><mark style="color:green;">(If the customer was never contacted, the system will calculate based on the customer creation date).</mark> <mark style="color:red;">Cannot be modified.</mark>

**Remark:**

1. Customer No.: If the user did not assign a value for this, the system will automatically assign it with an increment from 1 based on C-NO-0000000001. It takes the maximum value of *customer\_id* of the auto-increment number and adds 1.
2. The customer name and customer number will be validated for their uniqueness; an error will be prompted if not.
3. Customer source, status, type, attribute, and industry can be managed in Settings > Dropdown box > CRM

<figure><img src="https://1526800164-files.gitbook.io/~/files/v0/b/gitbook-x-prod.appspot.com/o/spaces%2F50DeL6mO9sNbAZBSEdaN%2Fuploads%2F2nuA5H5KMJgFzKYISeq9%2Fimage.png?alt=media&amp;token=93e575fa-5625-4547-a3d4-6ed948f142c0" alt=""><figcaption></figcaption></figure>

### 3.1 Field Setting

Path: CRM > Settings > Field Setting > Tab: Customer information > Form Design&#x20;

This page functions the same way as form design in the Workflow module.

<figure><img src="https://1526800164-files.gitbook.io/~/files/v0/b/gitbook-x-prod.appspot.com/o/spaces%2F50DeL6mO9sNbAZBSEdaN%2Fuploads%2FHgB48JV0JLOzZsY2HeJF%2Fimage.png?alt=media&amp;token=825aa868-b0d0-4aca-983a-bb1370c2da45" alt=""><figcaption></figcaption></figure>

* This page allows the user to add and remove fields, set field attributes, configure the form layout, and sort, which includes sorting mode, list display, advanced query settings, fields for filtering, and other settings.

### 3.2 Similar Customer

This feature is implemented todetects similarities in customer names during data entry to prevent duplicate customer entries in the system.

#### 3.2.1 Configuration

Form Design > Field: Customer Name > Control, under ***Display*** settings, make sure that the "Show similar customers" is checked to be available.&#x20;

<figure><img src="https://1526800164-files.gitbook.io/~/files/v0/b/gitbook-x-prod.appspot.com/o/spaces%2F50DeL6mO9sNbAZBSEdaN%2Fuploads%2FnZx3NkgCcfOn42p69rUm%2Fimage.png?alt=media&amp;token=985c715e-cb62-4236-891c-465c415c79fc" alt=""><figcaption></figcaption></figure>

#### 3.2.2 Result

**3.2.2.1 Enabled**

When "Show similar customers" is enabled, in create or edit customer mode, and the customer name is filled in, the system will display a list of similar customers.

<figure><img src="https://1526800164-files.gitbook.io/~/files/v0/b/gitbook-x-prod.appspot.com/o/spaces%2F50DeL6mO9sNbAZBSEdaN%2Fuploads%2FhAVhoHxkzvNL5RIAjO5n%2Fimage.png?alt=media&amp;token=dc3d2833-8af1-4528-a663-5a243c33b51c" alt=""><figcaption></figcaption></figure>

* The list will display the Customer Name. Account Executive, Customer Service Representative, Create Date and Last Contact Time.

#### **3.2.2.2 Disabled**

When "Show similar customers" is enabled, in create or edit customer mode, and the customer name is filled in, the system will not search for similar customer.

<figure><img src="https://1526800164-files.gitbook.io/~/files/v0/b/gitbook-x-prod.appspot.com/o/spaces%2F50DeL6mO9sNbAZBSEdaN%2Fuploads%2FYlsJUcptPiL14N0Vz93R%2Fimage.png?alt=media&amp;token=93af3f76-b077-4317-9aa4-4beba1478b0a" alt=""><figcaption></figcaption></figure>

### 3.3 Similar Customer List

<figure><img src="https://1526800164-files.gitbook.io/~/files/v0/b/gitbook-x-prod.appspot.com/o/spaces%2F50DeL6mO9sNbAZBSEdaN%2Fuploads%2FRtrEd3Jtqwj7kphJpcr8%2Fimage.png?alt=media&amp;token=2a3556b1-db90-4572-9eb2-bb046045036e" alt=""><figcaption></figcaption></figure>

#### 3.3.1 View

**3.3.1.1 No permission to view the customer, but the user has applied for sharing.**

<figure><img src="https://1526800164-files.gitbook.io/~/files/v0/b/gitbook-x-prod.appspot.com/o/spaces%2F50DeL6mO9sNbAZBSEdaN%2Fuploads%2FC3ro8HD1Vkol7KywD71c%2Fimage.png?alt=media&amp;token=c7c209f5-918e-45fc-98fb-34a45170b6f4" alt=""><figcaption></figcaption></figure>

<figure><img src="https://1526800164-files.gitbook.io/~/files/v0/b/gitbook-x-prod.appspot.com/o/spaces%2F50DeL6mO9sNbAZBSEdaN%2Fuploads%2FDBzezuzXqvpWbdS5LEjP%2Fimage.png?alt=media&amp;token=26e306f0-11d1-4b99-abc1-485c0d7ec732" alt=""><figcaption></figcaption></figure>

Error: "No view permission" will be prompted when the user click on the customer.

<figure><img src="https://1526800164-files.gitbook.io/~/files/v0/b/gitbook-x-prod.appspot.com/o/spaces%2F50DeL6mO9sNbAZBSEdaN%2Fuploads%2Fl7fHRwPmBv7ghWEhCrEt%2Fimage.png?alt=media&amp;token=6dd49b17-0570-4d50-a603-93550b012250" alt=""><figcaption></figcaption></figure>

**3.3.1.3 Have the permission to view**&#x20;

Click on the list data, a new page will be opened and the customer details will be displayed.

<figure><img src="https://1526800164-files.gitbook.io/~/files/v0/b/gitbook-x-prod.appspot.com/o/spaces%2F50DeL6mO9sNbAZBSEdaN%2Fuploads%2FLmYijwct6PxnmRxFj4XK%2Fimage.png?alt=media&amp;token=40a66d86-8e52-478c-814b-2f74c43b4a7a" alt=""><figcaption></figcaption></figure>

#### 3.3.2 Pick Up

For customers who do not have an account executive and customer service executive can be picked up directly. Only for user who are in the pool, the user who are not in the respective pool will not see the "Pick up" button.

<figure><img src="https://1526800164-files.gitbook.io/~/files/v0/b/gitbook-x-prod.appspot.com/o/spaces%2F50DeL6mO9sNbAZBSEdaN%2Fuploads%2FyH2bFsXKfAOfwaML9dUg%2Fimage.png?alt=media&amp;token=25d7443d-8b32-4814-b18c-41c1579f8606" alt=""><figcaption></figcaption></figure>

#### Remark:

Whether or not the pick up will be successful will be according to the settings in Pool Configuration [/pages/sbktA3nNKZVIJGX4F6qG#id-3.3-recycling-mechanism](https://eohelp.weaver.com.co/pages/sbktA3nNKZVIJGX4F6qG#id-3.3-recycling-mechanism "mention").

#### 3.3.3 Request to Share&#x20;

Purpose: To have the permission to view the customer information by the current user.

Step 1: On the Similiar Customer List data row, click more, click "Sharing" to apply for the customer to be shared.

<figure><img src="https://1526800164-files.gitbook.io/~/files/v0/b/gitbook-x-prod.appspot.com/o/spaces%2F50DeL6mO9sNbAZBSEdaN%2Fuploads%2FdrGw8gvmmUamqZOoIEAi%2Fimage.png?alt=media&amp;token=25e4a9d8-ad9c-40ab-a560-b3fe077d268a" alt=""><figcaption></figcaption></figure>

<figure><img src="https://1526800164-files.gitbook.io/~/files/v0/b/gitbook-x-prod.appspot.com/o/spaces%2F50DeL6mO9sNbAZBSEdaN%2Fuploads%2F1ag9etFOlst5Hj8w0jad%2Fimage.png?alt=media&amp;token=cbd31f0b-0b8b-4fe8-82ee-f529a12a0154" alt=""><figcaption></figcaption></figure>

Once the application has been approved, then the user will be able to view the customer.

Click on the "View application" to view the customer data.

<figure><img src="https://1526800164-files.gitbook.io/~/files/v0/b/gitbook-x-prod.appspot.com/o/spaces%2F50DeL6mO9sNbAZBSEdaN%2Fuploads%2FJPqT6q939FE0C6ur8iGy%2Fimage.png?alt=media&amp;token=e87679fd-2092-4cc2-b13d-ef48f53ed616" alt=""><figcaption></figcaption></figure>

#### 3.3.4 Apply as CSR

As long as the current user is not the Customer Service Representative, they will be able to apply as one.&#x20;

Step 1:  Click "Apply Customer Service Representative"

<figure><img src="https://1526800164-files.gitbook.io/~/files/v0/b/gitbook-x-prod.appspot.com/o/spaces%2F50DeL6mO9sNbAZBSEdaN%2Fuploads%2FJeM9NHf0gTcFBzPjR3iI%2Fimage.png?alt=media&amp;token=311c93b5-edb0-4712-882d-c0e9b228b036" alt=""><figcaption></figcaption></figure>

Step 2: Enter the \[Application reason] and click "Submit".

<figure><img src="https://1526800164-files.gitbook.io/~/files/v0/b/gitbook-x-prod.appspot.com/o/spaces%2F50DeL6mO9sNbAZBSEdaN%2Fuploads%2FsCqZYKBrp5YqHaRcehBg%2Fimage.png?alt=media&amp;token=d2eb6e7a-6f84-4fe8-b341-a63a7dbac15a" alt=""><figcaption></figcaption></figure>

<figure><img src="https://1526800164-files.gitbook.io/~/files/v0/b/gitbook-x-prod.appspot.com/o/spaces%2F50DeL6mO9sNbAZBSEdaN%2Fuploads%2FKZ4Bbfg2fKSXr7opGcQC%2Fimage.png?alt=media&amp;token=450ea55c-274f-4194-b8d0-9dfdb798638f" alt="" width="276"><figcaption></figcaption></figure>

When the application has not been processed, the current user will not be able to reapply (the process includes rejection and application deletion).

<figure><img src="https://1526800164-files.gitbook.io/~/files/v0/b/gitbook-x-prod.appspot.com/o/spaces%2F50DeL6mO9sNbAZBSEdaN%2Fuploads%2FqitY3H8c1zR5u96sDeFD%2Fimage.png?alt=media&amp;token=41f507ad-0872-4d13-8b80-1d5bb28b43ad" alt=""><figcaption></figcaption></figure>

**Request Approved**

<figure><img src="https://1526800164-files.gitbook.io/~/files/v0/b/gitbook-x-prod.appspot.com/o/spaces%2F50DeL6mO9sNbAZBSEdaN%2Fuploads%2FI0s0srViyc2fmxZV7aW8%2Fimage.png?alt=media&amp;token=6b98db65-93d0-4be4-987a-52655c8d54af" alt=""><figcaption></figcaption></figure>

**Request Rejected**

<figure><img src="https://1526800164-files.gitbook.io/~/files/v0/b/gitbook-x-prod.appspot.com/o/spaces%2F50DeL6mO9sNbAZBSEdaN%2Fuploads%2FhlsEJtoB4FYULMDSeMPB%2Fimage.png?alt=media&amp;token=8bd0374f-158b-4d77-8c5c-746e793fbdd0" alt=""><figcaption></figcaption></figure>

#### 2.3.5 Apply as Account Executive

As long as the current user is not the Account Executive, they will be able to apply as one.&#x20;

Step 1:  Click "Apply Account Executive"

<figure><img src="https://1526800164-files.gitbook.io/~/files/v0/b/gitbook-x-prod.appspot.com/o/spaces%2F50DeL6mO9sNbAZBSEdaN%2Fuploads%2FW8B1Up3hJfjFOwPHU51O%2Fimage.png?alt=media&amp;token=cb887edf-8a98-4c2f-bf21-136237be3eb3" alt=""><figcaption></figcaption></figure>

Step 2: Enter the \[Application reason] and click "Submit".

<figure><img src="https://1526800164-files.gitbook.io/~/files/v0/b/gitbook-x-prod.appspot.com/o/spaces%2F50DeL6mO9sNbAZBSEdaN%2Fuploads%2FsCqZYKBrp5YqHaRcehBg%2Fimage.png?alt=media&amp;token=d2eb6e7a-6f84-4fe8-b341-a63a7dbac15a" alt=""><figcaption></figcaption></figure>

<figure><img src="https://1526800164-files.gitbook.io/~/files/v0/b/gitbook-x-prod.appspot.com/o/spaces%2F50DeL6mO9sNbAZBSEdaN%2Fuploads%2FKZ4Bbfg2fKSXr7opGcQC%2Fimage.png?alt=media&amp;token=450ea55c-274f-4194-b8d0-9dfdb798638f" alt="" width="276"><figcaption></figcaption></figure>

When the application has not been processed, the current user will not be able to reapply (the process includes rejection and application deletion).

<figure><img src="https://1526800164-files.gitbook.io/~/files/v0/b/gitbook-x-prod.appspot.com/o/spaces%2F50DeL6mO9sNbAZBSEdaN%2Fuploads%2FI5dNlB2P9CfDGaB9gYXg%2Fimage.png?alt=media&amp;token=8989a261-90d3-49fc-94a2-6a13441ac8cb" alt=""><figcaption></figcaption></figure>

**Request Approved**

<figure><img src="https://1526800164-files.gitbook.io/~/files/v0/b/gitbook-x-prod.appspot.com/o/spaces%2F50DeL6mO9sNbAZBSEdaN%2Fuploads%2FTMaFXfSEtDxoOmoOsfIU%2Fimage.png?alt=media&amp;token=02ba7994-f246-466a-952a-66c3c8a1fbeb" alt=""><figcaption></figcaption></figure>

**Request Rejected**

<figure><img src="https://1526800164-files.gitbook.io/~/files/v0/b/gitbook-x-prod.appspot.com/o/spaces%2F50DeL6mO9sNbAZBSEdaN%2Fuploads%2FF7bsPnmoiaycfrx5mr1P%2Fimage.png?alt=media&amp;token=372bf45b-4055-426e-b347-7275a69342b1" alt=""><figcaption></figcaption></figure>

## 4 Import/Export

### 4.1 Import

Step 1: In the top-right corner of the page, click "Import".

<figure><img src="https://1526800164-files.gitbook.io/~/files/v0/b/gitbook-x-prod.appspot.com/o/spaces%2F50DeL6mO9sNbAZBSEdaN%2Fuploads%2FadWHpC7BAFcnwjJkg8mA%2Fimage.png?alt=media&amp;token=9b8dc7f4-1829-4db1-b46f-589734af17f6" alt=""><figcaption></figcaption></figure>

Step 2: Export the template by clicking on "Export template"

<figure><img src="https://1526800164-files.gitbook.io/~/files/v0/b/gitbook-x-prod.appspot.com/o/spaces%2F50DeL6mO9sNbAZBSEdaN%2Fuploads%2FQhzHU7ZVYNhv0TPzuRdw%2Fimage.png?alt=media&amp;token=fd63dde6-ebfd-4dc5-881e-1ac9fabb70b4" alt="" width="375"><figcaption></figcaption></figure>

Step 3: Fill up the Excel template

<figure><img src="https://1526800164-files.gitbook.io/~/files/v0/b/gitbook-x-prod.appspot.com/o/spaces%2F50DeL6mO9sNbAZBSEdaN%2Fuploads%2FblltPlGGqK9Oo6L74B3U%2Fimage.png?alt=media&amp;token=838c3bd0-89d1-4300-98ba-aefcbbcd9568" alt=""><figcaption></figcaption></figure>

Step 4: Select the updated Excel file by double-clicking on the file or click on the file and click "Open".

<figure><img src="https://1526800164-files.gitbook.io/~/files/v0/b/gitbook-x-prod.appspot.com/o/spaces%2F50DeL6mO9sNbAZBSEdaN%2Fuploads%2FeWOMc4tXXGgZV1bXUwQB%2Fimage.png?alt=media&amp;token=20555544-84d7-4d6c-bbe5-521af1eb21c1" alt=""><figcaption></figcaption></figure>

Step 5: Select whether you would like to add new data or update the existing data, once done, click on "Start importing" to begin the import.

<figure><img src="https://1526800164-files.gitbook.io/~/files/v0/b/gitbook-x-prod.appspot.com/o/spaces%2F50DeL6mO9sNbAZBSEdaN%2Fuploads%2FNXDevqEGPpaquHkJoYWj%2Fimage.png?alt=media&amp;token=eca7e767-5774-4314-a454-a420129c35b3" alt=""><figcaption></figcaption></figure>

Status message will pop-up once done.

<figure><img src="https://1526800164-files.gitbook.io/~/files/v0/b/gitbook-x-prod.appspot.com/o/spaces%2F50DeL6mO9sNbAZBSEdaN%2Fuploads%2FWKXZCP46yAnx880pSjE9%2Fimage.png?alt=media&amp;token=67ca251f-8af8-40f3-a27f-f85eeddcee80" alt="" width="278"><figcaption></figcaption></figure>

<figure><img src="https://1526800164-files.gitbook.io/~/files/v0/b/gitbook-x-prod.appspot.com/o/spaces%2F50DeL6mO9sNbAZBSEdaN%2Fuploads%2FJD0LL2EOc9XRJGE1JXdw%2Fimage.png?alt=media&amp;token=f8c7df0f-5207-4b98-ac95-cb7e5e733746" alt="" width="276"><figcaption></figcaption></figure>

When the import is complete, an Excel file will be generated to inform the user of the import status of all rows and provide an error message if the import failed.

### 4.2 Export

Step 1: In the top-right corner of the page, click "Export".

<figure><img src="https://1526800164-files.gitbook.io/~/files/v0/b/gitbook-x-prod.appspot.com/o/spaces%2F50DeL6mO9sNbAZBSEdaN%2Fuploads%2FyEMnCfgdcbQTw7YxFTRy%2Fimage.png?alt=media&amp;token=7b50a7b6-1385-45aa-89bf-cba58771fff3" alt=""><figcaption></figcaption></figure>

Step 2: Select or de-select fields to be exported, and click "Confirm" to begin the process.

<figure><img src="https://1526800164-files.gitbook.io/~/files/v0/b/gitbook-x-prod.appspot.com/o/spaces%2F50DeL6mO9sNbAZBSEdaN%2Fuploads%2FF0WOZQjHE9uZD3gcEXuG%2Fimage.png?alt=media&amp;token=baa159ad-c23c-4e76-baae-221aba3d2cb5" alt=""><figcaption></figcaption></figure>

The system will automatically generate and download the exported data in Excel format onto the user's device.

<figure><img src="https://1526800164-files.gitbook.io/~/files/v0/b/gitbook-x-prod.appspot.com/o/spaces%2F50DeL6mO9sNbAZBSEdaN%2Fuploads%2F94KBafut90HUGA5l1Qgw%2Fimage.png?alt=media&amp;token=ecbf792e-fe2c-4833-8bb3-2117a2c158ff" alt=""><figcaption></figcaption></figure>

**Remark:**

* This will export all the data that is shown on the current display list, across all pages. If your settings for the list are set to 10 results per page, the export will still include all existing data.
* The user can also export the desired data by filtering, searching, and applying query conditions before the export.
* If there are any attachments, such as a logo, in the master data, the attachment and Excel file will be exported simultaneously and compressed into a single zipped file.

## 5 Tag Manage

Purpose: A centralized console for the user to manage all tags the user had associated to each customers.&#x20;

### 5.1 View all tags&#x20;

Step 1: Click on the "Tag Manage" button to open the console.

<figure><img src="https://1526800164-files.gitbook.io/~/files/v0/b/gitbook-x-prod.appspot.com/o/spaces%2F50DeL6mO9sNbAZBSEdaN%2Fuploads%2FvDXtt5bQI3zJW9jjP7C1%2Fimage.png?alt=media&amp;token=28073991-b3f3-4dd1-98a9-94247ec53a40" alt=""><figcaption></figcaption></figure>

In this interface, the user can view all the current tags associated with each customer.

<figure><img src="https://1526800164-files.gitbook.io/~/files/v0/b/gitbook-x-prod.appspot.com/o/spaces%2F50DeL6mO9sNbAZBSEdaN%2Fuploads%2FU65wcy99oZVDCSiK3ewf%2Fimage.png?alt=media&amp;token=62d91cb0-e0b5-4c90-b637-f83bd185815e" alt=""><figcaption></figcaption></figure>

### 5.2 Replace current tag

Step 1: Click on ![](https://1526800164-files.gitbook.io/~/files/v0/b/gitbook-x-prod.appspot.com/o/spaces%2F50DeL6mO9sNbAZBSEdaN%2Fuploads%2FB4kWCWOq4wOx6ueEZftz%2Fimage.png?alt=media\&token=95dac158-7672-4caa-9c4c-70595d42bc12)next to the tag that you want to replace.&#x20;

<figure><img src="https://1526800164-files.gitbook.io/~/files/v0/b/gitbook-x-prod.appspot.com/o/spaces%2F50DeL6mO9sNbAZBSEdaN%2Fuploads%2FItesef5bYCwzxuRoSRub%2Fimage.png?alt=media&amp;token=6299e2c2-e4be-41a5-b075-d563b653d26a" alt=""><figcaption></figcaption></figure>

Step 2: Change the tag by selecting existing tag or create a new tag by simply enter the new tag name and click enter on your keyboard, then click "Save".

<figure><img src="https://1526800164-files.gitbook.io/~/files/v0/b/gitbook-x-prod.appspot.com/o/spaces%2F50DeL6mO9sNbAZBSEdaN%2Fuploads%2FT32gyufpoErYFpnNGmgr%2Fimage.png?alt=media&amp;token=5d3d98bf-8f3c-4987-8ec6-4042084e389a" alt=""><figcaption></figcaption></figure>

### 5.3 Assign customer(s) to current tag

Step 1: Under \[Select customers], click ![](https://1526800164-files.gitbook.io/~/files/v0/b/gitbook-x-prod.appspot.com/o/spaces%2F50DeL6mO9sNbAZBSEdaN%2Fuploads%2FtcP321lrhsCDcbOUXZEZ%2Fimage.png?alt=media\&token=5dc933f9-2236-4cf6-b0f0-836f2a7ccf21) .

<figure><img src="https://1526800164-files.gitbook.io/~/files/v0/b/gitbook-x-prod.appspot.com/o/spaces%2F50DeL6mO9sNbAZBSEdaN%2Fuploads%2Fl8FoMg4PlleVwjQDIJdO%2Fimage.png?alt=media&amp;token=fea60f82-b614-4422-b60d-0549ddd054cf" alt=""><figcaption></figcaption></figure>

Step 2: Click on the avatar to open a dropdown list of customer that the current user has the permission to view for.

<figure><img src="https://1526800164-files.gitbook.io/~/files/v0/b/gitbook-x-prod.appspot.com/o/spaces%2F50DeL6mO9sNbAZBSEdaN%2Fuploads%2FMrCtyOcNhbTur9ftxYTD%2Fimage.png?alt=media&amp;token=1f969559-c26f-40ef-9485-0d572f268765" alt=""><figcaption></figcaption></figure>

Step 3: Select the customer(s) and click "Confirm" to add them to the tag.

<figure><img src="https://1526800164-files.gitbook.io/~/files/v0/b/gitbook-x-prod.appspot.com/o/spaces%2F50DeL6mO9sNbAZBSEdaN%2Fuploads%2FGEet8pGJUdzYwEI8Pl3C%2Fimage.png?alt=media&amp;token=7bda2712-5f73-450b-af56-eea5104f6635" alt=""><figcaption></figcaption></figure>

Step 4: Click "Save" to implement the changes made.

<figure><img src="https://1526800164-files.gitbook.io/~/files/v0/b/gitbook-x-prod.appspot.com/o/spaces%2F50DeL6mO9sNbAZBSEdaN%2Fuploads%2FGdTVxnkTswyAf5xm7cqu%2Fimage.png?alt=media&amp;token=9f0cbcbc-6ebd-48de-ab14-fe8d47aa3327" alt=""><figcaption></figcaption></figure>

### 5.4 Add new tag

Step 1: In the top row, click on ![](https://1526800164-files.gitbook.io/~/files/v0/b/gitbook-x-prod.appspot.com/o/spaces%2F50DeL6mO9sNbAZBSEdaN%2Fuploads%2FmmAQQMHsgfS9MXDlAjX8%2Fimage.png?alt=media\&token=f1c09386-a93f-4e3c-ab4d-d21631c23c76) to add a new row.

<figure><img src="https://1526800164-files.gitbook.io/~/files/v0/b/gitbook-x-prod.appspot.com/o/spaces%2F50DeL6mO9sNbAZBSEdaN%2Fuploads%2FnqvEM6VBTKSpA2KpjR7I%2Fimage.png?alt=media&amp;token=4a3cbccf-0d1e-473a-b389-3c7842c9795c" alt=""><figcaption></figcaption></figure>

Step 2: In the newly created row, enter the new tag and the customer that is to be associated with the tag, and click save to create it.

<figure><img src="https://1526800164-files.gitbook.io/~/files/v0/b/gitbook-x-prod.appspot.com/o/spaces%2F50DeL6mO9sNbAZBSEdaN%2Fuploads%2FJEKcHt1KC9mmArb5LpI2%2Fimage.png?alt=media&amp;token=cf33556b-a1d3-4088-b74c-7a1bddc7778e" alt=""><figcaption></figcaption></figure>

<figure><img src="https://1526800164-files.gitbook.io/~/files/v0/b/gitbook-x-prod.appspot.com/o/spaces%2F50DeL6mO9sNbAZBSEdaN%2Fuploads%2Fd7NeZxTDXTpmhgrLy64P%2Fimage.png?alt=media&amp;token=b3913f53-a2bd-45ba-824a-424a15610fa8" alt=""><figcaption></figcaption></figure>

**Remark:**

If the user attempt to remove the existing tag and save without replacing it with a new tag, an error message will be displayed.

<figure><img src="https://1526800164-files.gitbook.io/~/files/v0/b/gitbook-x-prod.appspot.com/o/spaces%2F50DeL6mO9sNbAZBSEdaN%2Fuploads%2FDWm3oQGt2yTpKHLp1UB6%2Fimage.png?alt=media&amp;token=c52e2e46-7d85-4834-85d7-504ae9748344" alt="" width="252"><figcaption></figcaption></figure>

## 6. Nearby Customer

**Purpose:** Retrieve customers who are within a few kilometers away from the current user.

**Step 1:** On \[Customer list], click on "Nearby customers"

<figure><img src="https://1526800164-files.gitbook.io/~/files/v0/b/gitbook-x-prod.appspot.com/o/spaces%2F50DeL6mO9sNbAZBSEdaN%2Fuploads%2FGYB61rxaRwU9Y9HxYMpr%2Fimage.png?alt=media&amp;token=2364f185-df91-4160-a0d7-d163144db279" alt=""><figcaption></figcaption></figure>

**Step 2:** The customer name will display on the map.

<figure><img src="https://1526800164-files.gitbook.io/~/files/v0/b/gitbook-x-prod.appspot.com/o/spaces%2F50DeL6mO9sNbAZBSEdaN%2Fuploads%2FTkGQhOXGRTjsVwCnP5ea%2Fimage.png?alt=media&amp;token=ab14e20a-2545-4df4-8f9e-2cf5bb8c8a95" alt=""><figcaption></figcaption></figure>

### 6.1 Permission Settings

**Path:** Settings > Permission Setting > Page Permission

**Step 1:** Click "New".

<figure><img src="https://1526800164-files.gitbook.io/~/files/v0/b/gitbook-x-prod.appspot.com/o/spaces%2F50DeL6mO9sNbAZBSEdaN%2Fuploads%2FtxzU17m1yGpzfQfiAYhp%2Fimage.png?alt=media&amp;token=6cd15b81-cac0-46ea-8307-51b462823524" alt=""><figcaption></figcaption></figure>

**Step 2:** Set the relevant scope of user whom can use this feature and click "Save".

<figure><img src="https://1526800164-files.gitbook.io/~/files/v0/b/gitbook-x-prod.appspot.com/o/spaces%2F50DeL6mO9sNbAZBSEdaN%2Fuploads%2F1PXdmptM1HQ0h84UiPm2%2Fimage.png?alt=media&amp;token=a6a20473-e980-4b03-8efc-4aef2cd51580" alt=""><figcaption></figcaption></figure>

### 6.2 Configuration

#### 6.2.1 Customer Information: Location

Must have data in Customer Information: Location.

<figure><img src="https://1526800164-files.gitbook.io/~/files/v0/b/gitbook-x-prod.appspot.com/o/spaces%2F50DeL6mO9sNbAZBSEdaN%2Fuploads%2FhCsU1OMKaAJl4NJBDOpz%2Fimage.png?alt=media&amp;token=7e66e346-b72d-4fec-9e6d-b1f6aa09800b" alt=""><figcaption></figcaption></figure>

#### 6.2.2 Within how many kilometers

The user may set the range parameter in \[Related Business Settings] > \[Customer].

<figure><img src="https://1526800164-files.gitbook.io/~/files/v0/b/gitbook-x-prod.appspot.com/o/spaces%2F50DeL6mO9sNbAZBSEdaN%2Fuploads%2FirDROCMo2LegyMfnP4Nj%2Fimage.png?alt=media&amp;token=949a2de9-9947-4331-b1a9-6a177ba6abcd" alt=""><figcaption></figcaption></figure>

## 7. Filtering/Searching

The conditions of “More filters”, “Search” and “Advanced Search” can be set in \[Fields Setting].&#x20;

### 7.1 List Data

#### 7.1.1 Filter

The filter function allows users to refine or narrow down the data list based on the selected criteria.

Click on "More filters" to view more filtering options available.

<figure><img src="https://1526800164-files.gitbook.io/~/files/v0/b/gitbook-x-prod.appspot.com/o/spaces%2F50DeL6mO9sNbAZBSEdaN%2Fuploads%2FGWESduFcFy5CCj3zoNgl%2Fimage.png?alt=media&amp;token=545c9513-05ea-4a73-b90c-863cfa8bc8a9" alt=""><figcaption></figcaption></figure>

#### 7.1.2 Search

The users is able to filter customer with fieldsthat are similar/matched to the text entered in the search box.

<figure><img src="https://1526800164-files.gitbook.io/~/files/v0/b/gitbook-x-prod.appspot.com/o/spaces%2F50DeL6mO9sNbAZBSEdaN%2Fuploads%2FILqUofpVKNUR92TtZJ8R%2Fimage.png?alt=media&amp;token=4afb29bf-d3e5-4674-bb96-a5c6a90a347a" alt=""><figcaption></figcaption></figure>

<figure><img src="https://1526800164-files.gitbook.io/~/files/v0/b/gitbook-x-prod.appspot.com/o/spaces%2F50DeL6mO9sNbAZBSEdaN%2Fuploads%2FWFtgjzezGP0SPa0mwxFe%2Fimage.png?alt=media&amp;token=a864a1fc-e944-45f7-9ddf-19522d5a0894" alt=""><figcaption></figcaption></figure>

The \[Advance Query] allows the users to create complex searches or filters by specifying detailed conditions and criteria.

<figure><img src="https://1526800164-files.gitbook.io/~/files/v0/b/gitbook-x-prod.appspot.com/o/spaces%2F50DeL6mO9sNbAZBSEdaN%2Fuploads%2FjxFsIM833S8g0VTrajlB%2Fimage.png?alt=media&amp;token=c85913fe-46ae-49e8-8b4d-42bb41979604" alt=""><figcaption></figcaption></figure>

### 7.2 Detail Data

Allows user to search by customer name and opens in a new page

<figure><img src="https://1526800164-files.gitbook.io/~/files/v0/b/gitbook-x-prod.appspot.com/o/spaces%2F50DeL6mO9sNbAZBSEdaN%2Fuploads%2FQYyDMrVIVG2cOEP3KLfp%2Fimage.png?alt=media&amp;token=3f39da6b-b312-4b31-a11c-f01c62e13b1f" alt=""><figcaption></figcaption></figure>

<figure><img src="https://1526800164-files.gitbook.io/~/files/v0/b/gitbook-x-prod.appspot.com/o/spaces%2F50DeL6mO9sNbAZBSEdaN%2Fuploads%2FQ4rJw5k5nQzRAsliK9lv%2Fimage.png?alt=media&amp;token=69ce7029-ace6-4a67-8447-727b1caf264b" alt=""><figcaption></figcaption></figure>


# Data Operation

## 1 View&#x20;

On the left side of the data row, click \[···] for more options, and then click "View.

<figure><img src="https://1526800164-files.gitbook.io/~/files/v0/b/gitbook-x-prod.appspot.com/o/spaces%2F50DeL6mO9sNbAZBSEdaN%2Fuploads%2F2fy6zrzJBkqC3fLGOZUl%2Fimage.png?alt=media&amp;token=7018ed44-f7ea-4393-9e57-8e60fdddbf3a" alt=""><figcaption></figcaption></figure>

Click on the row to display the customer details directly on the right-hand side.

<figure><img src="https://1526800164-files.gitbook.io/~/files/v0/b/gitbook-x-prod.appspot.com/o/spaces%2F50DeL6mO9sNbAZBSEdaN%2Fuploads%2F5e17mabkC64vXJdB6TzK%2Fimage.png?alt=media&amp;token=8bf3c6f1-e333-4b1a-89dd-32b591c65b2d" alt=""><figcaption></figcaption></figure>

## 2 Follow/Unfollow&#x20;

All customer on the customer list can be followed or unfollowed.

<figure><img src="https://1526800164-files.gitbook.io/~/files/v0/b/gitbook-x-prod.appspot.com/o/spaces%2F50DeL6mO9sNbAZBSEdaN%2Fuploads%2F4QUj3vt7YUZJYOshUQiN%2Fimage.png?alt=media&amp;token=90b41e69-73d0-4dc7-b0e8-0ee251883fbc" alt=""><figcaption></figcaption></figure>

Followed customers will have a ☆ on their customer details.

<figure><img src="https://1526800164-files.gitbook.io/~/files/v0/b/gitbook-x-prod.appspot.com/o/spaces%2F50DeL6mO9sNbAZBSEdaN%2Fuploads%2FNKl4lqc0spBLUmwGvcTR%2Fimage.png?alt=media&amp;token=c5c06899-578f-4225-9952-327b00fb5849" alt=""><figcaption></figcaption></figure>

The user can then view the followed customer's in the "Followed" tab.

<figure><img src="https://1526800164-files.gitbook.io/~/files/v0/b/gitbook-x-prod.appspot.com/o/spaces%2F50DeL6mO9sNbAZBSEdaN%2Fuploads%2FQsfaR0mtSv6LMBvz2n86%2Fimage.png?alt=media&amp;token=13e9e571-a82e-4302-a945-001428e2f3cb" alt=""><figcaption></figcaption></figure>

## 3 Edit&#x20;

Step 1: On the left side of the data row, click \[···] for more options, and then click "Edit".&#x20;

<figure><img src="https://1526800164-files.gitbook.io/~/files/v0/b/gitbook-x-prod.appspot.com/o/spaces%2F50DeL6mO9sNbAZBSEdaN%2Fuploads%2FJHgiYDN9uo8WyO5X0aae%2Fimage.png?alt=media&amp;token=d76be43d-6445-4e50-b65d-ebe1f229ed96" alt=""><figcaption></figcaption></figure>

Customers who can be edited:

1. Customer who had the current user as account executive and/or customer service representative.
2. The current user's direct subordinates is the customers' account executive.
3. According to the current user's permission settings.

**Remark:**&#x20;

If the current user belongs to a role in a permission group with editing permission, they can also edit the customers assigned to that permission group. However, the list will no longer display the customers of their immediate subordinates for whom they are the account executive.

Step 2: In the \[Edit customer] page, modify the customer information, and click "Save".

<figure><img src="https://1526800164-files.gitbook.io/~/files/v0/b/gitbook-x-prod.appspot.com/o/spaces%2F50DeL6mO9sNbAZBSEdaN%2Fuploads%2FUxzSzJEsSooaMN4Ezev3%2Fimage.png?alt=media&amp;token=edbe3a84-2c76-48d4-8ab4-2aaeab74c437" alt=""><figcaption></figcaption></figure>

The operation will be recorded in the customer log, log type: "Edit customer".

<figure><img src="https://1526800164-files.gitbook.io/~/files/v0/b/gitbook-x-prod.appspot.com/o/spaces%2F50DeL6mO9sNbAZBSEdaN%2Fuploads%2FP5G9kIlQwBp2OCeaDIYu%2Fimage.png?alt=media&amp;token=fac099e9-7285-44b3-9d64-e0f6506b1f22" alt=""><figcaption></figcaption></figure>

Click on "View Change Records" to see the changed details.

<figure><img src="https://1526800164-files.gitbook.io/~/files/v0/b/gitbook-x-prod.appspot.com/o/spaces%2F50DeL6mO9sNbAZBSEdaN%2Fuploads%2FNdWb4ZYtghzzX9cQynR4%2Fimage.png?alt=media&amp;token=3211c08d-bebe-4085-a928-7ae1c695f012" alt=""><figcaption></figcaption></figure>

## 4 Delete

Only the administrator can delete a customer.

Step 1: On the desired data row, click more ···, then click "Delete".

<figure><img src="https://1526800164-files.gitbook.io/~/files/v0/b/gitbook-x-prod.appspot.com/o/spaces%2F50DeL6mO9sNbAZBSEdaN%2Fuploads%2FJSwwVRCi6edHpiSuE35v%2Fimage.png?alt=media&amp;token=92b32df9-bbfd-4422-b565-f5c78d7ad5ec" alt=""><figcaption></figcaption></figure>

Step 2: Click "Confirm" to proceed with the deletion.

**Remark:**

The operation will be recorded in the customer log, log type: "Delete customer".

## 5 Return to the high seas

Return the customer to the customer pool for other member to pick up (become the account executive of this customer).

<figure><img src="https://1526800164-files.gitbook.io/~/files/v0/b/gitbook-x-prod.appspot.com/o/spaces%2F50DeL6mO9sNbAZBSEdaN%2Fuploads%2FGMigBAbf0h11zyarAxgu%2Fimage.png?alt=media&amp;token=29643fd9-58d7-4fe7-957d-7588a6b98167" alt=""><figcaption></figcaption></figure>

Remark:

* Only the pool's administrator or the customer's account executive can perform this operation
* This operation will take effect immediately and the user will no longer finds it in their customer list.

Step 1: On the desired data row, click more ···, then click "Return to the high seas".

<figure><img src="https://1526800164-files.gitbook.io/~/files/v0/b/gitbook-x-prod.appspot.com/o/spaces%2F50DeL6mO9sNbAZBSEdaN%2Fuploads%2FbxwjRf3L8ohlGrVnIzR5%2Fimage.png?alt=media&amp;token=05145941-6bf6-49f8-aa77-161965f93afa" alt=""><figcaption></figcaption></figure>

Step 2: Enter the return reason and click \[Confirm] to complete the operation.

<figure><img src="https://1526800164-files.gitbook.io/~/files/v0/b/gitbook-x-prod.appspot.com/o/spaces%2F50DeL6mO9sNbAZBSEdaN%2Fuploads%2F5cW9SlyemznRd3wg9ry6%2Fimage.png?alt=media&amp;token=c881ad85-affd-41dc-b688-e59f8d6ac77a" alt=""><figcaption></figcaption></figure>

* The "Account Executive" for the successfully returned customers will be empty.

<figure><img src="https://1526800164-files.gitbook.io/~/files/v0/b/gitbook-x-prod.appspot.com/o/spaces%2F50DeL6mO9sNbAZBSEdaN%2Fuploads%2F40HhZ5e4fiwMQhO53mSz%2Fimage.png?alt=media&amp;token=1fd0c1fa-246a-40e6-9abb-b37ccc718bb2" alt=""><figcaption></figcaption></figure>

* The pickup operation will be recorded in the customer log, log type: “Back customer”.

## 6 Log

User can view the logs of all the customers in the customer list.\
● Click the \[Log] button to bring up the log data pop-up box, where you can view the specific operation records of the customer and support filtering or direct queries by operation type and operation time.

<figure><img src="https://1526800164-files.gitbook.io/~/files/v0/b/gitbook-x-prod.appspot.com/o/spaces%2F50DeL6mO9sNbAZBSEdaN%2Fuploads%2FzfBTtEetHS4gL2yOcwsU%2Fimage.png?alt=media&amp;token=739bc14c-4d7f-4fa6-a8aa-5ec1d77eb314" alt=""><figcaption></figcaption></figure>

The log is displayed as a timeline chart, with the time of occurrence shown on the left and the operation type and details displayed on the right.

<figure><img src="https://1526800164-files.gitbook.io/~/files/v0/b/gitbook-x-prod.appspot.com/o/spaces%2F50DeL6mO9sNbAZBSEdaN%2Fuploads%2Faoz99r4Jf1kFvFZOME6i%2Fimage.png?alt=media&amp;token=81e1705d-4403-441c-bed3-b3fce66bc89a" alt=""><figcaption></figcaption></figure>

## 7 Share Customer&#x20;

Using the share customer function, you are able to allow other users who do not have the relevant permission to view this customer or the selected customer.

The operation to add new personnel to the shared list will not clear the current shared list. Instead, the new range will be added to that customer's current shared range.

#### 3.7.1 Single Share:&#x20;

Step 1: On the left side of the data row, click \[···] for more options, and then click "Share".

<figure><img src="https://1526800164-files.gitbook.io/~/files/v0/b/gitbook-x-prod.appspot.com/o/spaces%2F50DeL6mO9sNbAZBSEdaN%2Fuploads%2FR0aulVpJhQVE4vJhtwoq%2Fimage.png?alt=media&amp;token=cb4106f8-e92b-40f3-a00f-9e3963ef2269" alt=""><figcaption></figcaption></figure>

Step 2: Enter the authorized department, role and/or specific user to view the customer and click "Save" to complete the operation.

<figure><img src="https://1526800164-files.gitbook.io/~/files/v0/b/gitbook-x-prod.appspot.com/o/spaces%2F50DeL6mO9sNbAZBSEdaN%2Fuploads%2FXZhKvHso72CYPPXrfvW4%2Fimage.png?alt=media&amp;token=f83643f4-1139-4ff2-9b90-789c146b529d" alt=""><figcaption></figcaption></figure>

<figure><img src="https://1526800164-files.gitbook.io/~/files/v0/b/gitbook-x-prod.appspot.com/o/spaces%2F50DeL6mO9sNbAZBSEdaN%2Fuploads%2FAvTppW9athmhlIywZlbo%2Fimage.png?alt=media&amp;token=62aadad9-54f7-4d08-812f-c957807e3b54" alt=""><figcaption></figcaption></figure>

The operation will be recorded in the customer log, log type: "Share customer".

<figure><img src="https://1526800164-files.gitbook.io/~/files/v0/b/gitbook-x-prod.appspot.com/o/spaces%2F50DeL6mO9sNbAZBSEdaN%2Fuploads%2FjzUZzlcEsMvTLJoUpUDB%2Fimage.png?alt=media&amp;token=8e4714d3-67f1-401a-b852-a0986d79d984" alt=""><figcaption></figcaption></figure>

<figure><img src="https://1526800164-files.gitbook.io/~/files/v0/b/gitbook-x-prod.appspot.com/o/spaces%2F50DeL6mO9sNbAZBSEdaN%2Fuploads%2F1OQMtBdrsCkm06F09QLp%2Fimage.png?alt=media&amp;token=63f05759-89ff-4bda-8218-330c52884f11" alt=""><figcaption></figcaption></figure>

#### 3.7.2 Batch Share

Step 1: Select the customers to share, then click on the "Batch sharing"&#x20;

<figure><img src="https://1526800164-files.gitbook.io/~/files/v0/b/gitbook-x-prod.appspot.com/o/spaces%2F50DeL6mO9sNbAZBSEdaN%2Fuploads%2FSXAc4gAJAeIBwdz0Wxvq%2Fimage.png?alt=media&amp;token=f64fdc19-2e73-4d0d-a311-fd1d8a2663c2" alt=""><figcaption></figcaption></figure>

Step 2: The selected customers will be listed in the \[Target customers] field.  Enter the authorized department, role, and/or specific user to view the customer, and click "Save" to complete the operation.

<figure><img src="https://1526800164-files.gitbook.io/~/files/v0/b/gitbook-x-prod.appspot.com/o/spaces%2F50DeL6mO9sNbAZBSEdaN%2Fuploads%2F6hw6DsUhDwCBCV16G48e%2Fimage.png?alt=media&amp;token=45716692-2216-4990-831f-8689d01e6055" alt=""><figcaption></figcaption></figure>

<figure><img src="https://1526800164-files.gitbook.io/~/files/v0/b/gitbook-x-prod.appspot.com/o/spaces%2F50DeL6mO9sNbAZBSEdaN%2Fuploads%2FKEp5IPPFpnDI29KeaEQg%2Fimage.png?alt=media&amp;token=51249a94-e82d-4b1a-afad-9884c7fb6ad8" alt=""><figcaption></figcaption></figure>

The operation will be recorded in the customer log, log type: "Batch Share customer".

<figure><img src="https://1526800164-files.gitbook.io/~/files/v0/b/gitbook-x-prod.appspot.com/o/spaces%2F50DeL6mO9sNbAZBSEdaN%2Fuploads%2FZNDNmCBIR9mYaX4E6jGp%2Fimage.png?alt=media&amp;token=01f18d90-8c1e-41e8-92e9-0238c306571e" alt=""><figcaption></figcaption></figure>

Click on "View change records" to see the changes made.&#x20;

<figure><img src="https://1526800164-files.gitbook.io/~/files/v0/b/gitbook-x-prod.appspot.com/o/spaces%2F50DeL6mO9sNbAZBSEdaN%2Fuploads%2FYfR6WniY5oXnbabhIlkM%2Fimage.png?alt=media&amp;token=643e7d1f-fad2-4811-9884-8b6bbf588868" alt=""><figcaption></figcaption></figure>

## 8 Batch Cancel Share

The customer to whom the user is shared and who is not the account executive and/or customer service representative can no longer view the customer in their customer list after this operation has been performed.

This operation can be applied to customers in the customer list for which you have editing permission.

Step 1: Select the relevant customers. Under \[More], click on "Cancel sharing in batch".

<figure><img src="https://1526800164-files.gitbook.io/~/files/v0/b/gitbook-x-prod.appspot.com/o/spaces%2F50DeL6mO9sNbAZBSEdaN%2Fuploads%2FaWM2WZI6kTue3rqjmAm2%2Fimage.png?alt=media&amp;token=a5ecdc15-12ab-4145-ac8b-325846a05c9e" alt=""><figcaption></figcaption></figure>

Step 2: The selected customers will be listed in the \[Target customers] field. Enter the authorized department, role, and/or specific user to view the customer, and click "Save" to complete the operation.

<figure><img src="https://1526800164-files.gitbook.io/~/files/v0/b/gitbook-x-prod.appspot.com/o/spaces%2F50DeL6mO9sNbAZBSEdaN%2Fuploads%2FkTlmOSHJb4jNuQi4i1Sw%2Fimage.png?alt=media&amp;token=1ef8aec5-82b8-4530-963e-ffee8981a7f1" alt=""><figcaption></figcaption></figure>

* Select "All": Clears all sharing for the selected customers.
* Selected specific departments/roles/users: Only the selected departments/roles/users will have their sharing removed, and the remaining sharing scope will remain.

The operation will be recorded in the customer log, log type: "Batch Cancel Share customer".

<figure><img src="https://1526800164-files.gitbook.io/~/files/v0/b/gitbook-x-prod.appspot.com/o/spaces%2F50DeL6mO9sNbAZBSEdaN%2Fuploads%2FoeBgI5kFSYChquIXceIx%2Fimage.png?alt=media&amp;token=7ea23ca2-bb4a-402e-b6c1-8b7d35cec6d5" alt=""><figcaption></figcaption></figure>

<figure><img src="https://1526800164-files.gitbook.io/~/files/v0/b/gitbook-x-prod.appspot.com/o/spaces%2F50DeL6mO9sNbAZBSEdaN%2Fuploads%2FN0tqyENakyrymKMLsSfG%2Fimage.png?alt=media&amp;token=71ccbfa9-b90d-4dc8-8b00-781262fa7032" alt=""><figcaption></figcaption></figure>

## 9 Batch Add Tag

### 9.1 Batches set labels to

Purpose: To overwrite the original tags with the newly assigned tags.

**Before**

<figure><img src="https://1526800164-files.gitbook.io/~/files/v0/b/gitbook-x-prod.appspot.com/o/spaces%2F50DeL6mO9sNbAZBSEdaN%2Fuploads%2FLV4sA9aUJS0tTWKUMpj3%2Fimage.png?alt=media&amp;token=3c783016-d1ac-4fe6-a05b-c4b8b8349808" alt=""><figcaption></figcaption></figure>

Step 1: Select the customer data, and click "Batches set labels to".

<figure><img src="https://1526800164-files.gitbook.io/~/files/v0/b/gitbook-x-prod.appspot.com/o/spaces%2F50DeL6mO9sNbAZBSEdaN%2Fuploads%2F45d60ZnykyC1XkLMrSaf%2Fimage.png?alt=media&amp;token=19316961-ce51-4540-af39-85f7b659b228" alt=""><figcaption></figcaption></figure>

Step 2: Select the existing tag or add a new tag by entering the new tag and pressing \[Enter] on your keyboard.

<figure><img src="https://1526800164-files.gitbook.io/~/files/v0/b/gitbook-x-prod.appspot.com/o/spaces%2F50DeL6mO9sNbAZBSEdaN%2Fuploads%2FHhi8myqGnzyrVmdXttE2%2Fimage.png?alt=media&amp;token=70361e62-758e-4163-87d0-0ab19748cd16" alt=""><figcaption></figcaption></figure>

Step 3: Click "Save" to apply the changes.

<figure><img src="https://1526800164-files.gitbook.io/~/files/v0/b/gitbook-x-prod.appspot.com/o/spaces%2F50DeL6mO9sNbAZBSEdaN%2Fuploads%2FAR1auHJYL0lZhyeESuYE%2Fimage.png?alt=media&amp;token=fc1ec237-3294-45af-b20c-729093d741b9" alt=""><figcaption></figcaption></figure>

**After**

<figure><img src="https://1526800164-files.gitbook.io/~/files/v0/b/gitbook-x-prod.appspot.com/o/spaces%2F50DeL6mO9sNbAZBSEdaN%2Fuploads%2FsL7PkFk8VX2gVuk2pRNV%2Fimage.png?alt=media&amp;token=385f1b3a-e56a-45e9-8d5b-20fc283e25d9" alt=""><figcaption></figcaption></figure>

### 9.2 Batches add labels to

Purpose: To add a new tag.

**Before**

<figure><img src="https://1526800164-files.gitbook.io/~/files/v0/b/gitbook-x-prod.appspot.com/o/spaces%2F50DeL6mO9sNbAZBSEdaN%2Fuploads%2FVcDX0RZ15BGxBuyCL34R%2Fimage.png?alt=media&amp;token=8f72119d-c278-46fd-a329-9782d7b8d3ac" alt=""><figcaption></figcaption></figure>

Step 1: Select the customer data, and click "Batches add labels".

<figure><img src="https://1526800164-files.gitbook.io/~/files/v0/b/gitbook-x-prod.appspot.com/o/spaces%2F50DeL6mO9sNbAZBSEdaN%2Fuploads%2F4OJ3nV4NOujaq2XLjTAZ%2Fimage.png?alt=media&amp;token=a70cc07c-40d1-4b89-846c-9854aa76ff0f" alt=""><figcaption></figcaption></figure>

Step 2: Select the existing tag or add a new tag by entering the new tag and pressing \[Enter] on your keyboard.

<figure><img src="https://1526800164-files.gitbook.io/~/files/v0/b/gitbook-x-prod.appspot.com/o/spaces%2F50DeL6mO9sNbAZBSEdaN%2Fuploads%2FWy8q6bgm7CyqPkYMcSEh%2Fimage.png?alt=media&amp;token=8fd5addb-69ff-4acc-bd58-340001eb591a" alt=""><figcaption></figcaption></figure>

Step 3: Click "Save" to apply the changes.

<figure><img src="https://1526800164-files.gitbook.io/~/files/v0/b/gitbook-x-prod.appspot.com/o/spaces%2F50DeL6mO9sNbAZBSEdaN%2Fuploads%2FRM2q8sNtD5N3BueX2WYt%2Fimage.png?alt=media&amp;token=bfd1dcc9-8206-4451-995e-5022bb5d8154" alt=""><figcaption></figcaption></figure>

**After**

<figure><img src="https://1526800164-files.gitbook.io/~/files/v0/b/gitbook-x-prod.appspot.com/o/spaces%2F50DeL6mO9sNbAZBSEdaN%2Fuploads%2F0MZHElJDiFcuCRNhu7hJ%2Fimage.png?alt=media&amp;token=4e074f85-7e0f-4548-891b-78e8015220f2" alt=""><figcaption></figcaption></figure>


# Customer Detail

## 1 Tab

The function of the tab is to separate customer data into its respective categories for a clear view of the data.

<figure><img src="https://1526800164-files.gitbook.io/~/files/v0/b/gitbook-x-prod.appspot.com/o/spaces%2F50DeL6mO9sNbAZBSEdaN%2Fuploads%2FX6AbwW1Qz28KBPDOvMBf%2Fimage.png?alt=media&amp;token=8d616936-1ab3-42d8-bd0d-4530d9e3175d" alt=""><figcaption></figcaption></figure>

#### 4.1.1 Show/Hide Tab

The user can customize which tabs are displayed through the selector.![](https://1526800164-files.gitbook.io/~/files/v0/b/gitbook-x-prod.appspot.com/o/spaces%2F50DeL6mO9sNbAZBSEdaN%2Fuploads%2F8gF1pujTIaQZMrTvrfHO%2Fimage.png?alt=media\&token=923d83c8-f5cd-43c6-b5cc-9b242cc13dbb)by turning on and off using the toggle.&#x20;

<figure><img src="https://1526800164-files.gitbook.io/~/files/v0/b/gitbook-x-prod.appspot.com/o/spaces%2F50DeL6mO9sNbAZBSEdaN%2Fuploads%2FubKHfaXxYjMURirAmF85%2Fimage.png?alt=media&amp;token=96db5bbb-8957-4b6d-90ff-a80e08dd1670" alt=""><figcaption></figcaption></figure>

**Remark:**

The Customer Information tab does not support this operation.

## 2 Customer Information

The Customer Card displays customer information by default; this tab cannot be hidden and is used to show all of the customer's details.

<figure><img src="https://1526800164-files.gitbook.io/~/files/v0/b/gitbook-x-prod.appspot.com/o/spaces%2F50DeL6mO9sNbAZBSEdaN%2Fuploads%2FkquKvGObBaRkHoufBo8p%2Fimage.png?alt=media&amp;token=63b9903b-1550-4c38-aa32-c8adac3815f4" alt=""><figcaption></figcaption></figure>

## 3 Operation Log

The log details in the \[Operation log] tab support the user in filtering the data by operation type and operation time or directly querying log information.

<figure><img src="https://1526800164-files.gitbook.io/~/files/v0/b/gitbook-x-prod.appspot.com/o/spaces%2F50DeL6mO9sNbAZBSEdaN%2Fuploads%2FXeHVCfBpNEw4I8WU8F2W%2Fimage.png?alt=media&amp;token=781c141a-be75-42f8-b9cb-60990a0fab33" alt=""><figcaption></figcaption></figure>

### 3.1 Operation Type

Filter the log details by Operation type.

<figure><img src="https://1526800164-files.gitbook.io/~/files/v0/b/gitbook-x-prod.appspot.com/o/spaces%2F50DeL6mO9sNbAZBSEdaN%2Fuploads%2FRskOqaUcZUatq5b5If3c%2Fimage.png?alt=media&amp;token=f34a04d9-39ef-4ed1-bef5-e6252d87029f" alt=""><figcaption></figcaption></figure>

### 3.2 Time Range

The user can filter the time range of the log details using the existing filters such as Today, this week, this month, etc., or they can use the time range function, where they can customize the time range to filter the log details.

<figure><img src="https://1526800164-files.gitbook.io/~/files/v0/b/gitbook-x-prod.appspot.com/o/spaces%2F50DeL6mO9sNbAZBSEdaN%2Fuploads%2FKmQ3vBKqjNkqbDHvw2Fj%2Fimage.png?alt=media&amp;token=fb40504d-af3e-45d2-b4f4-453ee5cd42bf" alt=""><figcaption></figcaption></figure>

<figure><img src="https://1526800164-files.gitbook.io/~/files/v0/b/gitbook-x-prod.appspot.com/o/spaces%2F50DeL6mO9sNbAZBSEdaN%2Fuploads%2FLr8N4cfEcvkNeaoNX1Xq%2Fimage.png?alt=media&amp;token=327011ed-6ad7-467a-91dc-1906dc5eb0b2" alt=""><figcaption></figcaption></figure>

### 3.3 Search

Directly query the log details using the Search function on the log information.

<figure><img src="https://1526800164-files.gitbook.io/~/files/v0/b/gitbook-x-prod.appspot.com/o/spaces%2F50DeL6mO9sNbAZBSEdaN%2Fuploads%2FR05uTgzES2RGKpocoZZb%2Fimage.png?alt=media&amp;token=cda6f629-5ef7-4d68-8bb3-b542324669e4" alt=""><figcaption></figcaption></figure>

## 4 Contacts

The user will need the "Contacts" menu permission for this tab to be displayed on the customer details page.

### 4.1 Contact List

The current contact list displays the data created by the current user and those with view permission&#x20;

<figure><img src="https://1526800164-files.gitbook.io/~/files/v0/b/gitbook-x-prod.appspot.com/o/spaces%2F50DeL6mO9sNbAZBSEdaN%2Fuploads%2FJ9fjX3yHaKYlvMXG1y17%2Fimage.png?alt=media&amp;token=834f0c8e-acd1-4b1e-b030-dafe8a3c7596" alt=""><figcaption></figcaption></figure>

You can view more details by:

Option 1: Clicking on the data row&#x20;

<figure><img src="https://1526800164-files.gitbook.io/~/files/v0/b/gitbook-x-prod.appspot.com/o/spaces%2F50DeL6mO9sNbAZBSEdaN%2Fuploads%2FfrdzocZF4Ni5OT2iprNd%2Fimage.png?alt=media&amp;token=627744f3-47d9-48ea-86f9-fda2095c0279" alt=""><figcaption></figcaption></figure>

<figure><img src="https://1526800164-files.gitbook.io/~/files/v0/b/gitbook-x-prod.appspot.com/o/spaces%2F50DeL6mO9sNbAZBSEdaN%2Fuploads%2FIvQVPBI2IwMTgo669fpX%2Fimage.png?alt=media&amp;token=4fb443e2-40a3-4121-bb4b-0d34bdd1efc5" alt=""><figcaption></figcaption></figure>

Option 2: At the end of the data row, click more ···, and click on the "View" button

<figure><img src="https://1526800164-files.gitbook.io/~/files/v0/b/gitbook-x-prod.appspot.com/o/spaces%2F50DeL6mO9sNbAZBSEdaN%2Fuploads%2FwTCjFAcye4QK6LjalRB5%2Fimage.png?alt=media&amp;token=8a4bffcb-9357-464e-8a10-6e7316f76737" alt=""><figcaption></figcaption></figure>

### 4.2 Create New Contact

The user can create new contacts in two different ways:&#x20;

Option 1: On the top-right side of the page, click on the drop-down box <img src="https://1526800164-files.gitbook.io/~/files/v0/b/gitbook-x-prod.appspot.com/o/spaces%2F50DeL6mO9sNbAZBSEdaN%2Fuploads%2FNW3Qnm4nRAPPQHoHBs8E%2Fimage.png?alt=media&amp;token=628e75ee-1cae-42e3-b5e5-f1aee710eca3" alt="" data-size="line"> , and the "Contacts" option will be available.&#x20;

<figure><img src="https://1526800164-files.gitbook.io/~/files/v0/b/gitbook-x-prod.appspot.com/o/spaces%2F50DeL6mO9sNbAZBSEdaN%2Fuploads%2FYI3SaiULbGW2FvZ6AiDD%2Fimage.png?alt=media&amp;token=1233abea-7c68-41e7-ae5f-921cc81cd4a7" alt=""><figcaption></figcaption></figure>

Option 2: In the top-right corner of the tab, click "New" to create a new contact.

<figure><img src="https://1526800164-files.gitbook.io/~/files/v0/b/gitbook-x-prod.appspot.com/o/spaces%2F50DeL6mO9sNbAZBSEdaN%2Fuploads%2FAptPuxoM09PWfBfIF0r0%2Fimage.png?alt=media&amp;token=3434b010-ff2a-4eb8-848d-ce60e88cab0b" alt=""><figcaption></figcaption></figure>

<figure><img src="https://1526800164-files.gitbook.io/~/files/v0/b/gitbook-x-prod.appspot.com/o/spaces%2F50DeL6mO9sNbAZBSEdaN%2Fuploads%2FEKbkA82Y4KgafkPDOhPn%2Fimage.png?alt=media&amp;token=6683f01f-f8b8-4d3b-a96f-9de2f5005dab" alt=""><figcaption></figcaption></figure>

A Primary Contact is the main individual at a customer’s organization who serves as the key point of communication. When the “Primary Contact” field is set to “Yes,” there will be a \[Primary Contact] label in front of the contact name on the list. Each customer can have more than one primary contact.

**Remark:**

The newly created contact will appear on the list immediately after it has been saved.

### 4.3 Edit Contact

The user can edit the contacts they created.

Step 1: At the end of the data row, click more ···, and click on the \[Edit] button.

<figure><img src="https://1526800164-files.gitbook.io/~/files/v0/b/gitbook-x-prod.appspot.com/o/spaces%2F50DeL6mO9sNbAZBSEdaN%2Fuploads%2FnvAxsIeybgTgxqgxSTsd%2Fimage.png?alt=media&amp;token=d1d88b73-2959-427b-9d2c-b7faa3790f37" alt=""><figcaption></figcaption></figure>

Step 2: Once all the changes are made, click save and the changes will be immediately implemented.

<figure><img src="https://1526800164-files.gitbook.io/~/files/v0/b/gitbook-x-prod.appspot.com/o/spaces%2F50DeL6mO9sNbAZBSEdaN%2Fuploads%2FYLYs1E655xIv7U22cxLo%2Fimage.png?alt=media&amp;token=6c9440c1-62aa-4755-9851-47b121beb182" alt=""><figcaption></figcaption></figure>

### 4.4 Delete Contact

<figure><img src="https://1526800164-files.gitbook.io/~/files/v0/b/gitbook-x-prod.appspot.com/o/spaces%2F50DeL6mO9sNbAZBSEdaN%2Fuploads%2FSQxYKBd1GiDApouMeRho%2Fimage.png?alt=media&amp;token=f99628c4-bbcb-402b-a7fa-4a2a7a3090e3" alt=""><figcaption></figcaption></figure>

**Remark:**\
Only the user with the "Delete" permission are allowed to delete the existing data; there is no \[Delete]/\[Batch Delete] button for other users.

## 5 Opportunity

### 5.1 Opportunity List

The user will need to have permission for the "Opportunity" menu to view this tab.

<figure><img src="https://1526800164-files.gitbook.io/~/files/v0/b/gitbook-x-prod.appspot.com/o/spaces%2F50DeL6mO9sNbAZBSEdaN%2Fuploads%2FRZwJjIrdmUULuWIpoCGw%2Fimage.png?alt=media&amp;token=1f08318f-b34c-43b5-af37-e66556772422" alt=""><figcaption></figcaption></figure>

You can view more details by:

Option 1: Clicking on the data row&#x20;

<figure><img src="https://1526800164-files.gitbook.io/~/files/v0/b/gitbook-x-prod.appspot.com/o/spaces%2F50DeL6mO9sNbAZBSEdaN%2Fuploads%2FMEEyQpcNi57lX6t1WUgT%2Fimage.png?alt=media&amp;token=eccfd9ca-904d-43fd-9aee-fd9d1100e5a4" alt=""><figcaption></figcaption></figure>

<figure><img src="https://1526800164-files.gitbook.io/~/files/v0/b/gitbook-x-prod.appspot.com/o/spaces%2F50DeL6mO9sNbAZBSEdaN%2Fuploads%2FDkycbUEBpmdSGgIqtTzV%2Fimage.png?alt=media&amp;token=904967bc-f04d-45ca-8082-8a29fcb0c278" alt=""><figcaption></figcaption></figure>

Option 2: At the end of the data row, click more ···, and click on the "View" button

<figure><img src="https://1526800164-files.gitbook.io/~/files/v0/b/gitbook-x-prod.appspot.com/o/spaces%2F50DeL6mO9sNbAZBSEdaN%2Fuploads%2Fg6eLX4QObgKIfeaPpFOv%2Fimage.png?alt=media&amp;token=c6f67898-5f64-4840-a465-dde76f909fc1" alt=""><figcaption></figcaption></figure>

### 5.2 Creaete New Opportunity

The user can create new opportunity in two different ways:&#x20;

Option 1: On the top-right side of the page, click on the drop-down box <img src="https://1526800164-files.gitbook.io/~/files/v0/b/gitbook-x-prod.appspot.com/o/spaces%2F50DeL6mO9sNbAZBSEdaN%2Fuploads%2FNW3Qnm4nRAPPQHoHBs8E%2Fimage.png?alt=media&amp;token=628e75ee-1cae-42e3-b5e5-f1aee710eca3" alt="" data-size="line"> , and the "Business" option will be available.&#x20;

<figure><img src="https://1526800164-files.gitbook.io/~/files/v0/b/gitbook-x-prod.appspot.com/o/spaces%2F50DeL6mO9sNbAZBSEdaN%2Fuploads%2FZfHGcNTgpP7M0phEwS5T%2Fimage.png?alt=media&amp;token=a38ae0af-f3e4-4a4c-bfd2-39491fd5a822" alt=""><figcaption></figcaption></figure>

<figure><img src="https://1526800164-files.gitbook.io/~/files/v0/b/gitbook-x-prod.appspot.com/o/spaces%2F50DeL6mO9sNbAZBSEdaN%2Fuploads%2Fe02WZEwH8ZHD81PIYMpJ%2Fimage.png?alt=media&amp;token=3695a13e-825d-4499-b1e1-6083164732ec" alt=""><figcaption></figcaption></figure>

Option 2: In the top-right corner of the tab, click "New" to create a new opportunity.

<figure><img src="https://1526800164-files.gitbook.io/~/files/v0/b/gitbook-x-prod.appspot.com/o/spaces%2F50DeL6mO9sNbAZBSEdaN%2Fuploads%2FqSozw7UiUcLI234ShbIF%2Fimage.png?alt=media&amp;token=78336c09-1015-44fe-9376-4b11b6b01084" alt=""><figcaption></figcaption></figure>

**Remark:**

The newly created opportunity will appear on the list immediately after it has been saved.

### 5.3 Edit Opportunity

Step 1: At the end of the data row, click more ···, and click on the \[Edit] button

<figure><img src="https://1526800164-files.gitbook.io/~/files/v0/b/gitbook-x-prod.appspot.com/o/spaces%2F50DeL6mO9sNbAZBSEdaN%2Fuploads%2FSrqZZXCRuc0jJ3WXeWy2%2Fimage.png?alt=media&amp;token=b74b2502-f40e-45e5-8cfc-1b59bc68ae26" alt=""><figcaption></figcaption></figure>

Step 2: Once all the changes are made, click save and the changes will be immediately implemented.

<figure><img src="https://1526800164-files.gitbook.io/~/files/v0/b/gitbook-x-prod.appspot.com/o/spaces%2F50DeL6mO9sNbAZBSEdaN%2Fuploads%2FO623MRWJArLZtsxC72uF%2Fimage.png?alt=media&amp;token=7d42bcff-457f-46e4-b61d-e71fc911d0e8" alt=""><figcaption></figcaption></figure>

**Remark:**

Only users with editing permission for the current customer can edit the opportunity information of this customer.

### 5.4 Delete Opportunity

<figure><img src="https://1526800164-files.gitbook.io/~/files/v0/b/gitbook-x-prod.appspot.com/o/spaces%2F50DeL6mO9sNbAZBSEdaN%2Fuploads%2FBoP4SGTjk9y8sWArtPt1%2Fimage.png?alt=media&amp;token=b97d4d0d-d133-4797-9ea7-86b1cdd8bc78" alt=""><figcaption></figcaption></figure>

**Remark:**\
Only the user with the "Delete" permission are allowed to delete the existing data; there is no \[Delete]/\[Batch Delete] button for other users.

## 6 Contract

### 6.1 Contract List

The user will need to have permission for the "Contract" menu to view this tab.

<figure><img src="https://1526800164-files.gitbook.io/~/files/v0/b/gitbook-x-prod.appspot.com/o/spaces%2F50DeL6mO9sNbAZBSEdaN%2Fuploads%2FDPYQCTgSKOBvF7o3XyFh%2Fimage.png?alt=media&amp;token=4535626a-6243-4a8f-8d7b-4f1c8a665a95" alt=""><figcaption></figcaption></figure>

You can view more details by:

Option 1: Clicking on the data row

<figure><img src="https://1526800164-files.gitbook.io/~/files/v0/b/gitbook-x-prod.appspot.com/o/spaces%2F50DeL6mO9sNbAZBSEdaN%2Fuploads%2F9imrqfUxlZsePn5bvU6p%2Fimage.png?alt=media&amp;token=f08ece36-6dd0-44e1-8ba5-76faa7fb7a9e" alt=""><figcaption></figcaption></figure>

Option 2: At the end of the data row, click more ···, and click on the "View" button.

<figure><img src="https://1526800164-files.gitbook.io/~/files/v0/b/gitbook-x-prod.appspot.com/o/spaces%2F50DeL6mO9sNbAZBSEdaN%2Fuploads%2Fvqyd6eE8Bxn9ke82XQeJ%2Fimage.png?alt=media&amp;token=abed691e-8e9c-4e4d-aadb-350b97f66036" alt=""><figcaption></figcaption></figure>

### 6.2 Create New Contract

The user can create new contract in two different ways:&#x20;

Option 1: Create in the Customer Card

Step 1: On the top-right side of the page, click on the drop-down box <img src="https://1526800164-files.gitbook.io/~/files/v0/b/gitbook-x-prod.appspot.com/o/spaces%2F50DeL6mO9sNbAZBSEdaN%2Fuploads%2FNW3Qnm4nRAPPQHoHBs8E%2Fimage.png?alt=media&amp;token=628e75ee-1cae-42e3-b5e5-f1aee710eca3" alt="" data-size="line"> , click on "Contract".&#x20;

<figure><img src="https://1526800164-files.gitbook.io/~/files/v0/b/gitbook-x-prod.appspot.com/o/spaces%2F50DeL6mO9sNbAZBSEdaN%2Fuploads%2FxX2Ym5llOTezUKotAR1C%2Fimage.png?alt=media&amp;token=0c8819a3-bf26-4b43-918e-de3d2a66723c" alt=""><figcaption></figcaption></figure>

Option 2: Create in the tab

Step 1: In the top-right corner of the tab, click "New" to create a new contract.

<figure><img src="https://1526800164-files.gitbook.io/~/files/v0/b/gitbook-x-prod.appspot.com/o/spaces%2F50DeL6mO9sNbAZBSEdaN%2Fuploads%2FQyxatwiomeoyy7AetKmH%2Fimage.png?alt=media&amp;token=033630f6-ac66-4df6-acd0-9d6f85f80c7a" alt=""><figcaption></figcaption></figure>

Step 2: Click "Save" after all data has been entered, a new contract will appear on the data list immediately.

<figure><img src="https://1526800164-files.gitbook.io/~/files/v0/b/gitbook-x-prod.appspot.com/o/spaces%2F50DeL6mO9sNbAZBSEdaN%2Fuploads%2FxnW4t1W8CwG79L3XcLbM%2Fimage.png?alt=media&amp;token=ccf283a2-addd-41bf-8576-11bb90c83cf0" alt=""><figcaption></figcaption></figure>

### 6.3 Edit Contract

Step 1: At the end of the data row, click more ···, and click on the \[Edit] button

<figure><img src="https://1526800164-files.gitbook.io/~/files/v0/b/gitbook-x-prod.appspot.com/o/spaces%2F50DeL6mO9sNbAZBSEdaN%2Fuploads%2FhhsakjbtXfgqEQyL8mw0%2Fimage.png?alt=media&amp;token=4bc470b5-158d-487b-a26b-a581f0e884ce" alt=""><figcaption></figcaption></figure>

Step 2: Once all the changes are made, click save and the changes will be immediately implemented.

<figure><img src="https://1526800164-files.gitbook.io/~/files/v0/b/gitbook-x-prod.appspot.com/o/spaces%2F50DeL6mO9sNbAZBSEdaN%2Fuploads%2FjrH8JZ2Qrl3TvC0yDmZl%2Fimage.png?alt=media&amp;token=c758274f-8c6c-4717-aa9b-1ab3363dff04" alt=""><figcaption></figcaption></figure>

**Remark:**

Only users with editing permission for the current customer can edit the contacts under this customer.

### 6.4 Delete Contract

<figure><img src="https://1526800164-files.gitbook.io/~/files/v0/b/gitbook-x-prod.appspot.com/o/spaces%2F50DeL6mO9sNbAZBSEdaN%2Fuploads%2FdgHQGSiIiM5HFMCMCMwz%2Fimage.png?alt=media&amp;token=0202de62-e843-41ec-85c4-93024ad7d5d7" alt=""><figcaption></figcaption></figure>

**Remark:**\
Only the user with the "Delete" permission are allowed to delete the existing data; there is no \[Delete]/\[Batch Delete] button for other users.

## 7 Reminder

### 7.1 Reminder List

As long as the user have the permission to view the customer, they can view this tab.

The list displays all the valid and unfinished reminder data (including effective and expired) for the current customer.

<figure><img src="https://1526800164-files.gitbook.io/~/files/v0/b/gitbook-x-prod.appspot.com/o/spaces%2F50DeL6mO9sNbAZBSEdaN%2Fuploads%2FE9flmcUJUORcWDfsX4cj%2Fimage.png?alt=media&amp;token=1b5d1a81-e7ed-48d4-9b3d-942126435172" alt=""><figcaption></figcaption></figure>

You can view more details by:

Option 1: Clicking on the data row

<figure><img src="https://1526800164-files.gitbook.io/~/files/v0/b/gitbook-x-prod.appspot.com/o/spaces%2F50DeL6mO9sNbAZBSEdaN%2Fuploads%2FzqTXv3kIO6JrP42WZrAf%2Fimage.png?alt=media&amp;token=e7a9bb73-f53d-4edb-8cf4-c2092079024c" alt=""><figcaption></figcaption></figure>

<figure><img src="https://1526800164-files.gitbook.io/~/files/v0/b/gitbook-x-prod.appspot.com/o/spaces%2F50DeL6mO9sNbAZBSEdaN%2Fuploads%2FTK0hDKqFOawmk5sPvOr0%2Fimage.png?alt=media&amp;token=1009e786-d4c6-486b-a182-3a85428f11c0" alt=""><figcaption></figcaption></figure>

Option 2: At the end of the data row, click more ···, and click on the "View" button.

<figure><img src="https://1526800164-files.gitbook.io/~/files/v0/b/gitbook-x-prod.appspot.com/o/spaces%2F50DeL6mO9sNbAZBSEdaN%2Fuploads%2FghxRa1Ali0ZwYBg9xoPD%2Fimage.png?alt=media&amp;token=5eb9a4d2-7c0e-45c9-9cf6-ccc1806bca0f" alt=""><figcaption></figcaption></figure>

### 7.2 Create New Reminder

The user can create new contract in two different ways:&#x20;

Option 1: Create from any tab on the page

Step 1: On the top-right side of the page, click on the drop-down box <img src="https://1526800164-files.gitbook.io/~/files/v0/b/gitbook-x-prod.appspot.com/o/spaces%2F50DeL6mO9sNbAZBSEdaN%2Fuploads%2FNW3Qnm4nRAPPQHoHBs8E%2Fimage.png?alt=media&amp;token=628e75ee-1cae-42e3-b5e5-f1aee710eca3" alt="" data-size="line"> , and click on "Remind" to create a new reminder.&#x20;

<figure><img src="https://1526800164-files.gitbook.io/~/files/v0/b/gitbook-x-prod.appspot.com/o/spaces%2F50DeL6mO9sNbAZBSEdaN%2Fuploads%2FHkg8g14JWHMfhxsxwy3x%2Fimage.png?alt=media&amp;token=7700e5c4-c476-4a84-b023-ca2a273a6378" alt=""><figcaption></figcaption></figure>

Option 2: Create on the tab itself

Step 1: On the top of the tab, click "+ New reminder" to create a new Reminder.

<figure><img src="https://1526800164-files.gitbook.io/~/files/v0/b/gitbook-x-prod.appspot.com/o/spaces%2F50DeL6mO9sNbAZBSEdaN%2Fuploads%2FnbVLY1aPfUREYcjMcn19%2Fimage.png?alt=media&amp;token=35487fdd-5908-4120-b236-3c231e5329c1" alt=""><figcaption></figcaption></figure>

Step 2: Click "Save" after all data has been entered, a new reminder will appear on the data list immediately.

<figure><img src="https://1526800164-files.gitbook.io/~/files/v0/b/gitbook-x-prod.appspot.com/o/spaces%2F50DeL6mO9sNbAZBSEdaN%2Fuploads%2FytANCRHvAcB1ytuHUGy6%2Fimage.png?alt=media&amp;token=3df7b012-0f7e-4e3a-a18d-70dd3c3593ba" alt=""><figcaption></figcaption></figure>

**Remark:**

Visit Customer: Defaulted as the current customer, cannot be modified.

Remind Time: Default to 1 minute more than the current time, can be modified, but cannot be less than the current time

Remind People: Default as the current user, users are allowed to select the scope of user that has \[View] permission on the current customers (excluding users with view permission through pool).  Remind people can be more than one user.

Contact Type: Predefined drop-down box

Contacts: The contact person of this customer

Reminder Content: When this field is empty, it will automatically assign "Today, you need to contact the customer: customer name" as the content after submission.

### 7.3 Edit Reminder

The user can edit the reminder they have created but has not expired.

<figure><img src="https://1526800164-files.gitbook.io/~/files/v0/b/gitbook-x-prod.appspot.com/o/spaces%2F50DeL6mO9sNbAZBSEdaN%2Fuploads%2FWFF3pszPJZcBffi1og0k%2Fimage.png?alt=media&amp;token=6b807ce1-c142-415e-bac7-c6756efbdea8" alt=""><figcaption></figcaption></figure>

### 7.4 Delete Reminder

The user can delete the reminder they created.

<figure><img src="https://1526800164-files.gitbook.io/~/files/v0/b/gitbook-x-prod.appspot.com/o/spaces%2F50DeL6mO9sNbAZBSEdaN%2Fuploads%2FZ6wgbahvdPfGKpKfUQkO%2Fimage.png?alt=media&amp;token=ae190275-7be5-45f5-9c59-58d2ef731898" alt=""><figcaption></figcaption></figure>

### 7.5 Confirm Reminder

This operation is to label the reminder as completed, and can only be perform for the reminder that has not expired. Only the creator and the remind people can confirm the reminder completion.&#x20;

Step 1: At the end of the data row, click more ···, click on "Confirm".

<figure><img src="https://1526800164-files.gitbook.io/~/files/v0/b/gitbook-x-prod.appspot.com/o/spaces%2F50DeL6mO9sNbAZBSEdaN%2Fuploads%2FyfKtBJgq8ZVP0dDixUwx%2Fimage.png?alt=media&amp;token=f62816a5-f39a-413a-8898-499f1a94693a" alt=""><figcaption></figcaption></figure>

Step 2: Fill in the necessary details in the \[Complete reminder] popup box, and click "Save".

<figure><img src="https://1526800164-files.gitbook.io/~/files/v0/b/gitbook-x-prod.appspot.com/o/spaces%2F50DeL6mO9sNbAZBSEdaN%2Fuploads%2FMFNGhA2yeMTtl66CNZqb%2Fimage.png?alt=media&amp;token=13f6f40b-200f-403e-805e-16b53cb7f6fb" alt=""><figcaption></figcaption></figure>

**Remark:**

The contact type, contact person, and contact content can be modified.&#x20;

When the toggle \[Create a contact record synchronously] is enabled, the reminder data will generate a contact record and will no longer be displayed on the list.&#x20;

When the reminder is confirmed, all remind people and the creator will no longer be able to view the reminder.&#x20;

When the reminder has passed the remind time, no operations other than deleting can be performed on the reminder.

<figure><img src="https://1526800164-files.gitbook.io/~/files/v0/b/gitbook-x-prod.appspot.com/o/spaces%2F50DeL6mO9sNbAZBSEdaN%2Fuploads%2FBp12grobv0GshS3egqDG%2Fimage.png?alt=media&amp;token=da40498e-9241-4799-98c0-2bf3e8e3329d" alt=""><figcaption></figcaption></figure>

<figure><img src="https://1526800164-files.gitbook.io/~/files/v0/b/gitbook-x-prod.appspot.com/o/spaces%2F50DeL6mO9sNbAZBSEdaN%2Fuploads%2FnECI5DwI4hXKwxihC2yE%2Fimage.png?alt=media&amp;token=a3e962a5-d823-4abe-b4a3-5d440282b6dd" alt="" width="273"><figcaption></figcaption></figure>

## 8 Share

Only users with editing permission for the current customer can edit the Share Scope of this customer, and newly created customer data is shared with the creator by default.

Step 1: Go to the "Share" tab

<figure><img src="https://1526800164-files.gitbook.io/~/files/v0/b/gitbook-x-prod.appspot.com/o/spaces%2F50DeL6mO9sNbAZBSEdaN%2Fuploads%2FADWECGurOhN3XlQ2wbiz%2Fimage.png?alt=media&amp;token=05447a6b-7e04-4f66-ad62-9819153182b6" alt=""><figcaption></figcaption></figure>

Step 2: Set the Sharing Scope by department, role, or user.

<figure><img src="https://1526800164-files.gitbook.io/~/files/v0/b/gitbook-x-prod.appspot.com/o/spaces%2F50DeL6mO9sNbAZBSEdaN%2Fuploads%2Fs53YFFHgIig0ZMlNOS5B%2Fimage.png?alt=media&amp;token=dfaa098f-df46-4241-9f2f-7c0b224e95ea" alt=""><figcaption></figcaption></figure>

**Remark:**

The users within the sharing range can view customer information, create new reminders, contact records, etc., depending on the corresponding menu permission to contacts, contracts, and opportunities.

## 9 Edit Customer Information

Only users with editing permission for the current customer is able to edit the customer's information.

Step 1:  On the top-right side of the page, click on "Edit customer information".

<figure><img src="https://1526800164-files.gitbook.io/~/files/v0/b/gitbook-x-prod.appspot.com/o/spaces%2F50DeL6mO9sNbAZBSEdaN%2Fuploads%2FxKu6d1it4mD53CuFrAC7%2Fimage.png?alt=media&amp;token=461dc703-5965-4864-bdb7-a052f7dfe755" alt=""><figcaption></figcaption></figure>

Step 2: Click "Save" after the respective data has been modified, the changes will be implemented immediately.

<figure><img src="https://1526800164-files.gitbook.io/~/files/v0/b/gitbook-x-prod.appspot.com/o/spaces%2F50DeL6mO9sNbAZBSEdaN%2Fuploads%2FO3SEbq4fosoZqbxi6Bvm%2Fimage.png?alt=media&amp;token=3cb1c496-ee89-43f8-8dec-224ea4482e61" alt=""><figcaption></figcaption></figure>

## 10 Contact Log

The contact log is where the user enters any interaction they had with the customer, also known as call log. It can be used as a Reference for Future Interactions or Tracking Issues and Progresses.

<figure><img src="https://1526800164-files.gitbook.io/~/files/v0/b/gitbook-x-prod.appspot.com/o/spaces%2F50DeL6mO9sNbAZBSEdaN%2Fuploads%2F7W0mN4xv8aNwroCsj7im%2Fimage.png?alt=media&amp;token=b161e4a4-3e68-4227-993d-88928963a2d5" alt=""><figcaption></figcaption></figure>

### 10.1 Contact Log List

You can view more details by:

Option 1: Clicking on the data row

<figure><img src="https://1526800164-files.gitbook.io/~/files/v0/b/gitbook-x-prod.appspot.com/o/spaces%2F50DeL6mO9sNbAZBSEdaN%2Fuploads%2FZn1ectIFk9DGtFmV16KX%2Fimage.png?alt=media&amp;token=b4869a09-905c-4393-9cea-6bdb73941cf2" alt=""><figcaption></figcaption></figure>

Option 2: At the end of the data row, click more ···, and click on the "View" button.

<figure><img src="https://1526800164-files.gitbook.io/~/files/v0/b/gitbook-x-prod.appspot.com/o/spaces%2F50DeL6mO9sNbAZBSEdaN%2Fuploads%2FFjjEoIpwVjPh3LknpmyK%2Fimage.png?alt=media&amp;token=d8247b33-92df-4b99-b4f2-3b83b1907a4d" alt=""><figcaption></figcaption></figure>

<figure><img src="https://1526800164-files.gitbook.io/~/files/v0/b/gitbook-x-prod.appspot.com/o/spaces%2F50DeL6mO9sNbAZBSEdaN%2Fuploads%2FqdpNVQX0slO4BhWLDq7X%2Fimage.png?alt=media&amp;token=c2f9e92d-4e25-4799-8091-2b869a7582a2" alt=""><figcaption></figcaption></figure>

#### 10.1.1 Filtering

Allows the user to filter the existing contact log.

<figure><img src="https://1526800164-files.gitbook.io/~/files/v0/b/gitbook-x-prod.appspot.com/o/spaces%2F50DeL6mO9sNbAZBSEdaN%2Fuploads%2FHT4TZZlgA12HfTF15wEU%2Fimage.png?alt=media&amp;token=4f290884-ddbf-460c-956d-1efa81980545" alt=""><figcaption></figcaption></figure>

#### 10.1.2 Advance Search

<figure><img src="https://1526800164-files.gitbook.io/~/files/v0/b/gitbook-x-prod.appspot.com/o/spaces%2F50DeL6mO9sNbAZBSEdaN%2Fuploads%2F7Ve4nrapgdsgjLR6jT4z%2Fimage.png?alt=media&amp;token=960d6620-4494-4688-a472-a6f1eccaabe0" alt=""><figcaption></figcaption></figure>

### 10.2  Create New Contact Log

Step 1: On the right-hand side of the page, on top of the call log tab, click on "+ add call log".

<figure><img src="https://1526800164-files.gitbook.io/~/files/v0/b/gitbook-x-prod.appspot.com/o/spaces%2F50DeL6mO9sNbAZBSEdaN%2Fuploads%2FqCdZGPqjjhbCdH8gLJ7r%2Fimage.png?alt=media&amp;token=2218734f-0597-45a3-a70c-21036613897e" alt=""><figcaption></figcaption></figure>

Step 2: Enter the relevant information and click "Submit".

<figure><img src="https://1526800164-files.gitbook.io/~/files/v0/b/gitbook-x-prod.appspot.com/o/spaces%2F50DeL6mO9sNbAZBSEdaN%2Fuploads%2F5pieUzU2hmd6f12X5ppK%2Fimage.png?alt=media&amp;token=b9072cea-692a-4e64-b86a-e9d576f2c64c" alt=""><figcaption></figcaption></figure>

**Remark:**

* Contact Start is defaulted as current date time
* Contact Time is defaulted as 30Minutes.
* Contact can only be contact that the current user has the permission to access.

Under the New Call Log fields, the user will be able to view up to 10 previous contact record.

<figure><img src="https://1526800164-files.gitbook.io/~/files/v0/b/gitbook-x-prod.appspot.com/o/spaces%2F50DeL6mO9sNbAZBSEdaN%2Fuploads%2FjdOfmcSg6ptmj3USz9N9%2Fimage.png?alt=media&amp;token=170836e3-9032-4113-a051-2fc97194ac13" alt=""><figcaption></figcaption></figure>

### 10.3 Reply Contact Log

All Contact Log can be viewed and replied.

Step 1: Clicking on the respective data row.

<figure><img src="https://1526800164-files.gitbook.io/~/files/v0/b/gitbook-x-prod.appspot.com/o/spaces%2F50DeL6mO9sNbAZBSEdaN%2Fuploads%2Fvx01QY8BLC8lota2y1MP%2Fimage.png?alt=media&amp;token=fb325218-1e85-4b73-b789-7026df7cc110" alt=""><figcaption></figcaption></figure>

Step 2: Under the \[Reply] tab, enter the respective comment, and click "Submit".

<figure><img src="https://1526800164-files.gitbook.io/~/files/v0/b/gitbook-x-prod.appspot.com/o/spaces%2F50DeL6mO9sNbAZBSEdaN%2Fuploads%2FX488E9Y0yqWKXMCounXF%2Fimage.png?alt=media&amp;token=6e4e2ef7-23f2-4cbd-9303-7cf478b4b049" alt=""><figcaption></figcaption></figure>

**Result:**

<figure><img src="https://1526800164-files.gitbook.io/~/files/v0/b/gitbook-x-prod.appspot.com/o/spaces%2F50DeL6mO9sNbAZBSEdaN%2Fuploads%2FfcqTpVLnODdea3UIj6NO%2Fimage.png?alt=media&amp;token=d69a4c20-d882-4763-b32b-88eff990bfed" alt=""><figcaption></figcaption></figure>

### 10.4 Delete Contact Log

Step 1: At the end of the respective data row, click more ···, and click on the "Delete" button.

<figure><img src="https://1526800164-files.gitbook.io/~/files/v0/b/gitbook-x-prod.appspot.com/o/spaces%2F50DeL6mO9sNbAZBSEdaN%2Fuploads%2FcXgQzC2Hwjv6JYSZEByu%2Fimage.png?alt=media&amp;token=fd0b6360-e76e-4c9d-b992-5de96d6e9f53" alt=""><figcaption></figcaption></figure>

Step 2: Click on "Confirm" in the Confirmation pop-up box, and the row will be deleted.

<figure><img src="https://1526800164-files.gitbook.io/~/files/v0/b/gitbook-x-prod.appspot.com/o/spaces%2F50DeL6mO9sNbAZBSEdaN%2Fuploads%2FWDRJ62yxBdkGrV06rzGX%2Fimage.png?alt=media&amp;token=fb73385b-cdb4-4d50-97c3-20d47b5fc532" alt="" width="296"><figcaption></figcaption></figure>

**Remark:**

Only the users with the permission are allowed to delete the existing data.

## 11 Follow/Unfollow

Purpose: If there are too many customers in the customer list due to customer pool permissions or customers shared with the user by others, the user can use the follow function to focus on key customers and then view them in the follow tab.

Option 1: On the left side of the data row, click \[···] for more options, and then click "Follow".

<figure><img src="https://1526800164-files.gitbook.io/~/files/v0/b/gitbook-x-prod.appspot.com/o/spaces%2F50DeL6mO9sNbAZBSEdaN%2Fuploads%2FgpiyT4vkOuYFayocfi7c%2Fimage.png?alt=media&amp;token=1fe7fd73-a5ae-4c41-b20f-aceaf167c1af" alt=""><figcaption></figcaption></figure>

Option 2:&#x20;

Step 1: Click on the row to display the customer details directly on the right-hand side.

Step 2: Click on the ![](https://1526800164-files.gitbook.io/~/files/v0/b/gitbook-x-prod.appspot.com/o/spaces%2F50DeL6mO9sNbAZBSEdaN%2Fuploads%2Fnz1ACwGDfvOOdIgv6hUY%2Fimage.png?alt=media\&token=0e4bc2cf-dfbd-4301-ae22-b610d736cb3e) icon to follow the customer.&#x20;

<figure><img src="https://1526800164-files.gitbook.io/~/files/v0/b/gitbook-x-prod.appspot.com/o/spaces%2F50DeL6mO9sNbAZBSEdaN%2Fuploads%2FupVKi2TT5dDtJdrNT0bm%2Fimage.png?alt=media&amp;token=9c87d64a-e7e9-45de-8e41-d9e3ba4c98a3" alt=""><figcaption></figcaption></figure>

In the customer card:

* The star should light up in yellow to indicate that the user is currently following this customer.
* It will also allow users to see directly which other users are following this customer and the number of followers.

<figure><img src="https://1526800164-files.gitbook.io/~/files/v0/b/gitbook-x-prod.appspot.com/o/spaces%2F50DeL6mO9sNbAZBSEdaN%2Fuploads%2FVZRZ4S8EiVGX2MRbeMUj%2Fimage.png?alt=media&amp;token=0e3dabc5-813a-46d0-b28f-0c1a17615efa" alt=""><figcaption></figcaption></figure>

View the user's currently followed customers in the \[Followed] tab.

<figure><img src="https://1526800164-files.gitbook.io/~/files/v0/b/gitbook-x-prod.appspot.com/o/spaces%2F50DeL6mO9sNbAZBSEdaN%2Fuploads%2F6Dcx09XX4vX2TTMPaSLu%2Fimage.png?alt=media&amp;token=3e67ab3f-65ce-4271-960c-8e41c68ffb9a" alt=""><figcaption></figcaption></figure>

## 12 Change Customer's Logo

Step 1: Click on the top-left side of the page where a preview thumbnail is located.

<figure><img src="https://1526800164-files.gitbook.io/~/files/v0/b/gitbook-x-prod.appspot.com/o/spaces%2F50DeL6mO9sNbAZBSEdaN%2Fuploads%2Fi1xoew2KqKNeNo8E3Bpz%2Fimage.png?alt=media&amp;token=4297a0be-f6e3-4150-af97-725ba1f386f8" alt=""><figcaption></figcaption></figure>

Step 2: Click "Upload Image" and click "Confirm" once the new logo has replaced the former one.

<figure><img src="https://1526800164-files.gitbook.io/~/files/v0/b/gitbook-x-prod.appspot.com/o/spaces%2F50DeL6mO9sNbAZBSEdaN%2Fuploads%2FZhzHCNJo7jlJDVhlhCPm%2Fimage.png?alt=media&amp;token=9386ae95-23b6-4334-b023-bed143ef30c8" alt="" width="375"><figcaption></figcaption></figure>

<figure><img src="https://1526800164-files.gitbook.io/~/files/v0/b/gitbook-x-prod.appspot.com/o/spaces%2F50DeL6mO9sNbAZBSEdaN%2Fuploads%2FAmvEWVUuE4J9sevw9dG7%2Fimage.png?alt=media&amp;token=ae968c2d-461e-47e6-a555-5e5432cb1282" alt=""><figcaption></figcaption></figure>

## 13 Tag

For the user to query related customer data directly using personal tags.

<figure><img src="https://1526800164-files.gitbook.io/~/files/v0/b/gitbook-x-prod.appspot.com/o/spaces%2F50DeL6mO9sNbAZBSEdaN%2Fuploads%2FlKjAleY0p5oHN1A6yLqx%2Fimage.png?alt=media&amp;token=61eabbbc-8385-4db6-8ec1-79216fb1a567" alt=""><figcaption></figcaption></figure>

Step 1: Click \[Add Tag]&#x20;

<figure><img src="https://1526800164-files.gitbook.io/~/files/v0/b/gitbook-x-prod.appspot.com/o/spaces%2F50DeL6mO9sNbAZBSEdaN%2Fuploads%2FBSqDfHnE5i3zYDi0TIB2%2Fimage.png?alt=media&amp;token=f370af3a-9baa-4899-8a79-b88c84f80430" alt=""><figcaption></figcaption></figure>

Step 2: Select personal/public tag data or enter the tag directly to create personal tags.

<figure><img src="https://1526800164-files.gitbook.io/~/files/v0/b/gitbook-x-prod.appspot.com/o/spaces%2F50DeL6mO9sNbAZBSEdaN%2Fuploads%2FomYwGJy8Qo8BsU5HIOkM%2Fimage.png?alt=media&amp;token=0e04c3a5-c65f-4f42-9c14-473036a354cc" alt=""><figcaption></figcaption></figure>

**Remark:**

Tags are only valid for individuals; that is, the tag data set by oneself is only displayed on one’s own customer card and does not affect the tag data of other users.

## 14 Previous/Next

The user can switch between different customers' detail pages by using the \[Previous] and \[Next] buttons in order.

<figure><img src="https://1526800164-files.gitbook.io/~/files/v0/b/gitbook-x-prod.appspot.com/o/spaces%2F50DeL6mO9sNbAZBSEdaN%2Fuploads%2FckLqbYH78cm42mKG6CFH%2Fimage.png?alt=media&amp;token=b03e774a-ff30-4d65-b2b3-f0704b08e618" alt=""><figcaption></figcaption></figure>


# Contact

## 1 Create New Contact

Step 1: On the top-right side of the page, click "Add".

<figure><img src="https://1526800164-files.gitbook.io/~/files/v0/b/gitbook-x-prod.appspot.com/o/spaces%2F50DeL6mO9sNbAZBSEdaN%2Fuploads%2FeL1nLo7SFPdParEEKo87%2Fimage.png?alt=media&amp;token=f0bfe968-053a-41c8-a76b-1efc541d8d16" alt=""><figcaption></figcaption></figure>

Step 2: Fill in the relevant information like contact name, contact's job title, selecting the customer and other information, then click \[Submit].

<figure><img src="https://1526800164-files.gitbook.io/~/files/v0/b/gitbook-x-prod.appspot.com/o/spaces%2F50DeL6mO9sNbAZBSEdaN%2Fuploads%2Fcp5jjK2On76QkGTCDt3H%2Fimage.png?alt=media&amp;token=6de517f5-8ac3-437e-bd8e-9b61462443cd" alt=""><figcaption></figcaption></figure>

**Remark:**

Customer: Only the customer that the user have permission to view will be in the selector list.

Phone No.: The phone no. for the same customer cannot be repeated. Else, an error message will be prompted.

<figure><img src="https://1526800164-files.gitbook.io/~/files/v0/b/gitbook-x-prod.appspot.com/o/spaces%2F50DeL6mO9sNbAZBSEdaN%2Fuploads%2F93pk1yof5uGxrzEwPV6V%2Fimage.png?alt=media&amp;token=4d676f27-553b-4c36-834e-7a1cdf9541e6" alt="" width="275"><figcaption></figcaption></figure>

View user:

* Defaulted as \[All staff]
* All staff is pointing to all the system user that can view this customer.
* When \[All staff] is not checked and the scope is not specified, only the creator will be able to view this contact.
* Regardless of whether or not the view scope includes the creator, the creator can view and edit the contact.

## 2 Data Operation

### 2.1 List Data

<figure><img src="https://1526800164-files.gitbook.io/~/files/v0/b/gitbook-x-prod.appspot.com/o/spaces%2F50DeL6mO9sNbAZBSEdaN%2Fuploads%2FeL1ezYbb1GpE53KFGoCe%2Fimage.png?alt=media&amp;token=47d9b620-fdb6-411e-bd81-63c13a2e39f3" alt=""><figcaption></figcaption></figure>

**Remark:**

The list displays the contact of the customers that the current user has the permission to view.

#### 2.1.1 Sorting

### 2.2 View Contact&#x20;

Step 1: Open the details page, and it will appear in a pop-up window on the right side of the page.\
Option 1: Click on the data row directly.\
Option 2: On the right side of the data row, click on "more ···" and then click "View.

<figure><img src="https://1526800164-files.gitbook.io/~/files/v0/b/gitbook-x-prod.appspot.com/o/spaces%2F50DeL6mO9sNbAZBSEdaN%2Fuploads%2Fqa0ZnQIZRXgnhgc6ki9Z%2Fimage.png?alt=media&amp;token=566d9899-c96f-47d7-bb24-149097c12352" alt=""><figcaption></figcaption></figure>

### 2.3 View Contact Log

Click on the names of the contact to view all contact logs in the pop-up box.

<figure><img src="https://1526800164-files.gitbook.io/~/files/v0/b/gitbook-x-prod.appspot.com/o/spaces%2F50DeL6mO9sNbAZBSEdaN%2Fuploads%2FqLreZoeFTbFI6EiN8FxB%2Fimage.png?alt=media&amp;token=540d30cf-b1d6-4298-bdac-43f83c8cea8c" alt=""><figcaption></figcaption></figure>

<figure><img src="https://1526800164-files.gitbook.io/~/files/v0/b/gitbook-x-prod.appspot.com/o/spaces%2F50DeL6mO9sNbAZBSEdaN%2Fuploads%2FMGcFH4onyLQ8bUmUWqTM%2Fimage.png?alt=media&amp;token=38cb49fd-d03b-4fae-acec-5263affc6c1b" alt=""><figcaption></figcaption></figure>

### 2.4 View Customer Details

Click on the customer's name to view more details on the right side of the page.

<figure><img src="https://1526800164-files.gitbook.io/~/files/v0/b/gitbook-x-prod.appspot.com/o/spaces%2F50DeL6mO9sNbAZBSEdaN%2Fuploads%2Fp2bVKHCu8FG8hNZzXsdP%2Fimage.png?alt=media&amp;token=c341d56b-42e1-4485-8457-d009f4b83b5d" alt=""><figcaption></figcaption></figure>

<figure><img src="https://1526800164-files.gitbook.io/~/files/v0/b/gitbook-x-prod.appspot.com/o/spaces%2F50DeL6mO9sNbAZBSEdaN%2Fuploads%2FrGUqGKDg8YunMGdGyACe%2Fimage.png?alt=media&amp;token=abef2c4b-c3b8-4a20-9cfd-7c009fc1f184" alt=""><figcaption></figcaption></figure>

### 2.5 Edit&#x20;

Step 1: On the right-side of the data row, click more ···, click on "Edit".

<figure><img src="https://1526800164-files.gitbook.io/~/files/v0/b/gitbook-x-prod.appspot.com/o/spaces%2F50DeL6mO9sNbAZBSEdaN%2Fuploads%2FLna6v0tuuvG0p9ddBqLD%2Fimage.png?alt=media&amp;token=0e02f937-6bb8-4724-9a7c-6388a9e311ac" alt=""><figcaption></figcaption></figure>

Step 2: Modify the details and click "Submit" to save the new changes made.

<figure><img src="https://1526800164-files.gitbook.io/~/files/v0/b/gitbook-x-prod.appspot.com/o/spaces%2F50DeL6mO9sNbAZBSEdaN%2Fuploads%2FURTlFyWbni6NJiY43rKV%2Fimage.png?alt=media&amp;token=0502583e-7e5b-4dac-8c90-820865b9d761" alt=""><figcaption></figcaption></figure>

### 2.6 Delete

Only the System Administrator are allowed to perform this operation.

#### 2.6.1 Single Delete

Step 1: On the right-side of the data row, click more ···, click on "Delete".

<figure><img src="https://1526800164-files.gitbook.io/~/files/v0/b/gitbook-x-prod.appspot.com/o/spaces%2F50DeL6mO9sNbAZBSEdaN%2Fuploads%2FrLEUHPuZbJsdoZvnjHKY%2Fimage.png?alt=media&amp;token=d55b7fa8-988a-4826-a777-4851856aca73" alt=""><figcaption></figcaption></figure>

Step 2: Click on "Confirm" to proceed the data deletion.

<figure><img src="https://1526800164-files.gitbook.io/~/files/v0/b/gitbook-x-prod.appspot.com/o/spaces%2F50DeL6mO9sNbAZBSEdaN%2Fuploads%2FcxRS8uVrUC5ubZpu3gFW%2Fimage.png?alt=media&amp;token=5cda7d96-13b1-4fe1-a246-090c10dbcca1" alt="" width="296"><figcaption></figcaption></figure>

<figure><img src="https://1526800164-files.gitbook.io/~/files/v0/b/gitbook-x-prod.appspot.com/o/spaces%2F50DeL6mO9sNbAZBSEdaN%2Fuploads%2FmTKLa6hz4k0UcPuanLeq%2Fimage.png?alt=media&amp;token=917e0069-cd27-4732-b357-ec100f805aa5" alt="" width="270"><figcaption></figcaption></figure>

#### 2.6.2 Batch Delete

Step 1: Select the data to be deleted, click "Batch delete" on the bottom left of the page.&#x20;

<figure><img src="https://1526800164-files.gitbook.io/~/files/v0/b/gitbook-x-prod.appspot.com/o/spaces%2F50DeL6mO9sNbAZBSEdaN%2Fuploads%2FnYIUABdvJXpKGtDqswsu%2Fimage.png?alt=media&amp;token=e7682829-cb66-4c1e-b90e-a3478cdcfb86" alt=""><figcaption></figcaption></figure>

Step 2: Confirm the delete operation, and the data will be deleted and removed from the list.

<figure><img src="https://1526800164-files.gitbook.io/~/files/v0/b/gitbook-x-prod.appspot.com/o/spaces%2F50DeL6mO9sNbAZBSEdaN%2Fuploads%2FcwzvNN7baAyZacsUf1Cj%2Fimage.png?alt=media&amp;token=840289d3-06f7-4c42-ac7a-132ae60d4c44" alt="" width="295"><figcaption></figcaption></figure>

<figure><img src="https://1526800164-files.gitbook.io/~/files/v0/b/gitbook-x-prod.appspot.com/o/spaces%2F50DeL6mO9sNbAZBSEdaN%2Fuploads%2FeHKfR1YzR2RXLkqA0EPO%2Fimage.png?alt=media&amp;token=4066692a-2d4b-4150-bedd-a1a338e8bd80" alt=""><figcaption></figcaption></figure>

### 2.7 Log

Logs have no permission restrictions, as long as the user has the permission to view the contact, they can see all the relevant logs&#x20;

Step 1: On the right side of the data row, click more ···, and click on "Logs" to open Log pop-up window to view more details.

<figure><img src="https://1526800164-files.gitbook.io/~/files/v0/b/gitbook-x-prod.appspot.com/o/spaces%2F50DeL6mO9sNbAZBSEdaN%2Fuploads%2FipaUacDIowSQIZzNXA7i%2Fimage.png?alt=media&amp;token=6b03dee9-4a2e-465a-abda-edf059d5ab87" alt=""><figcaption></figcaption></figure>

The log data can be filtered by log type through the operation type, by the creation time using the existing time filter, or by customizing the range with the "Time range" button. Additionally, the \[Search log] search box is used to search for log content.

<figure><img src="https://1526800164-files.gitbook.io/~/files/v0/b/gitbook-x-prod.appspot.com/o/spaces%2F50DeL6mO9sNbAZBSEdaN%2Fuploads%2FIObQHUI7DiwNG2IlARRu%2Fimage.png?alt=media&amp;token=01a93fbf-0a57-4dc9-8fa6-b8086a6aae0d" alt=""><figcaption></figcaption></figure>

## 3 Import/Export

### 3.1 Import

Step 1: In the top-right corner of the page, click "Import".

<figure><img src="https://1526800164-files.gitbook.io/~/files/v0/b/gitbook-x-prod.appspot.com/o/spaces%2F50DeL6mO9sNbAZBSEdaN%2Fuploads%2FSO7D45ttqvG4kR1mL7gL%2Fimage.png?alt=media&amp;token=7bfdc1a9-96b8-4407-bab7-a77835800a0c" alt=""><figcaption></figcaption></figure>

Step 2: Export the template by clicking on "Export template"

<figure><img src="https://1526800164-files.gitbook.io/~/files/v0/b/gitbook-x-prod.appspot.com/o/spaces%2F50DeL6mO9sNbAZBSEdaN%2Fuploads%2FQhzHU7ZVYNhv0TPzuRdw%2Fimage.png?alt=media&amp;token=fd63dde6-ebfd-4dc5-881e-1ac9fabb70b4" alt="" width="375"><figcaption></figcaption></figure>

Step 3: Fill up the Excel template

<figure><img src="https://1526800164-files.gitbook.io/~/files/v0/b/gitbook-x-prod.appspot.com/o/spaces%2F50DeL6mO9sNbAZBSEdaN%2Fuploads%2FGGF2kS3A1uVkzc5Dzcvp%2Fimage.png?alt=media&amp;token=20016a9b-b5aa-43ca-b35e-06b927bf6314" alt=""><figcaption></figcaption></figure>

Step 4: Select the updated Excel file by double-clicking on the file or click on the file and click "Open".

<figure><img src="https://1526800164-files.gitbook.io/~/files/v0/b/gitbook-x-prod.appspot.com/o/spaces%2F50DeL6mO9sNbAZBSEdaN%2Fuploads%2FUdSfRBAbkPQIQF4Avavy%2Fimage.png?alt=media&amp;token=3941ac9a-04d2-4c9e-9478-dc5b248ed094" alt=""><figcaption></figcaption></figure>

<figure><img src="https://1526800164-files.gitbook.io/~/files/v0/b/gitbook-x-prod.appspot.com/o/spaces%2F50DeL6mO9sNbAZBSEdaN%2Fuploads%2FWKXZCP46yAnx880pSjE9%2Fimage.png?alt=media&amp;token=67ca251f-8af8-40f3-a27f-f85eeddcee80" alt="" width="278"><figcaption></figcaption></figure>

<figure><img src="https://1526800164-files.gitbook.io/~/files/v0/b/gitbook-x-prod.appspot.com/o/spaces%2F50DeL6mO9sNbAZBSEdaN%2Fuploads%2FJD0LL2EOc9XRJGE1JXdw%2Fimage.png?alt=media&amp;token=f8c7df0f-5207-4b98-ac95-cb7e5e733746" alt="" width="276"><figcaption></figcaption></figure>

When the import is complete, an Excel file will be generated to inform the user of the import status of all rows and provide an error message if the import failed.

<figure><img src="https://1526800164-files.gitbook.io/~/files/v0/b/gitbook-x-prod.appspot.com/o/spaces%2F50DeL6mO9sNbAZBSEdaN%2Fuploads%2FIs3muAdbOr0K8P7DQII7%2Fimage.png?alt=media&amp;token=dc5559bd-dcb0-4421-b442-b381d4219baf" alt=""><figcaption></figcaption></figure>

### 3.2 Export

Step 1: In the top-right corner of the page, click "Export".

<figure><img src="https://1526800164-files.gitbook.io/~/files/v0/b/gitbook-x-prod.appspot.com/o/spaces%2F50DeL6mO9sNbAZBSEdaN%2Fuploads%2FLt4syy8U827lDgkyee3p%2Fimage.png?alt=media&amp;token=37ad9dde-5e9f-454b-8e38-1c5303727d14" alt=""><figcaption><p>\</p></figcaption></figure>

Step 2: Select or de-select fields to be exported, and click "Confirm" to begin the process.

<figure><img src="https://1526800164-files.gitbook.io/~/files/v0/b/gitbook-x-prod.appspot.com/o/spaces%2F50DeL6mO9sNbAZBSEdaN%2Fuploads%2F0Aqb8Jl2cs3u9ITp3tPh%2Fimage.png?alt=media&amp;token=678a85ff-c8b3-4020-8b34-297ed0f2d7c4" alt=""><figcaption></figcaption></figure>

<figure><img src="https://1526800164-files.gitbook.io/~/files/v0/b/gitbook-x-prod.appspot.com/o/spaces%2F50DeL6mO9sNbAZBSEdaN%2Fuploads%2F22h1lZqiGKlWNRHuP0nj%2Fimage.png?alt=media&amp;token=50b484f9-2025-4a48-b591-587eddcd8ea7" alt="" width="277"><figcaption></figcaption></figure>

<figure><img src="https://1526800164-files.gitbook.io/~/files/v0/b/gitbook-x-prod.appspot.com/o/spaces%2F50DeL6mO9sNbAZBSEdaN%2Fuploads%2FdXdlVr8VsP372mjolQ56%2Fimage.png?alt=media&amp;token=28505f39-a1f8-4283-8c76-2c34a1555eb4" alt=""><figcaption></figcaption></figure>

**Remark:**

* This will export all the data that is shown on the current display list, across all pages. If your settings for the list are set to 10 results per page, the export will still include all existing data.
* The user can also export the desired data by filtering, searching, and applying query conditions before the export.

## 4 Filtering/Searching

### 4.1 Filtering

The filter function allows users to refine or narrow down the data list based on the selected criteria.

Click on "More filters" to view more filtering options available.

<figure><img src="https://1526800164-files.gitbook.io/~/files/v0/b/gitbook-x-prod.appspot.com/o/spaces%2F50DeL6mO9sNbAZBSEdaN%2Fuploads%2FBBKUZtQOqVDCJDbLBlb7%2Fimage.png?alt=media&amp;token=75e8cbc8-d0aa-4ac8-a876-491da4d59432" alt=""><figcaption></figcaption></figure>

#### 4.1.2 Create new filter

Users can save their preferred search/filter condition by entering the details and click "Save" or "Save and Search" to be directed to the result straight away.

<figure><img src="https://1526800164-files.gitbook.io/~/files/v0/b/gitbook-x-prod.appspot.com/o/spaces%2F50DeL6mO9sNbAZBSEdaN%2Fuploads%2FmZTY8Xh5o56hdABdZW34%2Fimage.png?alt=media&amp;token=63d02099-27e5-450e-8ac9-1b808f588c59" alt=""><figcaption></figcaption></figure>

A new filter will be created as a result.

<figure><img src="https://1526800164-files.gitbook.io/~/files/v0/b/gitbook-x-prod.appspot.com/o/spaces%2F50DeL6mO9sNbAZBSEdaN%2Fuploads%2Fu8tbCDJy78w7Sb2uEu96%2Fimage.png?alt=media&amp;token=0f8a069f-c7f3-472b-82ef-7c6b02254276" alt=""><figcaption></figcaption></figure>

### 4.2 Searching

#### 4.2.1 Simple Query

By entering relevant text regarding contact names in the search box, users will be able to filter contacts with contact names that are similar/matched to the text entered.

<figure><img src="https://1526800164-files.gitbook.io/~/files/v0/b/gitbook-x-prod.appspot.com/o/spaces%2F50DeL6mO9sNbAZBSEdaN%2Fuploads%2FQogwD4v4c2JWHOm0jydE%2Fimage.png?alt=media&amp;token=d538b958-24e1-4b00-9ea1-2d62af309651" alt=""><figcaption></figcaption></figure>

#### 4.2.2 Advanced Query

The \[Advance Query] allows the users to create complex searches or filters by specifying detailed conditions and criteria.

Step 1: Click on the ![](https://1526800164-files.gitbook.io/~/files/v0/b/gitbook-x-prod.appspot.com/o/spaces%2F50DeL6mO9sNbAZBSEdaN%2Fuploads%2FiEfVlSzniIeYu3jlhfLf%2Fimage.png?alt=media\&token=ad1c38f3-3cab-4647-9272-8326c637299e)icon next to the search box.&#x20;

<figure><img src="https://1526800164-files.gitbook.io/~/files/v0/b/gitbook-x-prod.appspot.com/o/spaces%2F50DeL6mO9sNbAZBSEdaN%2Fuploads%2FhKy9xKGTFnfRfztSUN23%2Fimage.png?alt=media&amp;token=d635a464-c607-48b9-a59f-c1aaf9016cde" alt=""><figcaption></figcaption></figure>

Step 2: Fill in the relevant condition and click on "Search".

<figure><img src="https://1526800164-files.gitbook.io/~/files/v0/b/gitbook-x-prod.appspot.com/o/spaces%2F50DeL6mO9sNbAZBSEdaN%2Fuploads%2FnoPkAMobvcOu4L3FjPFv%2Fimage.png?alt=media&amp;token=7944a9ae-8f0d-4562-87ef-3905ceb16dd7" alt=""><figcaption></figcaption></figure>


# Contact Log

Kindly complete the customer's contact before proceeding to create the contact log.

## 1 Create new Contact Log

Step 1: In the top-right side of the page, click "Add".

<figure><img src="https://1526800164-files.gitbook.io/~/files/v0/b/gitbook-x-prod.appspot.com/o/spaces%2F50DeL6mO9sNbAZBSEdaN%2Fuploads%2FKQOeX6t7AyExDoyQiCYz%2Fimage.png?alt=media&amp;token=7b3007b7-5153-4192-9e90-3ceea2b3bd7d" alt=""><figcaption></figcaption></figure>

Step 2: Fill in the relevant details and click "Submit" to create new contact log(s).

<figure><img src="https://1526800164-files.gitbook.io/~/files/v0/b/gitbook-x-prod.appspot.com/o/spaces%2F50DeL6mO9sNbAZBSEdaN%2Fuploads%2FE4wCleXe0km6a8PKViIi%2Fimage.png?alt=media&amp;token=11170e44-a2dd-47fa-a255-dc3794ad5b16" alt=""><figcaption></figcaption></figure>

* Operation Mode: Default as batch add
* Customer name: When Operation Mode = 'Batch add', the user can select multiple customers to add contact records in batch. Only customers that the user has permission to view will be displayed on the selector.
* Contact Medium: Can be set in \[Settings > Dropdown Box > CRM >Contact Medium].&#x20;
* Contact start time: Default as current time, <mark style="color:green;">customizable</mark>.&#x20;
* Contact Time: Default 30 minutes, <mark style="color:green;">customizable</mark>.&#x20;

## 2  List Data

The contact log list displays all the contact log of customers that the user has the permission to view.

<figure><img src="https://1526800164-files.gitbook.io/~/files/v0/b/gitbook-x-prod.appspot.com/o/spaces%2F50DeL6mO9sNbAZBSEdaN%2Fuploads%2FlAZ7lRi0OgMUZb8aTqUY%2Fimage.png?alt=media&amp;token=76a6950c-222c-4068-ae99-dcac7d44b8e2" alt=""><figcaption></figcaption></figure>

**Remark:**

Sorting: the newest is on the top. Reply will not displayed on the contact log list.&#x20;

### 2.1 View

Step 1: Open the details page, and it will appear in a pop-up window on the right side of the page.\
Option 1: Click on the data row directly.\
Option 2: On the right side of the data row, click on "more ···" and then click "View.

<figure><img src="https://1526800164-files.gitbook.io/~/files/v0/b/gitbook-x-prod.appspot.com/o/spaces%2F50DeL6mO9sNbAZBSEdaN%2Fuploads%2F0wl2no8aRxK5sDYjYVe8%2Fimage.png?alt=media&amp;token=008ce34c-3817-4bc3-8be0-e16eec11cad4" alt=""><figcaption></figcaption></figure>

The details will open up in a new tab and new replies can be recorded.

<figure><img src="https://1526800164-files.gitbook.io/~/files/v0/b/gitbook-x-prod.appspot.com/o/spaces%2F50DeL6mO9sNbAZBSEdaN%2Fuploads%2FCQk0g3PIQmGzNGoRlUvx%2Fimage.png?alt=media&amp;token=3c958ca3-0ff1-4cc7-81fc-049ae2aaaf60" alt=""><figcaption></figcaption></figure>

### 2.2 Delete

The data on the contact log can be deleted only by the system administrator, and only the contact records visible to the system administrator can be deleted.

#### 2.2.1 Single Delete

Step 1: On the right-side of the contact log to be deleted, click more ···, and click on "Delete".

<figure><img src="https://1526800164-files.gitbook.io/~/files/v0/b/gitbook-x-prod.appspot.com/o/spaces%2F50DeL6mO9sNbAZBSEdaN%2Fuploads%2FsLk9A8xy26vv1yCsdPos%2Fimage.png?alt=media&amp;token=727dca83-c627-46b7-ba98-0be80c910873" alt=""><figcaption></figcaption></figure>

Step 2: Confirm the delete operation, and the data will be marked a deleted with a marked through.

<figure><img src="https://1526800164-files.gitbook.io/~/files/v0/b/gitbook-x-prod.appspot.com/o/spaces%2F50DeL6mO9sNbAZBSEdaN%2Fuploads%2FY6kAVxOCTnYLrRVbaaER%2Fimage.png?alt=media&amp;token=39841249-e42b-466a-be30-8f4bf7ff77c5" alt="" width="295"><figcaption></figcaption></figure>

<figure><img src="https://1526800164-files.gitbook.io/~/files/v0/b/gitbook-x-prod.appspot.com/o/spaces%2F50DeL6mO9sNbAZBSEdaN%2Fuploads%2Fr9d3L9JuZP6ED1iz3Vmt%2Fimage.png?alt=media&amp;token=761eaca3-3bb6-42f4-880b-412a692f29f8" alt="" width="272"><figcaption></figcaption></figure>

#### 2.2.2 Batch Delete

Step 1: Select the data to be deleted, click "Batch delete" on the bottom left of the page.&#x20;

<figure><img src="https://1526800164-files.gitbook.io/~/files/v0/b/gitbook-x-prod.appspot.com/o/spaces%2F50DeL6mO9sNbAZBSEdaN%2Fuploads%2FOSp1Z1IdEPr0plP3gFR4%2Fimage.png?alt=media&amp;token=616dd4e4-bb6c-4c26-a065-30ddb85b2460" alt=""><figcaption></figcaption></figure>

Step 2: Confirm the delete operation, and the data will be marked a deleted with a marked through.

<figure><img src="https://1526800164-files.gitbook.io/~/files/v0/b/gitbook-x-prod.appspot.com/o/spaces%2F50DeL6mO9sNbAZBSEdaN%2Fuploads%2FcwzvNN7baAyZacsUf1Cj%2Fimage.png?alt=media&amp;token=840289d3-06f7-4c42-ac7a-132ae60d4c44" alt="" width="295"><figcaption></figcaption></figure>

<figure><img src="https://1526800164-files.gitbook.io/~/files/v0/b/gitbook-x-prod.appspot.com/o/spaces%2F50DeL6mO9sNbAZBSEdaN%2Fuploads%2FeHKfR1YzR2RXLkqA0EPO%2Fimage.png?alt=media&amp;token=4066692a-2d4b-4150-bedd-a1a338e8bd80" alt=""><figcaption></figcaption></figure>

#### 2.2.3 Deleted Contacts

The deleted contact data is marked with a strikethrough and will still be displayed.

<figure><img src="https://1526800164-files.gitbook.io/~/files/v0/b/gitbook-x-prod.appspot.com/o/spaces%2F50DeL6mO9sNbAZBSEdaN%2Fuploads%2FGLSkm6gYNMWQXwonApn8%2Fimage.png?alt=media&amp;token=5f6f206d-8b1a-41cd-a7ae-51bd1dcbaaa9" alt=""><figcaption></figcaption></figure>

There will be a label <mark style="color:red;">(Deleted)</mark> after \[Call log detail].

<figure><img src="https://1526800164-files.gitbook.io/~/files/v0/b/gitbook-x-prod.appspot.com/o/spaces%2F50DeL6mO9sNbAZBSEdaN%2Fuploads%2FeV9s8FGj4LBeRRa112X7%2Fimage.png?alt=media&amp;token=f1811896-8198-4270-bbfb-1b2582fe531a" alt=""><figcaption></figcaption></figure>

**Remark:**

The user can still view the contact log details, reply and log, but can no longer leave any reply to the details.&#x20;

### 2.3 Log

Step 1: Open the relevant Contact log details

Option 1: Click on the data row directly to open the Contact Log details on the right-side of the page&#x20;

Option 2: Go to the right-side of the data row, click more ···, and click "View". The Contact Log details will display on the right-side of the page&#x20;

<figure><img src="https://1526800164-files.gitbook.io/~/files/v0/b/gitbook-x-prod.appspot.com/o/spaces%2F50DeL6mO9sNbAZBSEdaN%2Fuploads%2FG4wJnSfj3kn6RG3QayHA%2Fimage.png?alt=media&amp;token=5098e512-db3e-4d24-beba-3ad68137b5b8" alt=""><figcaption></figcaption></figure>

Step 2: Click on the "Log" tab to view the log details.

<figure><img src="https://1526800164-files.gitbook.io/~/files/v0/b/gitbook-x-prod.appspot.com/o/spaces%2F50DeL6mO9sNbAZBSEdaN%2Fuploads%2FlmKNh26jMzY37KXItsrN%2Fimage.png?alt=media&amp;token=cda5103a-d395-49ba-86f1-0bbd9e66c555" alt=""><figcaption></figcaption></figure>

The log data can be filtered by log type through the operation type, by the creation time using the existing time filter, or by customizing the range with the "Time range" button. Additionally, the \[Search log] search box is used to search for log content.

<figure><img src="https://1526800164-files.gitbook.io/~/files/v0/b/gitbook-x-prod.appspot.com/o/spaces%2F50DeL6mO9sNbAZBSEdaN%2Fuploads%2FTX62csRgiYW1CxiwDqkG%2Fimage.png?alt=media&amp;token=caa28f3b-b4e0-436c-81a6-047d12467360" alt=""><figcaption></figcaption></figure>

## 3 Import/Export

### 3.1 Import

Step 1: In the top-right corner of the page, click "Import".

<figure><img src="https://1526800164-files.gitbook.io/~/files/v0/b/gitbook-x-prod.appspot.com/o/spaces%2F50DeL6mO9sNbAZBSEdaN%2Fuploads%2FfZHz5H28bQZWM0w3IM7Z%2Fimage.png?alt=media&amp;token=ae8d7174-2c00-4527-860b-2909890a4ec0" alt=""><figcaption></figcaption></figure>

Step 2: Export the template by clicking on "Export template".

<figure><img src="https://1526800164-files.gitbook.io/~/files/v0/b/gitbook-x-prod.appspot.com/o/spaces%2F50DeL6mO9sNbAZBSEdaN%2Fuploads%2FQhzHU7ZVYNhv0TPzuRdw%2Fimage.png?alt=media&amp;token=fd63dde6-ebfd-4dc5-881e-1ac9fabb70b4" alt="" width="375"><figcaption></figcaption></figure>

Step 3: Fill up the Excel template.

<figure><img src="https://1526800164-files.gitbook.io/~/files/v0/b/gitbook-x-prod.appspot.com/o/spaces%2F50DeL6mO9sNbAZBSEdaN%2Fuploads%2FJuWVJyAEbamZrK3rVAOw%2Fimage.png?alt=media&amp;token=55c8ef80-b746-408d-aa0c-6b789414d03d" alt=""><figcaption></figcaption></figure>

Step 4: Select the updated Excel file by double-clicking on the file or click on the file and click "Open".

<figure><img src="https://1526800164-files.gitbook.io/~/files/v0/b/gitbook-x-prod.appspot.com/o/spaces%2F50DeL6mO9sNbAZBSEdaN%2Fuploads%2FukPUiOhFatRO7FXWdLGE%2Fimage.png?alt=media&amp;token=82caf31a-b523-4455-9b8a-af4b16e2bdae" alt=""><figcaption></figcaption></figure>

Step 5: Click on "Start importing" to begin the import.

<figure><img src="https://1526800164-files.gitbook.io/~/files/v0/b/gitbook-x-prod.appspot.com/o/spaces%2F50DeL6mO9sNbAZBSEdaN%2Fuploads%2FUbYpHepXqJ3mqruDvYoh%2Fimage.png?alt=media&amp;token=e19e105c-d887-46af-9c70-aae817017edf" alt=""><figcaption></figcaption></figure>

Status message will pop-up once done.

<figure><img src="https://1526800164-files.gitbook.io/~/files/v0/b/gitbook-x-prod.appspot.com/o/spaces%2F50DeL6mO9sNbAZBSEdaN%2Fuploads%2FWKXZCP46yAnx880pSjE9%2Fimage.png?alt=media&amp;token=67ca251f-8af8-40f3-a27f-f85eeddcee80" alt="" width="278"><figcaption></figcaption></figure>

<figure><img src="https://1526800164-files.gitbook.io/~/files/v0/b/gitbook-x-prod.appspot.com/o/spaces%2F50DeL6mO9sNbAZBSEdaN%2Fuploads%2FJD0LL2EOc9XRJGE1JXdw%2Fimage.png?alt=media&amp;token=f8c7df0f-5207-4b98-ac95-cb7e5e733746" alt="" width="276"><figcaption></figcaption></figure>

When the import is complete, an Excel file will be generated to inform the user of the import status of all rows and provide an error message if the import failed.

### 3.2 Export

Step 1: In the top-right corner of the page, click "Export".

<figure><img src="https://1526800164-files.gitbook.io/~/files/v0/b/gitbook-x-prod.appspot.com/o/spaces%2F50DeL6mO9sNbAZBSEdaN%2Fuploads%2FHSzdpUvNFAtQLRi57p4k%2Fimage.png?alt=media&amp;token=01eb5fd3-5026-4bec-965d-03a976cb35a7" alt=""><figcaption></figcaption></figure>

Step 2: Select or de-select fields to be exported, and click "Confirm" to begin the process.

<figure><img src="https://1526800164-files.gitbook.io/~/files/v0/b/gitbook-x-prod.appspot.com/o/spaces%2F50DeL6mO9sNbAZBSEdaN%2Fuploads%2FIZC2bKXcWPP40qRjW82h%2Fimage.png?alt=media&amp;token=19ecbf35-8d85-4cf0-b725-6b5c895f6f56" alt=""><figcaption></figcaption></figure>

The system will automatically generate and download the exported data in Excel format onto the user's device.

<figure><img src="https://1526800164-files.gitbook.io/~/files/v0/b/gitbook-x-prod.appspot.com/o/spaces%2F50DeL6mO9sNbAZBSEdaN%2Fuploads%2Fw7aweGzmaOWlkSHdyGoU%2Fimage.png?alt=media&amp;token=5399d12f-9817-4dd6-9e1e-1c959320319a" alt=""><figcaption></figcaption></figure>

**Remark:**

This will export all the data that is shown on the current display list, across all pages. If your settings for the list are set to 10 results per page, the export will still include all existing data, except in cases where the user has applied filters or searched for specific results; in such instances, the system will only export the filtered or queried results.

## 4 Filtering/Searching

### 4.1 Filter

The filter function allows users to refine or narrow down the data list based on the selected criteria.

Click on "More filters" to view more filtering options available.

<figure><img src="https://1526800164-files.gitbook.io/~/files/v0/b/gitbook-x-prod.appspot.com/o/spaces%2F50DeL6mO9sNbAZBSEdaN%2Fuploads%2FLquD3gTiPzjHxLn7zXRO%2Fimage.png?alt=media&amp;token=c5a8a99d-f26b-433e-8ee8-08cad88c9ecc" alt=""><figcaption></figcaption></figure>

### 4.2 Search

#### 4.2.1 Simple Query

The users is able to filter contact logs with customer names or creator or contact names that are similar/matched to the text entered in the search box.

<figure><img src="https://1526800164-files.gitbook.io/~/files/v0/b/gitbook-x-prod.appspot.com/o/spaces%2F50DeL6mO9sNbAZBSEdaN%2Fuploads%2FS27o80N99IvGMdDPn3T1%2Fimage.png?alt=media&amp;token=7cd7465a-37ba-47b7-9811-dc248dcbe82c" alt=""><figcaption></figcaption></figure>

#### 4.2.2 Advance Query

The \[Advance Query] allows the users to create complex searches or filters by specifying detailed conditions and criteria.

Step 1: Click on the ![](https://1526800164-files.gitbook.io/~/files/v0/b/gitbook-x-prod.appspot.com/o/spaces%2F50DeL6mO9sNbAZBSEdaN%2Fuploads%2FiEfVlSzniIeYu3jlhfLf%2Fimage.png?alt=media\&token=ad1c38f3-3cab-4647-9272-8326c637299e)icon next to the search box.&#x20;

<figure><img src="https://1526800164-files.gitbook.io/~/files/v0/b/gitbook-x-prod.appspot.com/o/spaces%2F50DeL6mO9sNbAZBSEdaN%2Fuploads%2F2rzu0tidAwqUf74jjLCi%2Fimage.png?alt=media&amp;token=a04e97c1-b22a-4437-8b16-c3f9fbdd9d61" alt=""><figcaption></figcaption></figure>

Step 2: Fill in the relevant condition and click on "Search".

<figure><img src="https://1526800164-files.gitbook.io/~/files/v0/b/gitbook-x-prod.appspot.com/o/spaces%2F50DeL6mO9sNbAZBSEdaN%2Fuploads%2FCD8ULYKUMpnJvvy3mO7P%2Fimage.png?alt=media&amp;token=349ca2df-28ca-4fdf-9fde-4e642f6ff1ee" alt=""><figcaption></figcaption></figure>

Users can save their preferred search/filter condition by entering the details and click "Save" or "Save and Search" to be directed to the result straight away.


# Opportunity

## 1 Create new opportunity

Step 1: In the top-right side of the page, click "Add".

<figure><img src="https://1526800164-files.gitbook.io/~/files/v0/b/gitbook-x-prod.appspot.com/o/spaces%2F50DeL6mO9sNbAZBSEdaN%2Fuploads%2FjZNrOabUAEadwFTFv41S%2Fimage.png?alt=media&amp;token=1cf2a42a-a838-4b72-a5ea-cf2cd779134c" alt=""><figcaption></figcaption></figure>

Step 2: Fill in the relevant details and click "Save" to create new opportunity.

<figure><img src="https://1526800164-files.gitbook.io/~/files/v0/b/gitbook-x-prod.appspot.com/o/spaces%2F50DeL6mO9sNbAZBSEdaN%2Fuploads%2FGq8SAK1FnNPqULiqEE4E%2Fimage.png?alt=media&amp;token=41ebb72c-955b-4d7e-b45e-2b5cf0ba99ae" alt=""><figcaption></figcaption></figure>

* Customers: Only customer that the current user have the permission to view can be selected.
* Opportunity Status, Opportunity Stage, Opportunity Type, and Opportunity Source can be set in \[Settings > Dropdown Box > CRM].
* Possibility: Must be integers between 0 and 100; if the data entered is negative, fractional, or greater than 100, an error will be prompted.

<figure><img src="https://1526800164-files.gitbook.io/~/files/v0/b/gitbook-x-prod.appspot.com/o/spaces%2F50DeL6mO9sNbAZBSEdaN%2Fuploads%2Fa10fVOWXGIuDjNkven8i%2Fimage.png?alt=media&amp;token=d2eb4df1-dcc5-47af-ad7c-6dc0f151d666" alt="" width="213"><figcaption></figcaption></figure>

* The opportunity rank is calculated automatically based on the stage and possibility of the opportunity and cannot be modified.

## 2 Data Operation

### 2.1 List Data

The user can view all the opportunities of the customers that they have been granted permission to view.

<figure><img src="https://1526800164-files.gitbook.io/~/files/v0/b/gitbook-x-prod.appspot.com/o/spaces%2F50DeL6mO9sNbAZBSEdaN%2Fuploads%2FXbLRZpw6DAq2kUilwUff%2Fimage.png?alt=media&amp;token=39fc9ada-aa74-4026-8cee-d3346a1475bb" alt=""><figcaption></figcaption></figure>

### 2.2 View

Step 1: Open the details page, and it will appear in a pop-up window on the right side of the page.\
Option 1: Click on the data row directly.\
Option 2: On the right side of the data row, click on "more ···" and then click "View".

<figure><img src="https://1526800164-files.gitbook.io/~/files/v0/b/gitbook-x-prod.appspot.com/o/spaces%2F50DeL6mO9sNbAZBSEdaN%2Fuploads%2FOnuCSgbXTRvL5pTSjzsu%2Fimage.png?alt=media&amp;token=c08692c7-a323-4dfe-a592-20428a3f7f61" alt=""><figcaption></figcaption></figure>

The user may click "New tab open" to open the \[Opportunity details] in a new tab.

<figure><img src="https://1526800164-files.gitbook.io/~/files/v0/b/gitbook-x-prod.appspot.com/o/spaces%2F50DeL6mO9sNbAZBSEdaN%2Fuploads%2Feql1J4uKX2a6B00bQkMr%2Fimage.png?alt=media&amp;token=40f3c620-c5a2-4d58-992d-fb67ff430078" alt=""><figcaption></figcaption></figure>

In \[Business Review], the user can create new comments, possibility update, and to update the opportunity stage. Changes will take effect immediately.&#x20;

<figure><img src="https://1526800164-files.gitbook.io/~/files/v0/b/gitbook-x-prod.appspot.com/o/spaces%2F50DeL6mO9sNbAZBSEdaN%2Fuploads%2FrKCDtV549bBcjnIhomGq%2Fimage.png?alt=media&amp;token=d6711ad1-a6b2-478b-abe7-290d38f372fc" alt=""><figcaption></figcaption></figure>

**Remark:**

The review's new possibility will build on the original possibility; if the sum exceeds 100, an error will be prompted.

<figure><img src="https://1526800164-files.gitbook.io/~/files/v0/b/gitbook-x-prod.appspot.com/o/spaces%2F50DeL6mO9sNbAZBSEdaN%2Fuploads%2FuVT7Xi5YMVFdn5C1tlyT%2Fimage.png?alt=media&amp;token=4623dd47-8ee0-4863-8c20-2d138329d698" alt=""><figcaption></figcaption></figure>

* Can be negative, will minus from the original possibility once the new changes is saved.
* Can be in decimal, the system will round it off to the smallest integer.&#x20;

### 2.3 View Customer Detail

Click on the customer's name to view more details on the right side of the page.

<figure><img src="https://1526800164-files.gitbook.io/~/files/v0/b/gitbook-x-prod.appspot.com/o/spaces%2F50DeL6mO9sNbAZBSEdaN%2Fuploads%2FLzch6ZNLWN6mr2I5iF5e%2Fimage.png?alt=media&amp;token=573ad155-a9b2-47ce-8256-1bdcedcb0d86" alt=""><figcaption></figcaption></figure>

<figure><img src="https://1526800164-files.gitbook.io/~/files/v0/b/gitbook-x-prod.appspot.com/o/spaces%2F50DeL6mO9sNbAZBSEdaN%2Fuploads%2FnYqo1tCkgFue85XheA53%2Fimage.png?alt=media&amp;token=65ce17db-2bcd-4872-9cba-7ee945f4e209" alt=""><figcaption></figcaption></figure>

### 2.4 Edit

The opportunity creator can edit the data and/or the opportunity created by other users but the current user has the customer's data edit permission.

Step 1: On the right-side of the data row, click more ···, and click "Edit".

<figure><img src="https://1526800164-files.gitbook.io/~/files/v0/b/gitbook-x-prod.appspot.com/o/spaces%2F50DeL6mO9sNbAZBSEdaN%2Fuploads%2F2fyNoUWNTkNmQyAKDwUu%2Fimage.png?alt=media&amp;token=770a768a-e649-41d1-b38e-5390b064f531" alt=""><figcaption></figcaption></figure>

Step 2: Modify the details and click "Save" to implement the new changes made.

<figure><img src="https://1526800164-files.gitbook.io/~/files/v0/b/gitbook-x-prod.appspot.com/o/spaces%2F50DeL6mO9sNbAZBSEdaN%2Fuploads%2F9vnNOkACIhiKRhH2iW45%2Fimage.png?alt=media&amp;token=117e4324-5a98-41ef-a64f-273cbacad869" alt=""><figcaption></figcaption></figure>

### 2.5 Delete

#### 2.5.1 Single Delete

Step 1: On the right-side of the data row, click more ···, and click "Delete".

<figure><img src="https://1526800164-files.gitbook.io/~/files/v0/b/gitbook-x-prod.appspot.com/o/spaces%2F50DeL6mO9sNbAZBSEdaN%2Fuploads%2FRDPgDDrIGntbjouKGZ4H%2Fimage.png?alt=media&amp;token=90e1423a-1c07-4cce-be87-cd88c603c230" alt=""><figcaption></figcaption></figure>

Step 2: Confirm the delete operation, and the data will be deleted and removed from the list.

<figure><img src="https://1526800164-files.gitbook.io/~/files/v0/b/gitbook-x-prod.appspot.com/o/spaces%2F50DeL6mO9sNbAZBSEdaN%2Fuploads%2FrMrIGCn3cHJGjYp92xgv%2Fimage.png?alt=media&amp;token=b1b8ee81-1876-4169-92f1-e6748c205aad" alt="" width="297"><figcaption></figcaption></figure>

#### 2.5.2 Batch Delete

Step 1: Select the data to be deleted, click "Batch delete" on the bottom left of the page.&#x20;

<figure><img src="https://1526800164-files.gitbook.io/~/files/v0/b/gitbook-x-prod.appspot.com/o/spaces%2F50DeL6mO9sNbAZBSEdaN%2Fuploads%2Fr6lSl1oBqECCJgiknnL4%2Fimage.png?alt=media&amp;token=3d6f2649-30b3-4a8f-9448-0d87d9a81fa1" alt=""><figcaption></figcaption></figure>

Step 2: Confirm the delete operation, and the data will be deleted and removed from the list.

<figure><img src="https://1526800164-files.gitbook.io/~/files/v0/b/gitbook-x-prod.appspot.com/o/spaces%2F50DeL6mO9sNbAZBSEdaN%2Fuploads%2FcwzvNN7baAyZacsUf1Cj%2Fimage.png?alt=media&amp;token=840289d3-06f7-4c42-ac7a-132ae60d4c44" alt="" width="295"><figcaption></figcaption></figure>

<figure><img src="https://1526800164-files.gitbook.io/~/files/v0/b/gitbook-x-prod.appspot.com/o/spaces%2F50DeL6mO9sNbAZBSEdaN%2Fuploads%2FeHKfR1YzR2RXLkqA0EPO%2Fimage.png?alt=media&amp;token=4066692a-2d4b-4150-bedd-a1a338e8bd80" alt="" width="272"><figcaption><p>Deletion success notification pop-up box</p></figcaption></figure>

### 2.6 Log

Step 1: Open the relevant Opportunity details, and it would display on the right-side of the page.

Option 1: Click on the data row directly.&#x20;

<figure><img src="https://1526800164-files.gitbook.io/~/files/v0/b/gitbook-x-prod.appspot.com/o/spaces%2F50DeL6mO9sNbAZBSEdaN%2Fuploads%2F4FeLhdUjBreHHqn5Gsyl%2Fimage.png?alt=media&amp;token=4557fbdb-5c86-4335-8e8f-9cb0b6dc38e3" alt=""><figcaption></figcaption></figure>

Option 2: Go to the right-side of the data row, click more ···, and click "View".&#x20;

<figure><img src="https://1526800164-files.gitbook.io/~/files/v0/b/gitbook-x-prod.appspot.com/o/spaces%2F50DeL6mO9sNbAZBSEdaN%2Fuploads%2FBd7oktkzQRjCtykVEC8P%2Fimage.png?alt=media&amp;token=16d47d18-83bf-4691-a5cd-2eb9ea18044c" alt=""><figcaption></figcaption></figure>

Step 2: Click on the "Log" tab to view the log details.

<figure><img src="https://1526800164-files.gitbook.io/~/files/v0/b/gitbook-x-prod.appspot.com/o/spaces%2F50DeL6mO9sNbAZBSEdaN%2Fuploads%2FAYqYb4mmWtfMFfeRcWEX%2Fimage.png?alt=media&amp;token=d49bf065-f15b-4520-b0be-ba8f3d6204a9" alt=""><figcaption></figcaption></figure>

The log data can be filtered by log type through the operation type, by the creation time using the existing time filter, or by customizing the range with the "Time range" button. Additionally, the \[Search log] search box is used to search for log content.

<figure><img src="https://1526800164-files.gitbook.io/~/files/v0/b/gitbook-x-prod.appspot.com/o/spaces%2F50DeL6mO9sNbAZBSEdaN%2Fuploads%2FGIVLTnMufZVUDUQmLH1X%2Fimage.png?alt=media&amp;token=23670438-0271-4568-abe9-350d7eb239b1" alt=""><figcaption></figcaption></figure>

### 2.7 Print

Purpose: To provide a hard copy reference for cross-functional meetings or customer/stakeholder presentations, serving as physical evidence to facilitate discussions and decision-making.

Step 1: Open the Opportunity details page

Option 1: Click on the data row directly&#x20;

<figure><img src="https://1526800164-files.gitbook.io/~/files/v0/b/gitbook-x-prod.appspot.com/o/spaces%2F50DeL6mO9sNbAZBSEdaN%2Fuploads%2FJ7fH4bmTkfM4wpkrFqFA%2Fimage.png?alt=media&amp;token=e193fa5b-515c-4430-900e-083576a976a2" alt=""><figcaption></figcaption></figure>

Option 2: On the right-side of the data row, click more ···, and click "View".

<figure><img src="https://1526800164-files.gitbook.io/~/files/v0/b/gitbook-x-prod.appspot.com/o/spaces%2F50DeL6mO9sNbAZBSEdaN%2Fuploads%2FOnuCSgbXTRvL5pTSjzsu%2Fimage.png?alt=media&amp;token=c08692c7-a323-4dfe-a592-20428a3f7f61" alt=""><figcaption></figcaption></figure>

Step 2: On the top-right of the detail page, click on "New tab open" to open the \[Opportunity details] fully in a new tab.

<figure><img src="https://1526800164-files.gitbook.io/~/files/v0/b/gitbook-x-prod.appspot.com/o/spaces%2F50DeL6mO9sNbAZBSEdaN%2Fuploads%2Feql1J4uKX2a6B00bQkMr%2Fimage.png?alt=media&amp;token=40f3c620-c5a2-4d58-992d-fb67ff430078" alt=""><figcaption></figcaption></figure>

Step 3: On the top-right side of the page, click "Print".

<figure><img src="https://1526800164-files.gitbook.io/~/files/v0/b/gitbook-x-prod.appspot.com/o/spaces%2F50DeL6mO9sNbAZBSEdaN%2Fuploads%2F2ASmxTifq4rauWHAeIbE%2Fimage.png?alt=media&amp;token=d682880e-9741-4f35-9bbc-57f5fd8eb9ce" alt=""><figcaption></figcaption></figure>

Step 4: Click "Print".

<figure><img src="https://1526800164-files.gitbook.io/~/files/v0/b/gitbook-x-prod.appspot.com/o/spaces%2F50DeL6mO9sNbAZBSEdaN%2Fuploads%2FrT5pJkJz64uxA3Ac9Q7t%2Fimage.png?alt=media&amp;token=eaa4c1ba-d16e-4467-bc9c-d29799efb347" alt=""><figcaption></figcaption></figure>

**Remark:**

Please note that the Business Review will not be attached and printed together; you will need to switch to the tab and print it separately.

## 3 Export

Step 1: In the top-right corner of the page, click "Export".

<figure><img src="https://1526800164-files.gitbook.io/~/files/v0/b/gitbook-x-prod.appspot.com/o/spaces%2F50DeL6mO9sNbAZBSEdaN%2Fuploads%2FvlSqR4UtXl04m0eym3ZJ%2Fimage.png?alt=media&amp;token=3cf5d525-2403-416a-b639-7ba103cc7e78" alt=""><figcaption></figcaption></figure>

Step 2: Select or de-select fields to be exported, and click "Confirm" to begin the process.

<figure><img src="https://1526800164-files.gitbook.io/~/files/v0/b/gitbook-x-prod.appspot.com/o/spaces%2F50DeL6mO9sNbAZBSEdaN%2Fuploads%2Fk7Xh7l5BI5I2Q7repEXf%2Fimage.png?alt=media&amp;token=38ff5d22-e1f0-4969-ae15-1e2faf8f1c20" alt=""><figcaption></figcaption></figure>

The system will automatically generate and download the exported data in Excel format onto the user's device.

<figure><img src="https://1526800164-files.gitbook.io/~/files/v0/b/gitbook-x-prod.appspot.com/o/spaces%2F50DeL6mO9sNbAZBSEdaN%2Fuploads%2FSJ2u3tMUKGCYzaSjTVUo%2Fimage.png?alt=media&amp;token=fc83945d-0cd5-4726-9df6-f1dc979ab494" alt=""><figcaption></figcaption></figure>

**Remark:**

This will export all the data that is shown on the current display list, across all pages. If your settings for the list are set to 10 results per page, the export will still include all existing data, except in cases where the user has applied filters or searched for specific results; in such instances, the system will only export the filtered or queried results.

## 4 Filtering/Searching

### 4.1 Filter

Users can save their preferred filter by entering/selecting the condition and click "Save" or "Save and Search" to be directed to the result straight away.

Step 1: Click on the ![](https://eohelp.weaverintl.com/~gitbook/image?url=https%3A%2F%2F1526800164-files.gitbook.io%2F%7E%2Ffiles%2Fv0%2Fb%2Fgitbook-x-prod.appspot.com%2Fo%2Fspaces%252F50DeL6mO9sNbAZBSEdaN%252Fuploads%252FiEfVlSzniIeYu3jlhfLf%252Fimage.png%3Falt%3Dmedia%26token%3Dad1c38f3-3cab-4647-9272-8326c637299e\&width=300\&dpr=4\&quality=100\&sign=868175da\&sv=1)icon next to the search box.

<figure><img src="https://1526800164-files.gitbook.io/~/files/v0/b/gitbook-x-prod.appspot.com/o/spaces%2F50DeL6mO9sNbAZBSEdaN%2Fuploads%2FNDbTOs6v8dB7KOdqhYT7%2Fimage.png?alt=media&amp;token=28956ae9-d18f-47e8-a861-f6e8af75f107" alt=""><figcaption></figcaption></figure>

Step 2: Fill in the relevant condition and click on "Save".

<figure><img src="https://1526800164-files.gitbook.io/~/files/v0/b/gitbook-x-prod.appspot.com/o/spaces%2F50DeL6mO9sNbAZBSEdaN%2Fuploads%2FgRyzvS3WDLAX4VsCratC%2Fimage.png?alt=media&amp;token=39627c21-e620-4466-989d-bfcf2b30da2b" alt=""><figcaption></figcaption></figure>

A new filter condition will be created.

<figure><img src="https://1526800164-files.gitbook.io/~/files/v0/b/gitbook-x-prod.appspot.com/o/spaces%2F50DeL6mO9sNbAZBSEdaN%2Fuploads%2FyDSalieG3lY2BsOKZeyu%2Fimage.png?alt=media&amp;token=d38342c5-6ee6-4838-848b-268719d92467" alt=""><figcaption></figcaption></figure>

The filter name can be changed by clicking on ![](https://1526800164-files.gitbook.io/~/files/v0/b/gitbook-x-prod.appspot.com/o/spaces%2F50DeL6mO9sNbAZBSEdaN%2Fuploads%2FGiv8FS6GDtry0O9h1y4x%2Fimage.png?alt=media\&token=8fce9755-1bbf-4bcf-a0ed-3df562709353)

<figure><img src="https://1526800164-files.gitbook.io/~/files/v0/b/gitbook-x-prod.appspot.com/o/spaces%2F50DeL6mO9sNbAZBSEdaN%2Fuploads%2F77lKQtBBJD8oJpFREa6f%2Fimage.png?alt=media&amp;token=9a784f2c-0fbe-4c7b-91a0-451086e4c386" alt=""><figcaption></figcaption></figure>

Click on the save icon when completed

<figure><img src="https://1526800164-files.gitbook.io/~/files/v0/b/gitbook-x-prod.appspot.com/o/spaces%2F50DeL6mO9sNbAZBSEdaN%2Fuploads%2FjhJvBBiHb3feOuUknivq%2Fimage.png?alt=media&amp;token=14540ab6-750a-43ac-b942-50f90bbb7736" alt="" width="249"><figcaption></figcaption></figure>

New filter is created.&#x20;

<figure><img src="https://1526800164-files.gitbook.io/~/files/v0/b/gitbook-x-prod.appspot.com/o/spaces%2F50DeL6mO9sNbAZBSEdaN%2Fuploads%2FyonclnukTsmbO53MVvN9%2Fimage.png?alt=media&amp;token=cb0df200-77e4-4e26-b25a-8b19a955aae3" alt=""><figcaption></figcaption></figure>

In the Advance Search, click on the (X) to delete the filter.

<figure><img src="https://1526800164-files.gitbook.io/~/files/v0/b/gitbook-x-prod.appspot.com/o/spaces%2F50DeL6mO9sNbAZBSEdaN%2Fuploads%2FKRbVtMYdx8GWLdhnH9FN%2Fimage.png?alt=media&amp;token=5cf20bbd-eaef-4e13-97f5-e651978527cd" alt="" width="375"><figcaption></figcaption></figure>

### 4.2 Search

#### 4.2.1 **Simple Query**

The users is able to filter opportunity with opportunity name that are similar/matched to the text entered in the search box.

<figure><img src="https://1526800164-files.gitbook.io/~/files/v0/b/gitbook-x-prod.appspot.com/o/spaces%2F50DeL6mO9sNbAZBSEdaN%2Fuploads%2FNmn2DMm6zfTrwgbVF7hl%2Fimage.png?alt=media&amp;token=152fc990-46c6-4a5b-ae33-9768d025cd8e" alt=""><figcaption></figcaption></figure>

**4.2.2 Advance Query**

The \[Advance Query] allows the users to create complex searches or filters by specifying detailed conditions and criteria.

Step 1: Click on the ![](https://eohelp.weaverintl.com/~gitbook/image?url=https%3A%2F%2F1526800164-files.gitbook.io%2F%7E%2Ffiles%2Fv0%2Fb%2Fgitbook-x-prod.appspot.com%2Fo%2Fspaces%252F50DeL6mO9sNbAZBSEdaN%252Fuploads%252FiEfVlSzniIeYu3jlhfLf%252Fimage.png%3Falt%3Dmedia%26token%3Dad1c38f3-3cab-4647-9272-8326c637299e\&width=300\&dpr=4\&quality=100\&sign=868175da\&sv=1)icon next to the search box.

<figure><img src="https://1526800164-files.gitbook.io/~/files/v0/b/gitbook-x-prod.appspot.com/o/spaces%2F50DeL6mO9sNbAZBSEdaN%2Fuploads%2F7CKBT6rQGLuC0Z9xjkEr%2Fimage.png?alt=media&amp;token=74855f49-42d7-4200-a7d6-66ea0461ce6f" alt=""><figcaption></figcaption></figure>

Step 2: Fill in the relevant condition and click on "Search".

<figure><img src="https://1526800164-files.gitbook.io/~/files/v0/b/gitbook-x-prod.appspot.com/o/spaces%2F50DeL6mO9sNbAZBSEdaN%2Fuploads%2FzmXwzg5fIjaKdMBYYhQd%2Fimage.png?alt=media&amp;token=d9d754d0-d4df-4237-af2c-e27fffda35d0" alt=""><figcaption></figcaption></figure>


# Sales Record

Kindly complete the product data before proceeding to create the Sales Record data.

## 1 Create New Sales Record

Step 1: In the top-right side of the page, click "Add".

<figure><img src="https://1526800164-files.gitbook.io/~/files/v0/b/gitbook-x-prod.appspot.com/o/spaces%2F50DeL6mO9sNbAZBSEdaN%2Fuploads%2FgczBWgfU232yX6BD8vYd%2Fimage.png?alt=media&amp;token=1258e4e9-61ea-4687-b833-547a0e77c7d9" alt=""><figcaption></figcaption></figure>

Step 2: Fill in the relevant details and click "Submit" to create new contract information.

<figure><img src="https://1526800164-files.gitbook.io/~/files/v0/b/gitbook-x-prod.appspot.com/o/spaces%2F50DeL6mO9sNbAZBSEdaN%2Fuploads%2F0EFx2aVlpYQaaPoZwKNg%2Fimage.png?alt=media&amp;token=eb037f3c-6fcf-42f4-881d-05e2631b9806" alt=""><figcaption></figcaption></figure>

Customer Name: The user can only select the customers for whom they have permission to view.

## 2 Data Operation&#x20;

### 2.1 List Data

The data displayed on the sales record list is based on the user's viewing permissions.

<figure><img src="https://1526800164-files.gitbook.io/~/files/v0/b/gitbook-x-prod.appspot.com/o/spaces%2F50DeL6mO9sNbAZBSEdaN%2Fuploads%2F0QvG7ejo8SLdT5efh52r%2Fimage.png?alt=media&amp;token=90b0d598-6a69-4657-b692-49c7a45c48b7" alt=""><figcaption></figcaption></figure>

### 2.2 View Sales Record

Step 1: Open the details page, it will appear in a pop-up window on the right side of the page.&#x20;

Option 1: Click on the data row directly.

<figure><img src="https://1526800164-files.gitbook.io/~/files/v0/b/gitbook-x-prod.appspot.com/o/spaces%2F50DeL6mO9sNbAZBSEdaN%2Fuploads%2Fjr9Hmig0oBTxVPjlhKAg%2Fimage.png?alt=media&amp;token=9cf39ded-fc04-4756-af7a-c86fbaa58486" alt=""><figcaption></figcaption></figure>

Option 2: On the right side of the data row, click on "more ···" and then click "View".

<figure><img src="https://1526800164-files.gitbook.io/~/files/v0/b/gitbook-x-prod.appspot.com/o/spaces%2F50DeL6mO9sNbAZBSEdaN%2Fuploads%2FKzv7fx9dMtluVitL2zkE%2Fimage.png?alt=media&amp;token=67aacbe2-5cca-4b6f-8a6a-2831342fe899" alt=""><figcaption></figcaption></figure>

<figure><img src="https://1526800164-files.gitbook.io/~/files/v0/b/gitbook-x-prod.appspot.com/o/spaces%2F50DeL6mO9sNbAZBSEdaN%2Fuploads%2FdMPKA4J87RHlvur1ZWM3%2Fimage.png?alt=media&amp;token=eb9be750-e77d-4ef4-887f-7ba4a67397d1" alt=""><figcaption></figcaption></figure>

### 2.3 View Customer Details&#x20;

Click on the field \[Customer Name].

<figure><img src="https://1526800164-files.gitbook.io/~/files/v0/b/gitbook-x-prod.appspot.com/o/spaces%2F50DeL6mO9sNbAZBSEdaN%2Fuploads%2FnlhhJJxlLdehgRKO3zQ7%2Fimage.png?alt=media&amp;token=c18b595d-d49c-4ec1-b89b-5e4e92d056f3" alt=""><figcaption></figcaption></figure>

The customer information details will be displayed in a pop-up window on the right side of the page.

<figure><img src="https://1526800164-files.gitbook.io/~/files/v0/b/gitbook-x-prod.appspot.com/o/spaces%2F50DeL6mO9sNbAZBSEdaN%2Fuploads%2F9qDQVlqVxWpkbtleb4IO%2Fimage.png?alt=media&amp;token=556cb857-fe75-4003-a428-28f90ff86b76" alt=""><figcaption></figcaption></figure>

### 2.4 Edit&#x20;

Step 1: On the right-side of the data row, click more ···, and click "Edit".

<figure><img src="https://1526800164-files.gitbook.io/~/files/v0/b/gitbook-x-prod.appspot.com/o/spaces%2F50DeL6mO9sNbAZBSEdaN%2Fuploads%2FXIW8AS7d3mplUTa737Ac%2Fimage.png?alt=media&amp;token=09aeab82-5641-4a5f-8cea-d67a2d1d7a27" alt=""><figcaption></figcaption></figure>

Step 2: Modify the details and click "Submit" to implement the new changes made.

<figure><img src="https://1526800164-files.gitbook.io/~/files/v0/b/gitbook-x-prod.appspot.com/o/spaces%2F50DeL6mO9sNbAZBSEdaN%2Fuploads%2FWrQiFDa836OZxNRAvb3o%2Fimage.png?alt=media&amp;token=ddaabaed-3746-40e7-bcc8-36ab1a128c7e" alt=""><figcaption></figcaption></figure>

**Remark:**

* The current user can edit the sales records created by themselves.
* The current user can edit sales records created by other users if they have the permission to edit for the customer.

### 2.5 Delete&#x20;

#### 2.5.1 Single Delete&#x20;

Step 1: On the right-side of the data row, click more ···, and click "Delete".

<figure><img src="https://1526800164-files.gitbook.io/~/files/v0/b/gitbook-x-prod.appspot.com/o/spaces%2F50DeL6mO9sNbAZBSEdaN%2Fuploads%2FSTryS5DknYDsCuCKwmCx%2Fimage.png?alt=media&amp;token=fa24de0b-a3ee-4c3f-9604-60bcf5bb6a8a" alt=""><figcaption></figcaption></figure>

Step 2: Confirm the delete operation, and the data will be deleted and removed from the list.

<figure><img src="https://1526800164-files.gitbook.io/~/files/v0/b/gitbook-x-prod.appspot.com/o/spaces%2F50DeL6mO9sNbAZBSEdaN%2Fuploads%2FWJ6ozu9H12WTIuIJazr0%2Fimage.png?alt=media&amp;token=a99d70e9-00a5-4094-a794-63a8adeea4aa" alt="" width="297"><figcaption></figcaption></figure>

#### 2.5.2 Batch Delete

Step 1: Select the data to be deleted, click "Batch delete" on the bottom left of the page.

<figure><img src="https://1526800164-files.gitbook.io/~/files/v0/b/gitbook-x-prod.appspot.com/o/spaces%2F50DeL6mO9sNbAZBSEdaN%2Fuploads%2FodPWneVXSub43MUT8PLl%2Fimage.png?alt=media&amp;token=60d3b1d5-f4ae-4752-8cc1-29ea7d510cb9" alt=""><figcaption></figcaption></figure>

Step 2: Confirm the delete operation, and the data will be deleted and removed from the list.

<figure><img src="https://1526800164-files.gitbook.io/~/files/v0/b/gitbook-x-prod.appspot.com/o/spaces%2F50DeL6mO9sNbAZBSEdaN%2Fuploads%2FAS4tAG2cI0lvQBChJ4tZ%2Fimage.png?alt=media&amp;token=1cbc0fd4-9f60-4828-9981-1e42d9a233fa" alt="" width="297"><figcaption></figcaption></figure>

<figure><img src="https://1526800164-files.gitbook.io/~/files/v0/b/gitbook-x-prod.appspot.com/o/spaces%2F50DeL6mO9sNbAZBSEdaN%2Fuploads%2FPdmlY6yW0cOliCHFlvz9%2Fimage.png?alt=media&amp;token=85e04c6c-00a0-4af8-a286-1b60f8179722" alt="" width="272"><figcaption><p>Deletion success notification pop-up box</p></figcaption></figure>

**Remark:**

* The current user can delete the sales records created by themselves.
* The current user can delete sales records created by other users if they have the permission to edit for the customer.

### 2.6 Log

Step 1: Open the Sales Record details, and it will display on the right-side of the page.

Option 1: Click on the data row directly.

<figure><img src="https://1526800164-files.gitbook.io/~/files/v0/b/gitbook-x-prod.appspot.com/o/spaces%2F50DeL6mO9sNbAZBSEdaN%2Fuploads%2Fhw7ApcFiJwdARm0hlVgH%2Fimage.png?alt=media&amp;token=9c04f255-0fae-4b04-b151-b1d9861b5b29" alt=""><figcaption></figcaption></figure>

Option 2: Go to the right-side of the data row, click more ···, and click "View".

<figure><img src="https://1526800164-files.gitbook.io/~/files/v0/b/gitbook-x-prod.appspot.com/o/spaces%2F50DeL6mO9sNbAZBSEdaN%2Fuploads%2Fg9a7KzqaBIoPbpYUI23J%2Fimage.png?alt=media&amp;token=5cc2e285-25d6-4cfa-b1c2-1682da5c56aa" alt=""><figcaption></figcaption></figure>

Step 2: Click on the "Log" tab to view the log details.

<figure><img src="https://1526800164-files.gitbook.io/~/files/v0/b/gitbook-x-prod.appspot.com/o/spaces%2F50DeL6mO9sNbAZBSEdaN%2Fuploads%2FJfnwpfLwQJ5tv9CTrkJb%2Fimage.png?alt=media&amp;token=8bfe63aa-8408-4f71-b793-f7828b345f6c" alt=""><figcaption></figcaption></figure>

The log data can be filtered by log type through the operation type, by the creation time using the existing time filter, or by customizing the range with the "Time range" button. Additionally, the \[Search log] search box is used to search for log content.

<figure><img src="https://1526800164-files.gitbook.io/~/files/v0/b/gitbook-x-prod.appspot.com/o/spaces%2F50DeL6mO9sNbAZBSEdaN%2Fuploads%2Fz0Zi9IwNFSIcs9JnWfzD%2Fimage.png?alt=media&amp;token=79e26837-6b43-4d1f-ae7d-8fef2e53bc18" alt=""><figcaption></figcaption></figure>

## 3 Import/Export&#x20;

### 3.1 Import&#x20;

Step 1: In the top-right corner of the page, click "Import".

<figure><img src="https://1526800164-files.gitbook.io/~/files/v0/b/gitbook-x-prod.appspot.com/o/spaces%2F50DeL6mO9sNbAZBSEdaN%2Fuploads%2F5AFtgHEfnw2Ji2939T97%2Fimage.png?alt=media&amp;token=575db455-142f-42e4-96d9-08c312e0244c" alt=""><figcaption></figcaption></figure>

Step 2: Export the template by clicking on "Export template".

<figure><img src="https://1526800164-files.gitbook.io/~/files/v0/b/gitbook-x-prod.appspot.com/o/spaces%2F50DeL6mO9sNbAZBSEdaN%2Fuploads%2FqvrLKC8kawz4Ca5jNAEJ%2Fimage.png?alt=media&amp;token=fbb97d63-8272-424a-aa6f-ac48dcf22f74" alt=""><figcaption></figcaption></figure>

Step 3: Fill up the Excel template.

<figure><img src="https://1526800164-files.gitbook.io/~/files/v0/b/gitbook-x-prod.appspot.com/o/spaces%2F50DeL6mO9sNbAZBSEdaN%2Fuploads%2F5Lf9zRZBXcgupWFHsK8r%2Fimage.png?alt=media&amp;token=0cb36959-4a8d-48a0-9569-b837c72a41fd" alt=""><figcaption></figcaption></figure>

Step 4: Select the updated Excel file by double-clicking on the file or click on the file and click "Open".

<figure><img src="https://1526800164-files.gitbook.io/~/files/v0/b/gitbook-x-prod.appspot.com/o/spaces%2F50DeL6mO9sNbAZBSEdaN%2Fuploads%2Fadr3OsukeY4mbFD6rYsW%2Fimage.png?alt=media&amp;token=4c3365ae-4c3f-4d70-98db-0e8a0d07af6a" alt=""><figcaption></figcaption></figure>

Step 5: Click on "Start importing" to begin the import.

<figure><img src="https://1526800164-files.gitbook.io/~/files/v0/b/gitbook-x-prod.appspot.com/o/spaces%2F50DeL6mO9sNbAZBSEdaN%2Fuploads%2FI5BNjQCCX0EfsonWjoil%2Fimage.png?alt=media&amp;token=6a98f5d8-4078-4bfa-bbc3-612ac44eef3e" alt=""><figcaption></figcaption></figure>

Status message will pop-up once done.

<figure><img src="https://1526800164-files.gitbook.io/~/files/v0/b/gitbook-x-prod.appspot.com/o/spaces%2F50DeL6mO9sNbAZBSEdaN%2Fuploads%2FIqOY1hhGRTIfLiR5I7g3%2Fimage.png?alt=media&amp;token=ed720ebf-3787-4776-acb2-b239d2914e19" alt="" width="278"><figcaption></figcaption></figure>

<figure><img src="https://1526800164-files.gitbook.io/~/files/v0/b/gitbook-x-prod.appspot.com/o/spaces%2F50DeL6mO9sNbAZBSEdaN%2Fuploads%2FCHYufbvdxIPmC6tEiuh3%2Fimage.png?alt=media&amp;token=76532f54-1c98-43b3-8336-e70590d87dd0" alt="" width="276"><figcaption></figcaption></figure>

When the import is complete, an Excel file will be generated to inform the user of the import status of all rows and provide an error message if the import failed.

### 3.2 Export&#x20;

Step 1: In the top-right corner of the page, click "Export".

<figure><img src="https://1526800164-files.gitbook.io/~/files/v0/b/gitbook-x-prod.appspot.com/o/spaces%2F50DeL6mO9sNbAZBSEdaN%2Fuploads%2FOsWIVdHvAKxKlB78Cok3%2Fimage.png?alt=media&amp;token=1a45845b-0622-4bee-a74f-a64c0a970e16" alt=""><figcaption></figcaption></figure>

Step 2: Select or de-select fields to be exported, and click "Confirm" to begin the process.

<figure><img src="https://1526800164-files.gitbook.io/~/files/v0/b/gitbook-x-prod.appspot.com/o/spaces%2F50DeL6mO9sNbAZBSEdaN%2Fuploads%2FHtOukzLkdLn1nvNoMa62%2Fimage.png?alt=media&amp;token=cbe37a6a-c39a-4a72-bb1c-74f3fcc2cc01" alt=""><figcaption></figcaption></figure>

The system will automatically generate and download the exported data in Excel format onto the user's device.

<figure><img src="https://1526800164-files.gitbook.io/~/files/v0/b/gitbook-x-prod.appspot.com/o/spaces%2F50DeL6mO9sNbAZBSEdaN%2Fuploads%2Fmg6fRXyvV9FD0ohsG31g%2Fimage.png?alt=media&amp;token=fe9081e5-b61d-4b27-874e-602c7724898a" alt=""><figcaption></figcaption></figure>

**Remark:**

* This will export all the data that is shown on the current display list, across all pages. If your settings for the list are set to 10 results per page, the export will still include all existing data.
* The user can also export the desired data by filtering, searching, and applying query conditions before the export.

## 4 Filtering/Searching&#x20;

### 4.1 Filter

<figure><img src="https://1526800164-files.gitbook.io/~/files/v0/b/gitbook-x-prod.appspot.com/o/spaces%2F50DeL6mO9sNbAZBSEdaN%2Fuploads%2FY9IwYXkaxdJIT8V5Zh56%2Fimage.png?alt=media&amp;token=518fdf42-aa34-45e2-8bd1-fdccfb0acd43" alt=""><figcaption></figcaption></figure>

<figure><img src="https://1526800164-files.gitbook.io/~/files/v0/b/gitbook-x-prod.appspot.com/o/spaces%2F50DeL6mO9sNbAZBSEdaN%2Fuploads%2FLkDyzAd9i0UVDzGDlJQ7%2Fimage.png?alt=media&amp;token=ed8d0fc3-cbb1-4661-adb7-49e2e995c1d3" alt=""><figcaption></figcaption></figure>

### 4.2 Search

#### 4.2.1 Simple Query

The users is able to filter contact logs with product name or salesperson or customer's name that are similar/matched to the text entered in the search box.

<figure><img src="https://1526800164-files.gitbook.io/~/files/v0/b/gitbook-x-prod.appspot.com/o/spaces%2F50DeL6mO9sNbAZBSEdaN%2Fuploads%2FVY71lEImACMGwJgT2ok5%2Fimage.png?alt=media&amp;token=59e4f68e-4fdb-4c84-88ae-0c050a004491" alt=""><figcaption></figcaption></figure>

#### 4.2.2 Advance Query

The \[Advance Query] allows the users to create complex searches or filters by specifying detailed conditions and criteria.

\
Step 1: Click on the ![](https://1526800164-files.gitbook.io/~/files/v0/b/gitbook-x-prod.appspot.com/o/spaces%2F50DeL6mO9sNbAZBSEdaN%2Fuploads%2FnjJDSlZsrXudSlnc2TJ3%2Fimage.png?alt=media\&token=b1563e72-8c52-4583-9815-c9e73c48356d)icon next to the search box.

<figure><img src="https://1526800164-files.gitbook.io/~/files/v0/b/gitbook-x-prod.appspot.com/o/spaces%2F50DeL6mO9sNbAZBSEdaN%2Fuploads%2F6HLNgVjAR96O0LsGsA2g%2Fimage.png?alt=media&amp;token=5a7ba173-2a50-4fe1-adc7-b4aaf34f9273" alt=""><figcaption></figcaption></figure>

Step 2: Fill in the relevant condition and click on "Search".

<figure><img src="https://1526800164-files.gitbook.io/~/files/v0/b/gitbook-x-prod.appspot.com/o/spaces%2F50DeL6mO9sNbAZBSEdaN%2Fuploads%2FBv66COEVkf6w5cttTVas%2Fimage.png?alt=media&amp;token=eaa306f3-3944-4fda-9891-53df01ffe42f" alt=""><figcaption></figcaption></figure>


# Contracts

## 1 Create new contract

Step 1: In the top-right side of the page, click "Add".

<figure><img src="https://1526800164-files.gitbook.io/~/files/v0/b/gitbook-x-prod.appspot.com/o/spaces%2F50DeL6mO9sNbAZBSEdaN%2Fuploads%2FYVRKoDJeH7svLCvOAt3S%2Fimage.png?alt=media&amp;token=7b28ce91-6dc9-47ac-b26a-1d58f99ecdae" alt=""><figcaption></figcaption></figure>

Step 2: Fill in the relevant details and click "Save" to create new contract information.

<figure><img src="https://1526800164-files.gitbook.io/~/files/v0/b/gitbook-x-prod.appspot.com/o/spaces%2F50DeL6mO9sNbAZBSEdaN%2Fuploads%2FWgcz7SW469nOxDEaPbtP%2Fimage.png?alt=media&amp;token=4164c102-1ec2-48ce-9052-c27c45d34363" alt=""><figcaption></figcaption></figure>

* Customers: The user can only select the customer that they have permission to view. (According to pool and sharing settings)
* Expiration reminder: If the creator selects \[Yes], a message will be sent to the account executive at 9:00 a.m. on the reminder date.&#x20;
* Payment Information: The user may add as much payment information as they like by clicking ![](https://1526800164-files.gitbook.io/~/files/v0/b/gitbook-x-prod.appspot.com/o/spaces%2F50DeL6mO9sNbAZBSEdaN%2Fuploads%2FVc0pQp9MYNfj2etSPcia%2Fimage.png?alt=media\&token=5206ea50-a798-4c19-9ee3-5c02f9b2453a)to add more rows or ![](https://1526800164-files.gitbook.io/~/files/v0/b/gitbook-x-prod.appspot.com/o/spaces%2F50DeL6mO9sNbAZBSEdaN%2Fuploads%2FNqBi1UWdJatuXW5mpMcJ%2Fimage.png?alt=media\&token=3d96dd26-ebfc-48e4-a889-97e28b8610d6)to remove rows. Payment information can also be imported using ![](https://1526800164-files.gitbook.io/~/files/v0/b/gitbook-x-prod.appspot.com/o/spaces%2F50DeL6mO9sNbAZBSEdaN%2Fuploads%2FA0yytN9HKhhq3D7zrp4P%2Fimage.png?alt=media\&token=6040d0b7-68c9-42d4-85a2-4683a4460bf4)just like the standard import function.

<figure><img src="https://1526800164-files.gitbook.io/~/files/v0/b/gitbook-x-prod.appspot.com/o/spaces%2F50DeL6mO9sNbAZBSEdaN%2Fuploads%2FZuVbodpW2lAhWZm9kjgb%2Fimage.png?alt=media&amp;token=c81c5e88-c053-4107-b4eb-7fd18826d428" alt=""><figcaption></figcaption></figure>

**Remark:**

As long as the users have the permission to access the \[Contracts] menu, they are able to create new contracts.

## 2 Contract Payment Reminder

IM Screenshot

## 3 Data Operation

### 3.1 List Data

The user can view all the contracts of the customers that they have been granted permission to view.

<figure><img src="https://1526800164-files.gitbook.io/~/files/v0/b/gitbook-x-prod.appspot.com/o/spaces%2F50DeL6mO9sNbAZBSEdaN%2Fuploads%2Fxz7uOIBAEW7FN3SGQvG9%2Fimage.png?alt=media&amp;token=07636ba2-cc7d-4371-88d1-c6fad8815020" alt=""><figcaption></figcaption></figure>

### 3.2 View Contract Details

Step 1: Open the details page, it will appear in a pop-up window on the right side of the page.\
Option 1: Click on the data row directly.

<figure><img src="https://1526800164-files.gitbook.io/~/files/v0/b/gitbook-x-prod.appspot.com/o/spaces%2F50DeL6mO9sNbAZBSEdaN%2Fuploads%2FSxux1EAa11phnIf0GQp0%2Fimage.png?alt=media&amp;token=578e9934-d740-4e4f-89f5-6c56036e7efa" alt=""><figcaption></figcaption></figure>

Option 2: On the right side of the data row, click on "more ···" and then click "View".

<figure><img src="https://1526800164-files.gitbook.io/~/files/v0/b/gitbook-x-prod.appspot.com/o/spaces%2F50DeL6mO9sNbAZBSEdaN%2Fuploads%2FrHkWOPmco7GycaFiqhWe%2Fimage.png?alt=media&amp;token=c5dbd109-661c-4a22-8e39-c4bd86e06ba6" alt=""><figcaption></figcaption></figure>

<figure><img src="https://1526800164-files.gitbook.io/~/files/v0/b/gitbook-x-prod.appspot.com/o/spaces%2F50DeL6mO9sNbAZBSEdaN%2Fuploads%2FPg1EI2zaQcSNhX3xC44H%2Fimage.png?alt=media&amp;token=d27a5f4c-9369-46d8-aa46-b337ae7bda32" alt=""><figcaption></figcaption></figure>

### 3.3 View Customer Details

Click on the field \[Customer Name].

<figure><img src="https://1526800164-files.gitbook.io/~/files/v0/b/gitbook-x-prod.appspot.com/o/spaces%2F50DeL6mO9sNbAZBSEdaN%2Fuploads%2Fz8X91jqfhGCcJjhrqwOU%2Fimage.png?alt=media&amp;token=e865601e-5a7b-4d56-aef4-d9e7fbe7c651" alt=""><figcaption></figcaption></figure>

The customer information details will be displayed in a pop-up window on the right side of the page.

<figure><img src="https://1526800164-files.gitbook.io/~/files/v0/b/gitbook-x-prod.appspot.com/o/spaces%2F50DeL6mO9sNbAZBSEdaN%2Fuploads%2FnjS0edUp4xjdRUkUlLY7%2Fimage.png?alt=media&amp;token=0d96b500-7520-44a0-ada6-3f9e61d56058" alt=""><figcaption></figcaption></figure>

### 3.4 Edit

Step 1: On the right-side of the data row, click more ···, and click "Edit".

<figure><img src="https://1526800164-files.gitbook.io/~/files/v0/b/gitbook-x-prod.appspot.com/o/spaces%2F50DeL6mO9sNbAZBSEdaN%2Fuploads%2FrUOyUEIrUhtUs73UNxnF%2Fimage.png?alt=media&amp;token=643243aa-c507-4828-a7dd-474f48e65283" alt=""><figcaption></figcaption></figure>

Step 2: Modify the details and click "Save" to implement the new changes made.

<figure><img src="https://1526800164-files.gitbook.io/~/files/v0/b/gitbook-x-prod.appspot.com/o/spaces%2F50DeL6mO9sNbAZBSEdaN%2Fuploads%2FEvgiNinzHKV6B7k23PpK%2Fimage.png?alt=media&amp;token=5f9012b4-ae36-4cef-8738-38f214b2c1a0" alt=""><figcaption></figcaption></figure>

**Remark:**

The contract creator can edit the data they've created and/or the contract created by other users but the current user has the customer's data edit permission.

### 3.5 Delete

#### 3.5.1 Single Delete

Step 1: On the right-side of the data row, click more ···, and click "Delete".

<figure><img src="https://1526800164-files.gitbook.io/~/files/v0/b/gitbook-x-prod.appspot.com/o/spaces%2F50DeL6mO9sNbAZBSEdaN%2Fuploads%2FAz9ayCRFotZdCm2C9pFo%2Fimage.png?alt=media&amp;token=242376fc-ceda-40cc-bd1f-18104f04a150" alt=""><figcaption></figcaption></figure>

Step 2: Confirm the delete operation, and the data will be deleted and removed from the list.

<figure><img src="https://1526800164-files.gitbook.io/~/files/v0/b/gitbook-x-prod.appspot.com/o/spaces%2F50DeL6mO9sNbAZBSEdaN%2Fuploads%2FlnUIfoA4koyQc8XPCizj%2Fimage.png?alt=media&amp;token=a9fffcfc-31de-4f3d-a4ab-d2e98d5595c7" alt="" width="297"><figcaption></figcaption></figure>

#### 3.5.2 Batch Delete

Step 1: Select the data to be deleted, click "Batch delete" on the bottom left of the page.

<figure><img src="https://1526800164-files.gitbook.io/~/files/v0/b/gitbook-x-prod.appspot.com/o/spaces%2F50DeL6mO9sNbAZBSEdaN%2Fuploads%2F4utqe1PZySJ1hkMWLU1u%2Fimage.png?alt=media&amp;token=e027d92a-d741-4a0e-a9ee-32661e76aedc" alt=""><figcaption></figcaption></figure>

Step 2: Confirm the delete operation, and the data will be deleted and removed from the list.

<figure><img src="https://1526800164-files.gitbook.io/~/files/v0/b/gitbook-x-prod.appspot.com/o/spaces%2F50DeL6mO9sNbAZBSEdaN%2Fuploads%2FLpAfCiU5hbRqJl3WrptF%2Fimage.png?alt=media&amp;token=7f7b9b80-3823-4d4d-899b-185fe10a5c16" alt="" width="297"><figcaption></figcaption></figure>

<figure><img src="https://1526800164-files.gitbook.io/~/files/v0/b/gitbook-x-prod.appspot.com/o/spaces%2F50DeL6mO9sNbAZBSEdaN%2Fuploads%2FDsdpi06sPPCdK0f5TFIJ%2Fimage.png?alt=media&amp;token=73abe410-a613-412f-84ba-abed6a4fb9a4" alt="" width="272"><figcaption><p>Deletion success notification pop-up box</p></figcaption></figure>

### 3.6 Log

Step 1: Open the Contract details, and it will display on the right-side of the page.

Option 1: Click on the data row directly.

<figure><img src="https://1526800164-files.gitbook.io/~/files/v0/b/gitbook-x-prod.appspot.com/o/spaces%2F50DeL6mO9sNbAZBSEdaN%2Fuploads%2FxgpwyfCnttvnvUaCj333%2Fimage.png?alt=media&amp;token=d2e0702a-4f96-4441-8766-a5c05d285370" alt=""><figcaption></figcaption></figure>

Option 2: Go to the right-side of the data row, click more ···, and click "View".&#x20;

<figure><img src="https://1526800164-files.gitbook.io/~/files/v0/b/gitbook-x-prod.appspot.com/o/spaces%2F50DeL6mO9sNbAZBSEdaN%2Fuploads%2FbBjLW2E4Iwd0DMc3BBQF%2Fimage.png?alt=media&amp;token=c6e7e28a-05f5-42dc-b7e9-46492014485c" alt=""><figcaption></figcaption></figure>

Step 2: Click on the "Log" tab to view the log details.

<figure><img src="https://1526800164-files.gitbook.io/~/files/v0/b/gitbook-x-prod.appspot.com/o/spaces%2F50DeL6mO9sNbAZBSEdaN%2Fuploads%2F9SKephDQoXTaRkFLxf2Q%2Fimage.png?alt=media&amp;token=8eaa6b13-aa09-46ce-9ff9-d52ddd146218" alt=""><figcaption></figcaption></figure>

The log data can be filtered by log type through the operation type, by the creation time using the existing time filter, or by customizing the range with the "Time range" button. Additionally, the \[Search log] search box is used to search for log content.

<figure><img src="https://1526800164-files.gitbook.io/~/files/v0/b/gitbook-x-prod.appspot.com/o/spaces%2F50DeL6mO9sNbAZBSEdaN%2Fuploads%2Fbyd4yXZ8u0DzjEv7YZwc%2Fimage.png?alt=media&amp;token=9fcf57b4-0bc2-43c8-8e63-54cd7aad5496" alt=""><figcaption></figcaption></figure>

## 4 Export

Step 1: In the top-right corner of the page, click "Export".

<figure><img src="https://1526800164-files.gitbook.io/~/files/v0/b/gitbook-x-prod.appspot.com/o/spaces%2F50DeL6mO9sNbAZBSEdaN%2Fuploads%2FVMvKfC2SOq9L4qUnaS2a%2Fimage.png?alt=media&amp;token=2d3abccb-affc-44ca-8a1a-fba0e8bd313c" alt=""><figcaption></figcaption></figure>

Step 2: Select or de-select fields to be exported, and click "Confirm" to begin the process.

<figure><img src="https://1526800164-files.gitbook.io/~/files/v0/b/gitbook-x-prod.appspot.com/o/spaces%2F50DeL6mO9sNbAZBSEdaN%2Fuploads%2FgEEANqt0jDHpP5KZ8lrl%2Fimage.png?alt=media&amp;token=183ae36a-3991-4685-b13d-ce798a150692" alt=""><figcaption></figcaption></figure>

The system will automatically generate and download the exported data in Excel format onto the user's device.

<figure><img src="https://1526800164-files.gitbook.io/~/files/v0/b/gitbook-x-prod.appspot.com/o/spaces%2F50DeL6mO9sNbAZBSEdaN%2Fuploads%2FRWA3V8bWJAmhtTUwCzXs%2Fimage.png?alt=media&amp;token=6465e24c-ad1d-4f4e-b6e7-fb1b68f2dec5" alt=""><figcaption></figcaption></figure>

**Remark:**

* This will export all the data that is shown on the current display list, across all pages. If your settings for the list are set to 10 results per page, the export will still include all existing data.
* The user can also export the desired data by filtering, searching, and applying query conditions before the export.

## 5 Filtering/Searching

### 5.1 Filter

Click on "More filters" to view more filtering option.

<figure><img src="https://1526800164-files.gitbook.io/~/files/v0/b/gitbook-x-prod.appspot.com/o/spaces%2F50DeL6mO9sNbAZBSEdaN%2Fuploads%2FaqzbfAdRtQIlycbSk2HL%2Fimage.png?alt=media&amp;token=5509e51a-a45d-4915-a2ee-d0186c7bd0e4" alt=""><figcaption></figcaption></figure>

### 5.2 Search

#### 5.2.1 Simple Query

The users is able to filter contract with contracts' name that are similar/matched to the text entered in the search box.

<figure><img src="https://1526800164-files.gitbook.io/~/files/v0/b/gitbook-x-prod.appspot.com/o/spaces%2F50DeL6mO9sNbAZBSEdaN%2Fuploads%2FMmVH0J7UIwHyz0SVSkEr%2Fimage.png?alt=media&amp;token=7edb62cb-6e31-4a37-867b-ec241b4eb844" alt=""><figcaption></figcaption></figure>

#### 5.2.2 Advance Query

The \[Advance Query] allows the users to create complex searches or filters by specifying detailed conditions and criteria.

Step 1: Click on the ![](https://eohelp.weaverintl.com/~gitbook/image?url=https%3A%2F%2F1526800164-files.gitbook.io%2F%7E%2Ffiles%2Fv0%2Fb%2Fgitbook-x-prod.appspot.com%2Fo%2Fspaces%252F50DeL6mO9sNbAZBSEdaN%252Fuploads%252FiEfVlSzniIeYu3jlhfLf%252Fimage.png%3Falt%3Dmedia%26token%3Dad1c38f3-3cab-4647-9272-8326c637299e\&width=300\&dpr=4\&quality=100\&sign=868175da\&sv=1)icon next to the search box.

<figure><img src="https://1526800164-files.gitbook.io/~/files/v0/b/gitbook-x-prod.appspot.com/o/spaces%2F50DeL6mO9sNbAZBSEdaN%2Fuploads%2FZxbZdaQILeQPQ99tTxsb%2Fimage.png?alt=media&amp;token=5174ebad-11a5-4feb-b6c3-3f5d95753304" alt=""><figcaption></figcaption></figure>

Step 2: Fill in the relevant condition and click on "Search".

<figure><img src="https://1526800164-files.gitbook.io/~/files/v0/b/gitbook-x-prod.appspot.com/o/spaces%2F50DeL6mO9sNbAZBSEdaN%2Fuploads%2FsFd4fiyaNvivyCAJ2TKZ%2Fimage.png?alt=media&amp;token=b2f7d92a-fbba-4f9d-abba-229b85c7638f" alt=""><figcaption></figcaption></figure>


# Customer Pool

Customer Pool is a shared library of customer information within our company. It allows all related personnel to collect and share important details about customers in one accessible place.

## 1 Data Presentation

<figure><img src="https://1526800164-files.gitbook.io/~/files/v0/b/gitbook-x-prod.appspot.com/o/spaces%2F50DeL6mO9sNbAZBSEdaN%2Fuploads%2FeZxcnxHNIEDkU9bhwMB9%2Fimage.png?alt=media&amp;token=4942a27b-8269-4e0e-9e8b-877bbf83920e" alt=""><figcaption></figcaption></figure>

Description:

* The customer pool page is categorized into Public Pool, Pool I Manage, and Pool I Participate.
* **Public Pool**: Users assigned by the system administrator to view large customer groups are listed as “Public Pool” in the customer oceans list.
* **Pool I Manage**: Data from public pool where the current user manages the Pool group.
* **Pool I Joined**: Pool where the current user is part of Pool group's member.

### 1.1 Pool I Managed

<figure><img src="https://1526800164-files.gitbook.io/~/files/v0/b/gitbook-x-prod.appspot.com/o/spaces%2F50DeL6mO9sNbAZBSEdaN%2Fuploads%2Fmu6khH6rQsYZfbWlczzq%2Fimage.png?alt=media&amp;token=fb7e957f-fd6e-4416-9c96-e8ca108320b1" alt="" width="209"><figcaption></figcaption></figure>

{% content-ref url="/pages/zG5F1u4whQ6orNtZbrA9" %}
[Pools I Managed](https://eohelp.weaver.com.co/crm/details/customer-pool/pools-i-managed)
{% endcontent-ref %}

### 1.2 Pool I Joined

<figure><img src="https://1526800164-files.gitbook.io/~/files/v0/b/gitbook-x-prod.appspot.com/o/spaces%2F50DeL6mO9sNbAZBSEdaN%2Fuploads%2F9MnJ6bEUG0XyXleMLKGE%2Fimage.png?alt=media&amp;token=b119c82b-b865-4acc-bed0-ae57dac12910" alt=""><figcaption></figcaption></figure>

Description:

* "Pool I Manage" displays all the pools where the current user is the administrator.
* When hovering over each section, you can directly see the data and ratio of assigned and unassigned customers for the day.

<figure><img src="https://1526800164-files.gitbook.io/~/files/v0/b/gitbook-x-prod.appspot.com/o/spaces%2F50DeL6mO9sNbAZBSEdaN%2Fuploads%2FuEfmQfJjfPpHsARhpXAh%2Fimage.png?alt=media&amp;token=24cbcfe2-a088-45b8-b4dd-b19d069e6a5f" alt=""><figcaption></figcaption></figure>

{% content-ref url="/pages/Xy1UOF56Hgwsf0bVBhlz" %}
[Pools I Joined](https://eohelp.weaver.com.co/crm/details/customer-pool/pools-i-joined)
{% endcontent-ref %}


# Pools I Managed

<figure><img src="https://1526800164-files.gitbook.io/~/files/v0/b/gitbook-x-prod.appspot.com/o/spaces%2F50DeL6mO9sNbAZBSEdaN%2Fuploads%2F7K4AEalfFgaZ5V8RjYu2%2Fimage.png?alt=media&amp;token=13f6e039-08d5-4a0a-a34f-1c0a6a393390" alt=""><figcaption></figcaption></figure>

Remark:

* "My manage pool” shows all pools managed by the current user as the administrator.
* Allocated and unallocated customer data and ratios for the day can be seen directly by hovering your mouse over the chart.

## 1. List Data

Click on the chart to view the current pool's list data.

<figure><img src="https://1526800164-files.gitbook.io/~/files/v0/b/gitbook-x-prod.appspot.com/o/spaces%2F50DeL6mO9sNbAZBSEdaN%2Fuploads%2FPHNz7X9P0hjVmYcpx2uo%2Fimage.png?alt=media&amp;token=bad369d4-f8a9-4389-9f7f-f7e7629b39bc" alt=""><figcaption></figcaption></figure>

Remark:

* All the customer data in the pool, whether or not there is an account executive, is displayed.
* Users who already have permission to view/edit customer data in the list can still click to view the details, add customer contact records, and perform other related operations; if you do not have permission to view, clicking on the list data will only prompt "No permission to view the current customer details".

## 2. Pick up

<figure><img src="https://1526800164-files.gitbook.io/~/files/v0/b/gitbook-x-prod.appspot.com/o/spaces%2F50DeL6mO9sNbAZBSEdaN%2Fuploads%2FAJwGg5FhkyUUJ7Tlfouj%2Fimage.png?alt=media&amp;token=3c20b8b9-3cbc-4d35-917c-68fbbb40256e" alt=""><figcaption></figcaption></figure>

Remark:&#x20;

* If no account executive is assigned, the \[Pickup] button will be available under \[···]. You can click it to pickup the customer and become the account executive for the respective customer.
* You can pick up the customers in batches by selecting them and clicking on "Pick up" at the bottom of the page. If any customer is already assigned to an account manager, the error “Only unassigned customers can be picked up" will be displayed, and the pickup will fail.
* The operation will be recorded in the customer log, log type: "Pick customer".

## 3. Return to the high seas

Return the customer to the customer pool for other member to pick up

<figure><img src="https://1526800164-files.gitbook.io/~/files/v0/b/gitbook-x-prod.appspot.com/o/spaces%2F50DeL6mO9sNbAZBSEdaN%2Fuploads%2FHvRfZczBuiAambTNJp6R%2Fimage.png?alt=media&amp;token=71445c4f-8afd-4402-94b0-5d1df0d09762" alt=""><figcaption></figcaption></figure>

Remark:

* The administrator can perform the operation \[Return to the high seas] for all customers, including those with account executives.
* Single Return: Using the \[Return to the high seas] button, which is displayed under \[···]. A dialog box will appear; enter the reason and then click \[Confirm] to complete the operation.
* Batch Return: Tick the customer to be returned and click on the \[Return to the high seas] button on the bottom of the page, then fill in the reason for return.&#x20;
* When there are customers without account managers among the selected customers, the batch return will prompt “Only return the customers that have been assigned”, and all the selected customers will fail to be returned.

<figure><img src="https://1526800164-files.gitbook.io/~/files/v0/b/gitbook-x-prod.appspot.com/o/spaces%2F50DeL6mO9sNbAZBSEdaN%2Fuploads%2FTNmxTDCLNrFYNv9KPYAM%2Fimage.png?alt=media&amp;token=5894e6d7-9a08-47b4-bf90-99816c04f546" alt="" width="404"><figcaption></figcaption></figure>

* The "Account Executive" for the successfully returned customers will be empty.

<figure><img src="https://1526800164-files.gitbook.io/~/files/v0/b/gitbook-x-prod.appspot.com/o/spaces%2F50DeL6mO9sNbAZBSEdaN%2Fuploads%2F40HhZ5e4fiwMQhO53mSz%2Fimage.png?alt=media&amp;token=1fd0c1fa-246a-40e6-9abb-b37ccc718bb2" alt=""><figcaption></figcaption></figure>

* The pickup operation will be recorded in the customer log, log type: “Back customer”.

## 4. Change the grouping

Select the customer and click \[Change the grouping] to transfer them to another pool.

<figure><img src="https://1526800164-files.gitbook.io/~/files/v0/b/gitbook-x-prod.appspot.com/o/spaces%2F50DeL6mO9sNbAZBSEdaN%2Fuploads%2FhbCvzaBMKo13bqaKkBCy%2Fimage.png?alt=media&amp;token=cbd598f1-047a-4df8-a20b-6d7c2fd3de14" alt=""><figcaption></figcaption></figure>

<figure><img src="https://1526800164-files.gitbook.io/~/files/v0/b/gitbook-x-prod.appspot.com/o/spaces%2F50DeL6mO9sNbAZBSEdaN%2Fuploads%2F1Nyxg2lietrWyQd63qHV%2Fimage.png?alt=media&amp;token=50fea9a8-91dc-4d07-9c9d-652f5cc21a4a" alt=""><figcaption></figcaption></figure>

Remark:&#x20;

* Administrator can change the grouping operation for all customer data in the pool.
* If the customer data meets the allocation mechanism in the new group, the account executives will be matched automatically according to the rules.
* A reminder will pop up on the page when \[Change the grouping] is performed. After changing the grouping, the current account executive will be cleared, and changes take effect immediately.&#x20;
* The operation will be recorded in the customer log, log type: "".

<figure><img src="https://1526800164-files.gitbook.io/~/files/v0/b/gitbook-x-prod.appspot.com/o/spaces%2F50DeL6mO9sNbAZBSEdaN%2Fuploads%2F9fGNDnySr0wPHw9fDB35%2Fimage.png?alt=media&amp;token=fae1efdd-9078-4df0-ad41-ef3396827dfd" alt="" width="295"><figcaption></figcaption></figure>

## 5. Assign Account Executive

### 5.1 Appointed Account Executive

<figure><img src="https://1526800164-files.gitbook.io/~/files/v0/b/gitbook-x-prod.appspot.com/o/spaces%2F50DeL6mO9sNbAZBSEdaN%2Fuploads%2Fq47lTAHhO9LI7l811nxa%2Fimage.png?alt=media&amp;token=033decb7-e81d-4060-9f31-585a1036edd7" alt=""><figcaption></figcaption></figure>

Remark:&#x20;

* Administrator can change the Account Manager for all customer data in the pool.
* Select the customer, click \[Appointed Account Manager], select the user, and click "Confirm" to update the account executive for the selected customer.&#x20;

<figure><img src="https://1526800164-files.gitbook.io/~/files/v0/b/gitbook-x-prod.appspot.com/o/spaces%2F50DeL6mO9sNbAZBSEdaN%2Fuploads%2FDi91rLPkC3w6o5kC8gWr%2Fimage.png?alt=media&amp;token=e4c75bdb-8a38-4a5b-9235-b4955ff274af" alt=""><figcaption></figcaption></figure>

<figure><img src="https://1526800164-files.gitbook.io/~/files/v0/b/gitbook-x-prod.appspot.com/o/spaces%2F50DeL6mO9sNbAZBSEdaN%2Fuploads%2FQT6QfhH6coEWGX0BAHZp%2Fimage.png?alt=media&amp;token=f5e95e7a-4d29-4166-80dd-0795a98eb3d9" alt=""><figcaption></figcaption></figure>

* Users that can be selected includes the pool's administrator and members.
* The operation will be recorded in the customer log, log type: "Appoint customers".

### 5.2 Managed by Account Manager

This tab will display the account manager's name and the number of customers assigned to them.

<figure><img src="https://1526800164-files.gitbook.io/~/files/v0/b/gitbook-x-prod.appspot.com/o/spaces%2F50DeL6mO9sNbAZBSEdaN%2Fuploads%2FnaabNk1QSlGRaUtaYtCC%2Fimage.png?alt=media&amp;token=c5a84447-d350-4b9f-86b0-83c0f06d95de" alt=""><figcaption></figcaption></figure>

Remark:&#x20;

* Customers who doesn't have account manager assigned will not be displayed here.
* Select the account manager, click the \[Assign to account manager] button to, and then select a new account manager (Range: Administrator and Members of the pool).
* The operation will be recorded in the customer log, log type: "Appoint customer".

## 6. Auto distribute all customer

By using the \[Auto distribution all customers] button to automatically assign an account executive for all customers, or by going to More > Auto distribution, you can assign an account executive for customers in the pool in batches.

<figure><img src="https://1526800164-files.gitbook.io/~/files/v0/b/gitbook-x-prod.appspot.com/o/spaces%2F50DeL6mO9sNbAZBSEdaN%2Fuploads%2FCWWXBaTeW1S9hvoefcfu%2Fimage.png?alt=media&amp;token=bedfcdad-c627-4478-a4ac-b84b90ce090b" alt=""><figcaption></figcaption></figure>

This will only take effect for customers whose "Account Executive" field is empty.

#### 6.1 By Batch

Step 1: Select the respective customer who does not have an Account Executive and click \[Auto distribution].

<figure><img src="https://1526800164-files.gitbook.io/~/files/v0/b/gitbook-x-prod.appspot.com/o/spaces%2F50DeL6mO9sNbAZBSEdaN%2Fuploads%2FhZcsgexVSfQcshERd9WE%2Fimage.png?alt=media&amp;token=3d73a728-aecf-43f4-abc1-3c02a0640e12" alt=""><figcaption></figcaption></figure>

Step 2: Click \[Confirm] to continue the distribution.&#x20;

<figure><img src="https://1526800164-files.gitbook.io/~/files/v0/b/gitbook-x-prod.appspot.com/o/spaces%2F50DeL6mO9sNbAZBSEdaN%2Fuploads%2FkhvdW828N4dGTufMQiw1%2Fimage.png?alt=media&amp;token=cef5f59e-943c-4c63-9706-7dd3681781c5" alt=""><figcaption></figcaption></figure>

<figure><img src="https://1526800164-files.gitbook.io/~/files/v0/b/gitbook-x-prod.appspot.com/o/spaces%2F50DeL6mO9sNbAZBSEdaN%2Fuploads%2FtrkJkoTCW4yCdLpNWFyF%2Fimage.png?alt=media&amp;token=565e3109-c937-4362-b128-55863e923c38" alt=""><figcaption></figcaption></figure>

Remarks:&#x20;

* Account executive is distributed based on the[/pages/sbktA3nNKZVIJGX4F6qG#id-3.2.3-fast-allocation-rules](https://eohelp.weaver.com.co/pages/sbktA3nNKZVIJGX4F6qG#id-3.2.3-fast-allocation-rules "mention") set for the current pool.&#x20;
* If the selected customer does not meet the rules, their “Account Executive” will remain the same.
* If the max. no. of customer acquired by a member has been reached, no further customer will be allocated to that member during auto-allocation.
* The operation will be recorded in the customer log, log type: "Auto distribute".

## 7. Import

New customers can be imported directly into the pool.

<figure><img src="https://1526800164-files.gitbook.io/~/files/v0/b/gitbook-x-prod.appspot.com/o/spaces%2F50DeL6mO9sNbAZBSEdaN%2Fuploads%2F924cvJaZD623EXh71wxx%2Fimage.png?alt=media&amp;token=476ee3a0-fca8-4fc4-9d4b-4854227eb41e" alt=""><figcaption></figcaption></figure>

Remark:&#x20;

* The pool's import template is the same as the template used for importing from the \[Customer Import/Export].
* When importing customers from the pool, regardless of the data entered in the "Seas group” field, the imported customers will belong to the current pool by default.&#x20;
* If the customer's account executive is empty and meets the allocation criteria, the system will automatically assign one for the imported customer.

## 8. Add

&#x20;\[New Customer] can be created directly in the pool.

<figure><img src="https://1526800164-files.gitbook.io/~/files/v0/b/gitbook-x-prod.appspot.com/o/spaces%2F50DeL6mO9sNbAZBSEdaN%2Fuploads%2F2UE0cMCc2PEDEsgylidC%2Fimage.png?alt=media&amp;token=cd8321ec-e5c8-4f27-9744-c8959aea0177" alt=""><figcaption></figcaption></figure>

<figure><img src="https://1526800164-files.gitbook.io/~/files/v0/b/gitbook-x-prod.appspot.com/o/spaces%2F50DeL6mO9sNbAZBSEdaN%2Fuploads%2Fxe6ZakIdSFD6nNsp8NfJ%2Fimage.png?alt=media&amp;token=2697f6e4-f4da-4d74-b80d-998e31bbe35e" alt=""><figcaption></figcaption></figure>

Remark:

* When a new customer is created directly in the pool, the data will belong to the current pool.
* When creating a new customer, if the account executive is empty and it meets the current pool's allocation mechanism, a account executive will be automatically assigned.

## 9. Filtering

The list data supports data filtering, searching and querying.

<figure><img src="https://1526800164-files.gitbook.io/~/files/v0/b/gitbook-x-prod.appspot.com/o/spaces%2F50DeL6mO9sNbAZBSEdaN%2Fuploads%2FuCMRxzlRwjiEM8WGmTiW%2Fimage.png?alt=media&amp;token=86b858fd-7e81-4774-9144-ea716757e570" alt=""><figcaption></figcaption></figure>

<figure><img src="https://1526800164-files.gitbook.io/~/files/v0/b/gitbook-x-prod.appspot.com/o/spaces%2F50DeL6mO9sNbAZBSEdaN%2Fuploads%2FEU49lBAbIWGiXw5ehKHc%2Fimage.png?alt=media&amp;token=9e896a57-d656-45f2-8f05-71de3b53e1ef" alt=""><figcaption></figcaption></figure>

<figure><img src="https://1526800164-files.gitbook.io/~/files/v0/b/gitbook-x-prod.appspot.com/o/spaces%2F50DeL6mO9sNbAZBSEdaN%2Fuploads%2FK0MPqMJI7g1GNtN10HTw%2Fimage.png?alt=media&amp;token=72c76072-e766-4ff5-a1b0-f5008149daf6" alt=""><figcaption></figcaption></figure>

Remark:

* The conditions of “More filters”, “Search” and “Advanced Search” are the same as those in \[Customer List], which can be set in \[Fields Setting].&#x20;
* Filtering, searching and querying will only display data in the current pool, customer outside this pool will not appear in the search result.


# Pools I Joined

<figure><img src="https://1526800164-files.gitbook.io/~/files/v0/b/gitbook-x-prod.appspot.com/o/spaces%2F50DeL6mO9sNbAZBSEdaN%2Fuploads%2Fwq7CIMQDSpNv2oIaRq3O%2Fimage.png?alt=media&amp;token=9053dca0-0472-421a-af6d-d3203f255ab2" alt=""><figcaption></figcaption></figure>

Remark:

* "Pool I joined” shows all pools joined by the current user as the member.
* Allocated and unallocated customer data and ratios for the day can be seen directly by hovering your mouse over the chart.

## 1. List Data

Click on the chart to view the current pool's list data.

<figure><img src="https://1526800164-files.gitbook.io/~/files/v0/b/gitbook-x-prod.appspot.com/o/spaces%2F50DeL6mO9sNbAZBSEdaN%2Fuploads%2FFQJe1f57TJZOs9RkVRIH%2Fimage.png?alt=media&amp;token=38545f5e-8ebd-42f8-8b56-3603523819c4" alt=""><figcaption></figcaption></figure>

Remark:

* Only customer data without an account executive or where the current user is acting as the account executive is currently displayed.
* Users who already have permission to view/edit customer data in the list can click to view the details, add customer contact records, and perform other related operations; if you do not have permission to view, clicking on the list data will only prompt "No permission to view the current customer details".

## 2. Pick up

Customers without an account executive can be picked up if the [/pages/sbktA3nNKZVIJGX4F6qG#id-3.2.1-allocation](https://eohelp.weaver.com.co/pages/sbktA3nNKZVIJGX4F6qG#id-3.2.1-allocation "mention") Allocation is enabled. If not, the pickup button won't display anywhere on the page.

<figure><img src="https://1526800164-files.gitbook.io/~/files/v0/b/gitbook-x-prod.appspot.com/o/spaces%2F50DeL6mO9sNbAZBSEdaN%2Fuploads%2FVWOkPM1Zz8eBgtyKNnXK%2Fimage.png?alt=media&amp;token=52c4b3a0-fe2d-483f-b605-855383402d54" alt=""><figcaption></figcaption></figure>

### 2.1 Operation

Step 1:&#x20;

**Single Pickup:** Go to \[···] and click "Pick up" to allocate yourself as the account executive for the customer.\
**Batch Pickup:** Select the customers to be picked up and click the \[Pick up] button at the bottom of the page to allocate yourself as the account executive for the customers.

<figure><img src="https://1526800164-files.gitbook.io/~/files/v0/b/gitbook-x-prod.appspot.com/o/spaces%2F50DeL6mO9sNbAZBSEdaN%2Fuploads%2FPtFT1RT0K9HkhPiUq3PX%2Fimage.png?alt=media&amp;token=195dd347-ee8f-4d01-b4ca-171931f96897" alt=""><figcaption></figcaption></figure>

<figure><img src="https://1526800164-files.gitbook.io/~/files/v0/b/gitbook-x-prod.appspot.com/o/spaces%2F50DeL6mO9sNbAZBSEdaN%2Fuploads%2FDLW6x4hVNkXNn3Zm77Ga%2Fimage.png?alt=media&amp;token=0c358b83-c72e-4a59-b8a4-e76f830ce0a0" alt=""><figcaption></figcaption></figure>

If any customer is already assigned to an account manager, the error “Only unassigned customers can be picked up" will be displayed, and the pickup will fail.

Remark: The operation will be recorded in the customer log, log type: "Pick customer".

### 2.2 Error Message

#### 2.2.1  Exceeding the number of customers that can be allocated

<figure><img src="https://1526800164-files.gitbook.io/~/files/v0/b/gitbook-x-prod.appspot.com/o/spaces%2F50DeL6mO9sNbAZBSEdaN%2Fuploads%2FnMUl4jzZIwI9PL0eXXFD%2Fimage.png?alt=media&amp;token=543dfd7a-8c91-4ba6-8adb-262f432bea63" alt=""><figcaption></figcaption></figure>

Determined by the settings in Pool Configuration [/pages/sbktA3nNKZVIJGX4F6qG#id-3.2.2-distribution-of-limit](https://eohelp.weaver.com.co/pages/sbktA3nNKZVIJGX4F6qG#id-3.2.2-distribution-of-limit "mention")

#### 2.2.2 Cannot be picked up by the same member within a client returned to the pool (days) 0

Determined by the settings in Pool Configuration [/pages/sbktA3nNKZVIJGX4F6qG#id-3.2.2-distribution-of-limit](https://eohelp.weaver.com.co/pages/sbktA3nNKZVIJGX4F6qG#id-3.2.2-distribution-of-limit "mention")

## 3. Return to the high seas

Return the customer to the customer pool for other member to pick up.

Step 1:  Go to \[···] and click "Return to the high seas" to unallocate yourself as the account executive for the customer.

<figure><img src="https://1526800164-files.gitbook.io/~/files/v0/b/gitbook-x-prod.appspot.com/o/spaces%2F50DeL6mO9sNbAZBSEdaN%2Fuploads%2FELBJ5Un85svMZCLugLg6%2Fimage.png?alt=media&amp;token=06cbef48-7ec0-48dc-be13-489feeb87aae" alt=""><figcaption></figcaption></figure>

Step 2: Enter the reason reason in the dialog box and then click \[Confirm] to complete the operation.

<figure><img src="https://1526800164-files.gitbook.io/~/files/v0/b/gitbook-x-prod.appspot.com/o/spaces%2F50DeL6mO9sNbAZBSEdaN%2Fuploads%2Fu4v3a0ROyZqFz90zQmWm%2Fimage.png?alt=media&amp;token=974fccb5-d8b9-4d03-9cd1-fc50ca077366" alt=""><figcaption></figcaption></figure>

The "Account Executive" field will be cleared.

<figure><img src="https://1526800164-files.gitbook.io/~/files/v0/b/gitbook-x-prod.appspot.com/o/spaces%2F50DeL6mO9sNbAZBSEdaN%2Fuploads%2FdfpLlG85jCyIaaCDtgDV%2Fimage.png?alt=media&amp;token=e7fec794-af60-4c91-9da9-8fe5977fff39" alt=""><figcaption></figcaption></figure>

## 4. Import

New customers can be imported directly into the pool when the user has the necessary permission set in the Permission Settings.

<figure><img src="https://1526800164-files.gitbook.io/~/files/v0/b/gitbook-x-prod.appspot.com/o/spaces%2F50DeL6mO9sNbAZBSEdaN%2Fuploads%2FQj30i0TtvJioFJWEBVOE%2Fimage.png?alt=media&amp;token=d7c1089b-c1c6-4286-9b1c-b5f9190fb2fd" alt=""><figcaption></figcaption></figure>

Remark:&#x20;

* The pool's import template is the same as the template used for importing from the \[Customer Import/Export].
* When importing customers from the pool, regardless of the data entered in the "Seas group” field, the imported customers will belong to the current pool by default.&#x20;
* If the customer's account executive is empty and meets the allocation criteria, the system will automatically assign one for the imported customer.

## 5. Add

&#x20;\[New Customer] can be created directly in the pool when the user has the necessary permission set in the Permission Settings.

<figure><img src="https://1526800164-files.gitbook.io/~/files/v0/b/gitbook-x-prod.appspot.com/o/spaces%2F50DeL6mO9sNbAZBSEdaN%2Fuploads%2FESWsQTkr6JJI41iqnJXu%2Fimage.png?alt=media&amp;token=f28c7666-e3d4-4d6f-babe-e9d24ae6c7d6" alt=""><figcaption></figcaption></figure>

<figure><img src="https://1526800164-files.gitbook.io/~/files/v0/b/gitbook-x-prod.appspot.com/o/spaces%2F50DeL6mO9sNbAZBSEdaN%2Fuploads%2Fxe6ZakIdSFD6nNsp8NfJ%2Fimage.png?alt=media&amp;token=2697f6e4-f4da-4d74-b80d-998e31bbe35e" alt=""><figcaption></figcaption></figure>

Remark:

* When a new customer is created directly in the pool, the data will belong to the current pool.
* When creating a new customer, if the account executive is empty and it meets the current pool's allocation mechanism, a new account executive will be automatically assigned.

## 9. Filtering

The list data supports data filtering, searching and querying.

<figure><img src="https://1526800164-files.gitbook.io/~/files/v0/b/gitbook-x-prod.appspot.com/o/spaces%2F50DeL6mO9sNbAZBSEdaN%2Fuploads%2FPnxNFoorKhAjQkNB8gOD%2Fimage.png?alt=media&amp;token=077460cc-a1dd-4e13-871d-d3f0abae051f" alt=""><figcaption></figcaption></figure>

<figure><img src="https://1526800164-files.gitbook.io/~/files/v0/b/gitbook-x-prod.appspot.com/o/spaces%2F50DeL6mO9sNbAZBSEdaN%2Fuploads%2FjFXPlZOnHXgORQXO6qN8%2Fimage.png?alt=media&amp;token=ad1d7a0f-76ee-4c2e-b218-93abc5b52b70" alt=""><figcaption></figcaption></figure>

<figure><img src="https://1526800164-files.gitbook.io/~/files/v0/b/gitbook-x-prod.appspot.com/o/spaces%2F50DeL6mO9sNbAZBSEdaN%2Fuploads%2FdnABqD21jUkwf7iND7PD%2Fimage.png?alt=media&amp;token=b0942d4e-f99d-4853-9afd-c71cd2c5b96a" alt=""><figcaption></figcaption></figure>

Description

* The conditions of “More filters”, “Search” and “Advanced Search” are the same as those in \[Customer List], which can be set in \[Fields Setting].&#x20;
* Filtering, searching and querying will only display data in the current pool, customer outside this pool will not appear in the search result.


# Pool Configuration

## 1. List Page

<figure><img src="https://1526800164-files.gitbook.io/~/files/v0/b/gitbook-x-prod.appspot.com/o/spaces%2F50DeL6mO9sNbAZBSEdaN%2Fuploads%2FWEJNt2LKf4nVt0aEgP7h%2Fimage.png?alt=media&amp;token=6fc5b69e-e169-4be2-a786-377fa600441b" alt=""><figcaption></figcaption></figure>

## 2. Manage Pool

### 2.1 New Pool

Create a new pool

Step 1: Click on the \[New] button on the page

Step 2: Read more at[#id-3.-pool-configuration](#id-3.-pool-configuration "mention") to to learn how you can configure the new pool according to your needs.

<figure><img src="https://1526800164-files.gitbook.io/~/files/v0/b/gitbook-x-prod.appspot.com/o/spaces%2F50DeL6mO9sNbAZBSEdaN%2Fuploads%2F4acnXl4bJySMfZYHHmrx%2Fimage.png?alt=media&amp;token=8987b38a-a73a-4a82-93e6-b2beff4b3aac" alt=""><figcaption></figcaption></figure>

### 2.2 Edit Pool

Edit the existing pool's configuration

Step 1: In the more settings \[···], click on the "Edit" button to the configure page.

<figure><img src="https://1526800164-files.gitbook.io/~/files/v0/b/gitbook-x-prod.appspot.com/o/spaces%2F50DeL6mO9sNbAZBSEdaN%2Fuploads%2F1xIrL0SA8LpFkzhd7pU1%2Fimage.png?alt=media&amp;token=b0bda1d9-35ec-45ac-8677-af933618e4c9" alt=""><figcaption></figcaption></figure>

Step 2: Read more at[#id-3.-pool-configuration](#id-3.-pool-configuration "mention") to to learn how you can configure the pool to your needs.

### 2.3 Delete Pool

Although there is a \[Delete] button for all the pools, only empty pools with no customer data can be deleted.

Step 1: In the more settings \[···], click on the "Delete" button to delete the respective pool.

<figure><img src="https://1526800164-files.gitbook.io/~/files/v0/b/gitbook-x-prod.appspot.com/o/spaces%2F50DeL6mO9sNbAZBSEdaN%2Fuploads%2FtleU7RuIC1P4WyY89zgM%2Fimage.png?alt=media&amp;token=02b1028a-4410-4f2f-baa1-6c156bd75f19" alt=""><figcaption></figcaption></figure>

## 3. Pool Configuration

### 3.1 Basic configuration

Basic information settings to define the group name, administrator and members.

<figure><img src="https://1526800164-files.gitbook.io/~/files/v0/b/gitbook-x-prod.appspot.com/o/spaces%2F50DeL6mO9sNbAZBSEdaN%2Fuploads%2FOXnztUmaEJ9wHdDq3xHG%2Fimage.png?alt=media&amp;token=d7e51dd8-e0ac-4fa8-8204-ddc5370a3899" alt=""><figcaption></figcaption></figure>

* Group name: Required
* Administrator:&#x20;
  * Can be multiple users
  * Permission: To pick up, return, change the grouping, appoint the account manager, and perform the automatic allocation of all customer data in the pool.
* Members
  * Can be set for All users, or individually, or by department, or by role.&#x20;
  * Permission: Manage their own customers in the pool (view, edit, return, etc.), and at the same time, they can access customer data in the pool that do not have an account executive.

### 3.2 Allocation mechanism

It is used to set the member's permissions of the pool and the automatic allocation rule of the pool.

<figure><img src="https://1526800164-files.gitbook.io/~/files/v0/b/gitbook-x-prod.appspot.com/o/spaces%2F50DeL6mO9sNbAZBSEdaN%2Fuploads%2F8w3SNBzt9FOfDu9xjYdI%2Fimage.png?alt=media&amp;token=2c6ed24b-2469-40c9-9955-d1be2e078b6d" alt=""><figcaption></figcaption></figure>

#### 3.2.1 Allocation

* Tick to enable.
* Purpose: Allows the members to pick up and return the customer in the pool, if its not enable then the member can only view and edit the assigned customers.

#### 3.2.2 Distribution of limit

1. Max. no. of customer whose cards were picked up by members

* Tick to enable
* When enabled, it defines the maximum number of customers that a member can pick up.

2. Cannot be picked by the same member within a customer returned to the pool (days)

* Tick to enable
* When enabled, customers who have been returned cannot be picked up by the previous account executive for a set period of time, but the administrator can assign a new account executive.

#### 3.2.3 Fast Allocation Rules

<figure><img src="https://1526800164-files.gitbook.io/~/files/v0/b/gitbook-x-prod.appspot.com/o/spaces%2F50DeL6mO9sNbAZBSEdaN%2Fuploads%2FfCBdg4Gd9tbSnNjwBmxy%2Fimage.png?alt=media&amp;token=96d2e4ac-57cf-4c99-8bff-df03ea903f59" alt=""><figcaption></figcaption></figure>

1. SQL statement:&#x20;

* Execute the SQL statement and set the allocated personnel as the account executive for customers if the conditions of the statement are met.

2. Assigning personnel

* Determine the range of personnel to assign as the account executive if the SQL conditions are met.

3. Allocation Method

* Average: Customer that meets the SQL conditions will be distributed equally to the personnel assigned.&#x20;
* Limit the no. of customer allocated during the cycle time

<figure><img src="https://1526800164-files.gitbook.io/~/files/v0/b/gitbook-x-prod.appspot.com/o/spaces%2F50DeL6mO9sNbAZBSEdaN%2Fuploads%2FGXW1Jbh8bsTpl9c9EBV5%2Fimage.png?alt=media&amp;token=10445e76-ac2c-42d5-ae01-bafd4960d89a" alt=""><figcaption></figcaption></figure>

<figure><img src="https://1526800164-files.gitbook.io/~/files/v0/b/gitbook-x-prod.appspot.com/o/spaces%2F50DeL6mO9sNbAZBSEdaN%2Fuploads%2FiK2fnpxdJEsTC6KBBPec%2Fimage.png?alt=media&amp;token=12fa7c5b-b733-471c-a171-92109324a0bf" alt=""><figcaption></figcaption></figure>

Step 1: Set the cycle&#x20;

Step 2: Specify the number of customers each assignor can get

Remark: When the set limit is reached, customer will no longer be automatically assigned to the personnel, but can be assigned by the administrator

* Prorated

<figure><img src="https://1526800164-files.gitbook.io/~/files/v0/b/gitbook-x-prod.appspot.com/o/spaces%2F50DeL6mO9sNbAZBSEdaN%2Fuploads%2FBXN2SMQ5Nc6DesvvBDgo%2Fimage.png?alt=media&amp;token=185af98c-cc2d-4b4c-b36a-0cd4b7e18003" alt=""><figcaption></figcaption></figure>

Customer data that meets the conditions of the SQL statement will be distributed to the appropriate personnel in accordance with the set ratio.

* Remark:
  * Multiple allocation rules can be set for the same pool, prioritized from top to bottom.
  * If the conditions are not met, or if all staff have already been allocated the maximum number of customers, then the customer's account executive will be left empty.
  * The rules applies to the customers that are newly created, imported, returned, and changed grouping into the current pool.
  * New rules will only apply to newly added customers; existing customer will not be reallocated to other account executives.
  * Customers imported and newly created in a specific pool will be assigned to account executive based on the quick allocation rules established for that pool.
  * Customers that were changed grouping will be automatically assigned with an account executive according to the rules.

### 3.3 Recycling mechanism

The recycling mechanism is for customers whose contact log has not been updated for some time, automatically return to the pool for other members to pick up.  &#x20;

<figure><img src="https://1526800164-files.gitbook.io/~/files/v0/b/gitbook-x-prod.appspot.com/o/spaces%2F50DeL6mO9sNbAZBSEdaN%2Fuploads%2FSuN5hrdpEAcEf6JoyCDO%2Fimage.png?alt=media&amp;token=b9343960-65ae-4dc1-92b8-bbcb6cd878d1" alt=""><figcaption></figcaption></figure>

#### 3.3.1 Recycle customers who have not added a new contact record after acquisition (days) \[N]

The customer will be returned to the pool if no new contact record are made on the Nth day after the customer has been appointed or picked up

i.e.: Customers assigned before 9:00 a.m. will be returned at 9:00 a.m. on the Nth day; customers acquired after 9:00 a.m. will be recalled at 9:00 a.m. on the \[N+1] day.&#x20;

#### 3.3.2 Recycle customers who have not added a new contact record since the last follow-up (days) \[N]:&#x20;

If the contact record is not added after N days, the customer is automatically return to pool.

#### 3.3.3 Recycle customer, month of created customer

Recycle the customers who have been not contacted for *xx days*, created within N months

xx days: setting refers to the two settings above

#### 3.3.4 Number of days in advance of customer recycle reminders

Recycling reminders will be made for customers based on the "Recycle customer, month of created customer".

When the customer's created date is within that month, only the corresponding account executive will receive the continuous recycling reminders.

## 4. All seas set

All, where customers who have not been assigned to a pool will be placed here as a general category.

Step 1: Click on the "All seas set" button

<figure><img src="https://1526800164-files.gitbook.io/~/files/v0/b/gitbook-x-prod.appspot.com/o/spaces%2F50DeL6mO9sNbAZBSEdaN%2Fuploads%2FGvmY0QymfYxEXwO8uWoQ%2Fimage.png?alt=media&amp;token=dc5fc713-5934-4c5e-92a3-bacf193cd579" alt=""><figcaption></figcaption></figure>

* Only the system administrator can view and click the \[All seas set] button

Step 2: Assign the members of the all seas to allow them to view the customers in the pool.

<figure><img src="https://1526800164-files.gitbook.io/~/files/v0/b/gitbook-x-prod.appspot.com/o/spaces%2F50DeL6mO9sNbAZBSEdaN%2Fuploads%2FCmtZ9pz1IbcY2QkF6spe%2Fimage.png?alt=media&amp;token=f26bccaf-077e-4f76-8c82-67537e4f3e24" alt="" width="375"><figcaption></figcaption></figure>


# Suppliers

## 1 Create new supplier

Step 1: In the top-right side of the page, click "Add".

<figure><img src="https://1526800164-files.gitbook.io/~/files/v0/b/gitbook-x-prod.appspot.com/o/spaces%2F50DeL6mO9sNbAZBSEdaN%2Fuploads%2FA4VExN0wtE0V2wSK6Wxs%2Fimage.png?alt=media&amp;token=b0b493a9-4d71-43d5-9ab6-90bf2dab306d" alt=""><figcaption></figcaption></figure>

Step 2: Fill in the relevant details and click "Save" to create new supplier data.

<figure><img src="https://1526800164-files.gitbook.io/~/files/v0/b/gitbook-x-prod.appspot.com/o/spaces%2F50DeL6mO9sNbAZBSEdaN%2Fuploads%2FhSfbbxzGAPtw2la30hqR%2Fimage.png?alt=media&amp;token=ff925751-a15f-429e-9e6a-13bad233403e" alt=""><figcaption></figcaption></figure>

## 2 Data Operation

### 2.1 Data List

The supplier list display all the supplier data created in the system.

<figure><img src="https://1526800164-files.gitbook.io/~/files/v0/b/gitbook-x-prod.appspot.com/o/spaces%2F50DeL6mO9sNbAZBSEdaN%2Fuploads%2FUMt1LlAXQQegd1BzJ8Im%2Fimage.png?alt=media&amp;token=a1fed07d-e1fc-403e-992a-c66bf463c4b7" alt=""><figcaption></figcaption></figure>

### 2.2 View Supplier Detail

Step 1: Open the details page, it will appear in a pop-up window on the right side of the page.&#x20;

Option 1: Click on the data row directly.&#x20;

<figure><img src="https://1526800164-files.gitbook.io/~/files/v0/b/gitbook-x-prod.appspot.com/o/spaces%2F50DeL6mO9sNbAZBSEdaN%2Fuploads%2Fy6FcL0OkHkUC9AWFpiXY%2Fimage.png?alt=media&amp;token=58ce7bb9-5744-400a-a369-9488c8a04582" alt=""><figcaption></figcaption></figure>

Option 2: On the right side of the data row, click on "more ···" and then click "View.

<figure><img src="https://1526800164-files.gitbook.io/~/files/v0/b/gitbook-x-prod.appspot.com/o/spaces%2F50DeL6mO9sNbAZBSEdaN%2Fuploads%2FetCJ7xekjJBSt3mWiuOl%2Fimage.png?alt=media&amp;token=e22147b8-7578-4903-96f2-7ed739651e8d" alt=""><figcaption></figcaption></figure>

<figure><img src="https://1526800164-files.gitbook.io/~/files/v0/b/gitbook-x-prod.appspot.com/o/spaces%2F50DeL6mO9sNbAZBSEdaN%2Fuploads%2FoLfowueCNYwhfHtNBUzf%2Fimage.png?alt=media&amp;token=d3b0da9d-b0fc-4c21-a7ca-a145b72d37aa" alt=""><figcaption></figcaption></figure>

### 2.3 Edit

Step 1: On the right-side of the data row, click more ···, and click "Edit".

<figure><img src="https://1526800164-files.gitbook.io/~/files/v0/b/gitbook-x-prod.appspot.com/o/spaces%2F50DeL6mO9sNbAZBSEdaN%2Fuploads%2Fz5XP8vMu08bFWeWHcUgB%2Fimage.png?alt=media&amp;token=476243ee-d136-479b-80f3-4a00c528593d" alt=""><figcaption></figcaption></figure>

Step 2: Modify the details and click "Submit" to implement the new changes made.

<figure><img src="https://1526800164-files.gitbook.io/~/files/v0/b/gitbook-x-prod.appspot.com/o/spaces%2F50DeL6mO9sNbAZBSEdaN%2Fuploads%2FtXxUvFB01CnL9OxPyJkR%2Fimage.png?alt=media&amp;token=be077683-97af-436e-ae0e-6cf264fdca34" alt=""><figcaption></figcaption></figure>

**Remark:**

The supplier creator can only edit the data they've created

Only System Administrator can edit all the other suppliers created by other users

### 2.4 Delete

#### 2.4.1 Single Delete

Step 1: On the right-side of the data row, click more ···, and click "Delete".

<figure><img src="https://1526800164-files.gitbook.io/~/files/v0/b/gitbook-x-prod.appspot.com/o/spaces%2F50DeL6mO9sNbAZBSEdaN%2Fuploads%2F5Olp7gzfDv8PlS8yNjkf%2Fimage.png?alt=media&amp;token=8f6d0506-afd6-4284-86ab-ff3c4620bdb4" alt=""><figcaption></figcaption></figure>

Step 2: Confirm the delete operation, and the data will be deleted and removed from the list.

<figure><img src="https://1526800164-files.gitbook.io/~/files/v0/b/gitbook-x-prod.appspot.com/o/spaces%2F50DeL6mO9sNbAZBSEdaN%2Fuploads%2F47m7EBIY9zgoOPY3GN55%2Fimage.png?alt=media&amp;token=9f439538-594c-4218-a723-ae24e6504711" alt="" width="297"><figcaption></figcaption></figure>

#### 2.4.2 Batch Delete

Step 1: Select the data to be deleted, click "Batch delete" on the bottom left of the page.

<figure><img src="https://1526800164-files.gitbook.io/~/files/v0/b/gitbook-x-prod.appspot.com/o/spaces%2F50DeL6mO9sNbAZBSEdaN%2Fuploads%2FsdqdDUP1ivps27PNIO2t%2Fimage.png?alt=media&amp;token=e748f7dd-6312-482f-b6b9-f1732d74e7ca" alt=""><figcaption></figcaption></figure>

Step 2: Confirm the delete operation, and the data will be deleted and removed from the list.

<figure><img src="https://1526800164-files.gitbook.io/~/files/v0/b/gitbook-x-prod.appspot.com/o/spaces%2F50DeL6mO9sNbAZBSEdaN%2Fuploads%2F4MG9gH2he7ZvgMBPdBJm%2Fimage.png?alt=media&amp;token=ab491475-a62e-480b-a4c5-6ec60b54bec5" alt="" width="297"><figcaption></figcaption></figure>

<figure><img src="https://1526800164-files.gitbook.io/~/files/v0/b/gitbook-x-prod.appspot.com/o/spaces%2F50DeL6mO9sNbAZBSEdaN%2Fuploads%2FxTVTxZQCtq2ZHpxhHXpy%2Fimage.png?alt=media&amp;token=ea2a0d55-0a56-4757-9a94-8a23f015de5b" alt="" width="272"><figcaption><p>Deletion success notification pop-up box</p></figcaption></figure>

**Remark:**

* Non-admin user can only delete supplier they created and is not linked to any product information.&#x20;

<figure><img src="https://1526800164-files.gitbook.io/~/files/v0/b/gitbook-x-prod.appspot.com/o/spaces%2F50DeL6mO9sNbAZBSEdaN%2Fuploads%2F9EzRbBbNAYDBYFVZnSW2%2Fimage.png?alt=media&amp;token=05df9d10-7242-4e5d-94d3-567769eb3ac4" alt=""><figcaption></figcaption></figure>

### 2.5 Log

Step 1: Open the details, and it will display on the right-side of the page.

Option 1: Click on the data row directly.

<figure><img src="https://1526800164-files.gitbook.io/~/files/v0/b/gitbook-x-prod.appspot.com/o/spaces%2F50DeL6mO9sNbAZBSEdaN%2Fuploads%2FPYw7TiOo3AkeAvRlw4uG%2Fimage.png?alt=media&amp;token=0dd414ad-627a-4052-92ed-bd265631b25f" alt=""><figcaption></figcaption></figure>

Option 2: Go to the right-side of the data row, click more ···, and click "View".

<figure><img src="https://1526800164-files.gitbook.io/~/files/v0/b/gitbook-x-prod.appspot.com/o/spaces%2F50DeL6mO9sNbAZBSEdaN%2Fuploads%2FbvBR00RRRWcVovxgrrGJ%2Fimage.png?alt=media&amp;token=b81ba2e6-dcef-49ea-bc70-a4dabefc06f2" alt=""><figcaption></figcaption></figure>

Step 2: Click on the "Log" tab to view the log details.

<figure><img src="https://1526800164-files.gitbook.io/~/files/v0/b/gitbook-x-prod.appspot.com/o/spaces%2F50DeL6mO9sNbAZBSEdaN%2Fuploads%2F6z4SNqSG85dpwsIKG4ee%2Fimage.png?alt=media&amp;token=78ce4188-d712-4cfa-9ee2-ca647719fa18" alt=""><figcaption></figcaption></figure>

The log data can be filtered by log type through the operation type, by the creation time using the existing time filter, or by customizing the range with the "Time range" button. Additionally, the \[Search log] search box is used to search for log content.

<figure><img src="https://1526800164-files.gitbook.io/~/files/v0/b/gitbook-x-prod.appspot.com/o/spaces%2F50DeL6mO9sNbAZBSEdaN%2Fuploads%2FCyA9htGGZ6NZx7VbFgxR%2Fimage.png?alt=media&amp;token=d153a031-deb9-4f9c-8070-d5e8d31b84c9" alt=""><figcaption></figcaption></figure>

## 3 Import/Export

### 3.1 Import

Step 1: In the top-right corner of the page, click "Import".

<figure><img src="https://1526800164-files.gitbook.io/~/files/v0/b/gitbook-x-prod.appspot.com/o/spaces%2F50DeL6mO9sNbAZBSEdaN%2Fuploads%2FdW4BnLzJP8H1hQznl811%2Fimage.png?alt=media&amp;token=fa7787fc-a5d9-4d6a-98f4-a9ad4cbf69a9" alt=""><figcaption></figcaption></figure>

Step 2: Export the template by clicking on "Export template".

<figure><img src="https://1526800164-files.gitbook.io/~/files/v0/b/gitbook-x-prod.appspot.com/o/spaces%2F50DeL6mO9sNbAZBSEdaN%2Fuploads%2FQhzHU7ZVYNhv0TPzuRdw%2Fimage.png?alt=media&amp;token=fd63dde6-ebfd-4dc5-881e-1ac9fabb70b4" alt="" width="375"><figcaption></figcaption></figure>

Step 3: Fill up the Excel template.

<figure><img src="https://1526800164-files.gitbook.io/~/files/v0/b/gitbook-x-prod.appspot.com/o/spaces%2F50DeL6mO9sNbAZBSEdaN%2Fuploads%2F3HOXoO0bJPfeN6l48GV3%2Fimage.png?alt=media&amp;token=a0875ead-4445-4e38-bd71-44344ed55dac" alt=""><figcaption></figcaption></figure>

Step 4: Select the updated Excel file by double-clicking on the file or click on the file and click "Open".

<figure><img src="https://1526800164-files.gitbook.io/~/files/v0/b/gitbook-x-prod.appspot.com/o/spaces%2F50DeL6mO9sNbAZBSEdaN%2Fuploads%2FhmsDddAvOLRORu1bec3o%2Fimage.png?alt=media&amp;token=f3d0b6bc-4659-48a7-b5fb-7b3bcadbaf3f" alt=""><figcaption></figcaption></figure>

Step 5: Select whether you would like to add new data or update the existing data, once done, click on "Start importing" to begin the import.

<figure><img src="https://1526800164-files.gitbook.io/~/files/v0/b/gitbook-x-prod.appspot.com/o/spaces%2F50DeL6mO9sNbAZBSEdaN%2Fuploads%2FNXDevqEGPpaquHkJoYWj%2Fimage.png?alt=media&amp;token=eca7e767-5774-4314-a454-a420129c35b3" alt=""><figcaption></figcaption></figure>

Status message will pop-up once done.

<figure><img src="https://1526800164-files.gitbook.io/~/files/v0/b/gitbook-x-prod.appspot.com/o/spaces%2F50DeL6mO9sNbAZBSEdaN%2Fuploads%2FWKXZCP46yAnx880pSjE9%2Fimage.png?alt=media&amp;token=67ca251f-8af8-40f3-a27f-f85eeddcee80" alt="" width="278"><figcaption></figcaption></figure>

<figure><img src="https://1526800164-files.gitbook.io/~/files/v0/b/gitbook-x-prod.appspot.com/o/spaces%2F50DeL6mO9sNbAZBSEdaN%2Fuploads%2FJD0LL2EOc9XRJGE1JXdw%2Fimage.png?alt=media&amp;token=f8c7df0f-5207-4b98-ac95-cb7e5e733746" alt="" width="276"><figcaption></figcaption></figure>

When the import is complete, an Excel file will be generated to inform the user of the import status of all rows and provide an error message if the import failed.

### 3.2 Export

Step 1: In the top-right corner of the page, click "Export".

<figure><img src="https://1526800164-files.gitbook.io/~/files/v0/b/gitbook-x-prod.appspot.com/o/spaces%2F50DeL6mO9sNbAZBSEdaN%2Fuploads%2FKOarPAY6AAt4VcXk8M38%2Fimage.png?alt=media&amp;token=80a116f6-b9be-44bc-9257-cf455443915f" alt=""><figcaption></figcaption></figure>

Step 2: Select or de-select fields to be exported, and click "Confirm" to begin the process.

<figure><img src="https://1526800164-files.gitbook.io/~/files/v0/b/gitbook-x-prod.appspot.com/o/spaces%2F50DeL6mO9sNbAZBSEdaN%2Fuploads%2Ff09lqeW6aLWjbgMbTIxF%2Fimage.png?alt=media&amp;token=b73a6022-fd17-4232-9b5b-1e013a86a769" alt=""><figcaption></figcaption></figure>

The system will automatically generate and download the exported data in Excel format onto the user's device.

<figure><img src="https://1526800164-files.gitbook.io/~/files/v0/b/gitbook-x-prod.appspot.com/o/spaces%2F50DeL6mO9sNbAZBSEdaN%2Fuploads%2F2mBHGzDuDeIJW5TquInH%2Fimage.png?alt=media&amp;token=dea0433b-7202-4b7a-a202-c0554f137ef0" alt=""><figcaption></figcaption></figure>

**Remark:**

* This will export all the data that is shown on the current display list, across all pages. If your settings for the list are set to 10 results per page, the export will still include all existing data.
* The user can also export the desired data by filtering, searching, and applying query conditions before the export.

## 4 Filtering/Searching

### 4.1 Filter

Users can save their preferred filter by entering/selecting the condition and click "Save" or "Save and Search" to be directed to the result straight away.

Step 1: Click on the ![](https://eohelp.weaverintl.com/~gitbook/image?url=https%3A%2F%2F1526800164-files.gitbook.io%2F%7E%2Ffiles%2Fv0%2Fb%2Fgitbook-x-prod.appspot.com%2Fo%2Fspaces%252F50DeL6mO9sNbAZBSEdaN%252Fuploads%252FiEfVlSzniIeYu3jlhfLf%252Fimage.png%3Falt%3Dmedia%26token%3Dad1c38f3-3cab-4647-9272-8326c637299e\&width=300\&dpr=4\&quality=100\&sign=868175da\&sv=1)icon next to the search box.

<figure><img src="https://1526800164-files.gitbook.io/~/files/v0/b/gitbook-x-prod.appspot.com/o/spaces%2F50DeL6mO9sNbAZBSEdaN%2Fuploads%2FxPw9j1XM38U7sXnGKWrK%2Fimage.png?alt=media&amp;token=9677586b-3c6f-4631-af81-e3e599bd564e" alt=""><figcaption></figcaption></figure>

Step 2: Fill in the relevant condition and click "Save".

<figure><img src="https://1526800164-files.gitbook.io/~/files/v0/b/gitbook-x-prod.appspot.com/o/spaces%2F50DeL6mO9sNbAZBSEdaN%2Fuploads%2FBFLEto6cT2phKwTSxFv4%2Fimage.png?alt=media&amp;token=056e93ae-e577-4530-b061-1e9a17bf844f" alt=""><figcaption></figcaption></figure>

A new filter condition has been created.

<figure><img src="https://1526800164-files.gitbook.io/~/files/v0/b/gitbook-x-prod.appspot.com/o/spaces%2F50DeL6mO9sNbAZBSEdaN%2Fuploads%2F6nzVKS1bICfxKUXFHhjB%2Fimage.png?alt=media&amp;token=396c3eb2-a33a-4e94-b576-cc0ad8f5234c" alt=""><figcaption></figcaption></figure>

You can change the filter name by clicking on ![](https://1526800164-files.gitbook.io/~/files/v0/b/gitbook-x-prod.appspot.com/o/spaces%2F50DeL6mO9sNbAZBSEdaN%2Fuploads%2FGiv8FS6GDtry0O9h1y4x%2Fimage.png?alt=media\&token=8fce9755-1bbf-4bcf-a0ed-3df562709353)

<figure><img src="https://1526800164-files.gitbook.io/~/files/v0/b/gitbook-x-prod.appspot.com/o/spaces%2F50DeL6mO9sNbAZBSEdaN%2Fuploads%2FV33m0GCIf79ouDq8SciT%2Fimage.png?alt=media&amp;token=c74ea37c-0669-4187-9484-d92fa53de772" alt="" width="289"><figcaption></figcaption></figure>

Click on the save icon when completed

<figure><img src="https://1526800164-files.gitbook.io/~/files/v0/b/gitbook-x-prod.appspot.com/o/spaces%2F50DeL6mO9sNbAZBSEdaN%2Fuploads%2FOAGzyn852oyzcYrtwfTW%2Fimage.png?alt=media&amp;token=92e02db1-0c76-48dd-b988-c5e908efb5bf" alt="" width="199"><figcaption></figcaption></figure>

New filter is created.&#x20;

<figure><img src="https://1526800164-files.gitbook.io/~/files/v0/b/gitbook-x-prod.appspot.com/o/spaces%2F50DeL6mO9sNbAZBSEdaN%2Fuploads%2FZfRFMAk5Cnyi2Xa7I6Fo%2Fimage.png?alt=media&amp;token=b15c521e-313f-4fd6-98f8-60a58de66973" alt=""><figcaption></figcaption></figure>

In the Advance Search, click on the (X) to delete the filter.

<figure><img src="https://1526800164-files.gitbook.io/~/files/v0/b/gitbook-x-prod.appspot.com/o/spaces%2F50DeL6mO9sNbAZBSEdaN%2Fuploads%2FxQC0iYDTMczREmzISwPA%2Fimage.png?alt=media&amp;token=03f77163-31c6-4d5c-8828-d011efb96d76" alt="" width="206"><figcaption></figcaption></figure>

### 4.2 Searching

#### 4.2.1 **Simple Query**

By entering relevant text regarding contact names in the search box, users will be able to filter suppliers with supplier names or phone no. or company address that are similar/matched to the text entered.

<figure><img src="https://1526800164-files.gitbook.io/~/files/v0/b/gitbook-x-prod.appspot.com/o/spaces%2F50DeL6mO9sNbAZBSEdaN%2Fuploads%2FEhVjHrAnvaM2YhREiwXr%2Fimage.png?alt=media&amp;token=64c2c00d-30c9-4295-bc35-6f58af64e109" alt=""><figcaption></figcaption></figure>

**4.2.2 Advance Query**

The \[Advance Query] allows the users to create complex searches or filters by specifying detailed conditions and criteria.

Step 1: Click on the ![](https://eohelp.weaverintl.com/~gitbook/image?url=https%3A%2F%2F1526800164-files.gitbook.io%2F%7E%2Ffiles%2Fv0%2Fb%2Fgitbook-x-prod.appspot.com%2Fo%2Fspaces%252F50DeL6mO9sNbAZBSEdaN%252Fuploads%252FiEfVlSzniIeYu3jlhfLf%252Fimage.png%3Falt%3Dmedia%26token%3Dad1c38f3-3cab-4647-9272-8326c637299e\&width=300\&dpr=4\&quality=100\&sign=868175da\&sv=1)icon next to the search box.

<figure><img src="https://1526800164-files.gitbook.io/~/files/v0/b/gitbook-x-prod.appspot.com/o/spaces%2F50DeL6mO9sNbAZBSEdaN%2Fuploads%2F3yNTQJ9vsPa2yFhcMYoa%2Fimage.png?alt=media&amp;token=b29ca8e9-ca1e-4552-9afb-1a46077153b9" alt=""><figcaption></figcaption></figure>

Step 2: Fill in the relevant condition and click on "Search".

<figure><img src="https://1526800164-files.gitbook.io/~/files/v0/b/gitbook-x-prod.appspot.com/o/spaces%2F50DeL6mO9sNbAZBSEdaN%2Fuploads%2FzmXwzg5fIjaKdMBYYhQd%2Fimage.png?alt=media&amp;token=d9d754d0-d4df-4237-af2c-e27fffda35d0" alt=""><figcaption></figcaption></figure>

\ <br>


# Product

Kindly complete the supplier data before proceeding to create the product data.

## 1 Create New Product

Step 1: In the top-right side of the page, click "Add".

<figure><img src="https://1526800164-files.gitbook.io/~/files/v0/b/gitbook-x-prod.appspot.com/o/spaces%2F50DeL6mO9sNbAZBSEdaN%2Fuploads%2FJBrgkAuFGFhE8TA4UYFc%2Fimage.png?alt=media&amp;token=d45c7b64-1d69-4c2a-8bc4-603d630efb44" alt=""><figcaption></figcaption></figure>

Step 2: Fill in the relevant details and click "Save" to create new supplier data.

<figure><img src="https://1526800164-files.gitbook.io/~/files/v0/b/gitbook-x-prod.appspot.com/o/spaces%2F50DeL6mO9sNbAZBSEdaN%2Fuploads%2FIw8Vf1bmldXQ4TLgZdcw%2Fimage.png?alt=media&amp;token=9b59e69d-b79a-4b06-85cf-d0552ace4c52" alt=""><figcaption></figcaption></figure>

## 2 Data Operation

### 2.1 Data List

The product list display all the product data created in the system.

<figure><img src="https://1526800164-files.gitbook.io/~/files/v0/b/gitbook-x-prod.appspot.com/o/spaces%2F50DeL6mO9sNbAZBSEdaN%2Fuploads%2FmSMPKwmERDmfp9Kiu3kc%2Fimage.png?alt=media&amp;token=e262452e-cb3f-4db9-a535-56a55f5e858c" alt=""><figcaption></figcaption></figure>

### 2.2 View

Step 1: Open the details page, it will appear in a pop-up window on the right side of the page.

Option 1: Click on the data row directly.

<figure><img src="https://1526800164-files.gitbook.io/~/files/v0/b/gitbook-x-prod.appspot.com/o/spaces%2F50DeL6mO9sNbAZBSEdaN%2Fuploads%2FRSzkjclc6oLMaH505V80%2Fimage.png?alt=media&amp;token=bffa8e59-d585-4ff2-98e1-e77a062567ba" alt=""><figcaption></figcaption></figure>

Option 2: On the right side of the data row, click on "more ···" and then click "View.

<figure><img src="https://1526800164-files.gitbook.io/~/files/v0/b/gitbook-x-prod.appspot.com/o/spaces%2F50DeL6mO9sNbAZBSEdaN%2Fuploads%2FcDrtBq01R7CQFOjKyCdJ%2Fimage.png?alt=media&amp;token=0f82ebfc-3aab-4f31-8905-9bba8b41aaa3" alt=""><figcaption></figcaption></figure>

<figure><img src="https://1526800164-files.gitbook.io/~/files/v0/b/gitbook-x-prod.appspot.com/o/spaces%2F50DeL6mO9sNbAZBSEdaN%2Fuploads%2Fg8mTaZGPULFahkR5uR9l%2Fimage.png?alt=media&amp;token=eaa5c229-cd5c-4987-abd2-7efc5b641016" alt=""><figcaption></figcaption></figure>

### 2.3 Edit

Step 1: On the right-side of the data row, click more ···, and click "Edit".

<figure><img src="https://1526800164-files.gitbook.io/~/files/v0/b/gitbook-x-prod.appspot.com/o/spaces%2F50DeL6mO9sNbAZBSEdaN%2Fuploads%2FulZoBlvlpadnnFBl7QHE%2Fimage.png?alt=media&amp;token=dbe48fc8-60fd-4208-96cf-2f81d42155e1" alt=""><figcaption></figcaption></figure>

Step 2: Modify the details and click "Submit" to implement the new changes made.

<figure><img src="https://1526800164-files.gitbook.io/~/files/v0/b/gitbook-x-prod.appspot.com/o/spaces%2F50DeL6mO9sNbAZBSEdaN%2Fuploads%2F6pWxIJi1JTjAmSy48cNv%2Fimage.png?alt=media&amp;token=2a762312-f309-4277-aa77-94140887b1ac" alt=""><figcaption></figcaption></figure>

**Remark:**

Users can only edit the products they have created.

### 2.4 Delete

#### 2.4.1 Single Delete

Step 1: On the right-side of the data row, click more ···, and click "Delete".

<figure><img src="https://1526800164-files.gitbook.io/~/files/v0/b/gitbook-x-prod.appspot.com/o/spaces%2F50DeL6mO9sNbAZBSEdaN%2Fuploads%2FyCZ86f2TN1uzmrgXKed8%2Fimage.png?alt=media&amp;token=72b66a16-8522-4be3-936b-7ed653626f73" alt=""><figcaption></figcaption></figure>

Step 2: Confirm the delete operation, and the data will be deleted and removed from the list.

<figure><img src="https://1526800164-files.gitbook.io/~/files/v0/b/gitbook-x-prod.appspot.com/o/spaces%2F50DeL6mO9sNbAZBSEdaN%2Fuploads%2FWGmm5qldBvuWHzzKzzjI%2Fimage.png?alt=media&amp;token=b1c51bf9-90c1-41ef-8d66-8e86f830660b" alt="" width="297"><figcaption></figcaption></figure>

#### 2.4.2  Batch Delete

Step 2: Confirm the delete operation, and the data will be deleted and removed from the list.

<figure><img src="https://1526800164-files.gitbook.io/~/files/v0/b/gitbook-x-prod.appspot.com/o/spaces%2F50DeL6mO9sNbAZBSEdaN%2Fuploads%2FWOD5TNusHrkvqbImR40n%2Fimage.png?alt=media&amp;token=2efc35f2-c675-4ec7-ba9c-b12974ed667c" alt="" width="297"><figcaption></figcaption></figure>

<figure><img src="https://1526800164-files.gitbook.io/~/files/v0/b/gitbook-x-prod.appspot.com/o/spaces%2F50DeL6mO9sNbAZBSEdaN%2Fuploads%2FtCKHbtdafJAgxBKNAxl9%2Fimage.png?alt=media&amp;token=e6713158-2d2b-45ae-bda5-b875263b3cab" alt="" width="272"><figcaption><p>Deletion success notification pop-up box</p></figcaption></figure>

**Remark:**

Users can only delete products that they have created and no sales records have been generated.

## 3 Log

Step 1: Open the details, and it will display on the right-side of the page.

Option 1: Click on the data row directly.

<figure><img src="https://1526800164-files.gitbook.io/~/files/v0/b/gitbook-x-prod.appspot.com/o/spaces%2F50DeL6mO9sNbAZBSEdaN%2Fuploads%2FKqKYsGufW5a1abdUlzCF%2Fimage.png?alt=media&amp;token=4ba72e94-cd30-4360-9664-93c4702c8ce0" alt=""><figcaption></figcaption></figure>

Option 2: Go to the right-side of the data row, click more ···, and click "View".

<figure><img src="https://1526800164-files.gitbook.io/~/files/v0/b/gitbook-x-prod.appspot.com/o/spaces%2F50DeL6mO9sNbAZBSEdaN%2Fuploads%2FNNQO0SxgEOeHTfTA8BW7%2Fimage.png?alt=media&amp;token=1731033f-81ad-4823-8c72-002291a24161" alt=""><figcaption></figcaption></figure>

Step 2: Click on the "Log" tab to view the log details.

<figure><img src="https://1526800164-files.gitbook.io/~/files/v0/b/gitbook-x-prod.appspot.com/o/spaces%2F50DeL6mO9sNbAZBSEdaN%2Fuploads%2FzoZFbgmoLM2popWusepi%2Fimage.png?alt=media&amp;token=4a980d66-e991-41cd-ba6f-6bfb035d595b" alt=""><figcaption></figcaption></figure>

The log data can be filtered by log type through the operation type, by the creation time using the existing time filter, or by customizing the range with the "Time range" button. Additionally, the \[Search log] search box is used to search for log content.

<figure><img src="https://1526800164-files.gitbook.io/~/files/v0/b/gitbook-x-prod.appspot.com/o/spaces%2F50DeL6mO9sNbAZBSEdaN%2Fuploads%2FwhCNrFVnyPyvMF1OP6I5%2Fimage.png?alt=media&amp;token=6a759510-0148-499b-9673-bec159a82da9" alt=""><figcaption></figcaption></figure>

## 4 Import/Export

### 4.1 Import

Step 1: In the top-right corner of the page, click "Import".

<figure><img src="https://1526800164-files.gitbook.io/~/files/v0/b/gitbook-x-prod.appspot.com/o/spaces%2F50DeL6mO9sNbAZBSEdaN%2Fuploads%2FCE9iJSdURcltLbesV6e1%2Fimage.png?alt=media&amp;token=54579d8d-6364-48d0-aa2d-23c1ae763600" alt=""><figcaption></figcaption></figure>

Step 2: Export the template by clicking on "Export template".

<figure><img src="https://1526800164-files.gitbook.io/~/files/v0/b/gitbook-x-prod.appspot.com/o/spaces%2F50DeL6mO9sNbAZBSEdaN%2Fuploads%2FQdvrlluy9VgYEVOTJ2hL%2Fimage.png?alt=media&amp;token=1782c782-2e66-4a47-9042-817f800573ad" alt=""><figcaption></figcaption></figure>

\
Step 3: Fill up the Excel template.

<figure><img src="https://1526800164-files.gitbook.io/~/files/v0/b/gitbook-x-prod.appspot.com/o/spaces%2F50DeL6mO9sNbAZBSEdaN%2Fuploads%2Fqhj0iXbenmgKMZ1C6PYw%2Fimage.png?alt=media&amp;token=55306f17-b338-4ac5-bbc7-ff41ac880b7e" alt=""><figcaption></figcaption></figure>

\
Step 4: Select the updated Excel file by double-clicking on the file or click on the file and click "Open".

<figure><img src="https://1526800164-files.gitbook.io/~/files/v0/b/gitbook-x-prod.appspot.com/o/spaces%2F50DeL6mO9sNbAZBSEdaN%2Fuploads%2Fuep2wXreTFUbqP2mHCcR%2Fimage.png?alt=media&amp;token=a90b107d-93ad-4e93-9f8b-116533e7044f" alt=""><figcaption></figcaption></figure>

\
Step 5: Click on "Start importing" to begin the import.

<figure><img src="https://1526800164-files.gitbook.io/~/files/v0/b/gitbook-x-prod.appspot.com/o/spaces%2F50DeL6mO9sNbAZBSEdaN%2Fuploads%2F2ZzhNVZmBCB3r9Bd0tRh%2Fimage.png?alt=media&amp;token=c4fc14cb-b7ef-460e-97aa-edb88294e570" alt=""><figcaption></figcaption></figure>

\
Status message will pop-up once done.

<figure><img src="https://1526800164-files.gitbook.io/~/files/v0/b/gitbook-x-prod.appspot.com/o/spaces%2F50DeL6mO9sNbAZBSEdaN%2Fuploads%2FEiF9LiMJiQX5PFUykcBv%2Fimage.png?alt=media&amp;token=04dca1f0-e5b7-4e6d-a8ae-cef3b1ae5469" alt="" width="278"><figcaption></figcaption></figure>

<figure><img src="https://1526800164-files.gitbook.io/~/files/v0/b/gitbook-x-prod.appspot.com/o/spaces%2F50DeL6mO9sNbAZBSEdaN%2Fuploads%2FEUnJD5O7FXKyAl6rMkgl%2Fimage.png?alt=media&amp;token=3ad7f3d4-7d59-4bb1-89f6-f02bfa19692e" alt="" width="276"><figcaption></figcaption></figure>

When the import is complete, an Excel file will be generated to inform the user of the import status of all rows and provide an error message if the import failed.

### 4.2 Export

Step 1: In the top-right corner of the page, click "Export".

<figure><img src="https://1526800164-files.gitbook.io/~/files/v0/b/gitbook-x-prod.appspot.com/o/spaces%2F50DeL6mO9sNbAZBSEdaN%2Fuploads%2Ffw1x98YV2reQ8iFfCko6%2Fimage.png?alt=media&amp;token=8cc8ba48-220f-41a3-b704-6ae3cad3252c" alt=""><figcaption></figcaption></figure>

Step 2: Select or de-select fields to be exported, and click "Confirm" to begin the process.

<figure><img src="https://1526800164-files.gitbook.io/~/files/v0/b/gitbook-x-prod.appspot.com/o/spaces%2F50DeL6mO9sNbAZBSEdaN%2Fuploads%2FqTtazHDZwLwFcNCinWvL%2Fimage.png?alt=media&amp;token=2052e7e8-1e0e-4161-8ec5-dac533951c79" alt="" width="375"><figcaption></figcaption></figure>

The system will automatically generate and download the exported data in Excel format onto the user's device.

<figure><img src="https://1526800164-files.gitbook.io/~/files/v0/b/gitbook-x-prod.appspot.com/o/spaces%2F50DeL6mO9sNbAZBSEdaN%2Fuploads%2FBLwBuDfs0Wh8g5tFwfyJ%2Fimage.png?alt=media&amp;token=f71936f6-5042-41ed-bc53-b208b4e9ca8c" alt=""><figcaption></figcaption></figure>

## 5 Filtering/Searching

### 5.1 Filter&#x20;

Users can save their preferred filter by entering/selecting the condition and click "Save" or "Save and Search" to be directed to the result straight away.

Step 1: Click on the ![](https://1526800164-files.gitbook.io/~/files/v0/b/gitbook-x-prod.appspot.com/o/spaces%2F50DeL6mO9sNbAZBSEdaN%2Fuploads%2F10ROrozknY6wpyB3Vjo1%2Fimage.png?alt=media\&token=251169f5-e00d-45a9-a3e6-155b3938bc91)icon next to the search box.

<figure><img src="https://1526800164-files.gitbook.io/~/files/v0/b/gitbook-x-prod.appspot.com/o/spaces%2F50DeL6mO9sNbAZBSEdaN%2Fuploads%2FaeASsxM75ObSrb3zBfXv%2Fimage.png?alt=media&amp;token=83175ac7-0774-473b-9312-12a924983073" alt=""><figcaption></figcaption></figure>

Step 2: Fill in the relevant condition and click "Save".

<figure><img src="https://1526800164-files.gitbook.io/~/files/v0/b/gitbook-x-prod.appspot.com/o/spaces%2F50DeL6mO9sNbAZBSEdaN%2Fuploads%2FamW4s5CIMZTz0XP8Ym8E%2Fimage.png?alt=media&amp;token=2bafe12c-837d-40d3-b78a-c99159eff356" alt=""><figcaption></figcaption></figure>

A new filter condition has been created.

<figure><img src="https://1526800164-files.gitbook.io/~/files/v0/b/gitbook-x-prod.appspot.com/o/spaces%2F50DeL6mO9sNbAZBSEdaN%2Fuploads%2FK649WTBaJI8YDfDW4Q6W%2Fimage.png?alt=media&amp;token=a47c3367-4937-48db-8ffe-f651a73760e4" alt=""><figcaption></figcaption></figure>

You can change the filter name by clicking on![](https://1526800164-files.gitbook.io/~/files/v0/b/gitbook-x-prod.appspot.com/o/spaces%2F50DeL6mO9sNbAZBSEdaN%2Fuploads%2F6XKe0WDnMT7ScswBaS9E%2Fimage.png?alt=media\&token=0a1b44c7-375e-4f2d-b90f-ffb0552664cc)

<figure><img src="https://1526800164-files.gitbook.io/~/files/v0/b/gitbook-x-prod.appspot.com/o/spaces%2F50DeL6mO9sNbAZBSEdaN%2Fuploads%2FDONmVVIdNDT72QIiUAHB%2Fimage.png?alt=media&amp;token=3ec7462f-9c51-49c1-bea1-4c73afaca7b6" alt=""><figcaption></figcaption></figure>

Click on the save icon when completed

<figure><img src="https://1526800164-files.gitbook.io/~/files/v0/b/gitbook-x-prod.appspot.com/o/spaces%2F50DeL6mO9sNbAZBSEdaN%2Fuploads%2FpdAixchtXQqwcoarCS6B%2Fimage.png?alt=media&amp;token=93c382bc-71ed-43d0-aff4-6205fd570cb3" alt=""><figcaption></figcaption></figure>

New filter is created.

<figure><img src="https://1526800164-files.gitbook.io/~/files/v0/b/gitbook-x-prod.appspot.com/o/spaces%2F50DeL6mO9sNbAZBSEdaN%2Fuploads%2FldFBELC4bXWvBemiRcC0%2Fimage.png?alt=media&amp;token=bccfa8ad-c087-4561-8878-a39c71c47a0d" alt=""><figcaption></figcaption></figure>

In the Advance Search, click on the (X) to delete the filter.

<figure><img src="https://1526800164-files.gitbook.io/~/files/v0/b/gitbook-x-prod.appspot.com/o/spaces%2F50DeL6mO9sNbAZBSEdaN%2Fuploads%2Fjq3LefOailjalUZKeVN1%2Fimage.png?alt=media&amp;token=e319beb0-e7f3-4f6e-ab29-c3676ba7fd61" alt=""><figcaption></figcaption></figure>

### 5.2 Search

#### 5.2.1 Simple Query

By entering relevant text regarding contact names in the search box, users will be able to filter suppliers with product names or product no. that are similar/matched to the text entered.

<figure><img src="https://1526800164-files.gitbook.io/~/files/v0/b/gitbook-x-prod.appspot.com/o/spaces%2F50DeL6mO9sNbAZBSEdaN%2Fuploads%2FH8lSahVv5AC9rO4SOOFK%2Fimage.png?alt=media&amp;token=afd8bfc3-2f91-4a39-a585-13f8a45ac4d2" alt=""><figcaption></figcaption></figure>

#### 5.2.2 Advanced Query

The \[Advance Query] allows the users to create complex searches or filters by specifying detailed conditions and criteria.

Step 1: Click on the ![](https://1526800164-files.gitbook.io/~/files/v0/b/gitbook-x-prod.appspot.com/o/spaces%2F50DeL6mO9sNbAZBSEdaN%2Fuploads%2F10ROrozknY6wpyB3Vjo1%2Fimage.png?alt=media\&token=251169f5-e00d-45a9-a3e6-155b3938bc91)icon next to the search box.

<figure><img src="https://1526800164-files.gitbook.io/~/files/v0/b/gitbook-x-prod.appspot.com/o/spaces%2F50DeL6mO9sNbAZBSEdaN%2Fuploads%2FvinK5o8r1pJmSmG5x5Y3%2Fimage.png?alt=media&amp;token=66615ad7-f22e-4164-b378-fa4f8422cf02" alt=""><figcaption></figcaption></figure>

Step 2: Fill in the relevant condition and click on "Search".

<figure><img src="https://1526800164-files.gitbook.io/~/files/v0/b/gitbook-x-prod.appspot.com/o/spaces%2F50DeL6mO9sNbAZBSEdaN%2Fuploads%2FusGptmVHHcArj2ZxXDuQ%2Fimage.png?alt=media&amp;token=d1123fc5-b21e-4ed5-bdde-76d0214f7de9" alt=""><figcaption></figcaption></figure>

<br>


# More

{% content-ref url="/pages/BmqYVoepjtejyorTwMbm" %}
[Import/Export](https://eohelp.weaver.com.co/crm/more/import-export)
{% endcontent-ref %}

{% content-ref url="/pages/Pei4sLBHhN3CWVgar8fv" %}
[Transfer](https://eohelp.weaver.com.co/crm/more/transfer)
{% endcontent-ref %}

{% content-ref url="/pages/5F5PGcuKpCHTXipLRT1c" %}
[Merge](https://eohelp.weaver.com.co/crm/more/merge)
{% endcontent-ref %}

{% content-ref url="/pages/hfYQOHb9WUeB6l2mye4q" %}
[Recycle Bin](https://eohelp.weaver.com.co/crm/more/recycle-bin)
{% endcontent-ref %}

{% content-ref url="/pages/6F9BMUVbaQmRHJqTIldF" %}
[Request to access](https://eohelp.weaver.com.co/crm/more/request-to-access)
{% endcontent-ref %}

{% content-ref url="/pages/wLCPWo2pTz0JbNlUTOxh" %}
[Permission Approval](https://eohelp.weaver.com.co/crm/more/permission-approval)
{% endcontent-ref %}


# Import/Export

## 1 List Data

The data displayed in the list is the same as that in the customer list.

<figure><img src="https://1526800164-files.gitbook.io/~/files/v0/b/gitbook-x-prod.appspot.com/o/spaces%2F50DeL6mO9sNbAZBSEdaN%2Fuploads%2FJDLysrAvGL6WhXbcpsfq%2Fimage.png?alt=media&amp;token=c02943c5-fa08-46f9-82a2-d9ee93d4288d" alt=""><figcaption></figcaption></figure>

By clicking on the list, the customer details open directly on the right side of the list, and the user can add contact records, contacts, opportunities, contracts, and new reminders.

## 2 Import

Step 1: In the top-right corner of the page, click "Import".

<figure><img src="https://1526800164-files.gitbook.io/~/files/v0/b/gitbook-x-prod.appspot.com/o/spaces%2F50DeL6mO9sNbAZBSEdaN%2Fuploads%2FezIeIENCWc2QCZPPJ60y%2Fimage.png?alt=media&amp;token=52b6a8fe-10e0-4ebb-97cd-30ae1960253d" alt=""><figcaption></figcaption></figure>

Step 2: Export the template by clicking on "Export template"

<figure><img src="https://1526800164-files.gitbook.io/~/files/v0/b/gitbook-x-prod.appspot.com/o/spaces%2F50DeL6mO9sNbAZBSEdaN%2Fuploads%2FKI3va2wxGPyhUCMBfwSi%2Fimage.png?alt=media&amp;token=a1e159a7-10cf-46c2-b45c-246c44df9fe6" alt=""><figcaption></figcaption></figure>

Step 3: Fill up the Excel template

\
Step 4: Select the updated Excel file by double-clicking on the file or click on the file and click "Open".

<figure><img src="https://1526800164-files.gitbook.io/~/files/v0/b/gitbook-x-prod.appspot.com/o/spaces%2F50DeL6mO9sNbAZBSEdaN%2Fuploads%2FGwZfHpA6OhMT7OIr7XLP%2Fimage.png?alt=media&amp;token=01cac056-5ec2-40f4-ac1d-4eb3e39a3f7b" alt=""><figcaption></figcaption></figure>

Step 5: Select whether you would like to add new data or update the existing data, once done, click on "Start importing" to begin the import.

<figure><img src="https://1526800164-files.gitbook.io/~/files/v0/b/gitbook-x-prod.appspot.com/o/spaces%2F50DeL6mO9sNbAZBSEdaN%2Fuploads%2Fhlp4sy46j6JgkokhhxxQ%2Fimage.png?alt=media&amp;token=68fb0a7d-681c-495f-9e3c-1b675e3663be" alt=""><figcaption></figcaption></figure>

When the import is complete, an Excel file will be generated to inform the user of the import status of all rows.

### 2.1 Import Success

<figure><img src="https://1526800164-files.gitbook.io/~/files/v0/b/gitbook-x-prod.appspot.com/o/spaces%2F50DeL6mO9sNbAZBSEdaN%2Fuploads%2FgN7UnXGUpBTH0IQnrbjA%2Fimage.png?alt=media&amp;token=a16ed032-e7f3-4f08-8f45-f1d12674c950" alt=""><figcaption></figcaption></figure>

### 4.2 Import Fail

When the import failed, the system will provide the reason for failure in the import report.

<figure><img src="https://1526800164-files.gitbook.io/~/files/v0/b/gitbook-x-prod.appspot.com/o/spaces%2F50DeL6mO9sNbAZBSEdaN%2Fuploads%2F3HWDuAflWqE1uiSylwPa%2Fimage.png?alt=media&amp;token=ec237d14-62f2-4c58-bf11-655a3c244a57" alt=""><figcaption></figcaption></figure>

<figure><img src="https://1526800164-files.gitbook.io/~/files/v0/b/gitbook-x-prod.appspot.com/o/spaces%2F50DeL6mO9sNbAZBSEdaN%2Fuploads%2Fku9U5UPqm3S8B3xTBlYF%2Fimage.png?alt=media&amp;token=0c96eca3-fb94-4c5b-b65a-7c544cf4ead5" alt=""><figcaption></figcaption></figure>

<figure><img src="https://1526800164-files.gitbook.io/~/files/v0/b/gitbook-x-prod.appspot.com/o/spaces%2F50DeL6mO9sNbAZBSEdaN%2Fuploads%2FiYnYv0WhOGggO5s72bzC%2Fimage.png?alt=media&amp;token=a93e7ed7-eb4a-409b-b328-6993d3afacc7" alt=""><figcaption><p>Import Report.xlsx</p></figcaption></figure>

## 3 Export

Step 1: In the top-right corner of the page, click "Export".

<figure><img src="https://1526800164-files.gitbook.io/~/files/v0/b/gitbook-x-prod.appspot.com/o/spaces%2F50DeL6mO9sNbAZBSEdaN%2Fuploads%2FmierXIlPmaE0wYjToEh8%2Fimage.png?alt=media&amp;token=a3d0d564-9a0b-4a14-8730-39b3bb049ddb" alt=""><figcaption></figcaption></figure>

Step 2: Select or de-select fields to be exported, and click "Confirm" to begin the process.

<figure><img src="https://1526800164-files.gitbook.io/~/files/v0/b/gitbook-x-prod.appspot.com/o/spaces%2F50DeL6mO9sNbAZBSEdaN%2Fuploads%2FlE4zgVo6HaxPwhdxL2D3%2Fimage.png?alt=media&amp;token=08a116bd-9fcf-474b-b43a-f967ab26bccf" alt=""><figcaption></figcaption></figure>

The system will automatically generate and download the exported data in Excel format onto the user's device.

<figure><img src="https://1526800164-files.gitbook.io/~/files/v0/b/gitbook-x-prod.appspot.com/o/spaces%2F50DeL6mO9sNbAZBSEdaN%2Fuploads%2FTA1ca5Pj0C6kbCvwG5tt%2Fimage.png?alt=media&amp;token=780006cf-fa99-47bb-b4fb-2ddfa5f64200" alt=""><figcaption></figcaption></figure>

**Remark:**

* This will export all the data that is shown on the current display list, across all pages. If your settings for the list are set to 10 results per page, the export will still include all existing data.
* The user can also export the desired data by filtering, searching, and applying query conditions before the export.

## 4 Filtering/Searching

### 4.1 Filter

#### 4.1.1 Existing Filter

The filter function allows users to refine or narrow down the data list based on the selected criteria.

Click on "More filters" to view more filtering options available.

<figure><img src="https://1526800164-files.gitbook.io/~/files/v0/b/gitbook-x-prod.appspot.com/o/spaces%2F50DeL6mO9sNbAZBSEdaN%2Fuploads%2FbpZ4Hn5ALC46rvuMtx8W%2Fimage.png?alt=media&amp;token=8857fa20-8582-4aec-b792-32e4b5c9d1c5" alt=""><figcaption></figcaption></figure>

<figure><img src="https://1526800164-files.gitbook.io/~/files/v0/b/gitbook-x-prod.appspot.com/o/spaces%2F50DeL6mO9sNbAZBSEdaN%2Fuploads%2FGxm0Fe9Q5dZjQLEBb10J%2Fimage.png?alt=media&amp;token=1e8741d8-5ef6-41dc-ba10-9e9d9c1d70a3" alt=""><figcaption></figcaption></figure>

#### 4.1.1.2 Create new filter

Users can save their preferred filter by entering/selecting the condition and click "Save" or "Save and Search" to be directed to the result straight away.

Step 1: Click on the ![](https://1526800164-files.gitbook.io/~/files/v0/b/gitbook-x-prod.appspot.com/o/spaces%2F50DeL6mO9sNbAZBSEdaN%2Fuploads%2FoVQuiRteaaA2JsZC9rFm%2Fimage.png?alt=media\&token=6b3561ce-2149-48fd-9d2f-e946bd02ac39)icon next to the search box.

<figure><img src="https://1526800164-files.gitbook.io/~/files/v0/b/gitbook-x-prod.appspot.com/o/spaces%2F50DeL6mO9sNbAZBSEdaN%2Fuploads%2FQAVmS603OJ5mhiGCig5A%2Fimage.png?alt=media&amp;token=44b86a6e-6a70-4a63-b645-49fad9fb87be" alt=""><figcaption></figcaption></figure>

Step 2: Fill in the relevant condition and click on "Save".

<figure><img src="https://1526800164-files.gitbook.io/~/files/v0/b/gitbook-x-prod.appspot.com/o/spaces%2F50DeL6mO9sNbAZBSEdaN%2Fuploads%2FnOQZhUKxHwANd6o3xLQV%2Fimage.png?alt=media&amp;token=709b8f0f-f771-4ebd-b984-0935277dc775" alt=""><figcaption></figcaption></figure>

A new filter condition will be created.

<figure><img src="https://1526800164-files.gitbook.io/~/files/v0/b/gitbook-x-prod.appspot.com/o/spaces%2F50DeL6mO9sNbAZBSEdaN%2Fuploads%2FFuEcKobvoS4BccF5PSWs%2Fimage.png?alt=media&amp;token=1cde3489-a34f-4721-ad2f-998bbd48a62f" alt=""><figcaption></figcaption></figure>

The filter name can be changed by clicking on ![](https://eohelp.weaverintl.com/~gitbook/image?url=https%3A%2F%2F1526800164-files.gitbook.io%2F%7E%2Ffiles%2Fv0%2Fb%2Fgitbook-x-prod.appspot.com%2Fo%2Fspaces%252F50DeL6mO9sNbAZBSEdaN%252Fuploads%252FGiv8FS6GDtry0O9h1y4x%252Fimage.png%3Falt%3Dmedia%26token%3D8fce9755-1bbf-4bcf-a0ed-3df562709353\&width=300\&dpr=4\&quality=100\&sign=40fe3c21\&sv=1)

<figure><img src="https://1526800164-files.gitbook.io/~/files/v0/b/gitbook-x-prod.appspot.com/o/spaces%2F50DeL6mO9sNbAZBSEdaN%2Fuploads%2Fl1wjWTP6jRcs0D5Loput%2Fimage.png?alt=media&amp;token=f0323cbe-7cfd-4cdf-a236-490094085a5f" alt=""><figcaption></figcaption></figure>

\
Click on the save icon when completed

<figure><img src="https://1526800164-files.gitbook.io/~/files/v0/b/gitbook-x-prod.appspot.com/o/spaces%2F50DeL6mO9sNbAZBSEdaN%2Fuploads%2FmOx1d2WRddZHdhtlH5se%2Fimage.png?alt=media&amp;token=0284d0c5-485e-43cf-b9f7-a2c965822a26" alt=""><figcaption></figcaption></figure>

New filter is created.

<figure><img src="https://1526800164-files.gitbook.io/~/files/v0/b/gitbook-x-prod.appspot.com/o/spaces%2F50DeL6mO9sNbAZBSEdaN%2Fuploads%2F0L0FSe5NwCtgQ2nyZSVq%2Fimage.png?alt=media&amp;token=c4925502-11e2-4ad7-b19c-2c0f7861a775" alt=""><figcaption></figcaption></figure>

In the Advance Search, click on the (X) to delete the filter.

<figure><img src="https://1526800164-files.gitbook.io/~/files/v0/b/gitbook-x-prod.appspot.com/o/spaces%2F50DeL6mO9sNbAZBSEdaN%2Fuploads%2FwPlvM8ISEoB21QRSnybw%2Fimage.png?alt=media&amp;token=b1f82794-d776-4652-aa32-88002f995b78" alt=""><figcaption></figcaption></figure>

<figure><img src="https://1526800164-files.gitbook.io/~/files/v0/b/gitbook-x-prod.appspot.com/o/spaces%2F50DeL6mO9sNbAZBSEdaN%2Fuploads%2FR6usmE1hyfWV5n0DU5a8%2Fimage.png?alt=media&amp;token=e6b42245-e976-4bd2-9933-cf1c6fcd6e71" alt="" width="291"><figcaption></figcaption></figure>

### 4.2 Search

#### 4.2.1 Simple Query

The user is able to search for customers using customer name, contact number, company address, account executive, customer service representative, contact name, contact phone number, and customer creator that are similar to or match the text entered in the search box.

<figure><img src="https://1526800164-files.gitbook.io/~/files/v0/b/gitbook-x-prod.appspot.com/o/spaces%2F50DeL6mO9sNbAZBSEdaN%2Fuploads%2FCrZgfoFGkJv9D8pa1vec%2Fimage.png?alt=media&amp;token=2e7ab9ab-3e10-439f-b5b2-068a3c7ddad2" alt=""><figcaption></figcaption></figure>

#### 4.2.2 Advanced Query

The \[Advance Query] allows the users to create complex searches or filters by specifying detailed conditions and criteria.\
Step 1: Click on the ![](https://eohelp.weaverintl.com/~gitbook/image?url=https%3A%2F%2F1526800164-files.gitbook.io%2F%7E%2Ffiles%2Fv0%2Fb%2Fgitbook-x-prod.appspot.com%2Fo%2Fspaces%252F50DeL6mO9sNbAZBSEdaN%252Fuploads%252FnjJDSlZsrXudSlnc2TJ3%252Fimage.png%3Falt%3Dmedia%26token%3Db1563e72-8c52-4583-9815-c9e73c48356d\&width=300\&dpr=4\&quality=100\&sign=2c534acb\&sv=1)icon next to the search box.

<figure><img src="https://1526800164-files.gitbook.io/~/files/v0/b/gitbook-x-prod.appspot.com/o/spaces%2F50DeL6mO9sNbAZBSEdaN%2Fuploads%2FtI6RSaSFdFqbLDQQQCZp%2Fimage.png?alt=media&amp;token=d4764fff-8e5d-45c4-8e4b-fa5972c37d25" alt=""><figcaption></figcaption></figure>

Step 2: Fill in the relevant condition and click on "Search".

<figure><img src="https://1526800164-files.gitbook.io/~/files/v0/b/gitbook-x-prod.appspot.com/o/spaces%2F50DeL6mO9sNbAZBSEdaN%2Fuploads%2F37OKAsYwtKLoHYaBXK4f%2Fimage.png?alt=media&amp;token=06fe54e5-5a0f-4dc7-b769-1ef51df6b3ac" alt=""><figcaption></figcaption></figure>

<br>


# Transfer

Purpose: Allocation by customer service representative or allocation by account manager to batch-assign a new account executive, customer service representative, and share with other users.

## 1 Allocation by Customer

### 1.1 List Data

The customer list in the merge will only show the customers that the current user has permission to edit.

<figure><img src="https://1526800164-files.gitbook.io/~/files/v0/b/gitbook-x-prod.appspot.com/o/spaces%2F50DeL6mO9sNbAZBSEdaN%2Fuploads%2FX3OdAmpen78jLzdAbsXt%2Fimage.png?alt=media&amp;token=63f3a613-c4a8-4c9a-b166-cd2fe92b4a26" alt=""><figcaption></figcaption></figure>

### 1.2 Batch specify Account Executive

Step 1: Select the customer to be transferred and click "Batch Specify Account Executive".

<figure><img src="https://1526800164-files.gitbook.io/~/files/v0/b/gitbook-x-prod.appspot.com/o/spaces%2F50DeL6mO9sNbAZBSEdaN%2Fuploads%2FORLOS14HXWRa36pZHnWx%2Fimage.png?alt=media&amp;token=47d66901-f139-41e5-a466-85c4c756eac7" alt=""><figcaption></figcaption></figure>

Step 2: Select the user to replace the current account executive with and click "Confirm".

<figure><img src="https://1526800164-files.gitbook.io/~/files/v0/b/gitbook-x-prod.appspot.com/o/spaces%2F50DeL6mO9sNbAZBSEdaN%2Fuploads%2Fu9CX2E2YWG6wXqm30VPq%2Fimage.png?alt=media&amp;token=1bc92372-2316-4927-98cb-97c09b49a5f0" alt=""><figcaption></figcaption></figure>

<figure><img src="https://1526800164-files.gitbook.io/~/files/v0/b/gitbook-x-prod.appspot.com/o/spaces%2F50DeL6mO9sNbAZBSEdaN%2Fuploads%2FFS5QnASHFOZ55nfPJ6oi%2Fimage.png?alt=media&amp;token=01855101-5086-4c13-afce-57566bc146e8" alt="" width="278"><figcaption></figcaption></figure>

**Remark:**

* After the replacement is completed, the Transfer list will be updated immediate after.&#x20;
* If the current user no longer has editing permission due to the change, the data will no longer be displayed in the list.&#x20;
* The new account executive will be notified of the change.

### 1.3 Batch specify Customer Service Representative

Step 1: Select the customer to be transferred, click "More", and click "Batch Specify Customer Service Representative".

<figure><img src="https://1526800164-files.gitbook.io/~/files/v0/b/gitbook-x-prod.appspot.com/o/spaces%2F50DeL6mO9sNbAZBSEdaN%2Fuploads%2FGEbgQMpNRIna5MMPOaQY%2Fimage.png?alt=media&amp;token=16c40429-0442-48c0-a306-e67f6e37d59b" alt=""><figcaption></figcaption></figure>

Step 2: Select the user to replace the current customer service representative with and click "Confirm".

<figure><img src="https://1526800164-files.gitbook.io/~/files/v0/b/gitbook-x-prod.appspot.com/o/spaces%2F50DeL6mO9sNbAZBSEdaN%2Fuploads%2FpTwyb4EaxJFTZ1n7UY11%2Fimage.png?alt=media&amp;token=5c4d6a91-ebc2-46f1-aed1-c4ccb4e3865e" alt=""><figcaption></figcaption></figure>

**Remark:**

* After the replacement is completed, the Transfer list will be updated immediate after.&#x20;
* If the current user no longer has editing permission due to the change, the data will no longer be displayed in the list.&#x20;
* The new customer service representative will be notified of the change.

### 1.4 Batch assign sharers

Purpose: Batch assign whom to share the customer data with.

Step 1: Select the customer to be shared, click "More", and click "Batch assign sharers".

<figure><img src="https://1526800164-files.gitbook.io/~/files/v0/b/gitbook-x-prod.appspot.com/o/spaces%2F50DeL6mO9sNbAZBSEdaN%2Fuploads%2FGup7JwtVPkDd1WEtl8ih%2Fimage.png?alt=media&amp;token=458b57d5-db0f-4524-a7c5-ca49130198f4" alt=""><figcaption></figcaption></figure>

Step 2.1: Click on "Replace." The user's original shared range will be reset and replaced with the current settings.

Step 2.2: Click on "Add." The user's original shared range will remain unchanged, and the new range will be added to the current one.

<figure><img src="https://1526800164-files.gitbook.io/~/files/v0/b/gitbook-x-prod.appspot.com/o/spaces%2F50DeL6mO9sNbAZBSEdaN%2Fuploads%2F2WtbJEB6MMoKN8GqKZQC%2Fimage.png?alt=media&amp;token=869d3b76-f4f7-4ab2-9413-436c3e6665ea" alt=""><figcaption></figcaption></figure>

## 2 Allocation by Account Executive

### 2.1 List Data

The account executive displayed on the list are all system users (including resigned user) and that the current user are allowed to edit.

<figure><img src="https://1526800164-files.gitbook.io/~/files/v0/b/gitbook-x-prod.appspot.com/o/spaces%2F50DeL6mO9sNbAZBSEdaN%2Fuploads%2FVVyRKaZ76y7eBhMAoCc7%2Fimage.png?alt=media&amp;token=6a5934c7-2513-45bc-80ad-ddc2bf8b950c" alt=""><figcaption></figcaption></figure>

**Remark:**

\[Number of clients] represents the number of customer under the current account executive.

### 2.2 Batch specify Account Executive

Step 1: Select the customer to be transferred and click "Batch Specify Account Executive".

<figure><img src="https://1526800164-files.gitbook.io/~/files/v0/b/gitbook-x-prod.appspot.com/o/spaces%2F50DeL6mO9sNbAZBSEdaN%2Fuploads%2F0111fSQU2pujwMDuDcEc%2Fimage.png?alt=media&amp;token=9251b4da-4b11-4f06-9926-42f57e097c70" alt=""><figcaption></figcaption></figure>

Step 2: Select the user to replace the current account executive with and click "Confirm".

<figure><img src="https://1526800164-files.gitbook.io/~/files/v0/b/gitbook-x-prod.appspot.com/o/spaces%2F50DeL6mO9sNbAZBSEdaN%2Fuploads%2FwvJHgKSGSTfEDXSfMkmE%2Fimage.png?alt=media&amp;token=f4ec7dd0-efac-418e-b5f7-842bb41efc64" alt=""><figcaption></figcaption></figure>

**Remark:**

* After the replacement is completed, the Transfer list will be updated immediate after.&#x20;
* If the current user no longer has editing permission due to the change, the data will no longer be displayed in the list.&#x20;
* The new account executive will be notified of the change.

### 2.3 Batch sepcify Customer Service Representative

Step 1: Select the customer to be transferred, click "More", and click "Batch Specify Customer Service Representative".

<figure><img src="https://1526800164-files.gitbook.io/~/files/v0/b/gitbook-x-prod.appspot.com/o/spaces%2F50DeL6mO9sNbAZBSEdaN%2Fuploads%2FlQ4JcIlBfPmjm1JnChWR%2Fimage.png?alt=media&amp;token=a1877935-70b4-4a03-b876-fd7997b25ae1" alt=""><figcaption></figcaption></figure>

Step 2: Select the user to replace the current customer service representative with and click "Confirm".

<figure><img src="https://1526800164-files.gitbook.io/~/files/v0/b/gitbook-x-prod.appspot.com/o/spaces%2F50DeL6mO9sNbAZBSEdaN%2Fuploads%2FEL2NoNzWMe907C6MPxmO%2Fimage.png?alt=media&amp;token=9f64c590-3293-4c70-80cb-6b96fb391cf7" alt=""><figcaption></figcaption></figure>

**Remark:**

* After the replacement is completed, the Transfer list will be updated immediate after.&#x20;
* If the current user no longer has editing permission due to the change, the data will no longer be displayed in the list.&#x20;
* The new customer service representative will be notified of the change.

### 2.4 Batch assign sharers

Purpose: Batch assign whom to share the customer data with.

Step 1: Select the customer to be shared, click "More", and click "Batch assign sharers".

<figure><img src="https://1526800164-files.gitbook.io/~/files/v0/b/gitbook-x-prod.appspot.com/o/spaces%2F50DeL6mO9sNbAZBSEdaN%2Fuploads%2FFekI2Ic2lrOvGnkzJ5ig%2Fimage.png?alt=media&amp;token=08d757d9-8cd6-4ca2-a849-0090123e8e81" alt=""><figcaption></figcaption></figure>

Step 2.1: Click on "Replace." The user's original shared range will be reset and replaced with the current settings.

Step 2.2: Click on "Add." The user's original shared range will remain unchanged, and the new range will be added to the current one.

<figure><img src="https://1526800164-files.gitbook.io/~/files/v0/b/gitbook-x-prod.appspot.com/o/spaces%2F50DeL6mO9sNbAZBSEdaN%2Fuploads%2FNLgeTAin9ZBGozzjNLyR%2Fimage.png?alt=media&amp;token=d031d5e0-41af-4cb7-a136-e78fb870ae20" alt=""><figcaption></figcaption></figure>


# Merge

Purpose: to merge multiple customers into a single customer

## 1 List Data

The customer list in the merge will only show the customers that the current user has permission to edit.

<figure><img src="https://1526800164-files.gitbook.io/~/files/v0/b/gitbook-x-prod.appspot.com/o/spaces%2F50DeL6mO9sNbAZBSEdaN%2Fuploads%2FoP6GyAHNNs9nYHP2t50y%2Fimage.png?alt=media&amp;token=83b7d7b2-7314-460c-877b-b14240ff5938" alt=""><figcaption></figcaption></figure>

**Remark:**

List displaying fields, search fields, advanced query fields, and sort fields, can be controlled by field settings

## 2 Filtering/Searching

### 2.1 Filter

#### 2.1.1 Existing Filter

Click on "More filters" to view filtering option available.

<figure><img src="https://1526800164-files.gitbook.io/~/files/v0/b/gitbook-x-prod.appspot.com/o/spaces%2F50DeL6mO9sNbAZBSEdaN%2Fuploads%2FERAvTTd99D4sKtuSNWgn%2Fimage.png?alt=media&amp;token=fa751cb4-5c45-41a8-a412-adc54d08ff11" alt=""><figcaption></figcaption></figure>

#### 2.1.2 Create new filters

Users can save their preferred filter by entering/selecting the condition and click "Save" or "Save and Search" to be directed to the result straight away.

Step 1: Click on the ![](https://eohelp.weaverintl.com/~gitbook/image?url=https%3A%2F%2F1526800164-files.gitbook.io%2F%7E%2Ffiles%2Fv0%2Fb%2Fgitbook-x-prod.appspot.com%2Fo%2Fspaces%252F50DeL6mO9sNbAZBSEdaN%252Fuploads%252F10ROrozknY6wpyB3Vjo1%252Fimage.png%3Falt%3Dmedia%26token%3D251169f5-e00d-45a9-a3e6-155b3938bc91\&width=300\&dpr=4\&quality=100\&sign=bcdc8c38\&sv=1)icon next to the search box.

<figure><img src="https://1526800164-files.gitbook.io/~/files/v0/b/gitbook-x-prod.appspot.com/o/spaces%2F50DeL6mO9sNbAZBSEdaN%2Fuploads%2Fa6ZgexW4drxUJOIsJOgR%2Fimage.png?alt=media&amp;token=ebfa3091-52f1-4aa0-8fc0-1bc00b878cb1" alt=""><figcaption></figcaption></figure>

Step 2: Fill in the relevant condition and click "Save".

<figure><img src="https://1526800164-files.gitbook.io/~/files/v0/b/gitbook-x-prod.appspot.com/o/spaces%2F50DeL6mO9sNbAZBSEdaN%2Fuploads%2F2RXoMkHh8bZXR5s52MwX%2Fimage.png?alt=media&amp;token=8173cd50-8b24-4167-8470-2376bd6a6651" alt=""><figcaption></figcaption></figure>

A new filter condition will be created.

<figure><img src="https://1526800164-files.gitbook.io/~/files/v0/b/gitbook-x-prod.appspot.com/o/spaces%2F50DeL6mO9sNbAZBSEdaN%2Fuploads%2FKUPpaajlvsz0StTH4Sg5%2Fimage.png?alt=media&amp;token=3564df72-acc0-4c6e-b3d7-8a402bd511e0" alt=""><figcaption></figcaption></figure>

You can change the filter name by clicking on![](https://eohelp.weaverintl.com/~gitbook/image?url=https%3A%2F%2F1526800164-files.gitbook.io%2F%7E%2Ffiles%2Fv0%2Fb%2Fgitbook-x-prod.appspot.com%2Fo%2Fspaces%252F50DeL6mO9sNbAZBSEdaN%252Fuploads%252F6XKe0WDnMT7ScswBaS9E%252Fimage.png%3Falt%3Dmedia%26token%3D0a1b44c7-375e-4f2d-b90f-ffb0552664cc\&width=300\&dpr=4\&quality=100\&sign=515d7e93\&sv=1)in Advance Query.

<figure><img src="https://1526800164-files.gitbook.io/~/files/v0/b/gitbook-x-prod.appspot.com/o/spaces%2F50DeL6mO9sNbAZBSEdaN%2Fuploads%2FfJXbvlPNVkmOVgza2eOC%2Fimage.png?alt=media&amp;token=eeb04150-3f7c-4267-8922-a87da5ae1c8f" alt=""><figcaption></figcaption></figure>

Click on the save icon when completed.

<figure><img src="https://1526800164-files.gitbook.io/~/files/v0/b/gitbook-x-prod.appspot.com/o/spaces%2F50DeL6mO9sNbAZBSEdaN%2Fuploads%2FTBla3qBZ5XVkiHPuROiu%2Fimage.png?alt=media&amp;token=7cc62743-4e9a-4631-89e4-f9c618c24b8b" alt=""><figcaption></figcaption></figure>

New filter is created.

<figure><img src="https://1526800164-files.gitbook.io/~/files/v0/b/gitbook-x-prod.appspot.com/o/spaces%2F50DeL6mO9sNbAZBSEdaN%2Fuploads%2FZkRebqptg7PFnxsTnS76%2Fimage.png?alt=media&amp;token=942c4ef3-8ef1-46d6-b1bc-b121e07a1183" alt=""><figcaption></figcaption></figure>

In the Advance Search, click on the (X) to delete the filter.

<figure><img src="https://1526800164-files.gitbook.io/~/files/v0/b/gitbook-x-prod.appspot.com/o/spaces%2F50DeL6mO9sNbAZBSEdaN%2Fuploads%2FLkgU07u7Trky51HWtCJE%2Fimage.png?alt=media&amp;token=6fd5985c-8234-45a2-97e5-24127523d3a9" alt=""><figcaption></figcaption></figure>

### 2.2 Searching

#### 2.1.1 Simple Query

By entering relevant text regarding contact names in the search box, users will be able to filter suppliers with product names or product no. that are similar/matched to the text entered.

<figure><img src="https://1526800164-files.gitbook.io/~/files/v0/b/gitbook-x-prod.appspot.com/o/spaces%2F50DeL6mO9sNbAZBSEdaN%2Fuploads%2F82Sah3WXfGZ4nAcBWqFc%2Fimage.png?alt=media&amp;token=8e588a69-7130-4495-9611-378a5933b75f" alt=""><figcaption></figcaption></figure>

#### 2.1.2 Advance Query

The \[Advance Query] allows the users to create complex searches or filters by specifying detailed conditions and criteria.

Step 1: Click on the ![](https://eohelp.weaverintl.com/~gitbook/image?url=https%3A%2F%2F1526800164-files.gitbook.io%2F%7E%2Ffiles%2Fv0%2Fb%2Fgitbook-x-prod.appspot.com%2Fo%2Fspaces%252F50DeL6mO9sNbAZBSEdaN%252Fuploads%252F10ROrozknY6wpyB3Vjo1%252Fimage.png%3Falt%3Dmedia%26token%3D251169f5-e00d-45a9-a3e6-155b3938bc91\&width=300\&dpr=4\&quality=100\&sign=bcdc8c38\&sv=1)icon next to the search box.

<figure><img src="https://1526800164-files.gitbook.io/~/files/v0/b/gitbook-x-prod.appspot.com/o/spaces%2F50DeL6mO9sNbAZBSEdaN%2Fuploads%2FW3SSmYE42dwkRQl3Y0Jc%2Fimage.png?alt=media&amp;token=39e4be89-8b0c-4a59-972e-b2ce277ea131" alt=""><figcaption></figcaption></figure>

Step 2: Fill in the relevant condition and click on "Search".

<figure><img src="https://1526800164-files.gitbook.io/~/files/v0/b/gitbook-x-prod.appspot.com/o/spaces%2F50DeL6mO9sNbAZBSEdaN%2Fuploads%2F8r1T4qnylOBH5tINynrl%2Fimage.png?alt=media&amp;token=cf1fe8c0-0a00-44cb-80f0-7fe5fe6d02e3" alt=""><figcaption></figcaption></figure>

**Remarks:**

Filtering conditions and advance search range can be further modified in \[Settings] > \[Field Setting] > \[Customer Information] > List > Page name: Merge customers.&#x20;

## 3 Merging

Step 1: Select the customer to be merged from the list.

<figure><img src="https://1526800164-files.gitbook.io/~/files/v0/b/gitbook-x-prod.appspot.com/o/spaces%2F50DeL6mO9sNbAZBSEdaN%2Fuploads%2FfygCyqJ5bo0n6EXw4ZER%2Fimage.png?alt=media&amp;token=1c7c972b-0527-492f-8fbe-7d3051229129" alt=""><figcaption></figcaption></figure>

Step 2: Click on "Merge customers", select at least 2 customer and up to 5.

<figure><img src="https://1526800164-files.gitbook.io/~/files/v0/b/gitbook-x-prod.appspot.com/o/spaces%2F50DeL6mO9sNbAZBSEdaN%2Fuploads%2FLCHgzRjKmDb9uYkMCCcz%2Fimage.png?alt=media&amp;token=be191228-eef6-4250-900e-a9c17076368a" alt=""><figcaption></figcaption></figure>

Step 3: Select the main customer. After merging, only the main customer's data will be kept in the list, while other customers will be deleted.

<figure><img src="https://1526800164-files.gitbook.io/~/files/v0/b/gitbook-x-prod.appspot.com/o/spaces%2F50DeL6mO9sNbAZBSEdaN%2Fuploads%2FdDeW34SYkFPTx8biWulD%2Fimage.png?alt=media&amp;token=3fe4bf52-0961-4313-9b0b-b9006467fb95" alt=""><figcaption></figcaption></figure>

Remark:

* When merging, the contacts, opportunities, contracts, reminders, and contact log will be merged into the main customer.
* When merging, for the same field, if the main customer's field is empty, it will be filled with data from other customers in that same field.

Click "Back" to clear the form and return to the main list.&#x20;

<figure><img src="https://1526800164-files.gitbook.io/~/files/v0/b/gitbook-x-prod.appspot.com/o/spaces%2F50DeL6mO9sNbAZBSEdaN%2Fuploads%2F4GwkauMTftceR1TDzykJ%2Fimage.png?alt=media&amp;token=661a9c1d-e1ea-48aa-ba5f-e35e759412d0" alt=""><figcaption></figcaption></figure>

<br>


# Recycle Bin

## 1 List Data

The list displays all the deleted customer data, and any user with menu permission can view all the deleted customer data.

<figure><img src="https://1526800164-files.gitbook.io/~/files/v0/b/gitbook-x-prod.appspot.com/o/spaces%2F50DeL6mO9sNbAZBSEdaN%2Fuploads%2FIE1lGI6OJj64NmIg8S5j%2Fimage.png?alt=media&amp;token=572fb7ed-8325-49ea-80f9-202055333ea4" alt=""><figcaption></figcaption></figure>

## 2 View

Step 1: Open the details page, and it will appear in a pop-up window on the right side of the page.

Option 1: Click on the data row directly.

<figure><img src="https://1526800164-files.gitbook.io/~/files/v0/b/gitbook-x-prod.appspot.com/o/spaces%2F50DeL6mO9sNbAZBSEdaN%2Fuploads%2FwFxsRyp9Q5MQagHzGQJK%2Fimage.png?alt=media&amp;token=d1603b31-be76-46c1-b010-bc593505c6eb" alt=""><figcaption></figcaption></figure>

&#x20;Option 2: On the right side of the data row, click on "more ···" and then click "View.

<figure><img src="https://1526800164-files.gitbook.io/~/files/v0/b/gitbook-x-prod.appspot.com/o/spaces%2F50DeL6mO9sNbAZBSEdaN%2Fuploads%2F1J1f8nWYl5mCSBljAx8T%2Fimage.png?alt=media&amp;token=ee28fe7e-495f-4b72-a97f-fed4e4304ee6" alt=""><figcaption></figcaption></figure>

**Remark:**

* An error message will be displayed if the current user does not have permission to view the customer's data.

## 3 Log

Logs have no permission restrictions, as long as the user has the permission to view the contact, they can see all the relevant logs

Step 1: On the right side of the data row, click more ···, and click on "Logs" to open Log pop-up window to view more details.

<figure><img src="https://1526800164-files.gitbook.io/~/files/v0/b/gitbook-x-prod.appspot.com/o/spaces%2F50DeL6mO9sNbAZBSEdaN%2Fuploads%2FxfTPjOaffiBwZwP7hjw1%2Fimage.png?alt=media&amp;token=1729f0a6-14ce-4258-8f32-4ce5eab8a443" alt=""><figcaption></figcaption></figure>

The log data can be filtered by log type through the operation type, by the creation time using the existing time filter, or by customizing the range with the "Time range" button. Additionally, the \[Search log] search box is used to search for log content.

![](https://1526800164-files.gitbook.io/~/files/v0/b/gitbook-x-prod.appspot.com/o/spaces%2F50DeL6mO9sNbAZBSEdaN%2Fuploads%2FZzyhgaMT7dsWS4tlpzn2%2Fimage.png?alt=media\&token=50a98557-863f-45d9-acec-c61f42783f16)<br>

## 4 Delete/Batch Delete

### 4.1 Single Delete

Step 1: On the right-side of the data row, click more ···, click on "Delete".

<figure><img src="https://1526800164-files.gitbook.io/~/files/v0/b/gitbook-x-prod.appspot.com/o/spaces%2F50DeL6mO9sNbAZBSEdaN%2Fuploads%2FC3D5Qqax6Hky9ZlG6nUK%2Fimage.png?alt=media&amp;token=c9cd9b8a-c6e6-4a3d-80a2-e97816bf751e" alt=""><figcaption></figcaption></figure>

Step 2: Click on "Confirm" to proceed the data deletion.

<figure><img src="https://1526800164-files.gitbook.io/~/files/v0/b/gitbook-x-prod.appspot.com/o/spaces%2F50DeL6mO9sNbAZBSEdaN%2Fuploads%2FXKpRjM0CTsvwqNxBMsvG%2Fimage.png?alt=media&amp;token=c3b0b472-072a-48b4-acfe-4766dbf957a7" alt="" width="296"><figcaption></figcaption></figure>

**Remark:**

The deletion performed here is a complete deletion; the deleted customer data will no longer be displayed in the list and cannot be recovered.

### **4.2 Batch Delete**

Step 1: Select the data to be deleted, click "Batch delete" on the bottom left of the page.

<figure><img src="https://1526800164-files.gitbook.io/~/files/v0/b/gitbook-x-prod.appspot.com/o/spaces%2F50DeL6mO9sNbAZBSEdaN%2Fuploads%2FuqZlnd3gDGsaox4oHqbM%2Fimage.png?alt=media&amp;token=138009f8-4e4c-4682-abfb-f074b97605bd" alt=""><figcaption><p>\</p></figcaption></figure>

Step 2: Confirm the delete operation, and the data will be deleted and removed from the list.

<figure><img src="https://1526800164-files.gitbook.io/~/files/v0/b/gitbook-x-prod.appspot.com/o/spaces%2F50DeL6mO9sNbAZBSEdaN%2Fuploads%2FavpGLNWNxF5GQQyCxNx4%2Fimage.png?alt=media&amp;token=d714b9ee-506d-47ed-90c8-3a60f3bd7758" alt="" width="299"><figcaption></figcaption></figure>

<figure><img src="https://1526800164-files.gitbook.io/~/files/v0/b/gitbook-x-prod.appspot.com/o/spaces%2F50DeL6mO9sNbAZBSEdaN%2Fuploads%2F698l7ir0ZRj0AgPJtXOO%2Fimage.png?alt=media&amp;token=6bee1c62-f8a1-48bd-9222-3c71494f0f4f" alt="" width="269"><figcaption></figcaption></figure>

**Remark:**

The deletion performed here is a complete deletion; the deleted customer data will no longer be displayed in the list and cannot be recovered.

## 5 Restore

Recovered customer data will be moved to the customer list.

On the right-side of the data row, click more ···, click on "Restore".

<figure><img src="https://1526800164-files.gitbook.io/~/files/v0/b/gitbook-x-prod.appspot.com/o/spaces%2F50DeL6mO9sNbAZBSEdaN%2Fuploads%2FwMvrBsuUqi6IpaxT7XcZ%2Fimage.png?alt=media&amp;token=67dbe624-0029-4256-ab6c-72a0a1609894" alt=""><figcaption></figcaption></figure>

## 6 Filtering/Searching

### 6.1 Filter

Users can save their preferred search/filter condition by entering the details and click "Save" or "Save and Search" to be directed to the result straight away.

<figure><img src="https://1526800164-files.gitbook.io/~/files/v0/b/gitbook-x-prod.appspot.com/o/spaces%2F50DeL6mO9sNbAZBSEdaN%2Fuploads%2FQo4GOUjt816SqSt1dE5Z%2Fimage.png?alt=media&amp;token=fa22c5d8-474a-418a-80d7-cfc5d47b661d" alt=""><figcaption></figcaption></figure>

A new filter will be created as a result.

<figure><img src="https://1526800164-files.gitbook.io/~/files/v0/b/gitbook-x-prod.appspot.com/o/spaces%2F50DeL6mO9sNbAZBSEdaN%2Fuploads%2FIbgcqbyqDu7KacKEPDNb%2Fimage.png?alt=media&amp;token=6ce146f5-1b5e-41ea-a785-23c2e479fb48" alt=""><figcaption></figcaption></figure>

The filter name can be changed by clicking on ![](https://eohelp.weaverintl.com/~gitbook/image?url=https%3A%2F%2F1526800164-files.gitbook.io%2F%7E%2Ffiles%2Fv0%2Fb%2Fgitbook-x-prod.appspot.com%2Fo%2Fspaces%252F50DeL6mO9sNbAZBSEdaN%252Fuploads%252FGiv8FS6GDtry0O9h1y4x%252Fimage.png%3Falt%3Dmedia%26token%3D8fce9755-1bbf-4bcf-a0ed-3df562709353\&width=300\&dpr=4\&quality=100\&sign=40fe3c21\&sv=1)

<figure><img src="https://1526800164-files.gitbook.io/~/files/v0/b/gitbook-x-prod.appspot.com/o/spaces%2F50DeL6mO9sNbAZBSEdaN%2Fuploads%2F6rDQwLGiXBFH79CdYEZh%2Fimage.png?alt=media&amp;token=3d7ca9e8-d6ac-4c1f-9520-2f25881fda8c" alt="" width="375"><figcaption></figcaption></figure>

\
Click on the save icon when completed

<figure><img src="https://1526800164-files.gitbook.io/~/files/v0/b/gitbook-x-prod.appspot.com/o/spaces%2F50DeL6mO9sNbAZBSEdaN%2Fuploads%2FR9hTgagFOpbYwivH1p3B%2Fimage.png?alt=media&amp;token=8f0206e0-7f89-4c72-91ff-515404b49377" alt="" width="243"><figcaption></figcaption></figure>

New filter is created.

<figure><img src="https://1526800164-files.gitbook.io/~/files/v0/b/gitbook-x-prod.appspot.com/o/spaces%2F50DeL6mO9sNbAZBSEdaN%2Fuploads%2F2y9kr6zXE601qhSKUEWp%2Fimage.png?alt=media&amp;token=60aab024-e8d8-4411-832e-742c99b80044" alt="" width="355"><figcaption></figcaption></figure>

In the Advance Search, click on the (X) to delete the filter.

<figure><img src="https://1526800164-files.gitbook.io/~/files/v0/b/gitbook-x-prod.appspot.com/o/spaces%2F50DeL6mO9sNbAZBSEdaN%2Fuploads%2F7rxPPjPZJ6oYuGnbtRKA%2Fimage.png?alt=media&amp;token=d8952b8a-c557-4de4-ad11-0a1fc3ba5980" alt="" width="262"><figcaption></figcaption></figure>

\
\ <br>

### **6.2 Search**

#### **6.2.1 Simple Query**

By entering relevant text regarding contact names in the search box, users will be able to filter customers with customer names, contact no., company addressc account executive, customer service representative or creator that are similar/matched to the text entered.

<figure><img src="https://1526800164-files.gitbook.io/~/files/v0/b/gitbook-x-prod.appspot.com/o/spaces%2F50DeL6mO9sNbAZBSEdaN%2Fuploads%2F3me1CY3S8SMHq1A61GLh%2Fimage.png?alt=media&amp;token=26b95eb1-f991-41ad-9cb4-166b4d490e35" alt=""><figcaption></figcaption></figure>

#### 6.2.2 Advanced Query

The \[Advance Query] allows the users to create complex searches or filters by specifying detailed conditions and criteria.

Step 1: Click on the ![](https://eohelp.weaverintl.com/~gitbook/image?url=https%3A%2F%2F1526800164-files.gitbook.io%2F%7E%2Ffiles%2Fv0%2Fb%2Fgitbook-x-prod.appspot.com%2Fo%2Fspaces%252F50DeL6mO9sNbAZBSEdaN%252Fuploads%252FiEfVlSzniIeYu3jlhfLf%252Fimage.png%3Falt%3Dmedia%26token%3Dad1c38f3-3cab-4647-9272-8326c637299e\&width=300\&dpr=4\&quality=100\&sign=868175da\&sv=1)icon next to the search box.

<figure><img src="https://1526800164-files.gitbook.io/~/files/v0/b/gitbook-x-prod.appspot.com/o/spaces%2F50DeL6mO9sNbAZBSEdaN%2Fuploads%2F4aDd1VePUVGZVH54SWEZ%2Fimage.png?alt=media&amp;token=e619cc51-f769-410a-8c06-8fad1151049a" alt=""><figcaption></figcaption></figure>

Step 2: Fill in the relevant condition and click on "Search".

<figure><img src="https://1526800164-files.gitbook.io/~/files/v0/b/gitbook-x-prod.appspot.com/o/spaces%2F50DeL6mO9sNbAZBSEdaN%2Fuploads%2FdKsRhNIHt8P0XBUMdMrY%2Fimage.png?alt=media&amp;token=26c2fe16-f5e0-49f4-b8f8-312448f3b66a" alt=""><figcaption></figcaption></figure>


# Request to access

## 1 Request for access

Step 1: Enter the customer name in the \[Search customer name] field and click "Search".

<figure><img src="https://1526800164-files.gitbook.io/~/files/v0/b/gitbook-x-prod.appspot.com/o/spaces%2F50DeL6mO9sNbAZBSEdaN%2Fuploads%2FMWavLt7OBcxezkxmC465%2Fimage.png?alt=media&amp;token=a479c006-66cc-4a94-aa16-ecb69d096009" alt=""><figcaption></figcaption></figure>

Step 2: Apply to view or as the customer's account executive or customer service manager.

<figure><img src="https://1526800164-files.gitbook.io/~/files/v0/b/gitbook-x-prod.appspot.com/o/spaces%2F50DeL6mO9sNbAZBSEdaN%2Fuploads%2FQ0P2yd3kvfBwVABQbPpm%2Fimage.png?alt=media&amp;token=56197e26-03b5-402e-8931-61b6aec16c30" alt=""><figcaption></figcaption></figure>

**Remark:**

* If the current user had applied for all types of permissions, then the customer's data will no longer displayed.
* If the current user is both the account executive and customer service representative, then the customer will not appear in the list.
* When the current user is the account executive, they can only apply for the position of customer service representative.
* When the current user is the customer service representative, they can only apply for the position of account executive.
* When the current user is either the account executive or customer service representative, the data will be displayed, but they can't apply for sharing.
* When a request is rejected, the rejected customer will appear in the list if it matches the search criteria.

## 2 Apply records

### 2.1 List Data

The list shows all of the current user's applications, including pending, approved, and rejected.

<figure><img src="https://1526800164-files.gitbook.io/~/files/v0/b/gitbook-x-prod.appspot.com/o/spaces%2F50DeL6mO9sNbAZBSEdaN%2Fuploads%2FHz28myMZdAQPszb9Cdjl%2Fimage.png?alt=media&amp;token=3d42ee49-f0bf-47ba-b296-b2c1887bb9e4" alt=""><figcaption></figcaption></figure>

### 2.2 View

Step 1: Open the details page, and it will appear in a pop-up window on the right side of the page. Option 1: Click on the data row directly.&#x20;

Option 2: On the right side of the data row, click on "more ···" and then click "View".

<figure><img src="https://1526800164-files.gitbook.io/~/files/v0/b/gitbook-x-prod.appspot.com/o/spaces%2F50DeL6mO9sNbAZBSEdaN%2Fuploads%2FcR1pg4Nj7pyRb70DWotO%2Fimage.png?alt=media&amp;token=dbce3d6f-153f-4819-9c8a-396862ad3312" alt=""><figcaption></figcaption></figure>

<figure><img src="https://1526800164-files.gitbook.io/~/files/v0/b/gitbook-x-prod.appspot.com/o/spaces%2F50DeL6mO9sNbAZBSEdaN%2Fuploads%2FRq9S6HrXZ9qbZocO93Jh%2Fimage.png?alt=media&amp;token=2c794816-99f8-40fa-81b8-f436750def1d" alt=""><figcaption></figcaption></figure>

### 2.3 Delete

If the user deletes the application while the application is pending, they can later reapply for the permission again.

#### 2.3.1 Single Delete

Step 1: On the right-side of the data row, click more ···, and click "Delete".

<figure><img src="https://1526800164-files.gitbook.io/~/files/v0/b/gitbook-x-prod.appspot.com/o/spaces%2F50DeL6mO9sNbAZBSEdaN%2Fuploads%2F00d6yOxWC9IEcUFdhQJT%2Fimage.png?alt=media&amp;token=93f6e5bb-3c68-47ec-b63b-b247f35a1d65" alt=""><figcaption></figcaption></figure>

Step 2: Confirm the delete operation, and the data will be deleted and removed from the list.

<figure><img src="https://1526800164-files.gitbook.io/~/files/v0/b/gitbook-x-prod.appspot.com/o/spaces%2F50DeL6mO9sNbAZBSEdaN%2Fuploads%2FgPZXAo9BJcaNIIqAR42W%2Fimage.png?alt=media&amp;token=b50a23e3-ba30-4979-8cb9-0a8d627fb067" alt="" width="297"><figcaption></figcaption></figure>

#### 2.3.2 Batch Delete

Step 1: Select the data to be deleted, click "Batch delete" on the bottom left of the page.

<figure><img src="https://1526800164-files.gitbook.io/~/files/v0/b/gitbook-x-prod.appspot.com/o/spaces%2F50DeL6mO9sNbAZBSEdaN%2Fuploads%2FEEauugrLFebZjcZYhoVC%2Fimage.png?alt=media&amp;token=14d6f08c-263e-411f-804c-945cbe055a5a" alt=""><figcaption></figcaption></figure>

Step 2: Confirm the delete operation, and the data will be deleted and removed from the list.

<figure><img src="https://1526800164-files.gitbook.io/~/files/v0/b/gitbook-x-prod.appspot.com/o/spaces%2F50DeL6mO9sNbAZBSEdaN%2Fuploads%2FfLCF2LXNWqLWMJ6JBwx5%2Fimage.png?alt=media&amp;token=b121d625-826c-4976-b0c6-f69f0f597326" alt="" width="295"><figcaption></figcaption></figure>

<figure><img src="https://1526800164-files.gitbook.io/~/files/v0/b/gitbook-x-prod.appspot.com/o/spaces%2F50DeL6mO9sNbAZBSEdaN%2Fuploads%2FDmnzj7iYxJiRsQs1Or3j%2Fimage.png?alt=media&amp;token=23b52df6-03f1-475d-9f4d-377f1c111678" alt="" width="272"><figcaption><p>Deletion success notification pop-up box</p></figcaption></figure>

### 2.4 Filtering/Searching

#### 2.4.1 Filtering

**2.4.1.1 Exists Filter**

The filter function allows users to refine or narrow down the data list based on the selected criteria.

<figure><img src="https://1526800164-files.gitbook.io/~/files/v0/b/gitbook-x-prod.appspot.com/o/spaces%2F50DeL6mO9sNbAZBSEdaN%2Fuploads%2FwpD3V6leqFggGeIkpavQ%2Fimage.png?alt=media&amp;token=8889e9c8-f278-4809-a693-569f8587a20d" alt=""><figcaption></figcaption></figure>

**2.4.1.2 Create new filter**

Users can save their preferred filter by entering/selecting the condition and click "Save" or "Save and Search" to be directed to the result straight away.

Step 1: Click on the ![](https://1526800164-files.gitbook.io/~/files/v0/b/gitbook-x-prod.appspot.com/o/spaces%2F50DeL6mO9sNbAZBSEdaN%2Fuploads%2Fk0obI08Mqyvt0WffBwoX%2Fimage.png?alt=media\&token=00a29129-15f2-4a1a-b376-b63683b24936) icon next to the search box.

<figure><img src="https://1526800164-files.gitbook.io/~/files/v0/b/gitbook-x-prod.appspot.com/o/spaces%2F50DeL6mO9sNbAZBSEdaN%2Fuploads%2FdXLbcICZDapDIIUaX10x%2Fimage.png?alt=media&amp;token=3a8b28bf-2c7d-4756-8e81-f33572e1188f" alt=""><figcaption></figcaption></figure>

Step 2: Fill in the relevant condition and click on "Save".

<figure><img src="https://1526800164-files.gitbook.io/~/files/v0/b/gitbook-x-prod.appspot.com/o/spaces%2F50DeL6mO9sNbAZBSEdaN%2Fuploads%2FlgIYyEhY8jRURNjEFUMZ%2Fimage.png?alt=media&amp;token=4f6fc110-49ee-472b-9ae7-9f244a77cc77" alt=""><figcaption></figcaption></figure>

A new filter condition will be created.

<figure><img src="https://1526800164-files.gitbook.io/~/files/v0/b/gitbook-x-prod.appspot.com/o/spaces%2F50DeL6mO9sNbAZBSEdaN%2Fuploads%2FP4sPAWl1LU1FY7rFRRbM%2Fimage.png?alt=media&amp;token=dd681fbe-39ae-4956-948f-f215550efe85" alt=""><figcaption></figcaption></figure>

The filter name can be changed by clicking on ![](https://eohelp.weaverintl.com/~gitbook/image?url=https%3A%2F%2F1526800164-files.gitbook.io%2F%7E%2Ffiles%2Fv0%2Fb%2Fgitbook-x-prod.appspot.com%2Fo%2Fspaces%252F50DeL6mO9sNbAZBSEdaN%252Fuploads%252FGiv8FS6GDtry0O9h1y4x%252Fimage.png%3Falt%3Dmedia%26token%3D8fce9755-1bbf-4bcf-a0ed-3df562709353\&width=300\&dpr=4\&quality=100\&sign=40fe3c21\&sv=1)

<figure><img src="https://1526800164-files.gitbook.io/~/files/v0/b/gitbook-x-prod.appspot.com/o/spaces%2F50DeL6mO9sNbAZBSEdaN%2Fuploads%2FTaflipRSBbB4bohcUW1w%2Fimage.png?alt=media&amp;token=876c6003-5e1d-4ca8-aa91-e433b7533b3a" alt=""><figcaption></figcaption></figure>

Click on the save icon when completed

<figure><img src="https://1526800164-files.gitbook.io/~/files/v0/b/gitbook-x-prod.appspot.com/o/spaces%2F50DeL6mO9sNbAZBSEdaN%2Fuploads%2FWhUVmp49LSk87WVZz6ao%2Fimage.png?alt=media&amp;token=e52f6be8-7670-40aa-b900-83136c6a97dc" alt=""><figcaption></figcaption></figure>

New filter is created.

<figure><img src="https://1526800164-files.gitbook.io/~/files/v0/b/gitbook-x-prod.appspot.com/o/spaces%2F50DeL6mO9sNbAZBSEdaN%2Fuploads%2Fw0qH2R4tJ9kXNDKYC6L0%2Fimage.png?alt=media&amp;token=2755512f-70c6-4abc-a386-3035ae388355" alt=""><figcaption></figcaption></figure>

In the Advance Search, click on the (X) to delete the filter.

<figure><img src="https://1526800164-files.gitbook.io/~/files/v0/b/gitbook-x-prod.appspot.com/o/spaces%2F50DeL6mO9sNbAZBSEdaN%2Fuploads%2FFJbhZ7eAziaYVeN3NDrv%2Fimage.png?alt=media&amp;token=468ffaf0-c01a-45be-a7ff-f152c0c366a1" alt=""><figcaption></figcaption></figure>

#### 2.4.2 Searching

**2.4.2.1 Simple Query**

The users is able to filter customer with customer name that are similar/matched to the text entered in the search box.

<figure><img src="https://1526800164-files.gitbook.io/~/files/v0/b/gitbook-x-prod.appspot.com/o/spaces%2F50DeL6mO9sNbAZBSEdaN%2Fuploads%2FQ1kdeRe3dKdXGPFEt8Fo%2Fimage.png?alt=media&amp;token=bf4925c5-cd0c-4ff7-9602-6b22f4750342" alt=""><figcaption></figcaption></figure>

**2.4.2.2 Advanced Query**

The \[Advance Query] allows the users to create complex searches or filters by specifying detailed conditions and criteria.\
Step 1: Click on the ![](https://1526800164-files.gitbook.io/~/files/v0/b/gitbook-x-prod.appspot.com/o/spaces%2F50DeL6mO9sNbAZBSEdaN%2Fuploads%2Fq3QNH9BAYb1wITyus8vR%2Fimage.png?alt=media\&token=17621caa-f9d3-452d-949f-a12fd4204c59) icon next to the search box.

<figure><img src="https://1526800164-files.gitbook.io/~/files/v0/b/gitbook-x-prod.appspot.com/o/spaces%2F50DeL6mO9sNbAZBSEdaN%2Fuploads%2FreKYuKNExp1Drv9bLsxe%2Fimage.png?alt=media&amp;token=8c86fd86-87d3-46e7-aaad-b8dcb58db81e" alt=""><figcaption></figcaption></figure>

Step 2: Fill in the relevant condition and click on "Search".

<figure><img src="https://1526800164-files.gitbook.io/~/files/v0/b/gitbook-x-prod.appspot.com/o/spaces%2F50DeL6mO9sNbAZBSEdaN%2Fuploads%2FNHxvnWCwEfHaz1Lu5Anr%2Fimage.png?alt=media&amp;token=37762c92-805d-4301-b3d1-f159ed9ea468" alt=""><figcaption></figcaption></figure>


# Permission Approval

## 1 List Data

The list shows the requests to access the customer's data for which the current user has editing permission.

<figure><img src="https://1526800164-files.gitbook.io/~/files/v0/b/gitbook-x-prod.appspot.com/o/spaces%2F50DeL6mO9sNbAZBSEdaN%2Fuploads%2FlylKM1LmVxEHGQtDoEBv%2Fimage.png?alt=media&amp;token=ad7480dd-2905-4ebb-9816-6bfed988ae73" alt=""><figcaption></figcaption></figure>

## 2 Request Approval

### 2.1 Review

Step 1: On the right side of the data row, click on "more ···" and then click "View".

<figure><img src="https://1526800164-files.gitbook.io/~/files/v0/b/gitbook-x-prod.appspot.com/o/spaces%2F50DeL6mO9sNbAZBSEdaN%2Fuploads%2F5haB7hTHOVLI6wod4CGW%2Fimage.png?alt=media&amp;token=0c97aebd-f840-4b3c-959a-06b23a3c0382" alt=""><figcaption></figcaption></figure>

Step 2: Enter the approval comment and then select the approval action.

<figure><img src="https://1526800164-files.gitbook.io/~/files/v0/b/gitbook-x-prod.appspot.com/o/spaces%2F50DeL6mO9sNbAZBSEdaN%2Fuploads%2Fz5Wp2QQ7IsXGfRTywrIT%2Fimage.png?alt=media&amp;token=8eccd622-257a-40b2-8745-59d1d6c153cb" alt=""><figcaption></figcaption></figure>

**Remark:**

* Internal message alert: When enabled, the approval results are sent to the applicant; otherwise, the applicant will not receive any approval results.

### 2.2 Approved

Enter the approval comments and click "Approve".

<figure><img src="https://1526800164-files.gitbook.io/~/files/v0/b/gitbook-x-prod.appspot.com/o/spaces%2F50DeL6mO9sNbAZBSEdaN%2Fuploads%2FqxAaBkYNJapL6gjBWxzy%2Fimage.png?alt=media&amp;token=a8314b78-0d3f-48bb-b5e9-9f9664141fe4" alt=""><figcaption></figcaption></figure>

The system will prompt \[Successful approval].&#x20;

<figure><img src="https://1526800164-files.gitbook.io/~/files/v0/b/gitbook-x-prod.appspot.com/o/spaces%2F50DeL6mO9sNbAZBSEdaN%2Fuploads%2FMdT8EROsxiUE6A8zWV4G%2Fimage.png?alt=media&amp;token=70cb3c9c-9802-47a7-b969-6b1d73bbe87b" alt="" width="270"><figcaption></figcaption></figure>

and return to the Permission Approval list automatically.

<figure><img src="https://1526800164-files.gitbook.io/~/files/v0/b/gitbook-x-prod.appspot.com/o/spaces%2F50DeL6mO9sNbAZBSEdaN%2Fuploads%2FhS2VXCko7eJjohX4qmAQ%2Fimage.png?alt=media&amp;token=aaccfa1e-d998-469a-9d2e-ef9810c0f272" alt=""><figcaption></figcaption></figure>

### 2.3 Reject

Enter the approval comments and click "Refuse".

<figure><img src="https://1526800164-files.gitbook.io/~/files/v0/b/gitbook-x-prod.appspot.com/o/spaces%2F50DeL6mO9sNbAZBSEdaN%2Fuploads%2F4hNMTl67sUhPV9mxloqU%2Fimage.png?alt=media&amp;token=f7ebbb43-716a-4af3-9533-2593960b06f5" alt=""><figcaption></figcaption></figure>

The system will prompt \[Successful approval].&#x20;

<figure><img src="https://1526800164-files.gitbook.io/~/files/v0/b/gitbook-x-prod.appspot.com/o/spaces%2F50DeL6mO9sNbAZBSEdaN%2Fuploads%2Fb7whrjJrTwJS0Jt1vR65%2Fimage.png?alt=media&amp;token=cd14a04e-00ca-4e21-abd0-2d8f4eaf3a49" alt="" width="270"><figcaption></figcaption></figure>

and return to the Permission Approval list automatically.

<figure><img src="https://1526800164-files.gitbook.io/~/files/v0/b/gitbook-x-prod.appspot.com/o/spaces%2F50DeL6mO9sNbAZBSEdaN%2Fuploads%2FCbQUqmnQ3Yp3tLgJ3U9e%2Fimage.png?alt=media&amp;token=ee617512-124e-46f3-a501-4afa033354fc" alt=""><figcaption></figcaption></figure>

## 3 Data Operation

### 3.1 View

Step 1: Open the details page, and it will appear in a new tab.&#x20;

Option 1: Click on the data row directly.

<figure><img src="https://1526800164-files.gitbook.io/~/files/v0/b/gitbook-x-prod.appspot.com/o/spaces%2F50DeL6mO9sNbAZBSEdaN%2Fuploads%2FvnhBq00szRkPVZZ4pw3N%2Fimage.png?alt=media&amp;token=9ce1be41-d78c-4605-870b-427c0bec8250" alt=""><figcaption></figcaption></figure>

Option 2: On the right side of the data row, click on "more ···" and then click "View".

<figure><img src="https://1526800164-files.gitbook.io/~/files/v0/b/gitbook-x-prod.appspot.com/o/spaces%2F50DeL6mO9sNbAZBSEdaN%2Fuploads%2FgbD1KsH94poZoAdNCeQG%2Fimage.png?alt=media&amp;token=37b38eb7-f213-497c-b400-f1f6d2d49577" alt=""><figcaption></figcaption></figure>

<figure><img src="https://1526800164-files.gitbook.io/~/files/v0/b/gitbook-x-prod.appspot.com/o/spaces%2F50DeL6mO9sNbAZBSEdaN%2Fuploads%2FzZipXtNcoN5xWN3aH6Da%2Fimage.png?alt=media&amp;token=a880c08d-714c-418e-82e2-86d22e2302d2" alt=""><figcaption></figcaption></figure>

### 3.2 Delete

#### 3.2.1 Single Delete

Step 1: On the right-side of the data row, click more ···, and click "Delete".

<figure><img src="https://1526800164-files.gitbook.io/~/files/v0/b/gitbook-x-prod.appspot.com/o/spaces%2F50DeL6mO9sNbAZBSEdaN%2Fuploads%2F6NBRmeVCMJIKkyf5BkQw%2Fimage.png?alt=media&amp;token=66717d1f-07cf-4f34-ac36-ca5e978eb7e4" alt=""><figcaption></figcaption></figure>

Step 2: Confirm the delete operation, and the data will be deleted and removed from the list.

<figure><img src="https://1526800164-files.gitbook.io/~/files/v0/b/gitbook-x-prod.appspot.com/o/spaces%2F50DeL6mO9sNbAZBSEdaN%2Fuploads%2F3yuhiGtSTIxvI7iqMW7V%2Fimage.png?alt=media&amp;token=f88f23e2-ccf2-4d42-abdb-a004a44aa626" alt="" width="297"><figcaption></figcaption></figure>

#### 3.2.2 Batch Delete

Step 1: Select the data to be deleted, click "Batch delete" on the bottom left of the page.

<figure><img src="https://1526800164-files.gitbook.io/~/files/v0/b/gitbook-x-prod.appspot.com/o/spaces%2F50DeL6mO9sNbAZBSEdaN%2Fuploads%2FrcyddjPmRwgY9a16w2rc%2Fimage.png?alt=media&amp;token=11fc4e1a-6eab-46be-84ca-509fb47e464b" alt=""><figcaption></figcaption></figure>

Step 2: Confirm the delete operation, and the data will be deleted and removed from the list.

<figure><img src="https://1526800164-files.gitbook.io/~/files/v0/b/gitbook-x-prod.appspot.com/o/spaces%2F50DeL6mO9sNbAZBSEdaN%2Fuploads%2FsmVMq4I8V6nA5yNGElmG%2Fimage.png?alt=media&amp;token=a6147802-5cac-423a-bb5c-09878433a2eb" alt="" width="295"><figcaption></figcaption></figure>

<figure><img src="https://1526800164-files.gitbook.io/~/files/v0/b/gitbook-x-prod.appspot.com/o/spaces%2F50DeL6mO9sNbAZBSEdaN%2Fuploads%2FXFTnBach8fsQjym1S4Xs%2Fimage.png?alt=media&amp;token=728246d8-67ed-42dd-b7cb-51e85cc89287" alt="" width="272"><figcaption><p>Deletion success notification pop-up box</p></figcaption></figure>

## 4 Filtering/Search

### 4.1 Filtering

#### 4.1.1 Exists Filter

The filter function allows users to refine or narrow down the data list based on the selected criteria.

<figure><img src="https://1526800164-files.gitbook.io/~/files/v0/b/gitbook-x-prod.appspot.com/o/spaces%2F50DeL6mO9sNbAZBSEdaN%2Fuploads%2FPuOBeKUMblOVeRihYcKe%2Fimage.png?alt=media&amp;token=4494f97d-6329-40c7-992e-6cd0ff307077" alt=""><figcaption></figcaption></figure>

#### 4.1.2 Create new filter

Users can save their preferred filter by entering/selecting the condition and click "Save" or "Save and Search" to be directed to the result straight away.

Step 1: Click on the ![](https://1526800164-files.gitbook.io/~/files/v0/b/gitbook-x-prod.appspot.com/o/spaces%2F50DeL6mO9sNbAZBSEdaN%2Fuploads%2FgqmcR1SHqVuCsJ2j4GqP%2Fimage.png?alt=media\&token=7a13e675-8388-4ca2-846a-095d90ac1b77)icon next to the search box.

<figure><img src="https://1526800164-files.gitbook.io/~/files/v0/b/gitbook-x-prod.appspot.com/o/spaces%2F50DeL6mO9sNbAZBSEdaN%2Fuploads%2FJc51C9B0ROJg1tMk9o5L%2Fimage.png?alt=media&amp;token=52a4c53c-4d5d-4084-a12a-e10b8bcfe885" alt=""><figcaption></figcaption></figure>

Step 2: Fill in the relevant condition and click on "Save".

<figure><img src="https://1526800164-files.gitbook.io/~/files/v0/b/gitbook-x-prod.appspot.com/o/spaces%2F50DeL6mO9sNbAZBSEdaN%2Fuploads%2FV55xvviY6BCi9S5cQgJN%2Fimage.png?alt=media&amp;token=9c304a3d-03f3-40aa-a3b0-0b3b3ee9d84c" alt=""><figcaption></figcaption></figure>

A new filter condition will be created.

<figure><img src="https://1526800164-files.gitbook.io/~/files/v0/b/gitbook-x-prod.appspot.com/o/spaces%2F50DeL6mO9sNbAZBSEdaN%2Fuploads%2FRezkZLgR6ihvIblOgDoj%2Fimage.png?alt=media&amp;token=a8eaaa9b-5e92-4050-ae9e-44e770ed7799" alt=""><figcaption></figcaption></figure>

The filter name can be changed by clicking on ![](https://eohelp.weaverintl.com/~gitbook/image?url=https%3A%2F%2F1526800164-files.gitbook.io%2F%7E%2Ffiles%2Fv0%2Fb%2Fgitbook-x-prod.appspot.com%2Fo%2Fspaces%252F50DeL6mO9sNbAZBSEdaN%252Fuploads%252FGiv8FS6GDtry0O9h1y4x%252Fimage.png%3Falt%3Dmedia%26token%3D8fce9755-1bbf-4bcf-a0ed-3df562709353\&width=300\&dpr=4\&quality=100\&sign=40fe3c21\&sv=1)

<figure><img src="https://1526800164-files.gitbook.io/~/files/v0/b/gitbook-x-prod.appspot.com/o/spaces%2F50DeL6mO9sNbAZBSEdaN%2Fuploads%2FZ7qZM6fbA34FyjtxS4yn%2Fimage.png?alt=media&amp;token=39c2ee08-f9d7-4779-8786-aec4cb5dbaa4" alt=""><figcaption></figcaption></figure>

Click on the save icon when completed.

<figure><img src="https://1526800164-files.gitbook.io/~/files/v0/b/gitbook-x-prod.appspot.com/o/spaces%2F50DeL6mO9sNbAZBSEdaN%2Fuploads%2F2INPeXFiRRk6rryr9NHe%2Fimage.png?alt=media&amp;token=cf158e2e-9983-44b8-8842-e438c9d9a936" alt=""><figcaption></figcaption></figure>

New filter is created.

<figure><img src="https://1526800164-files.gitbook.io/~/files/v0/b/gitbook-x-prod.appspot.com/o/spaces%2F50DeL6mO9sNbAZBSEdaN%2Fuploads%2FXOll7Tj0b3kxCqcWFkGn%2Fimage.png?alt=media&amp;token=6d66df2b-bc64-4f6a-8cd7-ac9dc292e940" alt=""><figcaption></figcaption></figure>

In the Advance Search, click on the (X) to delete the filter.

<figure><img src="https://1526800164-files.gitbook.io/~/files/v0/b/gitbook-x-prod.appspot.com/o/spaces%2F50DeL6mO9sNbAZBSEdaN%2Fuploads%2FX6oBbJ9qKAG6LpEMyGc2%2Fimage.png?alt=media&amp;token=dbd79e1a-fb5d-4bc9-b915-59917b830584" alt="" width="563"><figcaption></figcaption></figure>

### 4.2 Search

#### 4.2.1 Simple Query

The users is able to filter customer with customer name that are similar/matched to the text entered in the search box.

<figure><img src="https://1526800164-files.gitbook.io/~/files/v0/b/gitbook-x-prod.appspot.com/o/spaces%2F50DeL6mO9sNbAZBSEdaN%2Fuploads%2FenGC59gBuspegewgnjoI%2Fimage.png?alt=media&amp;token=de2d62b3-d58c-43d7-b7a4-b81c1dcf309c" alt=""><figcaption></figcaption></figure>

#### 4.2.2 Advance Query

The \[Advance Query] allows the users to create complex searches or filters by specifying detailed conditions and criteria.\
Step 1: Click on the ![](https://1526800164-files.gitbook.io/~/files/v0/b/gitbook-x-prod.appspot.com/o/spaces%2F50DeL6mO9sNbAZBSEdaN%2Fuploads%2Fq3QNH9BAYb1wITyus8vR%2Fimage.png?alt=media\&token=17621caa-f9d3-452d-949f-a12fd4204c59) icon next to the search box.

<figure><img src="https://1526800164-files.gitbook.io/~/files/v0/b/gitbook-x-prod.appspot.com/o/spaces%2F50DeL6mO9sNbAZBSEdaN%2Fuploads%2Feb8KCnGgxfyaZFt9TItU%2Fimage.png?alt=media&amp;token=6acb0f5e-44a0-428b-ad56-456e44b6558a" alt=""><figcaption></figcaption></figure>

Step 2: Fill in the relevant condition and click on "Search".

<figure><img src="https://1526800164-files.gitbook.io/~/files/v0/b/gitbook-x-prod.appspot.com/o/spaces%2F50DeL6mO9sNbAZBSEdaN%2Fuploads%2FzyuYTwWt3cDi70m5Js9n%2Fimage.png?alt=media&amp;token=2796a641-b305-4288-88ef-b887056a6528" alt=""><figcaption></figcaption></figure>


# Customer Report

Purpose: To provide statistics on the customer data available to the current user through pie charts and bar charts based on various customer attributes.

## 1 Chart Display

### 1.1 Pie Chart

The pie charts show the percentage of customers by customer type, customer status, customer attributes, and customer size.

#### 1.1.1 Statistics

<figure><img src="https://1526800164-files.gitbook.io/~/files/v0/b/gitbook-x-prod.appspot.com/o/spaces%2F50DeL6mO9sNbAZBSEdaN%2Fuploads%2F2IkJaruB8yWghwMOJRGY%2Fimage.png?alt=media&amp;token=950f5f90-1ca6-4c39-90b2-d7be9a5267a9" alt="" width="372"><figcaption></figcaption></figure>

<figure><img src="https://1526800164-files.gitbook.io/~/files/v0/b/gitbook-x-prod.appspot.com/o/spaces%2F50DeL6mO9sNbAZBSEdaN%2Fuploads%2Fx6xYOJB28x8uxUkc2iZh%2Fimage.png?alt=media&amp;token=508695a1-3a86-4ce8-a349-6e8d5a9d8a8d" alt="" width="357"><figcaption></figcaption></figure>

<figure><img src="https://1526800164-files.gitbook.io/~/files/v0/b/gitbook-x-prod.appspot.com/o/spaces%2F50DeL6mO9sNbAZBSEdaN%2Fuploads%2FuL9roNieqMn8coCcthmV%2Fimage.png?alt=media&amp;token=96d2df36-f08f-4692-a1b3-c3aac0cbd825" alt="" width="375"><figcaption></figcaption></figure>

<figure><img src="https://1526800164-files.gitbook.io/~/files/v0/b/gitbook-x-prod.appspot.com/o/spaces%2F50DeL6mO9sNbAZBSEdaN%2Fuploads%2FkxNB7UIOHQTFxAIUoxCg%2Fimage.png?alt=media&amp;token=f226b430-9160-4df7-8bf2-460e6f9c8fb5" alt="" width="362"><figcaption></figcaption></figure>

#### 1.1.2 Filter

The charts statistics are displayed based on filter criteria and the filter are fixed.&#x20;

The filter range are created this week, created this month, created this quarter, and created this year.

<figure><img src="https://1526800164-files.gitbook.io/~/files/v0/b/gitbook-x-prod.appspot.com/o/spaces%2F50DeL6mO9sNbAZBSEdaN%2Fuploads%2FzucbDvovSOt8ZISCIpag%2Fimage.png?alt=media&amp;token=e28cc337-ef66-492d-b51c-6dd9f0d2a331" alt=""><figcaption></figcaption></figure>

### 1.2 Bar Chart

#### 1.2.1 According to Account Executive

Statistics on the total number of customers, customer types, customer statuses, and customer attributes.

<figure><img src="https://1526800164-files.gitbook.io/~/files/v0/b/gitbook-x-prod.appspot.com/o/spaces%2F50DeL6mO9sNbAZBSEdaN%2Fuploads%2FntnevCh6cXTpdtFowNNn%2Fimage.png?alt=media&amp;token=635f738b-691b-4f21-9557-45709153e179" alt=""><figcaption></figcaption></figure>

\
Horizontal axis: Account executive&#x20;

Vertical axis: Number of customers under each account executive.

#### 1.2.2 According to Creation Date

Statistics on the number of customers, customer types, customer statuses, and customer attributes by day, week, and month.

<figure><img src="https://1526800164-files.gitbook.io/~/files/v0/b/gitbook-x-prod.appspot.com/o/spaces%2F50DeL6mO9sNbAZBSEdaN%2Fuploads%2FD8wmaWbnsRzgFy8hyxQA%2Fimage.png?alt=media&amp;token=164ec5c4-737f-4cb7-a294-3ccb76029ef8" alt=""><figcaption></figcaption></figure>

Horizontal axis: Customer creation date

Vertical axis: Number of customers created

##


# Settings

{% content-ref url="/pages/F5NygkTPd6xzdJCj1kiG" %}
[Field Settings](https://eohelp.weaver.com.co/crm/settings/field-settings)
{% endcontent-ref %}

{% content-ref url="/pages/gEcOBdKwUI6qIbdMqjz2" %}
[Homepage Configuration](https://eohelp.weaver.com.co/crm/settings/homepage-configuration)
{% endcontent-ref %}

{% content-ref url="/pages/sbktA3nNKZVIJGX4F6qG" %}
[Pool Configuration](https://eohelp.weaver.com.co/crm/details/customer-pool/pool-configuration)
{% endcontent-ref %}

{% content-ref url="/pages/5KXyMvtaZnyVY47HySXN" %}
[Permission Setting](https://eohelp.weaver.com.co/crm/settings/permission-setting)
{% endcontent-ref %}

{% content-ref url="/pages/TgmXfeEnA7xY100tmVkx" %}
[Related Business Setting](https://eohelp.weaver.com.co/crm/settings/related-business-setting)
{% endcontent-ref %}


# Field Settings

Purpose: Give users greater control over the default fields and data on CRM pages, enabling more flexibility as a low-code platform.

**Path: CRM > Settings > Field Settings**

The different functionality pages are divided into separate tabs, making it easier for users to manage each page in a more organized manner.

## 1 Form Design

This page allow users to tailor the page's appearance and functionality to suit their needs. It supports various field types and page layouts, enabling users to create forms that capture the right information in an organized and visually appealing way.

<figure><img src="https://1526800164-files.gitbook.io/~/files/v0/b/gitbook-x-prod.appspot.com/o/spaces%2F50DeL6mO9sNbAZBSEdaN%2Fuploads%2F6ozNuAY47rhhpfcDe5Wf%2Fimage.png?alt=media&amp;token=8eb08c03-c40b-44b3-9fc3-8cb9186a150b" alt=""><figcaption></figcaption></figure>

**Remark:**&#x20;

* System default field can be hidden but cannot be deleted.
* Users can add new fields, remove fields, set field types, specify default data, adjust their sequence, etc.
* The preview button allows the user to preview the effect of the newly added fields.
* Fields that are system-defaulted as required cannot be hidden, and the hide button is grayed out and unavailable.

## 2 List

The user can adjust the list settings for the fields to be displayed, the sorting method, the fields that should be included in the advanced query, the fields that can be used as filters, etc.

<figure><img src="https://1526800164-files.gitbook.io/~/files/v0/b/gitbook-x-prod.appspot.com/o/spaces%2F50DeL6mO9sNbAZBSEdaN%2Fuploads%2FK4D1HY4nTGGumOdWE0Dg%2Fimage.png?alt=media&amp;token=c8b994a6-36cf-4c10-9c66-1a7d8cd38a23" alt=""><figcaption></figcaption></figure>

## 3 Field Control

Field control refers to the settings and rules applied to fields within a form or page. It allows users to manage how each field behaves and interacts.

<figure><img src="https://1526800164-files.gitbook.io/~/files/v0/b/gitbook-x-prod.appspot.com/o/spaces%2F50DeL6mO9sNbAZBSEdaN%2Fuploads%2FuFWDYT6pWIa6hrK2kA0j%2Fimage.png?alt=media&amp;token=cbffdc88-0826-4226-86c9-93f79c172482" alt=""><figcaption></figcaption></figure>

**Remark:**

* System defaulted operation cannot be changed
* **Edit:** Allows the field to be modified by users and sets conditions to determine which conditions must be met for the field to be editable.
* **Required:** Specifies whether the field is mandatory and defines the conditions that determine when the field must be filled out.

## 4 Validation

Validation ensures that the data entered into a form meets specific criteria when the new data is saved.

<figure><img src="https://1526800164-files.gitbook.io/~/files/v0/b/gitbook-x-prod.appspot.com/o/spaces%2F50DeL6mO9sNbAZBSEdaN%2Fuploads%2F12qkp7CrrzDANyb2AhUD%2Fimage.png?alt=media&amp;token=1c7435c2-8d9b-4dcb-81ba-a64598071301" alt=""><figcaption></figcaption></figure>

**Remark:**

The system-defaulted validation to check whether the customer name, customer number, and supplier name are unique cannot be disabled.

## 5 Linked data

When data on one page is referenced or used by another, it becomes interconnected across different parts of the system.&#x20;

<figure><img src="https://1526800164-files.gitbook.io/~/files/v0/b/gitbook-x-prod.appspot.com/o/spaces%2F50DeL6mO9sNbAZBSEdaN%2Fuploads%2FgI2bJOsNYIW0TYth2omW%2Fimage.png?alt=media&amp;token=5aa2c474-cd73-4376-ab17-f11572761cfe" alt=""><figcaption></figcaption></figure>

## 6 Reminder settings

Allow users to configure alerts and notifications for specific events or deadlines within the system. These settings help ensure that important tasks, follow-ups, or milestones are not missed.

<figure><img src="https://1526800164-files.gitbook.io/~/files/v0/b/gitbook-x-prod.appspot.com/o/spaces%2F50DeL6mO9sNbAZBSEdaN%2Fuploads%2Fkc7ArE0KyepJGz2QAXzo%2Fimage.png?alt=media&amp;token=e0cdc281-4e9b-4dce-8c78-fd4d4f7c4c85" alt=""><figcaption></figcaption></figure>


# Homepage Configuration

{% content-ref url="/pages/h5pssEEVA1vF3coLZaye" %}
[CRM Homepage](https://eohelp.weaver.com.co/crm/crm-homepage)
{% endcontent-ref %}


# Pool Configuration

{% content-ref url="/pages/N1LpeoRIswMqs4apNawc" %}
[Customer Pool](https://eohelp.weaver.com.co/crm/details/customer-pool)
{% endcontent-ref %}


# Permission Setting

Purpose: Enable users to create and manage permissions for various entities, including customers, suppliers, and products. This functionality allows for granular control over specific details such as customer data, contacts, contact logs, sales opportunities, contracts, and sales record.&#x20;

<figure><img src="https://1526800164-files.gitbook.io/~/files/v0/b/gitbook-x-prod.appspot.com/o/spaces%2F50DeL6mO9sNbAZBSEdaN%2Fuploads%2FBCQzRHDR6QcX1Jv0eLlx%2Fimage.png?alt=media&amp;token=2c3d7aea-7566-429c-8e9a-7162f6b499f1" alt=""><figcaption></figcaption></figure>

## 1 Data Permission

**Purpose**: Controls access to specific customer data based on the user's relationship to the data (e.g., creator or assigned representative).

<figure><img src="https://1526800164-files.gitbook.io/~/files/v0/b/gitbook-x-prod.appspot.com/o/spaces%2F50DeL6mO9sNbAZBSEdaN%2Fuploads%2F4NppcYLZn6Qonqxv8tt2%2Fimage.png?alt=media&amp;token=3d3575d8-0dad-4bcb-9102-09440fb97ef4" alt=""><figcaption></figcaption></figure>

### 1.1 **Relation Control**

**Creator**: The person who initially created the customer record.

**Customer Service Representative (CSR)**: The individual responsible for customer communication and support.

**Account Executive (AE)**: The salesperson responsible for managing the customer relationship.

**Shared User**: Users to whom the customer's card is explicitly shared for collaboration.

### **1.2 Operations**

**View**: Read-only access to customer data.

**Edit**: Modify customer information.

**Delete**: Remove customer records.

**Merge**: Combine duplicate records into one.

**Share**: Provide access to other users by sharing the customer card.

**View Log**: Check historical changes and actions performed on the customer record.

## 2 Monitoring Permission

**Purpose**: Provides the ability to monitor and manage data at various organizational levels. This includes seeing how customer information flows across the organization.

<figure><img src="https://1526800164-files.gitbook.io/~/files/v0/b/gitbook-x-prod.appspot.com/o/spaces%2F50DeL6mO9sNbAZBSEdaN%2Fuploads%2F9v1AIETb1YNUtWuOjHyl%2Fimage.png?alt=media&amp;token=a5e59a01-56b9-4e8a-b43e-f75e6d6f4692" alt=""><figcaption></figcaption></figure>

<figure><img src="https://1526800164-files.gitbook.io/~/files/v0/b/gitbook-x-prod.appspot.com/o/spaces%2F50DeL6mO9sNbAZBSEdaN%2Fuploads%2FqL6KcP4YBFT8kp4UK3yF%2Fimage.png?alt=media&amp;token=692422ef-d4cf-44b3-a7b4-79df1c7cfba5" alt=""><figcaption></figcaption></figure>

### **1.1 User Scope**

**All Users**: Permissions apply to all users.

**Specific User**: Permissions granted based on individuals.

**Specific Role**: Permissions granted based on role.

**Specific Department**: Permissions granted based on department.

### **1.2 Data Penetration**

Defines how much information can be accessed based on hierarchical position.

* **Myself**: Only data related to the user.
* **Superior**: The user’s direct supervisor.
* **All Superiors**: Access to all higher-ups in the organization.
* **Subordinates**: Data access for those reporting to the user.
* **All Subordinates**: Access to the entire team of subordinates.
* **HOD (Head of Department)**: Access to the department’s data.
* **Same Department**: Access limited to users within the same department.
* **Same Role**: Access to users with the same role, even if in different departments.

### **1.3 Operations**

[#id-1.2-operations](#id-1.2-operations "mention") (View, Edit, Delete, Merge, Share, View Log).

## 3 Page Permission

**Purpose**: Manages access to different features or functionalities within the CRM system's interface.

<figure><img src="https://1526800164-files.gitbook.io/~/files/v0/b/gitbook-x-prod.appspot.com/o/spaces%2F50DeL6mO9sNbAZBSEdaN%2Fuploads%2FQDwY9VmbEJ1MzDcJuIXK%2Fimage.png?alt=media&amp;token=187d6cbe-060f-4d5f-892f-8aa43ac93608" alt=""><figcaption></figcaption></figure>

<figure><img src="https://1526800164-files.gitbook.io/~/files/v0/b/gitbook-x-prod.appspot.com/o/spaces%2F50DeL6mO9sNbAZBSEdaN%2Fuploads%2FeyGR0hyiMcJt3FooCZcJ%2Fimage.png?alt=media&amp;token=4a6c605c-822b-4763-bdaf-2b93f20cf44d" alt=""><figcaption></figcaption></figure>

### **3.1 Operations**

**Add**: Ability to create new customer records or entities.

**Import**: Upload data into the CRM system.

**Export**: Download data from the CRM system.

**Manage Tag**: Modify tags associated with customers.

**Nearby Customer**: Access to a function that identifies customers located nearby, likely for sales or support purposes.

## 4 Log

The log is displayed as a timeline chart, with the time of occurrence shown on the left and the operation type and details displayed on the right. It can be filtered by log type through the operation type, by the creation time using the existing time filter, or by customizing the range with the "Time range" button. Additionally, the \[Search log] search box is used to search for log content.

<figure><img src="https://1526800164-files.gitbook.io/~/files/v0/b/gitbook-x-prod.appspot.com/o/spaces%2F50DeL6mO9sNbAZBSEdaN%2Fuploads%2FUS4eKSrOF90jQrMSnoHm%2Fimage.png?alt=media&amp;token=7c695482-4165-44ca-af04-5f72dbefeb45" alt=""><figcaption></figcaption></figure>

## 5 View permission details

**Purpose:** Provide clear overview of who is granted specific permissions and grouping the data by different dimensions.

### 5.1 Permission

**Purpose**: This dimension provides an overview of the specific types of permissions assigned (e.g., Add, Edit, Delete) and to whom they are granted.

<figure><img src="https://1526800164-files.gitbook.io/~/files/v0/b/gitbook-x-prod.appspot.com/o/spaces%2F50DeL6mO9sNbAZBSEdaN%2Fuploads%2FXYRTyWd0rQ7TCrITZgGZ%2Fimage.png?alt=media&amp;token=dca1d21b-a276-48f4-b819-2c20ef049e6e" alt=""><figcaption></figcaption></figure>

**Remark:**

* **Permission Type**: The type of action or permission granted (e.g., View, Edit, Delete, etc.).
* **Scope**: Defines who the permission applies to (e.g., specific user, role, department, all users).
* **Data Filtering**: This refers to any restrictions applied to the data a user can access based on specific criteria (e.g., only data related to their department, subordinates, or specific customers).

### 5.2 User

**Purpose**: Shows the individual users and the specific permissions they have, along with the extent to which they can access or modify data.

<figure><img src="https://1526800164-files.gitbook.io/~/files/v0/b/gitbook-x-prod.appspot.com/o/spaces%2F50DeL6mO9sNbAZBSEdaN%2Fuploads%2FpoMPti9wjSirCSZRGz3f%2Fimage.png?alt=media&amp;token=2495de76-7da8-4aa7-92bb-7579b8b6f5fa" alt=""><figcaption></figcaption></figure>

**Remark:**

**User**: The specific person (e.g., Gloria, John).

**Cross items (Penetration)**: Indicates how deep the user's permissions reach (e.g., whether they can see only their own data, their subordinates' data, or a broader range).

**Have Permission**: Lists the actions the user can perform (e.g., View, Edit).

**Data Filtering**: Specifies the data the user can access based on filtering conditions (e.g., only customers from a specific region).

### 5.3 Role

**Purpose**: Provides a role-based view of permissions, useful for managing large groups of users. It defines what permissions are granted to users based on their role in the organization.

<figure><img src="https://1526800164-files.gitbook.io/~/files/v0/b/gitbook-x-prod.appspot.com/o/spaces%2F50DeL6mO9sNbAZBSEdaN%2Fuploads%2FPhKTooHvzlP4obO9wPWe%2Fimage.png?alt=media&amp;token=ec4255e4-d80e-4f63-8e85-04eb1f3df0ec" alt=""><figcaption></figcaption></figure>

**Remark:**

**Role**: Specifies the role (e.g., Account Manager, Support Engineer).

**Cross items (Penetration)**: Indicates how deep the role's permissions reach (e.g., whether they can see only their own data, their subordinates' data, or a broader range).

**Have Permission**: Lists the actions the user can perform (e.g., View, Edit).

**Data Filtering**: Specifies the data the role can access based on filtering conditions (e.g., only customers from a specific region).

### 5.4 Department

**Purpose**: Provides a department-wide view of permissions, often used to grant broader access to users within a specific functional area (e.g., sales, support).

<figure><img src="https://1526800164-files.gitbook.io/~/files/v0/b/gitbook-x-prod.appspot.com/o/spaces%2F50DeL6mO9sNbAZBSEdaN%2Fuploads%2FVN7LxJGckXdybPQ8xgq0%2Fimage.png?alt=media&amp;token=af7aa50d-020b-469d-bbfa-7e8c69cef2c4" alt=""><figcaption></figcaption></figure>

**Remark:**

**Department**: Specifies the department (e.g., Sales, Customer Support).

**Cross items (Penetration)**: Indicates how deep the department's permissions reach (e.g., whether they can see only their own data, their subordinates' data, or a broader range).

**Have Permission**: Lists the actions the user can perform (e.g., View, Edit).

**Data Filtering**: Specifies the data the role can access based on filtering conditions (e.g., only customers from a specific region).

### 5.5 Fields

**Purpose**: Allows permissions to be controlled based on the relation of the user to specific data fields (e.g., Creator, Account Executive). It helps in granting granular permissions to specific fields within customer records.

<figure><img src="https://1526800164-files.gitbook.io/~/files/v0/b/gitbook-x-prod.appspot.com/o/spaces%2F50DeL6mO9sNbAZBSEdaN%2Fuploads%2FDCJqxDL1sVLl1aplHIqV%2Fimage.png?alt=media&amp;token=38e11b27-85db-4e82-b7c5-ab0014980903" alt=""><figcaption></figcaption></figure>

**Remarks:**

**Relation Control**: Defines the user’s relationship to the data (e.g., Creator, CSR, Account Executive).

**Cross items (Penetration)**: Indicates how deep the department's permissions reach (e.g., whether they can see only their own data, their subordinates' data, or a broader range).

**Have Permission**: Lists the actions the user can perform (e.g., View, Edit).

**Data Filtering**: Specifies the data the role can access based on filtering conditions (e.g., only customers from a specific region).


# Related Business Setting

## 1 Contract&#x20;

**Purpose:** For the user to define the number of days to remind in advance before the contract ended.

<figure><img src="https://1526800164-files.gitbook.io/~/files/v0/b/gitbook-x-prod.appspot.com/o/spaces%2F50DeL6mO9sNbAZBSEdaN%2Fuploads%2FGEuOtZcGZ9y8nV7EefI1%2Fimage.png?alt=media&amp;token=8f773f89-1c13-41cf-af9d-f772409a95ac" alt=""><figcaption></figcaption></figure>

<figure><img src="https://1526800164-files.gitbook.io/~/files/v0/b/gitbook-x-prod.appspot.com/o/spaces%2F50DeL6mO9sNbAZBSEdaN%2Fuploads%2FmARAUHxcZGKqSeiNf41a%2Fimage.png?alt=media&amp;token=0ef8f9d8-7e6e-43a3-b160-0975b8b0b887" alt=""><figcaption></figcaption></figure>

## 2 Customer

<figure><img src="https://1526800164-files.gitbook.io/~/files/v0/b/gitbook-x-prod.appspot.com/o/spaces%2F50DeL6mO9sNbAZBSEdaN%2Fuploads%2F9d1Ad41Af4byhFuYn4me%2Fimage.png?alt=media&amp;token=23757247-b0ce-4235-a9aa-b7fb55494f90" alt=""><figcaption></figcaption></figure>

### 2.1 Default share user

This will be the default shared with user when a new customer is created.

#### 2.1.1 No specific

The customer won't be shared to anyone when created.

<figure><img src="https://1526800164-files.gitbook.io/~/files/v0/b/gitbook-x-prod.appspot.com/o/spaces%2F50DeL6mO9sNbAZBSEdaN%2Fuploads%2FxHr4Wj520rHENo91PQzt%2Fimage.png?alt=media&amp;token=50eed58a-671b-49f7-a137-60e8c26f8a7c" alt=""><figcaption></figcaption></figure>

#### 2.1.2 Specified field

Controls access to specific customer data based on the user's relationship to the data.

<figure><img src="https://1526800164-files.gitbook.io/~/files/v0/b/gitbook-x-prod.appspot.com/o/spaces%2F50DeL6mO9sNbAZBSEdaN%2Fuploads%2FosbOZVGX85ZVyKvzCNbP%2Fimage.png?alt=media&amp;token=36c476bd-dc8d-47db-a88b-04679d977a74" alt=""><figcaption></figcaption></figure>

**Remark:**

**Creator**: The person who initially created the customer record.

**Customer Service Representative (CSR)**: The individual responsible for customer communication and support.

**Account Executive (AE)**: The salesperson responsible for managing the customer relationship.

#### 2.1.3 Designated Personnel

Allows the user to define the shared user using a detailed user scope.

<figure><img src="https://1526800164-files.gitbook.io/~/files/v0/b/gitbook-x-prod.appspot.com/o/spaces%2F50DeL6mO9sNbAZBSEdaN%2Fuploads%2FFDnpd1XFjpNNCzL4PuKk%2Fimage.png?alt=media&amp;token=b7c0f743-ec9f-40f9-9a5c-2e7932360112" alt=""><figcaption></figcaption></figure>

<figure><img src="https://1526800164-files.gitbook.io/~/files/v0/b/gitbook-x-prod.appspot.com/o/spaces%2F50DeL6mO9sNbAZBSEdaN%2Fuploads%2F926JFKNSPuEbFN1jsSSW%2Fimage.png?alt=media&amp;token=e6bcc5c9-a2a8-481c-87ee-b93a2854539c" alt=""><figcaption></figcaption></figure>

### 2.2 Nearby Customer

The range parameter allows the user to search for customers within their physical vicinity.

<figure><img src="https://1526800164-files.gitbook.io/~/files/v0/b/gitbook-x-prod.appspot.com/o/spaces%2F50DeL6mO9sNbAZBSEdaN%2Fuploads%2FNzOHepMhM8vT3FIqF7jn%2Fimage.png?alt=media&amp;token=d7f9def9-26a5-43b5-ab30-cfe248d522fb" alt=""><figcaption></figcaption></figure>

Refer to Customer List feature: Nearby Customer's [/pages/gxjM9NRrx9uklFtsQ24R#id-6.2-configuration](https://eohelp.weaver.com.co/pages/gxjM9NRrx9uklFtsQ24R#id-6.2-configuration "mention")

### 2.3 Similar search field

In \[New Customer], there is a function designed to search for existing customers with similar names in the system to prevent duplicate entries. This functionality can also be applied to contact names and mobile numbers.

<figure><img src="https://1526800164-files.gitbook.io/~/files/v0/b/gitbook-x-prod.appspot.com/o/spaces%2F50DeL6mO9sNbAZBSEdaN%2Fuploads%2F8xdUjbtxYDAvMKL1TjnZ%2Fimage.png?alt=media&amp;token=22dd3f33-16f1-418f-b65b-75aa95754125" alt=""><figcaption></figcaption></figure>


# Assets


# New asset

## 1. Content Desc.

New asset is used for asset entry. The user can modify and add fields to the asset list as needed directly through \[Settings] - \[Fields settings].

**Path:** Assets >> New asset

<figure><img src="https://1526800164-files.gitbook.io/~/files/v0/b/gitbook-x-prod.appspot.com/o/spaces%2F50DeL6mO9sNbAZBSEdaN%2Fuploads%2FcsIiQHOhXy0q0niHjzLQ%2F2024-07-17_154231.png?alt=media&amp;token=191b9837-98a5-47f0-975a-2800e1a44b89" alt=""><figcaption></figcaption></figure>

In "New asset", users can perform the following operations:

1. [View Assets](#2.1-view-assets-details)
2. [Add Assets](#2.2.1-add-new-asset)
3. [Import Assets](#2.2.2-import-asset)
4. [Delete Assets](#2.3-delete-asset)
5. [Generate QR code](#2.4.-generate-qr-code)
6. [Print QR code](#2.4.3.-printing-qr-code)

## 2. Function Feature

### 2.1 View Assets Details

In "New asset", click on the asset data or "Details" for more information on a new page.

<figure><img src="https://1526800164-files.gitbook.io/~/files/v0/b/gitbook-x-prod.appspot.com/o/spaces%2F50DeL6mO9sNbAZBSEdaN%2Fuploads%2FvJ2EIu2JgqwsEfqR1xXI%2FAsset-New-Details.png?alt=media&amp;token=d05a4763-698b-43a5-90bd-4413d2cb2b4b" alt=""><figcaption></figcaption></figure>

### 2.2 Add Assets

#### 2.2.1 Add new asset

<figure><img src="https://1526800164-files.gitbook.io/~/files/v0/b/gitbook-x-prod.appspot.com/o/spaces%2F50DeL6mO9sNbAZBSEdaN%2Fuploads%2FHymf9defL5GV1CyDOmJM%2FAsset-New.png?alt=media&amp;token=d90b1d4f-fcb9-4295-b7b5-abb9f28a96ea" alt=""><figcaption></figcaption></figure>

**Remark:**

1. Register number: automatically generated; Format: (ZCDJ + current time (year/month/day/hour/minute/second).&#x20;
2. Asset code: automatically generated according to the rule set in the \[Coding rule setting], and the code is presented incrementally according to the running number when adding new assets; Support manual input.
3. Asset Type: Select the asset category, which can be set in Settings-Category Setting.
4. Using the time: After selecting the asset category, \[Using the time] will automatically display the default duration of the asset category, and the user can adjust accordingly to the asset's actual circumstances.
5. Manager: Only the user(s) listed here can change asset information, approve the application of use, register maintenance, and return the asset.
6. Scope of use: can be set for all users or according to the free combination of departments, roles, and personnel.

#### 2.2.2 Import asset

**Step 1:** Click the \[Import] button on the right-hand side of the New assets page

**Step 2:** Click on \[Export template] to export the template.

<figure><img src="https://1526800164-files.gitbook.io/~/files/v0/b/gitbook-x-prod.appspot.com/o/spaces%2F50DeL6mO9sNbAZBSEdaN%2Fuploads%2FzFA2cV5uF9RMGB9Oe6D4%2FAsset-New-Import.png?alt=media&amp;token=9a259825-ec7a-435f-b504-5987cd85382b" alt=""><figcaption></figcaption></figure>

**Step 3:** Fill in the asset data in the EXCEL, read the remark below for more information.

<figure><img src="https://1526800164-files.gitbook.io/~/files/v0/b/gitbook-x-prod.appspot.com/o/spaces%2F50DeL6mO9sNbAZBSEdaN%2Fuploads%2F8CZ964HHd0j6AWxNf5rL%2FAsset-New-Import_2.png?alt=media&amp;token=9d019217-5874-4ddb-b1f9-d425a4400dfb" alt=""><figcaption></figcaption></figure>

**Remark:**&#x20;

1. The import operator is the asset operator by default.&#x20;
2. Imported asset's asset code will be automatically generated according to the \[Coding rule setting].&#x20;
3. If there is an error in the imported asset information, the error details will pop up.

**Step 4:** Click \[Import local file], upload your file, and click \[Start importing] to begin the import process.

<figure><img src="https://1526800164-files.gitbook.io/~/files/v0/b/gitbook-x-prod.appspot.com/o/spaces%2F50DeL6mO9sNbAZBSEdaN%2Fuploads%2FV988WFOJFVPLOs7WZr1G%2FAsset-New-Import_Start.png?alt=media&amp;token=5b0f0281-f21c-4afa-92e5-08e9cd2b14e3" alt=""><figcaption></figcaption></figure>

#### Remark:

1. Import error details pop-up box will show the number of successful and unsuccessful data imported.
2. The fail data will be displayed directly on the Error Details pop-up box.
3. After modifying the data, click \[Re-import] on the pop-up box to re-import the modified data.

<figure><img src="https://1526800164-files.gitbook.io/~/files/v0/b/gitbook-x-prod.appspot.com/o/spaces%2F50DeL6mO9sNbAZBSEdaN%2Fuploads%2FXcbVWIqXwP2q6EKXwPyx%2FAsset-New-Import_Error.png?alt=media&amp;token=2c744eff-2959-4efb-aa65-23d8a3759d84" alt=""><figcaption></figcaption></figure>

#### 2.2.3 Export asset

**Step 1:** The user can select data to be exported based on the filtering conditions, using asset category, more filters, search and advanced query.

<figure><img src="https://1526800164-files.gitbook.io/~/files/v0/b/gitbook-x-prod.appspot.com/o/spaces%2F50DeL6mO9sNbAZBSEdaN%2Fuploads%2FU2bfh7x1UDJWf1b33cTk%2FAsset-New-Export.png?alt=media&amp;token=04a9987b-1cd9-488d-b198-fc9754e564c5" alt=""><figcaption></figcaption></figure>

**Step 2:** Tick the fields you need to export, you will need at least one field to be able to export. Click confirm to export.

<figure><img src="https://1526800164-files.gitbook.io/~/files/v0/b/gitbook-x-prod.appspot.com/o/spaces%2F50DeL6mO9sNbAZBSEdaN%2Fuploads%2FQAjOvIZ5GcPPIrHhpxLa%2FAsset-New-Export.png?alt=media&amp;token=22e9c99b-606f-4423-b146-4de2c9812f4d" alt=""><figcaption></figcaption></figure>

#### Remark:

If the "Attachment" field is exported, then the file exported will be a .zip file.

### 2.3 Delete Asset

#### 2.3.1 Delete from the Asset List

**Step 1:** Click on the "···", and click \[Delete].

<figure><img src="https://1526800164-files.gitbook.io/~/files/v0/b/gitbook-x-prod.appspot.com/o/spaces%2F50DeL6mO9sNbAZBSEdaN%2Fuploads%2FfWYzH2l32gyVDTG9S3A1%2FAsset-New-Delete.png?alt=media&amp;token=ebe475ff-800b-493d-a1a1-041ae6774e62" alt=""><figcaption></figcaption></figure>

**Step 2:** Confirm the deletion

<figure><img src="https://1526800164-files.gitbook.io/~/files/v0/b/gitbook-x-prod.appspot.com/o/spaces%2F50DeL6mO9sNbAZBSEdaN%2Fuploads%2FBysexNCy0uXuuGwvmPuD%2FAsset-New-Delete-Confirm.png?alt=media&amp;token=be16787a-7b13-4a67-b490-7484b33499f3" alt=""><figcaption></figcaption></figure>

The data is deleted.

<figure><img src="https://1526800164-files.gitbook.io/~/files/v0/b/gitbook-x-prod.appspot.com/o/spaces%2F50DeL6mO9sNbAZBSEdaN%2Fuploads%2FIcHjdAratCI8EuVwVpdJ%2FAsset-New-Delete-Success.png?alt=media&amp;token=f1399e72-cd73-4926-b9e1-59b522ce8d79" alt=""><figcaption></figcaption></figure>

Remark:&#x20;

1. Asset Manager can delete the assets under their management.&#x20;
2. Assets that have been claimed/maintained/changed/returned cannot be deleted; if the claim record is deleted and there is no other operation record, the asset can be deleted.&#x20;
3. When an asset is deleted, it will no longer be included in the Asset Analysis.

### 2.4. Generate QR Code

#### 2.4.1. System QR Code

**Step 1:**  Select all the assets, and click "system qr code" to generate a list in a new tab.

<figure><img src="https://1526800164-files.gitbook.io/~/files/v0/b/gitbook-x-prod.appspot.com/o/spaces%2F50DeL6mO9sNbAZBSEdaN%2Fuploads%2FTPmCXKszG0XDNpooRO4x%2FPrint%20QR%20Code.png?alt=media&amp;token=43c088bc-2815-4769-a99f-610e7f5dee78" alt=""><figcaption></figcaption></figure>

<figure><img src="https://1526800164-files.gitbook.io/~/files/v0/b/gitbook-x-prod.appspot.com/o/spaces%2F50DeL6mO9sNbAZBSEdaN%2Fuploads%2Ff05LLwA4X6vbk6vkgKT3%2FQR%20Code%20List.png?alt=media&amp;token=f6d7db1b-6f21-4181-8746-f163a69825ec" alt=""><figcaption><p>The QR Code follows the System QR Code Settings in Coding Rule Settings</p></figcaption></figure>

#### 2.4.2. Regular QR Code

**Step 1:**  Select all the assets, and click "scanning gun qr code" to generate a list in a new tab.

&#x20;

<figure><img src="https://1526800164-files.gitbook.io/~/files/v0/b/gitbook-x-prod.appspot.com/o/spaces%2F50DeL6mO9sNbAZBSEdaN%2Fuploads%2FTZ2KA3uMiYKDFahYYirc%2FScan%20gun%20qr%20code.png?alt=media&amp;token=972ad7ec-c600-4448-a926-4edd4e7bc74f" alt=""><figcaption><p>The QR Code follows the Scanning Gun QR Code Settings in Coding Rule Settings</p></figcaption></figure>

#### 2.4.3. Printing QR Code

1. Normal Print

<figure><img src="https://1526800164-files.gitbook.io/~/files/v0/b/gitbook-x-prod.appspot.com/o/spaces%2F50DeL6mO9sNbAZBSEdaN%2Fuploads%2FqfDW2CnXiVQ4dvIH1ZrV%2FNormal%20Print.png?alt=media&amp;token=d7a3862f-dcf7-462d-9486-7b26ef3e2751" alt=""><figcaption></figcaption></figure>

2. Label Print (Single Column)

<figure><img src="https://1526800164-files.gitbook.io/~/files/v0/b/gitbook-x-prod.appspot.com/o/spaces%2F50DeL6mO9sNbAZBSEdaN%2Fuploads%2Fl3c66PSxJDGBGHHgeG0w%2FLabel%20Print%20-%20Single%20col.png?alt=media&amp;token=a95a48a0-84f8-4cf3-b7a7-a0d50603c596" alt=""><figcaption></figcaption></figure>

3. Label Print (Double Column)

<figure><img src="https://1526800164-files.gitbook.io/~/files/v0/b/gitbook-x-prod.appspot.com/o/spaces%2F50DeL6mO9sNbAZBSEdaN%2Fuploads%2FujeskpflRBvKGYCxGvfQ%2FLabel%20Print%20-%20Double%20column.png?alt=media&amp;token=3b76d9e6-d16a-427d-8fed-174ba8509c67" alt=""><figcaption></figcaption></figure>


# Application for use \~ WIP

Asset Application for Borrow/Use

## 1. Content Desc.

The usage of \[Application for use] is for the users to apply for the use of assets, return assets, and record of all user's applications.&#x20;

Path: Assets >> Application for use Request In "Application for use", users can perform the following operations:

1. [View Applications](#2.1.-view-applications-incomplete)
2. [Application for use](#2.2.-use-asset-incomplete)
3. [Application to return](#2.3.-return-asset)
4. [Delete application for use](#2.4.-delete-application-incomplete)
5. [Export application for use](#2.5.-export-application-incomplete)

## 2. Function Feature

### 2.1. View Applications

#### 2.1.1 List Data Display&#x20;

In "Application for use", click on the asset data or "Details" for more information.

<figure><img src="https://1526800164-files.gitbook.io/~/files/v0/b/gitbook-x-prod.appspot.com/o/spaces%2F50DeL6mO9sNbAZBSEdaN%2Fuploads%2FDJPLFMSxdq3jGLwhPKjS%2FList-Details.png?alt=media&amp;token=6988992f-504a-49be-93fc-31105b1d5935" alt=""><figcaption><p>Applicants can check their application status directly from this list.</p></figcaption></figure>

#### 2.1.2. Application Details

<figure><img src="https://1526800164-files.gitbook.io/~/files/v0/b/gitbook-x-prod.appspot.com/o/spaces%2F50DeL6mO9sNbAZBSEdaN%2Fuploads%2F34M8miOOQtzmJtHDy4xB%2FApproval%20Information.png?alt=media&amp;token=6fe332fb-de73-4aa3-865c-e6712611bf4d" alt=""><figcaption><p>More Information</p></figcaption></figure>

### 2.2. Use Asset

#### 2.2.1. With Asset Management

On the right-hand side of the menu, click on "Application for use" to apply for the use of an asset.

<figure><img src="https://1526800164-files.gitbook.io/~/files/v0/b/gitbook-x-prod.appspot.com/o/spaces%2F50DeL6mO9sNbAZBSEdaN%2Fuploads%2F7CI4l6YPpIY01sBbwrWP%2FApplication%20for%20Use.png?alt=media&amp;token=cc6ba1ff-c1a9-4d89-8a22-7a4e98538b9e" alt=""><figcaption></figcaption></figure>

Step 1: Click \[New], fill in the details and click \[Submit] to apply.

<figure><img src="https://1526800164-files.gitbook.io/~/files/v0/b/gitbook-x-prod.appspot.com/o/spaces%2F50DeL6mO9sNbAZBSEdaN%2Fuploads%2FEPcF55gvxVKQKYv9T1rm%2FApplication%20for%20Use-New.png?alt=media&amp;token=d435a1f1-a2ea-4bd2-b855-25ac7334b38c" alt=""><figcaption></figcaption></figure>

<figure><img src="https://1526800164-files.gitbook.io/~/files/v0/b/gitbook-x-prod.appspot.com/o/spaces%2F50DeL6mO9sNbAZBSEdaN%2Fuploads%2FHUEjroXzz5RrSZfIAX8p%2FApplication%20submit.png?alt=media&amp;token=b759c156-f592-4248-b7d9-872c4ab05e0c" alt=""><figcaption></figcaption></figure>

Remark:

1. Application Number is generated automatically with the concept of ZCSQ+ current time (year/month/day/hr/min/sec) + 5 random numbers.
2. When applying the user can only select the asset that they are given the rights to. Refer to [Asset Details](https://eohelp.weaver.com.co/assets/new-asset) (Scope of use, Dept of users, User role, and Use of personnel)]
3. The asset to be selected must be available, as when it has been selected for other applications, maintenance and removal cannot be selected.
4. The methods available are Borrow and Use; When "Borrow" the user must enter the Start Time and Date of Return but when "Use" the user only has to enter the Start Time.

<figure><img src="https://1526800164-files.gitbook.io/~/files/v0/b/gitbook-x-prod.appspot.com/o/spaces%2F50DeL6mO9sNbAZBSEdaN%2Fuploads%2FoHED36GUCugDpRkSGX44%2FApplication%20saved.png?alt=media&amp;token=103537db-950d-4bad-8d30-fc61763b5882" alt=""><figcaption><p>After the application is submitted, the system will remind the manager for approval.</p></figcaption></figure>

<figure><img src="https://1526800164-files.gitbook.io/~/files/v0/b/gitbook-x-prod.appspot.com/o/spaces%2F50DeL6mO9sNbAZBSEdaN%2Fuploads%2FJ6GMyRzLW0U69WyJJte7%2FStatus-Awaiting%20approval.png?alt=media&amp;token=32c9d814-2b30-45d4-88bb-709b2528a87f" alt=""><figcaption><p>Status is updated to Awaiting approval</p></figcaption></figure>

#### 2.2.2 Apply with Mobile App

Step 1: In the Message section, click \[+] on the top-right corner, open the scanner \[-], and scan the asset QR Code

![](https://1526800164-files.gitbook.io/~/files/v0/b/gitbook-x-prod.appspot.com/o/spaces%2F50DeL6mO9sNbAZBSEdaN%2Fuploads%2FV7BfdygjMVCpH5HXIJ6S%2FScan%20qr%20code.png?alt=media\&token=9649d90e-e7a5-44fa-8c2c-454b1d3c3348)

**Step 2:** The scanner will lead you to the Asset Details, click ··· on the top-right corner, click "Asset apply".

![](https://1526800164-files.gitbook.io/~/files/v0/b/gitbook-x-prod.appspot.com/o/spaces%2F50DeL6mO9sNbAZBSEdaN%2Fuploads%2FKjQMCGaxjIueLPoeN2Wf%2FScanner.png?alt=media\&token=17370dd9-1182-471a-976a-d58224285d5d)

### 2.3. Return Asset

**Step 1:** Click on the "···" of the asset to be returned, and click \[return].

<figure><img src="https://1526800164-files.gitbook.io/~/files/v0/b/gitbook-x-prod.appspot.com/o/spaces%2F50DeL6mO9sNbAZBSEdaN%2Fuploads%2FyVllDgIB8CbK6bQ6Ypem%2FAsset-Return-Button.png?alt=media&amp;token=718f74b0-6a7f-453c-a47a-0e580509568a" alt=""><figcaption></figcaption></figure>

**Remark:**&#x20;

1. Only assets approved can be returned.
2. Only assets borrowed have this button, use assets does not.

**Step 2:** Click "Confirm" and the asset's status will be updated

<figure><img src="https://1526800164-files.gitbook.io/~/files/v0/b/gitbook-x-prod.appspot.com/o/spaces%2F50DeL6mO9sNbAZBSEdaN%2Fuploads%2FgbPlDEJs0JbE7UdVGizQ%2FReturn%20confirmation.png?alt=media&amp;token=fd1cef72-2721-46f1-b507-6c9072fdbd8e" alt=""><figcaption></figcaption></figure>

<figure><img src="https://1526800164-files.gitbook.io/~/files/v0/b/gitbook-x-prod.appspot.com/o/spaces%2F50DeL6mO9sNbAZBSEdaN%2Fuploads%2FSxg9KOJXHYA2JSlKvnb1%2FAsset-Status-Update%20after%20return.png?alt=media&amp;token=4f2b1e29-2d1c-41ec-8638-54bb2dba75a1" alt=""><figcaption></figcaption></figure>

### 2.4. Delete Application \~ WIP

#### 2.4.1 Delete in Asset Management

####

### 2.5. Export Application

In Asset Management, Application for use, select the category(as necessary), and click "Export".

<figure><img src="https://1526800164-files.gitbook.io/~/files/v0/b/gitbook-x-prod.appspot.com/o/spaces%2F50DeL6mO9sNbAZBSEdaN%2Fuploads%2FSYbCVNtrprLSz9tgYjFg%2FExport%20List.png?alt=media&amp;token=716deb5a-1bd5-4ebd-9adf-45342790d77e" alt=""><figcaption></figcaption></figure>


# Application for approval

Application Review

## 1. Content Desc.

For Asset Managers to view, approve, reject and check asset applications for use.

**Path: Assets > Application for Approval**

<figure><img src="https://1526800164-files.gitbook.io/~/files/v0/b/gitbook-x-prod.appspot.com/o/spaces%2F50DeL6mO9sNbAZBSEdaN%2Fuploads%2F5bWankVC0AVynOC1X2tL%2FApplication%20for%20Use.png?alt=media&amp;token=f0dc939a-583d-4f12-8966-2a3b2ff09d17" alt=""><figcaption></figcaption></figure>

In "Application for approval", users can perform the following operations:

1. [View Approval](#2.1.-view-approvals)
2. [Asset Approval](#2.2.-asset-approval)
3. [Asset Check](#2.3.-asset-check)
4. [Export Approval](#2.4.-export-approval-incomplete)
5. [Generate QR Code](https://eohelp.weaver.com.co/pages/2svXnH76FHbu10OWfTeA#2.4.3.-printing-qr-code)

## 2. Function Feature

### 2.1.  View Approvals

#### 2.1.1. List Data Display&#x20;

<figure><img src="https://1526800164-files.gitbook.io/~/files/v0/b/gitbook-x-prod.appspot.com/o/spaces%2F50DeL6mO9sNbAZBSEdaN%2Fuploads%2FIfEsYx6a080YdawCI3U1%2FApproval%20List.png?alt=media&amp;token=b81419aa-0e12-436f-a8ee-9c395cd5664d" alt=""><figcaption></figcaption></figure>

#### 2.1.2 Approval Details

In "Application for approval", click on the asset data or "Details" for more information.

<figure><img src="https://1526800164-files.gitbook.io/~/files/v0/b/gitbook-x-prod.appspot.com/o/spaces%2F50DeL6mO9sNbAZBSEdaN%2Fuploads%2FMrARby9Oqya9vVP7sSgJ%2FApproval-Details.png?alt=media&amp;token=88bb24b0-0300-4071-a212-eaeaa1d2fe46" alt=""><figcaption></figcaption></figure>

<figure><img src="https://1526800164-files.gitbook.io/~/files/v0/b/gitbook-x-prod.appspot.com/o/spaces%2F50DeL6mO9sNbAZBSEdaN%2Fuploads%2F5hiPlYTCLFA91SvJwqzb%2FApproval%20Details.png?alt=media&amp;token=b77dea90-c325-435c-941f-74320a75c91b" alt=""><figcaption></figcaption></figure>

### 2.2. Asset Approval

#### 2.2.1 Application Review

**Step 1:** Click "approval" on the asset to be reviewed.

<figure><img src="https://1526800164-files.gitbook.io/~/files/v0/b/gitbook-x-prod.appspot.com/o/spaces%2F50DeL6mO9sNbAZBSEdaN%2Fuploads%2F8JxFdoF3g08yx2aKYL1s%2FApproval.png?alt=media&amp;token=d67907dc-38ca-4bb5-8b7a-ac898d902358" alt=""><figcaption></figcaption></figure>

**Step 2:** Fill in the opinions and click on "Approval" or "Reject" based on the decision made.

<figure><img src="https://1526800164-files.gitbook.io/~/files/v0/b/gitbook-x-prod.appspot.com/o/spaces%2F50DeL6mO9sNbAZBSEdaN%2Fuploads%2Fbq4gqj8Hz9Ow5ZO19ng8%2FApproval%20Form.png?alt=media&amp;token=c81dd62f-8f10-479f-873a-4ca5cefd96a7" alt=""><figcaption></figcaption></figure>

#### 2.2.2 In Instant Messenger (Incomplete)

**Step 1:** In Instant Messenger-Notification-系统消息-Asset Management, click on the "" and enter the Approval Form directly.

**Step 2:** Fill in the opinions and click on "Approval" or "Reject" based on the decision made. The status will change.

<figure><img src="https://1526800164-files.gitbook.io/~/files/v0/b/gitbook-x-prod.appspot.com/o/spaces%2F50DeL6mO9sNbAZBSEdaN%2Fuploads%2Fc83RhPf4Hd72tcKnfhH1%2FApproved%20Status.png?alt=media&amp;token=1bc66d97-6f24-4dd8-83d9-e5c92141154f" alt=""><figcaption><p>Approved Status</p></figcaption></figure>

<figure><img src="https://1526800164-files.gitbook.io/~/files/v0/b/gitbook-x-prod.appspot.com/o/spaces%2F50DeL6mO9sNbAZBSEdaN%2Fuploads%2FCRL9Ysuxol7un6Qa8RY7%2FStatus-Reject.png?alt=media&amp;token=202721c3-f27a-4e74-b6e5-bbf8ca02a489" alt=""><figcaption><p>Reject</p></figcaption></figure>

### 2.3. Asset Check

After the asset has been returned, the asset manager will have to check the condition of the asset and confirm the asset has been received.

**Step 1:** In the Application for approval, click "Check".

<figure><img src="https://1526800164-files.gitbook.io/~/files/v0/b/gitbook-x-prod.appspot.com/o/spaces%2F50DeL6mO9sNbAZBSEdaN%2Fuploads%2FzHldad2O1cqAmOAsb0L7%2FCheck%20button.png?alt=media&amp;token=f77b4965-6903-4718-ab15-db04de2abc5a" alt=""><figcaption></figcaption></figure>

**Step 2:** Click "Confirm" to accept the asset.

<figure><img src="https://1526800164-files.gitbook.io/~/files/v0/b/gitbook-x-prod.appspot.com/o/spaces%2F50DeL6mO9sNbAZBSEdaN%2Fuploads%2FeIK8yZYFyGHfD255xqcx%2FCheck%20confirm.png?alt=media&amp;token=ceebd505-6bf8-443f-9b1a-24f64ab41885" alt=""><figcaption></figcaption></figure>

After confirming the asset status and time of return will be updated as below.

<figure><img src="https://1526800164-files.gitbook.io/~/files/v0/b/gitbook-x-prod.appspot.com/o/spaces%2F50DeL6mO9sNbAZBSEdaN%2Fuploads%2FhJFfUzJ9hEWbu8UvrSLN%2FAfter%20check-status%20and%20time%20updated.png?alt=media&amp;token=81a2dc48-da86-41c8-9b6c-9220b9fc0137" alt=""><figcaption><p>Asset status and Tiime of return updated</p></figcaption></figure>

### 2.4. Export Approval

Click "Export" to export the approval data.

<figure><img src="https://1526800164-files.gitbook.io/~/files/v0/b/gitbook-x-prod.appspot.com/o/spaces%2F50DeL6mO9sNbAZBSEdaN%2Fuploads%2F4GRwtN3RZPlVBYiQ26Hu%2FExport%20Approval.png?alt=media&amp;token=622c1d3f-c1c9-4ad6-9083-cb01d4188d4a" alt=""><figcaption></figcaption></figure>

### 2.5. Generate QR Code

Kindly refer to \[New Asset] [Generate QR Code](https://eohelp.weaver.com.co/pages/2svXnH76FHbu10OWfTeA#2.4.-asset-qr-code).


# Changes

## 1. Content Desc.

Change is used to modify asset information, asset administrators can select their personal management scope of the idle assets to change its details.&#x20;

Path: Asset Management>> Changes

In "Application for approval", users can perform the following operations:

1. [Modify Asset Details](#2.1-modify)
2. [Asset Changes Made](#2.2-modification-details)

## 2. Function Feature

### 2.1. Modify

#### 2.1.1 In Asset Management

**Step 1:** Click "New"

**Step 2:** Select the corresponding asset.

**Step 3:** Change the Asset Details

**Step 4:** Click Submit.

<figure><img src="https://1526800164-files.gitbook.io/~/files/v0/b/gitbook-x-prod.appspot.com/o/spaces%2F50DeL6mO9sNbAZBSEdaN%2Fuploads%2FG1ymV12gDBcu7Q6ZNLQp%2FModification.png?alt=media&amp;token=e9c303af-70c0-4927-8550-dd7da8412a3f" alt=""><figcaption></figcaption></figure>

### 2.2. Modification Details

#### 2.2.1. Modification List

<figure><img src="https://1526800164-files.gitbook.io/~/files/v0/b/gitbook-x-prod.appspot.com/o/spaces%2F50DeL6mO9sNbAZBSEdaN%2Fuploads%2FoHxls0uLkXyb5epOEpnC%2FChange%20List.png?alt=media&amp;token=18b5119d-5521-4651-937e-069037751c17" alt=""><figcaption></figcaption></figure>

<figure><img src="https://1526800164-files.gitbook.io/~/files/v0/b/gitbook-x-prod.appspot.com/o/spaces%2F50DeL6mO9sNbAZBSEdaN%2Fuploads%2FJrzcuPiWkrc19qkHVr9R%2FChange%20Details.png?alt=media&amp;token=fe48e4e6-91a4-410b-a04d-250d35f3fe03" alt=""><figcaption><p>Data on the left is the previous details, the data on the right is the new detail of the asset.</p></figcaption></figure>


# Maintenance

## 1. Content Desc.

## 2. Function Feature

#### 2.1 Details

<figure><img src="https://1526800164-files.gitbook.io/~/files/v0/b/gitbook-x-prod.appspot.com/o/spaces%2F50DeL6mO9sNbAZBSEdaN%2Fuploads%2FbHyc5Ed6uChuDnBxFP6Y%2FMaintenance-Repair-Complete-Details.png?alt=media&amp;token=e1e120ad-1347-41af-a741-40a8c9b770d0" alt=""><figcaption></figcaption></figure>

#### 2.2 New Maintenance

#### 2.2.1 With Asset Management

Step 1: Click "New", select the asset and Declarer, click "Submit".

<figure><img src="https://1526800164-files.gitbook.io/~/files/v0/b/gitbook-x-prod.appspot.com/o/spaces%2F50DeL6mO9sNbAZBSEdaN%2Fuploads%2FVirHkGW5sF2uNkL65pT1%2FMaintenance-New.png?alt=media&amp;token=d0f65571-9bb5-4445-9d46-ba0044c6642a" alt=""><figcaption></figcaption></figure>

**Remark:**

Only Assets with a "Normal" status can be selected, other assets that have been borrowed, returned, or undergoing maintenance cannot be selected.

#### 2.2.2 With Mobile APP

#### 2.2.3. With Data Outsend

#### 2.3 Complete Maintenance


# Asset inventory \~ WIP


# Return of assets \~ WIP


# Analysis \~ WIP


# Settings \~ WIP


# Leave


# My Leave

My leave is used for displaying all the leave types' balances, change records, and expiration reminders of the current user.

## 1 Leave Balance List

<figure><img src="https://1526800164-files.gitbook.io/~/files/v0/b/gitbook-x-prod.appspot.com/o/spaces%2F50DeL6mO9sNbAZBSEdaN%2Fuploads%2FEOSPP0WHmwrtszk4vvE7%2Fimage.png?alt=media&amp;token=6537b26b-5b9a-4ffc-94fc-2a0b5d478662" alt=""><figcaption></figcaption></figure>

### 1.1 Field Explanation

**Leave Name:** Display the applicable and enabled leaves for the current user

**Current available days:** Remaining leave in the current cycle + Remaining leave in history

* If there is no fixed period of leave, the user is not allowed to continue to take leave when the currently available leave is 0.
* Clicking on the available leaves field to be redirected to \[Change Record], which automatically filters the leave type.
* Leave with unlimited leave balance will have their Currently Available Leave in 0.
* If the unit is converted to hours in \[Leave Settings], then the balance unit will all be converted to hours.

**Leave balance:** Leaves that are allowed in the current cycle, after the current cycle period, the balance will be transferred to the history balance or cleared to zero according to the settings.

**History balance:** When Extend leave period is enabled, the balance that exceeds the cycle period in \[Leave balance] will be transferred to the history balance for future use.&#x20;

* History balance will be deducted as a priority when taking leave.

## 2 Change Record

A timeline for the user to view the Change records, where it records the leave balance increament/decreament, modification time, reason for modification, and operator.

<figure><img src="https://1526800164-files.gitbook.io/~/files/v0/b/gitbook-x-prod.appspot.com/o/spaces%2F50DeL6mO9sNbAZBSEdaN%2Fuploads%2F44xZvie554M8f9czGVsG%2FChange%20Record.png?alt=media&amp;token=32c8dda2-617d-4079-b049-756db08afae5" alt=""><figcaption></figcaption></figure>

* Default display "All leave".
* The timeline is sorted in descending order by the modification time.
* Allows to be filtered by leave type, date range, or leave modification type.
* If the leave type is "Released daily", the daily automatic release will not be recorded in the change log.

## 3  Expiry Reminder

Displays the leave that is about to expire, the expired balance, and the expiration time.

<figure><img src="https://1526800164-files.gitbook.io/~/files/v0/b/gitbook-x-prod.appspot.com/o/spaces%2F50DeL6mO9sNbAZBSEdaN%2Fuploads%2F7YRHu13dTnOWBTmJI420%2Fimage.png?alt=media&amp;token=6a766393-b807-46bc-8829-ff6f04762b80" alt=""><figcaption></figcaption></figure>

**Remark:**&#x20;

* Will not display disabled and expired leaves; the expiration reminder record will be cleared once the leave expires.&#x20;
* If the expiration duration in the leave rule changes, the expiration here will also change.&#x20;
* This feature works with \[Leave Settings] - \[Leave Expiration Reminder Setting] and \[Settings] - \[Reminder Settings] - \[Leave Expiry Reminder Timing], allowing you to configure N days prior reminders in \[Leave Settings] and set the reminder method in \[Settings].


# Leave List

## 1 List&#x20;

The Leave List display leave types applicable to the user with balance.

<figure><img src="https://1526800164-files.gitbook.io/~/files/v0/b/gitbook-x-prod.appspot.com/o/spaces%2F50DeL6mO9sNbAZBSEdaN%2Fuploads%2Fme1fczX8WTU6v5aI4tgt%2Fimage.png?alt=media&amp;token=4ad92e21-2331-4f1a-b54e-4b14864d7b5e" alt=""><figcaption></figcaption></figure>

* **User Fullname**: Displays the full name of the user.
* **Leave Type Balance**: Shows the remaining leave balance for each leave type.

### 1.1 View resigned user

Allows users to view the leave balance details of resigned employees.

<figure><img src="https://1526800164-files.gitbook.io/~/files/v0/b/gitbook-x-prod.appspot.com/o/spaces%2F50DeL6mO9sNbAZBSEdaN%2Fuploads%2FYXB9DfxtMEaaFe3u27KM%2Fimage.png?alt=media&amp;token=7858ff7b-0a7c-48c6-bda3-084b3e17f66b" alt=""><figcaption></figcaption></figure>

#### 1.1.1 Search

Enables the current user to search for specific resigned employees to refine results.

#### 1.1.2  Separating date range

Provides options to filter records based on the following time ranges.

#### 1.1.3 Log

Step 1: Click on **···** for more options, click on "Log".

<figure><img src="https://1526800164-files.gitbook.io/~/files/v0/b/gitbook-x-prod.appspot.com/o/spaces%2F50DeL6mO9sNbAZBSEdaN%2Fuploads%2FfGOFbs2bv8vRVPGoyllV%2Fimage.png?alt=media&amp;token=0f6280fb-245f-4c07-8481-d94ae2046e58" alt=""><figcaption></figcaption></figure>

Detailed history of changes and actions related to the leave balance for the selected user.

<figure><img src="https://1526800164-files.gitbook.io/~/files/v0/b/gitbook-x-prod.appspot.com/o/spaces%2F50DeL6mO9sNbAZBSEdaN%2Fuploads%2F7KDIG1vgx8ibHGTc5dfX%2Fimage.png?alt=media&amp;token=fcf42990-c2d1-41de-8f2d-ba94dafba46e" alt=""><figcaption></figcaption></figure>

## 2 Edit

### 2.1 Single Edit

Step 1: On the left side of the data row, click \[···] for more options, and then click "Edit".

<figure><img src="https://1526800164-files.gitbook.io/~/files/v0/b/gitbook-x-prod.appspot.com/o/spaces%2F50DeL6mO9sNbAZBSEdaN%2Fuploads%2FY2Hd0OUj2gIfOJez5Jtp%2Fimage.png?alt=media&amp;token=734e6dc5-e619-4b46-b20b-af99579e438b" alt=""><figcaption></figcaption></figure>

Step 2: In the \[Edit user leave balance], modify the balance, and the modify reason, then click "Save" to make the changes.

<figure><img src="https://1526800164-files.gitbook.io/~/files/v0/b/gitbook-x-prod.appspot.com/o/spaces%2F50DeL6mO9sNbAZBSEdaN%2Fuploads%2FfZv10wPsiT1CcMzB16Pw%2Fimage.png?alt=media&amp;token=5f5a5978-0aca-46cf-b251-5c392a4333e2" alt=""><figcaption></figcaption></figure>

#### 2.1.1 Field Explanation

* **Name**: Displays only leave types that are applicable to the user and have a limited balance.
* **Current Period**: The period for which the leave is calculated or managed.

  <figure><img src="https://1526800164-files.gitbook.io/~/files/v0/b/gitbook-x-prod.appspot.com/o/spaces%2F50DeL6mO9sNbAZBSEdaN%2Fuploads%2FzXewrxdogDKtUX8NO0m8%2Fimage.png?alt=media&amp;token=42c1fc66-ae26-46c0-bca4-b25af198e320" alt=""><figcaption></figcaption></figure>

  * If "Allow Extended Validity" is not selected, the leave is only valid within the specified time period, and any unused leave beyond that period will be automatically cleared by the system.
  * Example:&#x20;

    * **Monthly:** If today is December 21, 2021, and 5 days of leave are issued on the 1st of each month, the period will be displayed as 2021-12-01 \~ 2021-12-31, regardless of whether \[Allow Extended Validity] is selected.&#x20;
    * **Yearly (Based on Employee Onboarding Date):** If leave is issued on the employee's onboarding date, the period is one year from the onboarding anniversary date. For example, if the onboarding date is June 1, 2017, the period for 2021 is 2021-06-01 \~ 2022-05-31.&#x20;
    * **Yearly (January 1 Release):** If leave is issued on January 1 every year, the period is the current calendar year. For example, 2021-01-01 \~ 2021-12-31.
    * **No Fixed Cycle (Forever):** The period is displayed as Forever.
    * **No Fixed Cycle (Expires after N Days):** The period is displayed as Valid for N days after issuance.&#x20;
    * **No Fixed Cycle (Custom M \~ N):** The period is displayed as M \~ N.
    * **Quota allocation rule:** by working life, service in company, or Age: If the relevant fields in the HR profile are empty, the period is displayed as \[-].

    <figure><img src="https://1526800164-files.gitbook.io/~/files/v0/b/gitbook-x-prod.appspot.com/o/spaces%2F50DeL6mO9sNbAZBSEdaN%2Fuploads%2FpEqRQKSfQMVu262999rc%2Fimage.png?alt=media&amp;token=b9e4c430-236a-4a3e-829c-482fe2d153e0" alt=""><figcaption></figcaption></figure>
* **Leave Balance**: Editable text box allowing manual updates to the leave balance.
* **Modify Reason**: Logs the reason for changes, facilitating traceability in the leave log.
* **Historical Leave Balance:** Displays the historical leave balances for reference.

#### 2.1.2 Clear

Step 1: Click on the "Clear" button to clear all leave type's historical leave balance.

<figure><img src="https://1526800164-files.gitbook.io/~/files/v0/b/gitbook-x-prod.appspot.com/o/spaces%2F50DeL6mO9sNbAZBSEdaN%2Fuploads%2FigrqQwd1HvG27vffjD57%2Fimage.png?alt=media&amp;token=e45aeaff-8e46-43d3-a433-cdb401ae34a1" alt=""><figcaption></figcaption></figure>

Step 2: Click "Confirm" to proceed.&#x20;

<figure><img src="https://1526800164-files.gitbook.io/~/files/v0/b/gitbook-x-prod.appspot.com/o/spaces%2F50DeL6mO9sNbAZBSEdaN%2Fuploads%2FyvCDzzrgM1zTSaOECqDf%2Fimage.png?alt=media&amp;token=ef30d84e-b8f5-43eb-81a7-9dabbf49081d" alt="" width="292"><figcaption></figcaption></figure>

**Remark:**

* Only applicable to leave that enabled 'Extend valid period'&#x20;
* Reset all the historical leave balance to 0 and will not affect the current cycle's leave balance.&#x20;
* Takes effect immediately after execution."
* Leave that did not enable 'Extend Valid Period', "Historical leave does not count toward accrual"  will display  at the end of the row.&#x20;
* 若为无固定周期假期，则在最后一列展示为【周期设置为仅一次】
* If the leave are not fixed cycled, "Cycle is set to only once" will display at the end of the row.

### 2.2 Batch Edit

Step 1: Click on the "Batch Edit" on the top-right side of the page.

<figure><img src="https://1526800164-files.gitbook.io/~/files/v0/b/gitbook-x-prod.appspot.com/o/spaces%2F50DeL6mO9sNbAZBSEdaN%2Fuploads%2FiWkoyhMp0DTDY02bWpFJ%2Fimage.png?alt=media&amp;token=4bad713f-354e-4e81-ad71-ce8d6d5e24f2" alt=""><figcaption></figcaption></figure>

Step 2: Select the leave

<figure><img src="https://1526800164-files.gitbook.io/~/files/v0/b/gitbook-x-prod.appspot.com/o/spaces%2F50DeL6mO9sNbAZBSEdaN%2Fuploads%2F4aaClcoBWu2q8KReqGuX%2Fimage.png?alt=media&amp;token=5cc1d409-fb1c-4be4-bbd2-165f042754c6" alt=""><figcaption></figcaption></figure>

Step 3: Modify the leave balance and the personnel this change will affect.&#x20;

<figure><img src="https://1526800164-files.gitbook.io/~/files/v0/b/gitbook-x-prod.appspot.com/o/spaces%2F50DeL6mO9sNbAZBSEdaN%2Fuploads%2FPhc2Pp5avTkimzZYOQSv%2Fimage.png?alt=media&amp;token=2e9ed707-1003-4d27-ac38-cea5f0ecd32a" alt=""><figcaption></figcaption></figure>

Step 4: Click "Submit" to save the changes made.

<figure><img src="https://1526800164-files.gitbook.io/~/files/v0/b/gitbook-x-prod.appspot.com/o/spaces%2F50DeL6mO9sNbAZBSEdaN%2Fuploads%2Fcv5qN6nMDKLn5juIgkOD%2Fimage.png?alt=media&amp;token=77d4e92b-420e-4213-b1f4-c41fbf7956f6" alt=""><figcaption></figcaption></figure>

## 3 Import

Step 1: In the top-right corner of the page, click "Import".

<figure><img src="https://1526800164-files.gitbook.io/~/files/v0/b/gitbook-x-prod.appspot.com/o/spaces%2F50DeL6mO9sNbAZBSEdaN%2Fuploads%2FCBNPN85Dx8kQg25tvCOs%2Fimage.png?alt=media&amp;token=bd522121-df15-4b88-b9e4-e5c5f26ceb5e" alt=""><figcaption></figcaption></figure>

Step 2: Export the template by clicking on "Export template"

<figure><img src="https://1526800164-files.gitbook.io/~/files/v0/b/gitbook-x-prod.appspot.com/o/spaces%2F50DeL6mO9sNbAZBSEdaN%2Fuploads%2FYYDs1fv3jpU4T0N9Oepd%2Fimage.png?alt=media&amp;token=467ff51a-d327-4419-8b4a-4d329aa8ccc5" alt=""><figcaption></figcaption></figure>

Step 3: Fill up the Excel template

Step 4: Select the updated Excel file by double-clicking on the file or click on the file and click "Open".

<figure><img src="https://1526800164-files.gitbook.io/~/files/v0/b/gitbook-x-prod.appspot.com/o/spaces%2F50DeL6mO9sNbAZBSEdaN%2Fuploads%2FchUsyRSc9wpopZCxQEnp%2Fimage.png?alt=media&amp;token=eec7082a-ea8e-4ee0-b294-f0c5201f6a7f" alt=""><figcaption></figcaption></figure>

Step 5: Select whether you would like to \[add new data] or \[update the existing data] or \[add data and update existing data], once done, click on "Start importing" to begin the import.

<figure><img src="https://1526800164-files.gitbook.io/~/files/v0/b/gitbook-x-prod.appspot.com/o/spaces%2F50DeL6mO9sNbAZBSEdaN%2Fuploads%2FTl2pWdhpkj2OaTtcVIPj%2Fimage.png?alt=media&amp;token=db26da89-e695-45d4-bf40-c4eff13e2ee9" alt=""><figcaption></figcaption></figure>

When the import is complete, an Excel file will be generated to inform the user of the import status of all rows.

## 4 Export

Step 1: In the top-right corner of the page, click "Export".

<figure><img src="https://1526800164-files.gitbook.io/~/files/v0/b/gitbook-x-prod.appspot.com/o/spaces%2F50DeL6mO9sNbAZBSEdaN%2Fuploads%2FDuVivCBZ4Vh7TCg8hIQ6%2Fimage.png?alt=media&amp;token=74b5aa20-851b-4866-a221-c070f5a6b39b" alt=""><figcaption></figcaption></figure>

The system will automatically generate and download the exported data in Excel format onto the user's device.

<figure><img src="https://1526800164-files.gitbook.io/~/files/v0/b/gitbook-x-prod.appspot.com/o/spaces%2F50DeL6mO9sNbAZBSEdaN%2Fuploads%2FVd1SE1XcMbmo6nhYK70F%2Fimage.png?alt=media&amp;token=4deb4dac-794f-4bde-b059-7aa994d068e0" alt=""><figcaption></figcaption></figure>

**Remark:**

Can export all leave types and corresponding balances for everyone/a single department/an employee.

## 5 Log

Step 1: On the left side of the data row, click \[···] for more options, and then click "Log".

<figure><img src="https://1526800164-files.gitbook.io/~/files/v0/b/gitbook-x-prod.appspot.com/o/spaces%2F50DeL6mO9sNbAZBSEdaN%2Fuploads%2FasnSqKNUKKSXlWk1lyMt%2Fimage.png?alt=media&amp;token=4cd73bb1-bcfc-48d1-9036-ed471925543a" alt=""><figcaption></figcaption></figure>

The log is defaulted to displayed as a timeline chart, with the time of occurrence shown on the left and the operation type and details displayed on the right.

<figure><img src="https://1526800164-files.gitbook.io/~/files/v0/b/gitbook-x-prod.appspot.com/o/spaces%2F50DeL6mO9sNbAZBSEdaN%2Fuploads%2FFKzMtz7zPENQWJd3gu9t%2Fimage.png?alt=media&amp;token=6839b3f6-4b6e-49dc-8798-e3481069f97b" alt=""><figcaption></figcaption></figure>


# Leave Type

## 1 List

<figure><img src="https://1526800164-files.gitbook.io/~/files/v0/b/gitbook-x-prod.appspot.com/o/spaces%2F50DeL6mO9sNbAZBSEdaN%2Fuploads%2FqJgON0wRMaPF10SXwmqX%2Fimage.png?alt=media&amp;token=120ed87e-55c0-484a-a322-5711a769d199" alt=""><figcaption></figcaption></figure>

### 1.1 Field Explanation

**Name:** This field specifies the name of the leave type and helps identify and distinguish different leave types in the system.

**Leave Type:** Defines the scope of days counted for the leave type and ensures that leave calculations align with the company's policies regarding workdays and non-workdays.

* **Working Day:** Leave applies only to regular working days.
* **All Day:** Leave applies to all calendar days, including working days, weekends, and holidays.

**Period:** Determines how leave entitlements are measured and renewed.

* **Year:** Leave allocation and usage are tracked on a yearly basis.
* **Month:** Leave allocation and usage are tracked monthly.
* **No Fixed Cycle:** No specific period is associated; leave can be taken anytime as available.

**Paid Ratio:** Specifies the percentage of salary that will be paid during the leave period.

**Enable:** Display leave type's status.

**User Range:** Defines who is eligible to apply for the specific leave type

### 1.2 Sort

Step 1: On the top-right side of the page, click on the \[Sort] button.

<figure><img src="https://1526800164-files.gitbook.io/~/files/v0/b/gitbook-x-prod.appspot.com/o/spaces%2F50DeL6mO9sNbAZBSEdaN%2Fuploads%2FI8m8EMA5GA2diSK8zPWE%2Fimage.png?alt=media&amp;token=9884d713-5c23-471f-8dfb-702310d7cf3c" alt=""><figcaption></figcaption></figure>

Step 2: Sort the leave by dragging and dropping them to achieve the desired sequence, then click "Save" to make the change.

<figure><img src="https://1526800164-files.gitbook.io/~/files/v0/b/gitbook-x-prod.appspot.com/o/spaces%2F50DeL6mO9sNbAZBSEdaN%2Fuploads%2FmhwOF4nv5KRgJDFnIy7K%2Fimage.png?alt=media&amp;token=95d5b5a6-6d32-4ad4-a366-98ebd0820f51" alt=""><figcaption></figcaption></figure>

## 2 Create Leave Type

Click on **\[Create]** to add a new leave type.

<figure><img src="https://1526800164-files.gitbook.io/~/files/v0/b/gitbook-x-prod.appspot.com/o/spaces%2F50DeL6mO9sNbAZBSEdaN%2Fuploads%2FUThGOWRGCkYcKjzAsDbX%2Fimage.png?alt=media&amp;token=90c718c6-2a8c-4dc4-b4c9-ef5971481364" alt=""><figcaption></figcaption></figure>

### 2.1 **Basic Settings**

<figure><img src="https://1526800164-files.gitbook.io/~/files/v0/b/gitbook-x-prod.appspot.com/o/spaces%2F50DeL6mO9sNbAZBSEdaN%2Fuploads%2FiRYO4dHeyLJP35gYAOAU%2Fimage.png?alt=media&amp;token=e1832296-10e7-40a6-b9ab-9831d8e7301d" alt=""><figcaption></figcaption></figure>

#### 2.2.1 Field Explanation

**Leave Name:** Identifier for leave type, this field is mandatory and cannot be empty.&#x20;

**Salary:** Determines the payment structure for the leave.

* **Unpaid Leave:** Selected by default; indicates no salary will be provided during the leave period.
* **Paid Leave:** When chosen, displays the "Paid Ratio" field for specifying the salary percentage.

**Paid Ratio:** Specifies the salary percentage paid during the leave period; must be an integer.

<figure><img src="https://1526800164-files.gitbook.io/~/files/v0/b/gitbook-x-prod.appspot.com/o/spaces%2F50DeL6mO9sNbAZBSEdaN%2Fuploads%2FyJJRUolibVI6tG8E8VTA%2Fimage.png?alt=media&amp;token=b908e94a-dbdc-46aa-8c06-7385578c4ecc" alt=""><figcaption></figcaption></figure>

**Remarks:** Provides a description of the leave type for additional context or clarification.

**Enable:** A toggle to activate or deactivate the leave type, enabling flexible management of leave options without permanent deletion.

### 2.2 Leave Calculation Rule

<figure><img src="https://1526800164-files.gitbook.io/~/files/v0/b/gitbook-x-prod.appspot.com/o/spaces%2F50DeL6mO9sNbAZBSEdaN%2Fuploads%2Fcjc4dQ99eALTzTiygbSp%2Fimage.png?alt=media&amp;token=b1a0fea0-b3e3-40ab-8286-9328dc97031b" alt=""><figcaption></figcaption></figure>

#### 2.2.1 Calculate leave by shift

* Default option
* Only considers the time spent within a shift when calculating the leave period.
* Ensures that leave is deducted only for hours that overlap with a predefined shift schedule.
* **Example:** If a shift is from 9:00 to 18:00, and leave is taken from 17:00 to 19:00, only 17:00 to 18:00

#### 2.2.2 Calculate leave by calendar day

* Considers the total leave hours across entire days, including non-shift hours.

#### 2.2.3 Minimum leave period

* Deducts leave in increments based on the predefined minimum period.

<figure><img src="https://1526800164-files.gitbook.io/~/files/v0/b/gitbook-x-prod.appspot.com/o/spaces%2F50DeL6mO9sNbAZBSEdaN%2Fuploads%2FIw5veshsxSXT5sQy73my%2FMin.%20leave%20period.png?alt=media&amp;token=44e47d51-45dd-42f0-a72c-77a34aefad02" alt=""><figcaption></figcaption></figure>

**Option:**

* **None**(Default): Leave is calculated in "minutes".&#x20;
* **Leave by Half an Hour:** Leave durations are rounded up to the next half-hour increment, even if the leave taken is less.
  * **Example:** If the calculation method is "Calculate Leave by Shift" + "Leave by Half an Hour," and leave is requested for 8:27 to 10:34:
    * Valid leave hours: 9:00 to 11:00 (adjusted to half-hour increments).
    * Total deducted time: 2 hours (converted to 0.22 days for a 9-hour workday).
* **Leave by an Hour:** Leave durations are rounded to the next full hour.
  * Example: Leave from 8:50 to 10:20 is counted as 9:00 to 11:00 (2 hours).
* **Leave by Half Day:**
  * Leave durations are rounded to half-day increments (typically half of a workday, e.g., 4.5 hours for a 9-hour shift).
  * Example: A leave duration from 9:00 to 12:30 would count as a half-day leave.
* **Leave by Full Day:**
  * Leave durations are rounded up to a full day.
  * Example: A leave period from 9:00 to 15:00 would count as 1 full day.

**Remark:**

* These rules affect only the deduction of leave balance in the Leave module.
* Leave time calculation in the Attendance module is not influenced by these rules.

### 2.3 Leave Balance Setting

The default setting is as shown below, which means the leave is annual leave, and the leave balance will be issued on January 1 every year.&#x20;

This leave is valid for one year from the date of issuance.&#x20;

You need to set the leave balance manually for your employees.

<figure><img src="https://1526800164-files.gitbook.io/~/files/v0/b/gitbook-x-prod.appspot.com/o/spaces%2F50DeL6mO9sNbAZBSEdaN%2Fuploads%2FdS9qwe5H0YdOKZ2W4YUg%2Fimage.png?alt=media&amp;token=8732a99d-75a9-4143-a830-0ca9c80c096b" alt=""><figcaption></figcaption></figure>

#### 2.3.1 Limit Leave Balance

* **Enable (Default):** Prevents employees from taking leave when their balance is 0, ensuring leave usage stays within allocated limits.
* **Disable:** Removes the restriction, allowing employees to take leave regardless of their balance. In this case, the fields like "Cycle," "Release Date," and others are not required.

#### 2.3.2 Leave Period

Specifies how frequently the leave balance is reset or renewed.

* **Yearly:** Resets every year (e.g., annual leave issued on January 1).
* **Monthly:** Resets every month (e.g., monthly leave allocation).
* **No Fixed Period:** A one-time leave that expires manually after issuance.

#### 2.3.3 Release Date

* Determines when the leave balance is issued to employees.
* The employee's start date for eligibility is based on their HR profile ("Onboarding day").

<figure><img src="https://1526800164-files.gitbook.io/~/files/v0/b/gitbook-x-prod.appspot.com/o/spaces%2F50DeL6mO9sNbAZBSEdaN%2Fuploads%2FgWD4lKJLF6JSqc0TNbfx%2Fimage.png?alt=media&amp;token=3461a35f-7091-45d7-87ca-d3dcabb273cc" alt=""><figcaption></figcaption></figure>

#### 2.3.4 Valid Period

Defines the time frame during which the leave balance is available for use.

* **Default Setting:** Leave expires after the validity period, and the balance is cleared at 23:55 on the last day of the cycle.
* **Allowed Extend Valid Period:** Allows extending the validity for an additional N days/months after the default expiration (N must be an integer ≥ 0).

#### 2.3.5 Leave Balance Release Method

Describe how the leaves are released to the employees.

* **Manually:** Administrators must assign leave balances to employees through the \[Leave] menu.
* **Auto Release:** The system automatically issues leave balances based on predefined rules.
* **Customized Rule:** Requires configuring an external file for tailored leave issuance logic.

### 2.4 Annual Leave Balance Setting

<figure><img src="https://1526800164-files.gitbook.io/~/files/v0/b/gitbook-x-prod.appspot.com/o/spaces%2F50DeL6mO9sNbAZBSEdaN%2Fuploads%2FtSFYYPm74nt3yHjSCGZH%2Fimage.png?alt=media&amp;token=a3d31ce2-3f4a-4d43-8d09-ea0d95afb86e" alt=""><figcaption></figcaption></figure>

**Example:**\
Employee A joined on September 1, 2019. With the release method set to January 1 annually:

* On January 1, 2020, A is not eligible for 5 days of leave due to less than one year of service.
* On January 1, 2021, A receives 5 days of leave, valid until December 31, 2021.
* With a 3-month extension, A can use these 5 days until March 31, 2022.
* **Monthly release:** Starting from July 1, 2020, 0.833 days of leave will be released each month.

<figure><img src="https://1526800164-files.gitbook.io/~/files/v0/b/gitbook-x-prod.appspot.com/o/spaces%2F50DeL6mO9sNbAZBSEdaN%2Fuploads%2FWAgX7sn0EPh6WsDOP286%2Fimage.png?alt=media&amp;token=7ffd4f43-4aa5-4928-a748-3918cd40e914" alt=""><figcaption></figcaption></figure>

* Daily Release Method: Starting from July 1, 2020, 0.027 days of leave will be released daily.

<figure><img src="https://1526800164-files.gitbook.io/~/files/v0/b/gitbook-x-prod.appspot.com/o/spaces%2F50DeL6mO9sNbAZBSEdaN%2Fuploads%2FCFj0L1KfvTUV9t7XTwXW%2Fimage.png?alt=media&amp;token=f0f7ecbc-ab98-469a-83cf-08eb492f05e4" alt=""><figcaption></figcaption></figure>

* If  Release Date: "Release on Employee Onboarding Date Every Year" is selected, Employee A will receive 5 days of annual leave on September 1, 2020, which will expire on November 30, 2021.

#### 2.4.1 Auto Release - Quota Allocation Rule

This rule determines how leave is automatically allocated when the **Leave Balance Release Method** is set to "Auto Release."

<figure><img src="https://1526800164-files.gitbook.io/~/files/v0/b/gitbook-x-prod.appspot.com/o/spaces%2F50DeL6mO9sNbAZBSEdaN%2Fuploads%2FLKbqG8VWeSvFxzhrL4Jj%2Fimage.png?alt=media&amp;token=7e382c5a-e111-40ba-855b-506a0416dbe1" alt=""><figcaption></figcaption></figure>

Quota allocation rule:

* **Fixed Quota (Default):** Releases a predefined number of days (N) annually.
* **Quota Based on HR Profile Data:** Allocates leave dynamically based on specific employee attributes:
  * **Working Experience:** Calculated from the "Time of Participation in Work."
  * **Length of Service:** Based on "Join This Unit Time."
  * **Age:** Calculated from the "Date of Birth."

**Remark:**

* Fixed Quota's N is sourced from quota
* If the corresponding field in the user's personnel file is empty, it is counted as 0.

#### 2.4.2 Auto Release - Release Method

<figure><img src="https://1526800164-files.gitbook.io/~/files/v0/b/gitbook-x-prod.appspot.com/o/spaces%2F50DeL6mO9sNbAZBSEdaN%2Fuploads%2Fz7e1tTaIORxiTmLglNDp%2Fimage.png?alt=media&amp;token=71098e36-5199-4963-af1d-d4f595c10101" alt=""><figcaption></figcaption></figure>

* **All at once (Default):** The system automatically releases the entire leave balance on the release date each year.
* **Monthly payment:** The balance is added and updated on the 1st of each month starting from the release date.
* **Accordingly to the day of release:** The system adds and updates the balance daily, starting from the release date.

**Example:**&#x20;

Assuming Employee A has 3 days of leave per year, and their shift is 9 hours/day, which totals to 27 hours of annual leave (3 \* 9 = 27 hours). Assuming today is 26th May 2020.&#x20;

* **All at Once (One-Time Payment):** Employee A will receive **27 hours of leave** on the release date (annually).
* **Monthly Payment:** Leave is distributed monthly. The total leave (27 hours) will be divided by 12 months, then multiplied by the number of months elapsed.
  * From January 1 to May 26, 5 months have passed.
  * **Leave received** = (5/12) x 27 = 11.25 hours.
* &#x20;**According to the Day of Release:** Leave is distributed daily based on the number of days that have passed in the year.
  * Days from January 1 to May 26: Total days = 31 + 29 + 31 + 30 + 26 = 147 days
    * January: 31 days; February: 29 days; March: 31 days; April: 30 days; May: 26 days
  * **Daily leave rate** = 27/366 = 0.0738 hours/day.
  * **Leave received** = 147×0.0738=10.84 hours as of today.

#### 2.4.3.  Employee onboard this year

<figure><img src="https://1526800164-files.gitbook.io/~/files/v0/b/gitbook-x-prod.appspot.com/o/spaces%2F50DeL6mO9sNbAZBSEdaN%2Fuploads%2FVHYtQmATrUtbRLPoTNcJ%2Fimage.png?alt=media&amp;token=2237d691-8797-4981-afa2-abe3b68638ca" alt=""><figcaption></figcaption></figure>

When ticked, then Personnel File -  Legth of Service must have value, otherwise it will be calculated as absence of actual working hour and recorded as 0.&#x20;

For example, each employee is given 6 days of leave every year, and new employees are onboarded in October (HR Profile - Join this unit time). This year's working time in the company is from October to December (3 months). If this option is checked, the leave balance of new employees this year would be 6\*(3/12) = 1.5 days, if not, it will all be 6 days.

#### 2.4.4. Release Date - Custom Date

Begin new annual leave balance cycle on the set custom date and the current validity period and balance for the current cycle of the corresponding leave type will be immediately updated.

<figure><img src="https://1526800164-files.gitbook.io/~/files/v0/b/gitbook-x-prod.appspot.com/o/spaces%2F50DeL6mO9sNbAZBSEdaN%2Fuploads%2FNFFqj37q53Zr2ygecpAi%2Fimage.png?alt=media&amp;token=c0916845-0cee-421d-9d10-a0f4aa3cb952" alt=""><figcaption></figcaption></figure>

* If the validity is set for one year from the issue date, the leave balance will expire at **23:55 one year later.**
* Example: If the custom issue date is 09-02, the leave balance expires on 09-01 of the following year at 23:55.

**Remark:**

* Only available when Leave Cycle is Yearly
* Format: mm-dd

### 2.5. Monthly-Release Leave

<figure><img src="https://1526800164-files.gitbook.io/~/files/v0/b/gitbook-x-prod.appspot.com/o/spaces%2F50DeL6mO9sNbAZBSEdaN%2Fuploads%2FHkFVnvMjBNAVPlenCxU2%2Fimage.png?alt=media&amp;token=11c5de5c-c2ef-4346-84aa-456d114bd748" alt=""><figcaption></figcaption></figure>

#### 2.5.1. Release date

Fixed to the 1st of each month and cannot be modified.

#### 2.5.2. Valid Period

* The leave balance is valid only for the current month by default.
* If checked, the leave remains valid for **N additional days or months** beyond the current month.

#### 2.5.3. Leave Balance Release Method&#x20;

* **Manually:** Administrators must manually assign leave to employees via the **Leave List**.
* **Auto release:** The system automatically issues **N days or hours** of leave each month.
* **Customize rule:** Requires configuring an external file address to define customized rules.

### 2.6. One-Time Leave

<figure><img src="https://1526800164-files.gitbook.io/~/files/v0/b/gitbook-x-prod.appspot.com/o/spaces%2F50DeL6mO9sNbAZBSEdaN%2Fuploads%2Fxp9i1KsVCFz5qFStIet6%2Fimage.png?alt=media&amp;token=ce7e4c1c-5b98-4d97-9efc-9898a60bcbf8" alt=""><figcaption></figcaption></figure>

#### 2.6.1. Valid Period

* **Forever:** Leave balance remains valid indefinitely after being issued.
* **It becomes invalid after how many days:** Specifies that the leave balance will expire after **N days**.
  * Example: Today is **May 29** and the leave expires **3 days after issue**, the leave balance will be cleared by the system at **23:55 on June 1**.
* **Custom expiration date:**&#x20;
  * Allows manual selection of a specific date range for leave validity.
  * The system will automatically clear the leave balance at 23:55 on the last day of the validity period.
  * Leave can only be applied if both the **start** and **end** dates fall within the selected range.
  * Example: If the validity period is set from March 5, 2023 to March 20, 2023, leave requests will only be approved if they fall entirely within this period.

#### 2.6.2. **Employee on board this year**

* Automatically issues **N days/hours** of leave to employees who joined within the current year.
* Default is **0**.

### 2.7. Application Range

<figure><img src="https://1526800164-files.gitbook.io/~/files/v0/b/gitbook-x-prod.appspot.com/o/spaces%2F50DeL6mO9sNbAZBSEdaN%2Fuploads%2FfE1V61oQb6WkijPEcYf3%2Fimage.png?alt=media&amp;token=c569a32f-1e09-4a3b-a74a-0b8de49d7e48" alt=""><figcaption></figcaption></figure>

**Remark:**

* Set the user range to whom the leave applies, which is the permissions for each leave.&#x20;
* All staff is checked by default. After unchecking "All staff", three selectors will appear: users, departments and roles.&#x20;
* New employees under the department/role will automatically apply the corresponding rules.

## 3 Edit Leave

**Step 1:** Click ··· for more options, and click "Edit".

<figure><img src="https://1526800164-files.gitbook.io/~/files/v0/b/gitbook-x-prod.appspot.com/o/spaces%2F50DeL6mO9sNbAZBSEdaN%2Fuploads%2FLRY6dZFseIqhENmr0InJ%2Fimage.png?alt=media&amp;token=88c4df8f-96f6-4d93-ab9f-4eb389f07433" alt=""><figcaption></figcaption></figure>

Step 2: Make the necessary changes and click "Save" to implement the new changes.&#x20;

<figure><img src="https://1526800164-files.gitbook.io/~/files/v0/b/gitbook-x-prod.appspot.com/o/spaces%2F50DeL6mO9sNbAZBSEdaN%2Fuploads%2FjQqktWVIXn1RFAoFTBoc%2Fimage.png?alt=media&amp;token=409538f4-005c-45f1-af72-fcfe9f3f8621" alt=""><figcaption></figcaption></figure>

Step 3: What to do with the current leave balance?

<figure><img src="https://1526800164-files.gitbook.io/~/files/v0/b/gitbook-x-prod.appspot.com/o/spaces%2F50DeL6mO9sNbAZBSEdaN%2Fuploads%2FOPVP2YLnZ1vyQWgLYAxC%2Fimage.png?alt=media&amp;token=925b1e46-9f17-4a41-a7bd-5e2fc48ee0e7" alt=""><figcaption></figcaption></figure>

**Remark:**

* After editing or modifying the leave balance, the system adjusts the balance based on usage.
* **Example**: If 4 days were issued and User A has used 1 day (leaving 3 days), and the balance is updated to 3 days, User A's remaining balance will be **2 days**.

## 4 Delete Leave

Step 1: Click ··· for more options, and click "Delete".

<figure><img src="https://1526800164-files.gitbook.io/~/files/v0/b/gitbook-x-prod.appspot.com/o/spaces%2F50DeL6mO9sNbAZBSEdaN%2Fuploads%2FsaJYP5oyv1SkRbe0IPJw%2Fimage.png?alt=media&amp;token=0b3c4e07-5884-4d6c-89b4-c62937401a17" alt=""><figcaption></figcaption></figure>

**Step 2:** Confirm Deletion

<figure><img src="https://1526800164-files.gitbook.io/~/files/v0/b/gitbook-x-prod.appspot.com/o/spaces%2F50DeL6mO9sNbAZBSEdaN%2Fuploads%2FXIgqK6DUx0iAG2C539fX%2Fimage.png?alt=media&amp;token=bb8a2af7-c2fb-42b8-bcd1-dba78d7378f8" alt=""><figcaption></figcaption></figure>

**Remark:**

* Leave can still be deleted even if there are employees with leave balances under it.
* Leave types that have already generated leave data cannot be deleted.


# Leave Setting

## 1 Leave Unit Conversion

<figure><img src="https://1526800164-files.gitbook.io/~/files/v0/b/gitbook-x-prod.appspot.com/o/spaces%2F50DeL6mO9sNbAZBSEdaN%2Fuploads%2FroXInCOBJuFh5orK73wi%2Fimage.png?alt=media&amp;token=8d43805b-3679-4a43-ad97-0a5274784a34" alt=""><figcaption></figcaption></figure>

### 1.1  Current Leave Unit

* Can only be **Day** or **Hour**
* The leave unit can only be changed by the conversion operation.

### 1.2 Conversion Ratio

Default 1:8 ratio conversion&#x20;

<figure><img src="https://1526800164-files.gitbook.io/~/files/v0/b/gitbook-x-prod.appspot.com/o/spaces%2F50DeL6mO9sNbAZBSEdaN%2Fuploads%2FSwahzgxatjGIX40FDPD7%2Fimage.png?alt=media&amp;token=44e8d6fb-65a3-4ca2-bff5-fea1cc81bbf8" alt=""><figcaption></figcaption></figure>

**Remark:**

* Fixed to \[1 day: N hours], only N can be modified.&#x20;
* Convert according to the entered N value.&#x20;
  * e.g. the current unit is an hour, manually release 8 hours of leave, N is 9, "1 day: 9 hours". When conversion begins, the system will convert to days, 8/9 = 0.889 days, and the leave balance will increase by 0.889 days. The second conversion, according to "1 day: 9 hours", converting days into hours, that is, 0.889\*9 = 8.00 hours, the user added 8 hours of leave.

#### 1.2.1 Begin Convert

* Converting leave units can only be done from "days" to "hours" or vice versa.&#x20;
* The conversion button is dynamic. (e.g. the current unit is "day", the button will be \[Start conversion (day -> hour)].)&#x20;

## 2 Leave Expiration Reminder

<figure><img src="https://1526800164-files.gitbook.io/~/files/v0/b/gitbook-x-prod.appspot.com/o/spaces%2F50DeL6mO9sNbAZBSEdaN%2Fuploads%2FryRyCvc0zLi2bve1ZsWz%2Fimage.png?alt=media&amp;token=c139e6b7-93e2-498d-8ad5-d41a4f5e5be3" alt=""><figcaption></figcaption></figure>

**Remark:**

* If a reminder is set for N days before expiration and the reminder method is configured in \[Settings] - \[Reminder] - \[Leave Expiration Reminder Timing], the user will receive an expiration reminder at 9:00 AM on the specified day to prevent leave balance wastage.
* **Example:** For a leave expiring on 12/06/2020 with a 5-day reminder period, the user will receive an IM reminder at 9:00 AM on 07/06/2020.


# Attendance \~ WIP